Mazda 6. Manual - part 221


  Index      Mazda     Mazda 6 - service repair manual 2002 year


Search            


Content   ..  219  220  221  222   ..


Mazda 6. Manual - part 221


TROUBLESHOOTING 

K–125

K

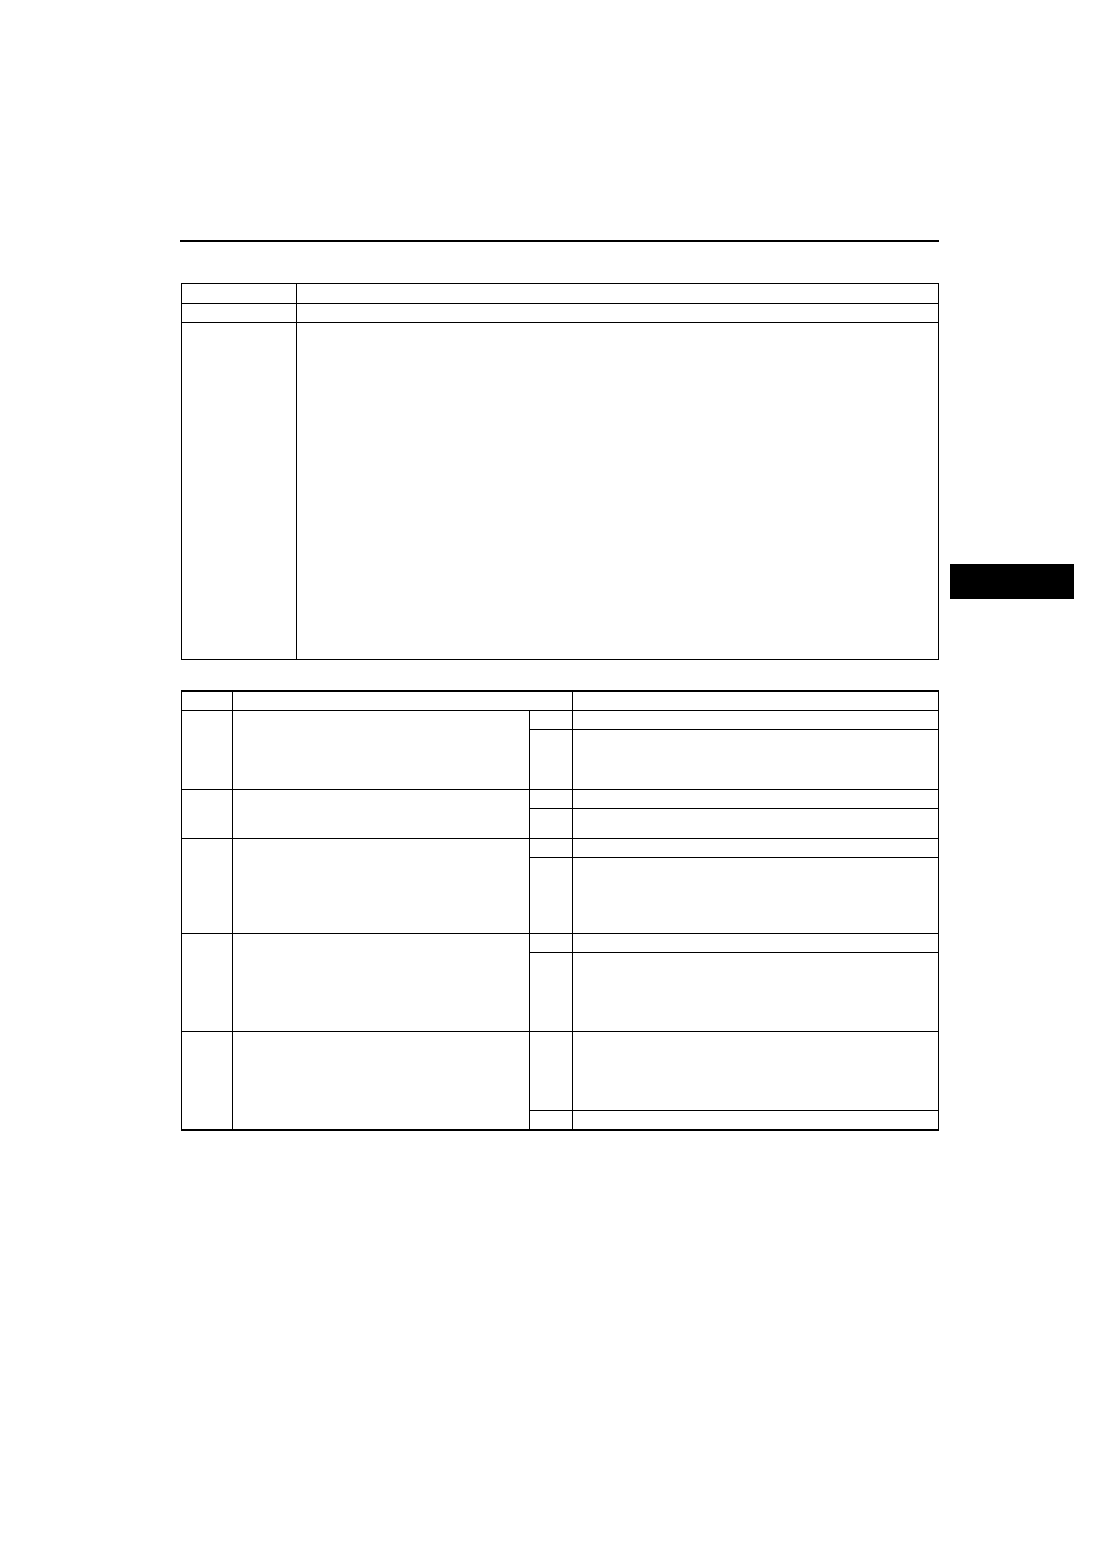
NO.16 JUDDER UPON TORQUE CONVERTER CLUTCH (TCC) OPERATION

A6E568001030W20

Diagnostic procedure

End Of Sie

16

Judder upon torque converter clutch (TCC) operation

DESCRIPTION

• Vehicle jolts when TCC is engaged.

POSSIBLE 

CAUSE

• Poor TCC engagement due to either slippage because the TCC is stuck or the line pressure is low

Caution

• If the TCC is stuck, inspect it. In addition, inspect the oil cooler for foreign particles which 

may have mixed in with the ATF.

1. Torque converter clutch piston slipped, burned

• Line pressure high

• Shift solenoid A malfunction

• Control valve body malfunction

• Body GND malfunction

• Pressure control solenoid malfunction

2. Signal malfunction

• Vehicle speed sensor malfunction

• Sensor GND malfunction

• TFT sensor malfunction

• TP sensor malfunction or mis-adjustment

• Input/turbine speed sensor malfunction

3. Torque converter malfunction

Note

• Before following troubleshooting steps, make sure that Automatic Transaxle On-Board Diagnostic 

and Automatic Transaxle Basic Inspection are conducted.

STEP

INSPECTION

ACTION

1

Check the value at the following PIDs using the 
WDS or equivalent. (See 

F–45 PCM 

INSPECTION

.)

• TSS

Are PID values okay?

Yes

Go to next step.

No

Repair or replace any defective parts.

2

Disconnect PCM. Is resistance between ground 
terminal at PCM connector and body ground 
less than 5.0 ohms?

Yes

Go to next step.

No

Repair open ground circuit.

3

Check resistance between shift solenoid A 
control circuit at PCM connector and control 
valve body connector. Check resistance 
between shift solenoid A circuit at PCM 
connector and control valve body connector. Are 
the resistance less than 5.0 ohms?

Yes

Go to next step.

No

Repair shift solenoid A circuit.

4

Inspect Shfit solenoid. (See 

K–26 SOLENOID 

VALVE INSPECTION

.) Is the solenoid valve 

operating properly?

Yes

Go to next step.

No

Overhaul control valve body and repair or replace any 
defective parts. If problem remains, overhaul transaxle and 
repair or replace any defective parts. (See ATX workshop 
manual (FN4A-EL) [1623-10-98E].) (See ATX workshop 
manual supplement (FN4A-EL) [1746-1*-02C].)

5

Check LPS PID value.
Is LPS PID value okay?
(See 

F–45 PCM INSPECTION

.)

Yes

Overhaul control valve body and repair or replace any 
defective parts. If problem remains, overhaul transaxle and 
repair or replace any defective parts. (See ATX workshop 
manual (FN4A-EL) [1623-10-98E].) (See ATX workshop 
manual supplement (FN4A-EL) [1746-1*-02C].)

No

Replace PCM.

K–126

TROUBLESHOOTING 

NO.17 EXCESSIVE SHIFT SHOCK FROM N TO D OR N TO R POSITION/RANGE

A6E568001030W21

Diagnostic procedure

17

Excessive shift shock from N to D or N to R position/range

DESCRIPTION

• Strong shock felt when shifting from N to D or N to R position/range.

POSSIBLE 

CAUSE

• Shift shock may worsen when the fail-safe is operating. If no DTC is output, the shift shock may worsen 

due to poor operation of the control valve body or sticking of the clutch.

1. Clutch burned (N

→D: Forward clutch, N→R: Reverse clutch or low and reverse brake)

• Line pressure low, high

• TP sensor malfunction

• Vehicle speed sensor malfunction

• Input/turbine speed sensor malfunction

• Shift solenoid B malfunction

• Shift solenoid D malfunction

• Shift solenoid A malfunction

• Shift solenoid C malfunction

• Pressure control solenoid malfunction

• Accelerator cable misadjustment

• Control valve body malfunction

• Sensor GND malfunction

• Body GND malfunction

2. Poor hydraulic operation (Malfunction in range change)

• Forward accumlator malfunction

• Servo apply accumulator malfunction

• Pressure switch malfunction

3. Idle speed high
4. Poor tightening torque of engine mount, exhaust mount
5. Poor operation of mechanical pressure

• Selector lever position disparity

Note

• Before following troubleshooting steps, make sure that Automatic Transaxle On-Board Diagnostic 

and Automatic Transaxle Basic Inspection are conducted.

STEP

INSPECTION

ACTION

1

Does shift shock occur only when engine cold?

Yes

Go to next step.

No

Go to Step 3.

2

Disconnect PCM. Is resistance between ground 
terminal at PCM connector and body ground 
less than 5.0 ohms?

Yes

Check the value at the following PIDs using the WDS or 
equivalent. (See 

F–45 PCM INSPECTION

.)

• TP

• TFT

• TFTV

Repair or replace any defective parts.

No

Repair open ground circuit. Reconnect PCM.

3

Perform the stall test. (See 

K–7 Stall Test

.) Is 

stall speed okay?

Yes

Go to next step.

No

Go to Step 5.

4

Check the value at the following PIDs using the 
WDS or equivalent. (See 

F–45 PCM 

INSPECTION

.)

• TR

Is PID value okay?

Yes

Overhaul control valve body and repair or replace any 
defective parts. If problem remains, overhaul transaxle and 
repair or replace any defective parts. (See ATX workshop 
manual (FN4A-EL) [1623-10-98E].) (See ATX workshop 
manual supplement (FN4A-EL) [1746-1*-02C].)

No

Repair or replace any defective parts.

5

Check the value at the following PID using the 
WDS or equivalent. (See 

F–45 PCM 

INSPECTION

.)

• TP

Is PID value okay?

Yes

Go to next step.

No

Repair or replace any defective parts.

6

Disconnect PCM. Is resistance between ground 
terminal at PCM connector and body ground 
less than 5.0 ohms?

Yes

Go to next step.

No

Repair open ground circuit. Reconnect PCM.

7

Check LPS PID value.
Is LPS PID value okay?
(See 

F–45 PCM INSPECTION

.)

Yes

Overhaul control valve body and repair or replace any 
defective parts. If problem remains, overhaul transaxle and 
repair or replace any defective parts. (See ATX workshop 
manual (FN4A-EL) [1623-10-98E].) (See ATX workshop 
manual supplement (FN4A-EL) [1746-1*-02C].)

No

Repair or replace any defective parts.

TROUBLESHOOTING 

K–127

K

End Of Sie

NO.18 EXCESSIVE SHIFT SHOCK IS FELT WHEN UPSHIFTING AND DOWNSHIFTING

A6E568001030W22

Diagnostic procedure

End Of Sie

NO.19 EXCESSIVE SHIFT SHOCK ON TORQUE CONVERTER CLUTCH (TCC)

A6E568001030W23

End Of Sie

18

Excessive shift shock is felt when upshifting and downshifting

DESCRIPTION

• Excessive shift shock felt when depressing accelerator pedal to accelerate at upshifting. During 

cruising, excessive shift shock is felt when depressing accelerator pedal at downshifting.

POSSIBLE 

CAUSE

• Shift shock may worsen when fail-safe is operating. The shift shock has worsened if the TP sensor, 

input/turbine speed sensor, or vehicle speed sensor signal malfunctions.

1. Clutch slipped, burned (Forward clutch, 2–4 brake band, 3–4 clutch)

• Line pressure low, high

• Shift solenoid D malfunction

• Shift solenoid E malfunction

• Shift solenoid A malfunction

• Shift solenoid B malfunction

• Shift solenoid C malfunction

• Pressure control solenoid malfunction

• Accelerator cable misadjustment

• Control valve body malfunction

• Body GND malfunction

2. Signal malfunction

• Transaxle temperature sensor malfunction

• Vehicle speed sensor malfunction

• Sensor GND malfunction

• TP sensor malfunction

• Input/turbine speed sensor malfunction

3. Poor hydraulic operation (Malfunction in range change)

• Pressure switch malfunction

• Forward accumulator malfunction

• Servo apply accumulator malfunction

Note

• Before following troubleshooting steps, make sure that Automatic Transaxle On-Board Diagnostic 

and Automatic Transaxle Basic Inspection are conducted.

STEP

INSPECTION

ACTION

1

Perform the stall test. (See 

K–7 Stall Test

.) Is 

stall speed okay?

Yes

Go to next step.

No

Repair or replace any defective parts.

2

Check the value at the following PIDs using the 
WDS or equivalent. (See 

F–45 PCM 

INSPECTION

.)

• TP V

Is PID value okay?

Yes

Go to next step.

No

Repair or replace any defective parts.

3

Disconnect PCM. Is resistance between ground 
terminal at PCM connector and body ground 
less than 5.0 ohms?

Yes

Go to next step.

No

Repair open ground circuit. Reconnect PCM.

4

Check LPS PID value.
Is LPS PID value okay?
(See 

F–45 PCM INSPECTION

.)

Yes

Overhaul control valve body and repair or replace any 
defective parts. If problem remains, overhaul transaxle and 
repair or replace any defective parts. (See ATX workshop 
manual (FN4A-EL) [1623-10-98E].) (See ATX workshop 
manual supplement (FN4A-EL) [1746-1*-02C].)

No

Repair or replace any defective parts.

19

Excessive shift shock on torque converter clutch (TCC)

DESCRIPTION

• Strong shock is felt when TCC engaged.

POSSIBLE 

CAUSE

• The troubleshooting flow is the same as No.16 “Judder upon TCC operation”.

K–128

TROUBLESHOOTING 

NO.20 NOISE OCCURS AT IDLE WHEN VEHICLE IS STOPPED IN ALL POSITIONS/RANGES

A6E568001030W24

Diagnostic procedure

End Of Sie

NO.21 NOISE OCCURS AT IDLE WHEN VEHICLE IS STOPPED IN D, S, L RANGES, OR IN R POSITION

A6E568001030W25

End Of Sie

20

Noise occurs at idle when vehicle is stopped in all positions/ranges

DESCRIPTION

• Transaxle noisy in all positions and ranges when vehicle is idling.

POSSIBLE 

CAUSE

• The malfunction is in the oil pump which causes a high-pitched noise to be emitted from the transaxle at 

idle.

Note

• If a noise is emitted during shifting only, the malfunction is in shift solenoid D, E or shift solenoid A, B, 

C. If a noise is emitted during shifting at certain gears only or during deceleration only, it is gear 
noise.

• Before following troubleshooting steps, make sure that Automatic Transaxle On-Board Diagnostic 

and Automatic Transaxle Basic Inspection are conducted.

STEP

INSPECTION

ACTION

1

Inspect engine condition.
Is any engine concern (i. e. rough idle)?

Yes

Go to appropriate symptom troubleshooting. (See Section 
F.)

No

Go to next step.

2

Does noise stop when solenoid connector is 
disconnected?

Yes

Go to next step.

No

Overhaul control valve body and repair or replace any 
defective parts. If problem remains, overhaul transaxle and 
repair or replace any defective  parts. (See ATX workshop 
manual (FN4A-EL) [1623-10-98E].) (See ATX workshop 
manual supplement (FN4A-EL) [1746-1*-02C].)

3

Check the value at the following PIDs using the 
WDS or equivalent. (See 

F–45 PCM 

INSPECTION

.)

• TP

• VSS

• TSS

Are PID values okay?

Yes

Go to next step.

No

Repair or replace any defective parts.

4

Disconnect PCM. Is resistance between ground 
terminal at PCM connector and body ground 
less than 5.0 ohms?

Yes

Go to next step.

No

Repair open ground circuit. Reconnect PCM.

5

Check LPS PID value.
Is LPS PID value okay?
(See 

F–45 PCM INSPECTION

.)

Yes

Overhaul control valve body and repair or replace any 
defective parts. If problem remains, overhaul transaxle and 
repair or replace any defective  parts. (See ATX workshop 
manual (FN4A-EL) [1623-10-98E].) (See ATX workshop 
manual supplement (FN4A-EL) [1746-1*-02C].)

No

Repair or replace any defective parts.

21

Noise occurs at idle when vehicle is stopped in D, S, L ranges, or in R position

DESCRIPTION

• Transaxle noisy in driving ranges when vehicle idling.

POSSIBLE 

CAUSE

• Although the malfunction is basically the same as No.20 "Noise occurs at idle when vehicle is stopped 

in all positions/ranges", other causes may be selector lever position disparity or TR switch position 
disparity.


Content   ..  219  220  221  222   ..