Land Rover Discovery. Manual - part 194
 

  Index      Land Rover     Land Rover Discovery - service 1995-1996 year


Search            


Content   ..  192  193  194  195   ..


Land Rover Discovery. Manual - part 194


82

AIR CONDITIONING

10

REPAIR

2. Disconnect 2 Lucar connectors from thermostat.
3. Position wiring aside.
4. Remove 2 screws securing heater pipe bracket

and position pipes aside.

5. Remove 10 clips retaining upper and lower

casings.

6. Remove 5 screws retaining upper casing.
7. Remove lower casing and evaporator.

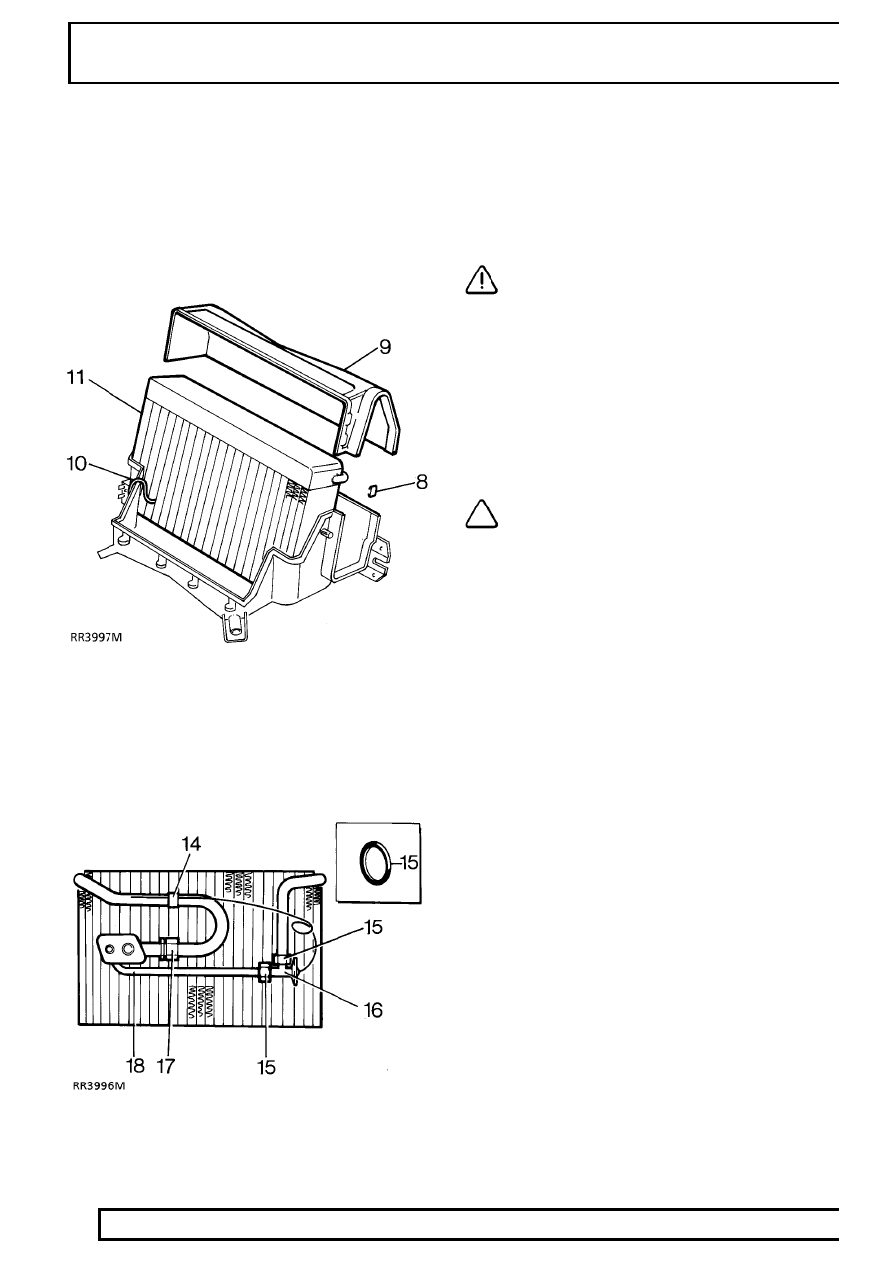
8. Remove 4 clips securing evaporator top cover.
9. Remove evaporator top cover.

10. Remove thermostat sensor from evaporator

matrix.

11. Remove evaporator assembly from lower casing.
12. Remove bulkhead seal from case.

Expansion valve

13. Remove insulation from evaporator and

expansion valve connections.

14. Remove expansion valve sensor retaining clip.
15. Unscrew 2 pipe unions. Discard ’O’ ring seals.

CAUTION: Use a second wrench to
support pipe adapters and plug
connections.

16. Remove expansion valve.
17. Unscrew pipe union. Discard ’O’ ring seal.
18. Remove evaporator pipe.

Refit

19. Reverse removal procedure. Use new ’O’ rings,

insulation and bulkhead seal.

NOTE: Use refrigerant oil on all ’O’ rings
and mating surfaces. Tighten connection
See Specifications, torque, Torque Values

20. Wrap all exposed metal at hose connections with

prestite tape.

21. Evacuate and recharge system.

See

Adjustment, Refrigerant Recovery Recycling
Recharging

22. Leak test any disturbed joints.

See Adjustment,

Leak Test System

23. Perform a functional check.
24. Disconnect service unit.

AIR CONDITIONING

11

REPAIR

THERMOSTAT

Service repair no - 86.25.50

Remove

1. Remove heater and cooler unit.

See Heater

and Cooler Unit

2. Remove lower cover and evaporator.

See

Evaporator and Expansion Valve

3. Remove 5 clips and screw securing evaporator

top cover.

4. Remove evaporator top cover.

5. Remove thermostat sensor from evaporator

matrix.

6. Remove 2 screws securing sensor unit.
7. Remove thermostat and insulation.

Refit

8. Reverse removal procedure.

CAUTION: The thermostat insulation must
be installed in the ORIGINAL POSITION in
the evaporator.

EVAPORATOR/BLOWER MOTOR ASSEMBLY -
REAR

Service repair no - 82.26.01

Remove

1. Recover refrigerant from system.

See

Adjustment, refrigerant recovery recycling
recharging

WARNING: Wear eye and hand protection
when disconnecting components
containing refrigerant. Plug all exposed

connections immediately.

2. Remove evaporator to alpine light duct.

See

evaporator to alpine light duct

3. Remove LH rear mud flap.

See CHASSIS AND

BODY, Repair, mud flap - rear - lh

4. Clean area around low and high pressure air

conditioning pipe unions, beneath rear wheel
arch, to prevent any risk of dirt entering the
system.

5. Loosen and disconnect high and low pressure

air conditioning pipe unions beneath rear wheel
arch.

6. Remove and discard ’O’ rings from pipe unions.

CAUTION: Use 2 spanners when loosening
or tightening air conditioning pipe unions.

CAUTION: Plug exposed connections
immediately.

82

AIR CONDITIONING

12

REPAIR

7. Remove nut securing rear fold down seat

mounting frame to wheel arch.

8. Remove 5 bolts securing rear fold down seat

mounting frame.

NOTE: The rear fold down seat mounting
frame retaining nut is located in the LH
rear wheel arch.

9. Remove mounting frame.

10. Disconnect 2, main to rear air conditioning unit

harness multiplugs.

11. Remove 3 bolts securing evaporator/blower

motor assembly to body.

12. Release evaporator/blower motor assembly

pipes from body grommets.

13. Remove evaporator/blower motor assembly.

Refit

14. Lubricate body grommets to aid fitment of

evaporator/blower motor assembly pipe unions.

15. Fit evaporator/blower motor assembly, feed pipe

unions through grommets and align to fittings.

16. Fit bolts securing evaporator/blower motor

assembly to body and tighten to

25 Nm .

17. Connect, main to rear air conditioning unit,

harness multiplugs.

18. Position and align rear fold down seat mounting

frame to fittings, fit nut and bolts and tighten to
25 Nm .

19. Lubricate NEW ’O’ rings with refrigerant oil, and

fit to pipe unions.

20. Remove plugs, align unions, and tighten to;

High pressure pipe:

14 Nm

Low pressure pipe:

22 Nm .

CAUTION: Use 2 spanners when loosening
or tightening air conditioning pipe unions.

21. Fit LH rear mud flap.

See CHASSIS AND

BODY, Repair, mud flap - rear - lh; Refit

22. Fit evaporator to alpine light duct.

See

evaporator to alpine light duct; Refit

23. Evacuate and recharge air conditioning system.

See Adjustment, refrigerant recovery
recycling recharging

AIR CONDITIONING

13

REPAIR

BLOWER MOTOR - REAR

Service repair no - 82.26.02

Remove

1. Remove evaporator/blower motor assembly.

See evaporator/blower motor assembly -
rear

2. Loosen 2 screws securing high pressure control

valve solenoid to blower motor housing.

3. Disconnect multiplug from blower motor.
4. Release blower motor cooling tube from

evaporator/blower motor housing.

5. Remove 3 screws securing blower motor.
6. Remove blower motor .

Refit

7. Position blower motor to housing and secure

with screws.

8. Secure blower motor cooling tube from

evaporator/blower motor housing.

9. Connect multiplug to blower motor.

10. Tighten screws securing control valve solenoid.
11. Fit evaporator/blower motor assembly.

See

evaporator/blower motor assembly - rear;
Refit

ELECTRONIC CONTROL UNIT - REAR AIR
CONDITIONING

Service repair no - 82.26.03

Remove

1. Remove rear compartment lower trim panel.

See CHASSIS AND BODY, Repair, rear
compartment lower trim panel - lh - with rear
air conditioning fitted

2. Disconnect multiplug from ECU.
3. Remove ECU from mounting bracket.

Refit

4. Fit ECU to mounting bracket and connect

multiplug.

5. Fit rear compartment lower trim panel.

See

CHASSIS AND BODY, Repair, rear
compartment lower trim panel - lh - with rear
air conditioning fitted; Refit


Content   ..  192  193  194  195   ..