Jaguar X-Type Sedan and Estate (Wagon). Manual - part 427


  Index      Jaguar     Jaguar X-Type Sedan and Estate (Wagon) (2.0 L, 2.5 L and 3.0 L Gasoline; 2.0 L and 2.2 L, Diesel) - manual 2001-2009 year


Search            


Content   ..  425  426  427  428   ..


Jaguar X-Type Sedan and Estate (Wagon). Manual - part 427


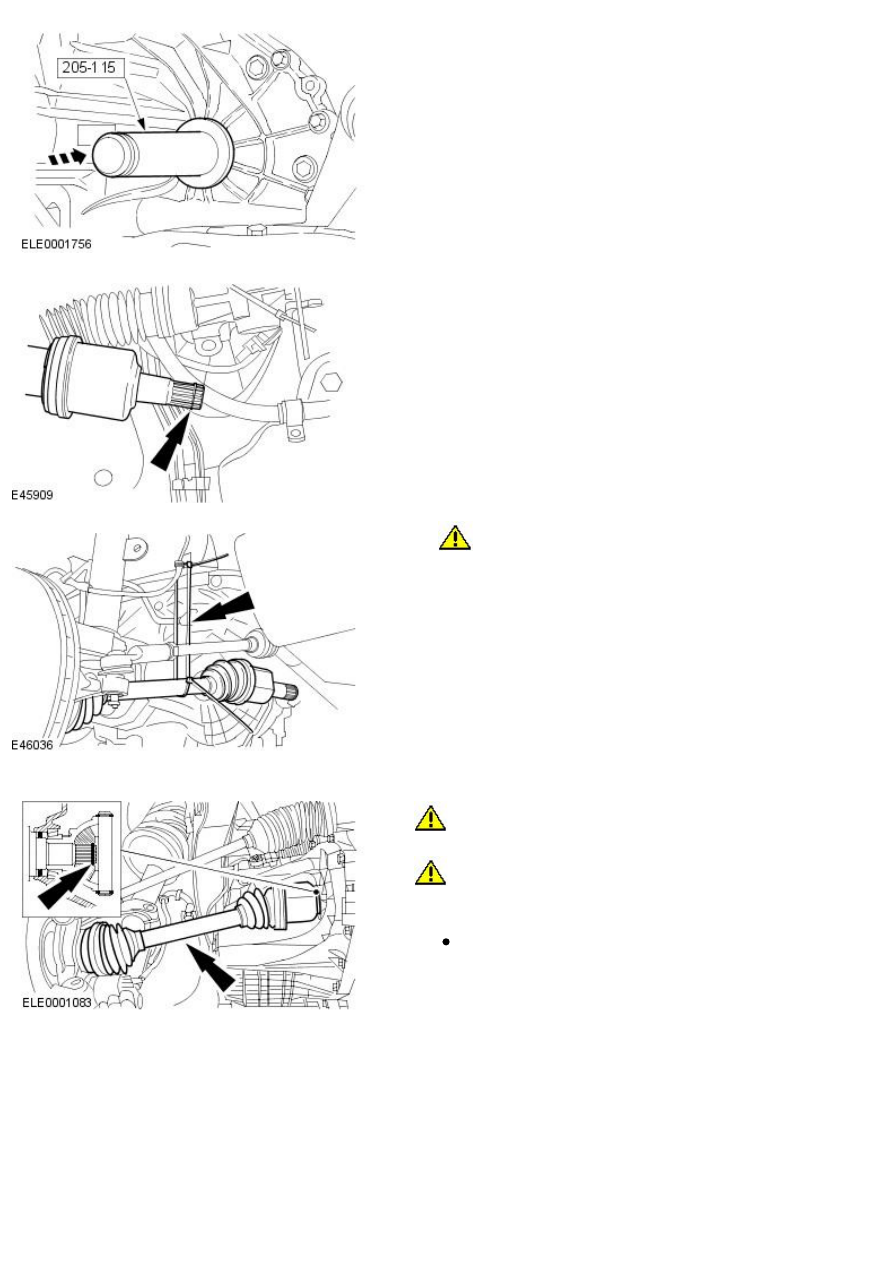
24. NOTE: Remove the transaxle plug.

Using the special tool, install a new right-hand halfshaft seal.

25. Install a new right-hand halfshaft snap ring.

26. 

CAUTION: Make sure the halfshaft constant velocity (CV) joints

do not over articulate. Failure to follow this instruction may result in
damage to the CV joints.

• NOTE: Remove the right-hand halfshaft tie strap.

Detach the right-hand halfshaft.

27. CAUTIONS:

 Make sure the halfshaft CV joints do not over articulate. Failure to

follow this instruction may result in damage to the CV joints.

 Make sure the halfshaft seal is not damaged. Failure to follow this

instruction may result in an transaxle fluid leak.

Attach the right-hand halfshaft to the transaxle.

Make sure the halfshaft snap ring is correctly seated.

28. NOTE: Remove the transaxle plug.

Using the special tool, install a new left-hand halfshaft seal.

29. 

CAUTION: Make sure the halfshaft CV joints do not over

articulate. Failure to follow this instruction may result in damage to the CV
joints.

Attach the left-hand halfshaft.

Engage the left-hand halfshaft to the transaxle.

Tighten to 25 Nm.

30. Install the charge air cooler intake pipe retaining bolts.

Tighten to 35 Nm.

31. Install the front subframe.

For additional information, refer to: 

Front Subframe - 2.0L Duratorq-

TDCi/2.2L Duratorq-TDCi (110kW /150PS) - Puma

 (502-00 Uni-Body,

Subframe and Mounting System, Removal and Installation).

32. Install the battery tray.

For additional information, refer to: 

Battery Tray

 (414-01 Battery,

Mounting and Cables, Removal and Installation).

33. Fill the manual transaxle to the correct oil level.

For additional information, refer to: 

Transaxle Draining and Filling -

Vehicles W ith: 6-Speed Manual Transaxle - MMT6

 (308-03 Manual

Transmission/Transaxle, General Procedures).

Published: 11-May-2011

Manual Transmission/Transaxle - Transaxle2.0L NA V6 - AJV6/2.5L NA V6 -
AJV6/3.0L NA V6 - AJ27

Installation

Special Tool(s)

Halfshaft oil seal installer

205-115

Powertrain assembly jack

HTJ1200-2

Engine support bracket

303-021

Engine support brackets

303-1068

Installation

All vehicles

1. Install the transaxle.

Raise the powertrain assembly jack and transaxle assembly.

Align the transaxle to the clutch plate.

2. NOTE: Vehicles with 2.5L and 3.0L engines shown, vehicles with 2.0L
engine similar.

Install the transaxle retaining bolt.

Tighten to 48 Nm.

3. Install the transaxle retaining bolt.

Tighten to 48 Nm.

4. Remove the powertrain assembly jack.

Remove the transaxle to the powertrain assembly jack securing
strap.

5. Install the transaxle retaining bolts.

Tighten to 48 Nm.

6. Install the transaxle retaining nut.

Tighten to 48 Nm.

7. Lower the vehicle.

For additional information, refer to: 

Lifting

 (100-02 Jacking and Lifting,

Description and Operation).


Content   ..  425  426  427  428   ..