Iveco Stralis AT/AD. Manual - part 274


  Index      Iveco     Iveco Stralis AT/AD - service repair manual 2003 year


Search            


Content   ..  272  273  274  275   ..


Iveco Stralis AT/AD. Manual - part 274


77137

Before proceeding to detach the heater radiator, it is
necessary to:

- Turn the ignition key onto “Key On” and switch over the

air temperature onto “LOW”.

- Drain off the engine coolant.

- Detach the pollen filter and cover (Figure 49).

- Detach the Body Control.

- Detach the bottom covering of the fascia on the

passenger side.

- Detach two passenger air openings.

- Detach the air delivery pipe from the central body to the

rh door opening.

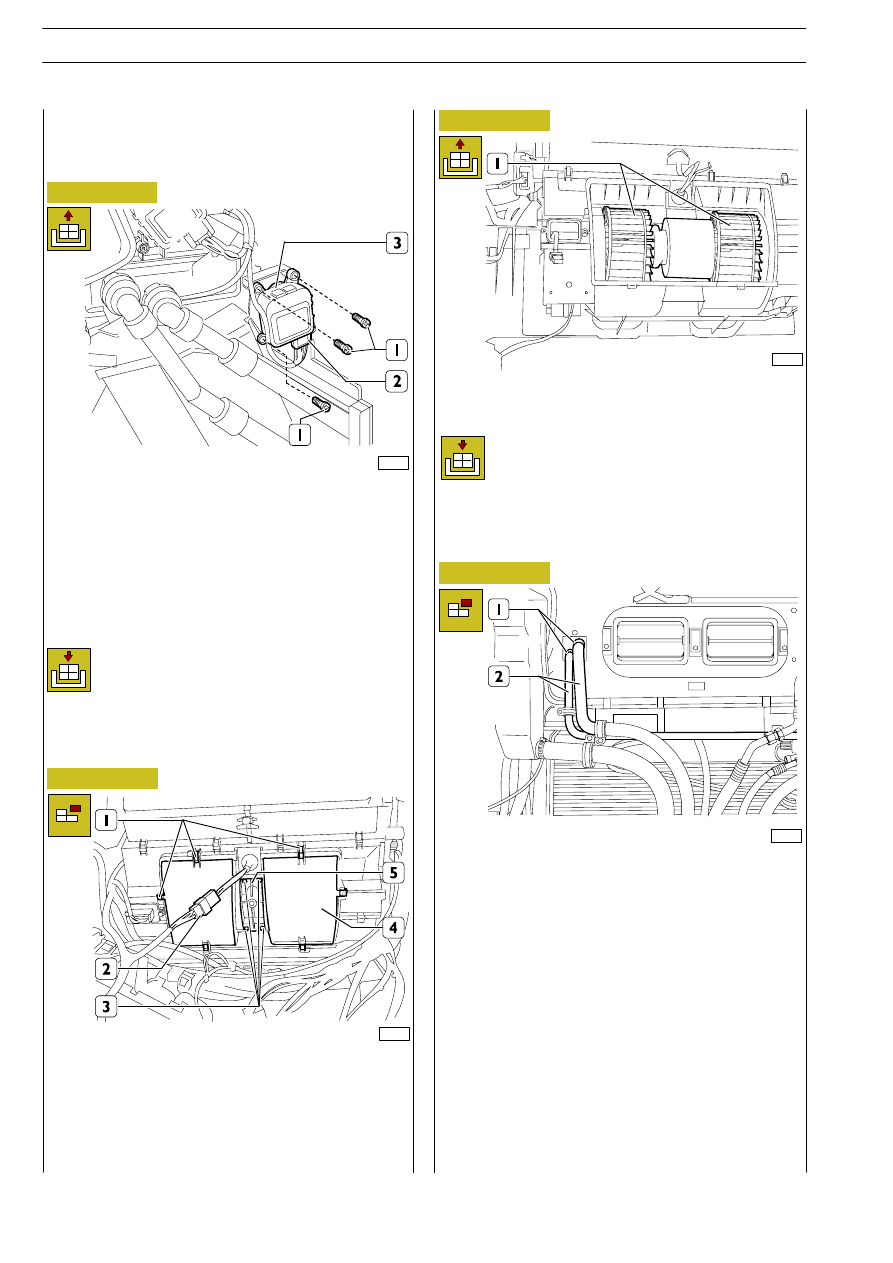
- Disconnect the retaining clamps (1) and separate the

water pipes (2).

Figure 41

553215

HEATER RADIATOR

Removal

Refitting

Refit by carrying out the procedures described for
removal in reverse order.

77136

- Detach the electric fan (1) from its seat.

Figure 42

- Detach the glove compartment, unscrew the fixing

screws, remove the Body Control and set it aside as
described in removing the “DEFROST CONTROL
MOTOR.”

- Disconnect the power supply connector (2).

- Unscrew the fixing screws (1).

- Detach the air recirculation door control motor (3).

553153

AIR

RECIRCULATION

DOOR

CONTROL MOTOR

77131

Figure 43

Removal

Refitting

Refit by carrying out the procedures described for
removal in reverse order.

77135

Figure 44

Removal

Perform the removal procedure:

- Central instrument panel (OP. 553710).

- Disconnect the connector (2).

- Take off the fixing clips (1), unscrew the screws (3) and

detach the covers (4) and (5).

553212

ELECTRIC FAN

30

BODYWORK AND CHASSIS FRAME

S

TRALIS

AT/AD

Base - January 2003

77140

- Detach the connectors (1), (2) indicated to facilitate the

outflow from the heater radiator.

Figure 45

77138

- Operating through the control unit compartment at the

bottom of the fascia covering, unscrew the screw (2)
fixing the clevis (1) and free the heater water pipes (3).

Refitting

Refit by carrying out the procedures described for
removal in reverse order.

Figure 46

77139

- Take off the clips and detach the pipe (3).

- Unscrew the screws (4) fixing the radiator to the heater.

- Detach the connectors (1), (2) indicated to facilitate the

outflow from the heater radiator.

Figure 47

Figure 48

77141

- Extract the heater radiator (1) with due caution from the

glove compartment bay.

BODYWORK AND CHASSIS FRAME

31

S

TRALIS

AT/AD

77142

Figure 49

Removal

Lift the radiator cowling, take off the cover (1) and remove the
pollen filter (2).

77144

- Loosen the automatic tightener and take off the

compressor belt.

- Disconnect the power supply connector (2).

- Unscrew the fixing screws (1).

Figure 50

77143

- Discharge the air-conditioning system by following the

procedure described under the relevant heading.

- Working from under the vehicle, unscrew the fixing

screws (1) and remove the inlet and outlet pipes (2) from
the compressor.

Figure 51

Refitting

Refit by carrying out the procedures described for
removal in reverse order.

77145

Figure 52

- Detach the compressor (1) from the vehicle.

553239

AIR-CONDITIONER
COMPRESSOR

Removal

Refitting

Refit by carrying out the procedures described for
removal in reverse order.
Check the state of the seal. If they are damaged or
worn, they must be changed.

32

BODYWORK AND CHASSIS FRAME

S

TRALIS

AT/AD

Base - January 2003

POLLEN FILTER

- Detach the outside air temperature sensor (1) from its

seat.

- Lift

the

radiator

cowling

and

discharge

the

air-conditioning system by following the procedure
described above.

- Unscrew the nut (6) and detach the condenser pipes (5).

- Unscrew the nut (4) fixing the pipe bracket (3).

- Unscrew the fixing screws (1) and remove the condenser

(2) from the vehicle.

77146

Figure 53

Removal

77147

- Lift the radiator cowling and disconnect the connector (1)

and free the wiring (2) of the sensor (3) from the retaining
clamps (4).

553232

AIR-CONDITIONER
CONDENSER

553242

OUTSIDE

AIR

TEMPERATURE

SENSOR

Removal

Refitting

Refit by carrying out the operations described for
removal in reverse order, verifying the integrity and
correct position of the seals on the pipes. If they are
damaged, they must be changed.

Figure 54

Figure 55

77148

Refitting

Refit by carrying out the procedures described for
removal in reverse order.

BODYWORK AND CHASSIS FRAME

33

S

TRALIS

AT/AD


Content   ..  272  273  274  275   ..