Geely Emgrand X7. Manual part - 382


  Главная      Geely     Geely Emgrand X7 - Manual


поиск по сайту          


содержание   ..   380  381  382  383  ..


Geely Emgrand X7. Manual part - 382


return when the master cylinder returns. 

Brake caliper and brake pad bracket: used for fixing the disc-type brake pad and the brake caliper in place to keep 
in correct coordination with the hydraulic brake caliper; and slide the brake pad when the mechanical output force 
acts on the brake pad. 

Floating pin of brake caliper: used for mounting the hydraulic brake caliper and fixing the brake caliper in place to 
keep in correct coordination with the brake caliper bracket; and leading the brake caliper to slide with respect to 
the brake pad when the mechanical output force acts on. 

Front disk-type brake system operated : 

The mechanical output force from the hydraulic brake caliper piston is acted on the internal brake pad ; when the 
piston pushes the internal brake pad    outward, the brake caliper housing pulls the external brake pad    inward at 
the same time so as to uniformly distribute the output force; the brake pad  applies the output force to both 
friction surfaces of the brake plate so as to slow down the tire and the wheel assembly; and it is very important to 
uniformly distribute the brake force whether the functions of the brake pad    guide plate and the brake caliper 
floating pin are normal. 

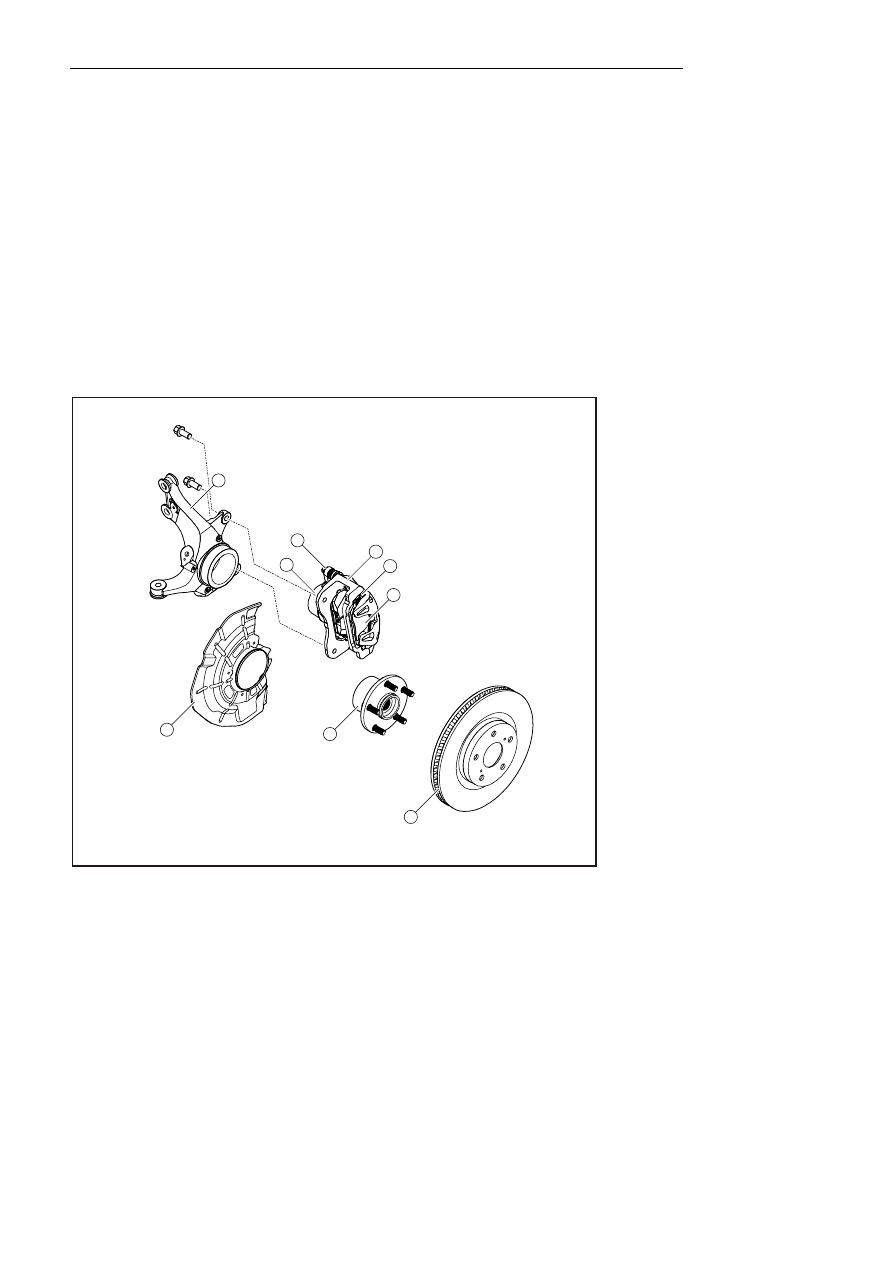
6.2.3 Disassemble drawings 

6.2.3.1 Disassembly Diagram 

5

4

1

3

2

6

8

7

9

NL06-1001b


1.    Brake pad guide plate 

2.    brake pad 

3.    Brake caliper mounting bracket 

4.    Float pin sealing ring 

5.   Brake caliper 

6.   Steering joint 

7.    Disc-type brake anti-dust cover 

8.   Hub assembly 

9 .    Brake disc 

1527


6.2.4 Diagnostic information and procedures 

6.2.4.1 Brake pad inspection 

1.   Regularly inspect  brake padand conduct measure according to the following figure. If it exceeds 

specification, replace brake lining. 

2.    If replacement is unavoidable, it is necessary to replace disc    brake padin accordance with complete set of 

vehicle axle. 

3 .    Check if friction surface of disc- brake padis clack or damaged. 

NL06-0003b


6.2.4.2 Brake caliper inspection 

1.    Inspect whether brake caliper has crack, serious abrasion and damage. If yes, replace brake caliper. 

2.   Inspect whether sealing ring of dust cover of brake caliper pistion has crack, breakage, gap, ageing and 

wrong installation out of brake caliper body. If yes, replace brake caliper. 

3.   Inspect whether there is brake fluid leakage around brake caliper piston dustproof cover sealing ring and 

from disc brake pad block, if yes, replace brake caliper. 

4.    Check whether the brake caliper piston can smoothly enter the brake caliper cylinder in full stroke. The brake 

caliper piston shall be able to move smoothly and uniformly in the brake caliper cylinder. The brake caliper 
needs to be replaced if the brake caliper piston is jammed or can hardly reach the bottom. 

6.2.4.3 Brake pad guide plate inspection 

Inspect whether brake pad guide piece is missing, has serious corrosion, or protruding tone bending due to 
inspection. 

If any of situations above ocurrs, it is necessary to replace disc brake pad guide piece. Ensure the brake pad  
slides on the disc-type filler block guide blade smoothly, without retardation. 

6.2.4.4 Brake caliper floating pin inspection 

Check if brake caliper float pin exist condition as follow : 

–   Clamping stagnation 

–   Locked 

–   Sheath clack or damaged 

–   Sheath lack 

1528


If any above situations are found, need to replace the brake caliper and dust cover seal ring. 

6.2.4.5 Brake disc surface and wron n inspection 

1.   Clean brake disc friction surface by using industrial alcohol or allowed similar equivalent brake cleaning 

agent. 

2.    Inspect whether brake disc friction surface has the following situations: 

•    Serious rust and/ or spot pitting 

•    Slight surface rusting 

•    Crack and / or burnings 

•    Serious decolor and turn into blue. 

•    Crack depth on brake disc friction surface 

If the friction surface of the brake disc incurs the above on or more situations, the brake disc needs surface 
dressing or replacement. 

Notes: 

After surface dressing or replacement of the brake disc, further replace the brake pad . 

6.2.4.6 Brake disc thickness measure 

NL06-0088b


1.    Clean brake disc friction surface by using industrial alcohol or smilar brake cleaning agent. 

2.    Use micrometer to measure and record minimum thickness of 4 or more than 4 position points uniformly 

distributed along the circumference of brake disc. Make sure that the measurement is only limited in    brake 
padand contact surface area, and the distance between micrometer and exterior edge of brake disc during 
each measurement must be equal. 

3.    If thickness of brake disc exceeds specifications, brake disc needs to be repaired on its surface or replace. 

Notes: 

After surface dressing or replacement of the brake disc, further replace the brake pad . 

6.2.4.7 End-face runout measure after brake disc installed 

Notes: 

When the brake disc is dismantled from the hub/axle flange, clean up rust or dirt on the matching surface of the 
hub/axle flange and the brake disc; otherwise, it may result in oversized end face runout after the brake disc is 

1529


assembled to result in brake pulsation. 

NL06-0009b


1.   For dismantling of brake disc from vehicle, refer to 6.2.5.3 Replacement of brake disc and/ or 6.3.5.3 

Replacement of brake disc - rear. 

2.    Clean brake disc friction surface by using industrial alcohol or smilar brake cleaning agent. 

3.  Install brake disc onto wheel hub/ axle flange. 

4.    Install the nut with hand and tighten with a wrench. 

5.    Install the dial indicator base to the steering joint and put the dial indicator measurement head in place in 

such a manner that the dial indicator measurement head is made to contact with the brake disc friction 
surface at an angle of 90° and is about 13mm (metric) or 0.5in (English) from the external edge of the brake 
disc. 

6.    Rotate the brake disc until the reading from the dial indicator reaches the minimum and then zero the dial 

indicator. 

7.    Rotate the brake disc until reading from the dial indicator reaches the maximum. 

8.    Mark and record the disc side face run-out. 

9.    Compare the disc side face run-out with the value as specified. 


Standard value : mm (Metric) in (English system) 

10.   If runout of rear end face exceeds stated specification after assembly of brake disc, it is necessary to inspect 

bearing axial clearance and runout of axle wheel hub. If axial clearance and runout of axle wheel hub are 
normal and brake disc thickness is within specified range, it is necesary to repair the surface of brake disc to 
ensure correct levelness. 

1530


содержание   ..   380  381  382  383  ..