Dodge Dakota (ND). Manual - part 828


  Index      Dodge     Dodge Dakota (ND) 2005 - service repair manual 2005 year


Search            


Content   ..  826  827  828  829   ..


Dodge Dakota (ND). Manual - part 828


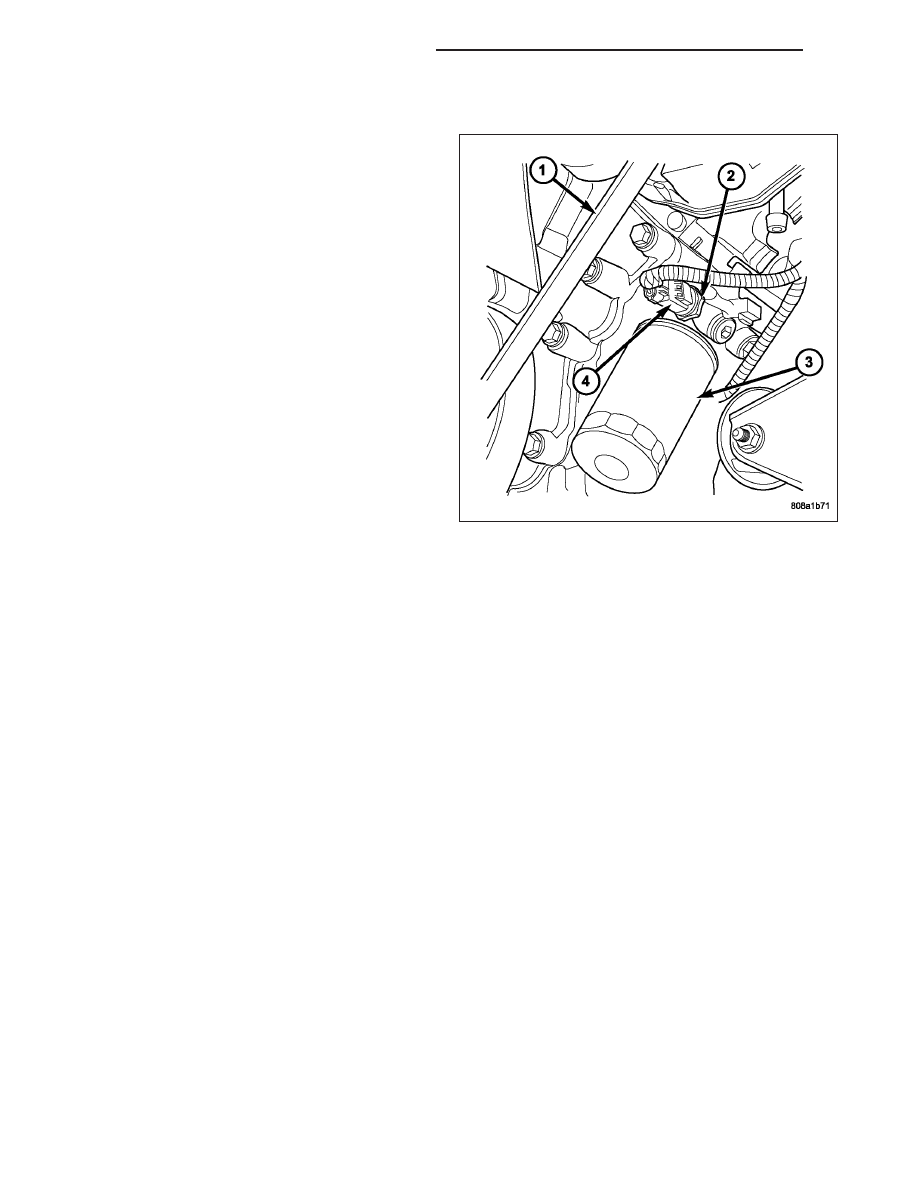
CHECKING ENGINE OIL PRESSURE

1. Remove oil pressure sending unit (2) and install

gauge assembly C-3292.

2. Run engine until thermostat opens.

3. Oil Pressure:

Curb Idle - 25 kPa (4 psi) minimum

3000 rpm - 170 - 758 kPa (25 - 110 psi)

4. If oil pressure is 0 at idle, shut off engine. Check

for a clogged oil pick-up screen or a pressure relief
valve stuck open.

REAR SEAL AREA LEAKS

Since it is sometimes difficult to determine the source of an oil leak in the rear seal area of the engine, a more
involved inspection is necessary. The following steps should be followed to help pinpoint the source of the leak.

If the leakage occurs at the crankshaft rear oil seal area:

1. Disconnect the battery.

2. Raise the vehicle.

3. Remove torque converter or clutch housing cover and inspect rear of block for evidence of oil. Use a black light

to check for the oil leak:

a. Circular spray pattern generally indicates seal leakage or crankshaft damage.

b. Where leakage tends to run straight down, possible causes are a porous block, camshaft bore cup plugs, oil

galley pipe plugs, oil filter runoff, and main bearing cap to cylinder block mating surfaces. See Engine, for
proper repair procedures of these items.

4. If no leaks are detected, pressurized the crankcase as outlined in the section, Inspection (Engine oil Leaks in

general)

CAUTION: Do not exceed 20.6 kPa (3 psi).

5. If the leak is not detected, very slowly turn the crankshaft and watch for leakage. If a leak is detected between

the crankshaft and seal while slowly turning the crankshaft, it is possible the crankshaft seal surface is damaged.
The seal area on the crankshaft could have minor nicks or scratches that can be polished out with emery cloth.

CAUTION: Use extreme caution when crankshaft polishing is necessary to remove minor nicks or
scratches. The crankshaft seal flange is specially machined to complement the function of the rear oil seal.

6. For bubbles that remain steady with shaft rotation, no further inspection can be done until disassembled. (Refer

to 9 - ENGINE - DIAGNOSIS AND TESTING) , under the Oil Leak, for components inspections on possible
causes and corrections.

7. After the oil leak root cause and appropriate corrective action have been identified, (Refer to 9 - ENGINE/EN-

GINE BLOCK/CRANKSHAFT OIL SEAL - REAR - REMOVAL).

9 - 850

ENGINE - 3.7L SERVICE INFORMATION

ND

PAN-ENGINE OIL

DESCRIPTION

The engine oil pan (1) is made of laminated steel and
has a single plane sealing surface. The sandwich style
oil pan gasket has an integrated windage tray (2) and
steel carrier. The sealing area of the gasket is molded
with rubber and is designed to be reused as long as
the gasket is not cut, torn or ripped.

REMOVAL

1. Disconnect the negative battery cable.

2. Install engine support fixture (1) special tool # 8534. Do not raise engine at this time.

3. Remove both left and right side engine mount through bolts.

4. Remove the structural dust cover.

ND

ENGINE - 3.7L SERVICE INFORMATION

9 - 851

5. Drain engine oil.

CAUTION: Only raise the engine enough to pro-
vide clearance for oil pan removal. Check for
proper clearance at fan shroud to fan and cowl to
intake manifold.

6. Raise engine using special tool (1) # 8534 to pro-

vide clearance to remove oil pan.

NOTE: On 4WD vehicles, the front axle must be
lowered, to provide clearance for oil pan removal.
It is not necessary to remove the front axle from
the vehicle, or remove the axle shafts.

7. For 4WD Vehicles Remove the pinion bracket.

8. For 4WD Vehicles Disconnect the front driveshaft

at the front axle.

9. For 4WD Vehicles Remove the front axle mount-

ing bolts.

10. For 4WD Vehicles Lower axle using suitable jack

enough to provide clearance to remove oil pan.

NOTE: Do not pry on oil pan or oil pan gasket.
Gasket is integral to engine windage tray and does
not come out with oil pan.

11. Remove the oil pan mounting bolts and oil pan.

12. Unbolt oil pump pickup tube and remove tube.

13. Inspect the integral windage tray and gasket and

replace as needed.

CLEANING

1. Clean oil pan in solvent and wipe dry with a clean cloth.

2. Clean the oil pan gasket surface. DO NOT use a grinder wheel or other abrasive tool to clean sealing surface.

3. Clean oil screen and tube thoroughly in clean solvent.

INSPECTION

1. Inspect oil drain plug and plug hole for stripped or damaged threads. Repair as necessary.

2. Inspect the oil pan mounting flange for bends or distortion. Straighten flange, if necessary.

9 - 852

ENGINE - 3.7L SERVICE INFORMATION

ND

INSTALLATION

1. Clean the oil pan gasket mating surface of the bed-

plate and oil pan.

2. Position the oil pan gasket and pickup tube with

new o-ring. Install the mounting bolt and nuts.
Tighten bolt and nuts to 28 N·m (20 ft. lbs.).

3. Position the oil pan and install the mounting bolts.

Tighten the mounting bolts to 15 N·m (11 ft. lbs.) in
the sequence shown.

4. Lower the engine into mounts using special tool (1)

# 8534.

5. Install both the left and right side engine mount

through bolts. Tighten the bolts to 68 N·m (50 ft.
lbs.).

6. Remove special tool # 8534.

ND

ENGINE - 3.7L SERVICE INFORMATION

9 - 853


Content   ..  826  827  828  829   ..