DAF LF45, LF55 Series. Manual - part 132


  Index      DAF     DAF LF45, LF55 Series - service repair manual


Search            


Content   ..  130  131  132  133   ..


DAF LF45, LF55 Series. Manual - part 132


1

LF45/55 series

Disassembly and assembly

CAB TILTING GEAR

5-1

5. DISASSEMBLY AND ASSEMBLY

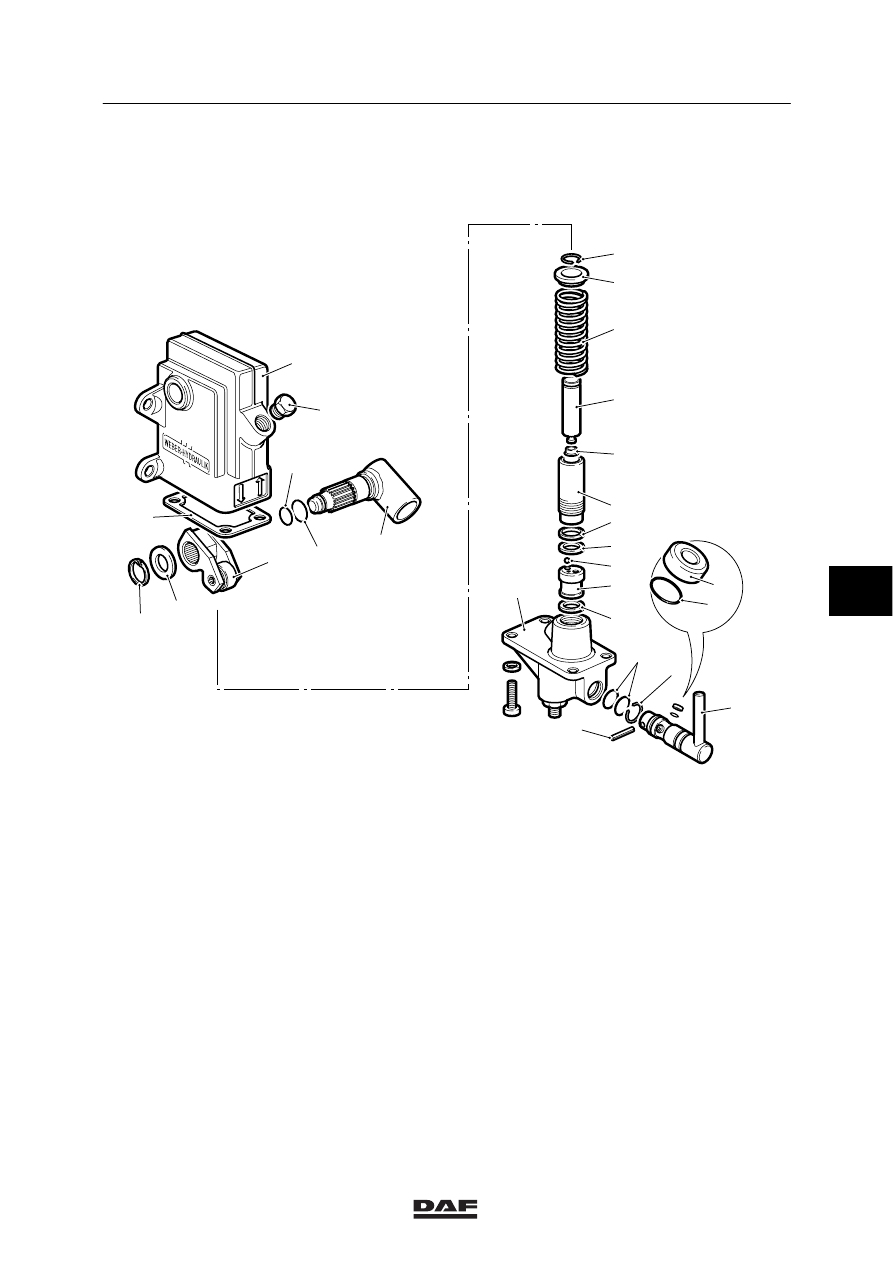
5.1 DISASSEMBLY AND ASSEMBLY, CAB TILTING PUMP

21

27

1

2

11

10

9

8

18

19

7

6

13

12

14

16

17

20

15

26

5

4

24

23

22

3

25

K1 01 103

Disassembling cab tilting pump
1.

Remove the pump, see ”Removal and
installation”.

2.

Remove the socket head screws and take
the pump housing (24) out of the reservoir
(1). Take account of the fact that the pump
housing is spring-loaded.

3.

Remove the gasket (27).

4.

Take the circlip (7), plunger (10), grooved
ring (11), spring washer (8) and the spring
itself out of the plunger housing (12).

6

ǹ 0210

1

CAB TILTING GEAR

Disassembly and assembly

LF45/55 series

5-2

5.

Turn the plunger housing (12) off the pump
housing (24) and remove the seal (13) and
the copper washer (14).

6.

Push the valve block (16) out of the pump
housing and pay attention to the ball (15).

7.

Remove the copper washer (17).

Note:
The valve block (16) is a sealed unit with a
pressure-relief valve inside that is set by the
manufacturer and cannot be taken apart.

8.

Tap the pin (21), which attaches the cross
bar and within it the direction selector (20),
until it is loose and take the cross bar
carefully off the housing. Pay attention to
the O-rings (18) and (23) and seal (19).

9.

Remove the spring washer (26) and the
spacer (25) that secure the lever block (3).

10. Remove the lever block (3) and the cam (6)

of the reservoir (1). Pay attention to the
O-rings (4) and (5).

Assembling cab tilting pump
1.

Check and the O-rings (4) and (5) and
replace them if necessary. Fit the lever
block (3) and the cam (6) with O-rings (4)
and (5) in the reservoir (1).

2.

Fit the spacer (25) and the spring washer
(26) to the lever block (3).

3.

Check the O- rings (18) and (23) and the
seal (19). Replace them if necessary.

4.

Fit the O- rings (18) and (23) and the seal
(19) to the direction selector (20). Fit the
direction selector (20) into the pump
housing (24).

5.

Fit the pin (21).

6.

Place the copper washer (17) on the pump
housing (24) and fit the valve block (16).
Pay attention to the ball (15).

6

ǹ 0210

1

LF45/55 series

Disassembly and assembly

CAB TILTING GEAR

5-3

7.

Check seal (13) and replace if necessary.

8.

Turn the plunger housing (12) with the seal
(13) and copper washer (14) in the pump
housing (24).

Note:
The bevelled side of the seal (13) points in
the direction of the plunger housing (12).

9.

Fit the grooved ring (11) and the plunger
(10) in the plunger housing (12).

10. Fit the spring (9), the spring washer (8) and

the circlip (7).

11. Fit a new gasket to the pump housing (24).

12. Fit the pump housing (24) in the reservoir

(1) in line with the marks.

13. Tighten the socket head screws.

6

ǹ 0210

1

CAB TILTING GEAR

Disassembly and assembly

LF45/55 series

5-4

6

ǹ 0210


Content   ..  130  131  132  133   ..