Chrysler Sebring, Stratus sedan, Sebring Convertible. Manual - part 656


  Index      Chrysler     Chrysler Sebring, Stratus sedan, Sebring Convertible - service repair manual 2001-2007 year


Search            


Content   ..  654  655  656  657   ..


Chrysler Sebring, Stratus sedan, Sebring Convertible. Manual - part 656


INSTALLATION

NOTE: To support the new Rear Window assembly
for stapling purposes, remove the new rear window
from packaging and place shipping box across the
top opening, resting on the back seat and decklid.

CAUTION: To avoid damage to the sunvisors, rotate
the driver’s and passenger’s sunvisor down before
lowering or raising the convertible top.

(1) Remove the boot shelf and two sail springs

from the old rear window assembly and install onto
the new rear window assembly.

(2) Place rear window locking strip on third bow.
(3) Insert the locking strip into the channel of the

number three roof bow. A rubber mallet may be
required to set locking strip into channel (Fig. 14).

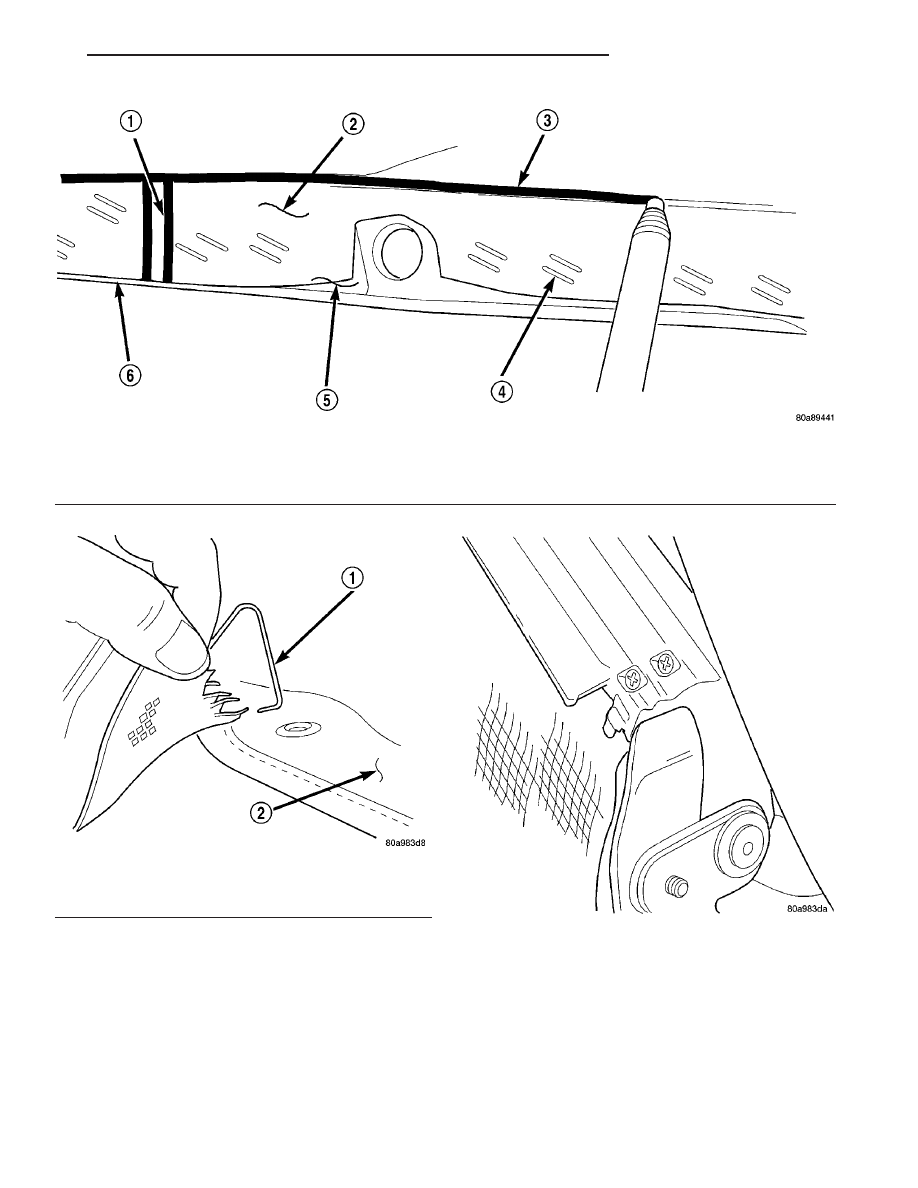
Fig. 11 SAIL PANEL REFERENCE MARKS

1 - SEAM REFERENCE MARK
2 - COVER ASSEMBLY
3 - REFERENCE MARK

4 - STAPLES
5 - OUTER TACK STRIP
6 - SECOND TACK STRIP

Fig. 12 SAIL SPRINGS

1 - SAIL SPRING
2 - COVER ASSEMBLY

Fig. 13 REAR WINDOW REAR STOP SCREW

JR

CONVERTIBLE TOP

23 - 21

CONVERTIBLE TOP REAR WINDOW (Continued)

CAUTION: Do not slide or pull the locking strip onto
the number three bow.

NOTE: To ensure rear window is snapped into num-
ber three bow, flip assembly onto top to inspect
snap in feature.

(4) Install existing or new foam on the end of the

bow using 1 in. black tape to secure foam to bow.

(5) Install the rearmost stop screw on the number

three bow.

(6) Starting from the right side of the vehicle,

locate the front edge of the cover assembly to the
tacking strip (use measurements located in the
Remove procedures (Refer to 23 - BODY/CONVERT-
IBLE TOP/REAR WINDOW - REMOVAL) and pull
cover down until marking is one eighth of an inch
below the top edge of the tacking strips.

NOTE: 1/8 inch measurement should be constant
when stapling the cover assembly to prevent wrin-
kles.

(7) Continue to staple right hand cover assembly

to tacking strips. Work from the outboard to center
line of the vehicle.

(8) Repeat Step 6 for left side of the vehicle.
(9) Install sail panel springs to front of cover

assembly.

(10) Install antenna mast.
(11) Engage rear window elastic strap to number

three roof bow.

(12) Using the nuts, install the belt line tacking

strips, starting with the center tack strip and work-
ing outboard.

(13) Feed rear window defogger wire harness

through the sleeves at each side of the rear window.

(14) Connect rear window defogger wire connectors

to terminals.

(15) Engage the headliner at the rear sail panel.
(16) Install shower curtain with push on nuts.

CAUTION: Make sure top well is not trapped under
the tack strips.

(17) Latch top and inspect for wrinkles.

CONVERTIBLE TOP STORAGE

REMOVAL

CAUTION: To avoid damage to the sunvisors, rotate
the driver’s and passenger’s sunvisor down before
lowering or raising the convertible top.

(1) Raise and secure convertible top.
(2) Remove screws attaching headliner to top well.
(3) Remove push in fasteners attaching convertible

top storage section to rear of storage area (Fig. 15).

(4) Remove push in fasteners attaching storage

area below seat belt bezel.

(5) Pull rear of storage area upward and disengage

front of storage area from beauty bar.

(6) Remove storage area from vehicle.

Fig. 14 REAR WINDOW LOCKING STRIP

1 - RUBBER MALLET
2 - LOCKING STRIP

Fig. 15 CENTER CONVERTIBLE TOP STORAGE

1 - CONVERTIBLE TOP STORAGE
2 - REAR DECK PANEL
3 - TACK STRIP
4 - PUSH-IN FASTENER

23 - 22

CONVERTIBLE TOP

JR

CONVERTIBLE TOP REAR WINDOW (Continued)

INSTALLATION

CAUTION: To avoid damage to the sunvisors, rotate
the driver’s and passenger’s sunvisor down before
lowering or raising the convertible top.

(1) Position convertible top storage area in vehicle.
(2) Engage front of storage area under beauty bar

and push rear of storage area downward into posi-
tion.

(3) Install push in fasteners attaching convertible

top storage section to rear of storage area.

(4) Install push in fasteners to attach storage

areas below seat belt bezel.

(5) Install screws attaching headliner to top well.

BOW

REMOVAL

CAUTION: To avoid damage to the sunvisors, rotate
the driver’s and passenger’s sunvisor down before
lowering or raising the convertible top.

(1) Lower all windows.
(2) Unlatch top and raise top midway.
(3) Remove headliner. (Refer to 23 - BODY/CON-

VERTIBLE TOP/HEADLINER - REMOVAL).

(4) Disconnect the outer straps from the top cover.
(5) To replace bow number 1 and/or 2, drill out the

three screws attaching top cover to bow (Fig. 16). The
screws have thread lock on the screws threads and
are difficult to remove (Fig. 17).

(6) Disconnect both stay pads from number 1

and/or 2 bow(s).

(7) Remove four screws attaching bow.
(8) Remove bow by sliding bow from the top cover.

Using a pair locking pliers grasp the bow and pull
free of the top cover (Fig. 18). Glass cleaner can be
used as a lubricate to ease removal of the bow.

Fig. 16 BOWS

1 - BOW 1
2 - BOW 2
3 - BOW 3

Fig. 17 DRILLING SCREW OUT

1 - DRILL MOTOR
2 - SCREWS HEAD

Fig. 18 REMOVING BOW

1 - BOW
2 - LOCKING PLIERS

JR

CONVERTIBLE TOP

23 - 23

CONVERTIBLE TOP STORAGE (Continued)

(9) To replace bow number 3 (Fig. 19), cut the

curved end off bow on the opposite side, to be make it
easier to remove the bow.

(10) Disconnect both stay pads from number 3

bow.

(11) Remove four screws attaching bow.
(12) Remove bow by sliding bow from the top

cover. Using a pair locking pliers grasp the bow and
pull free of the top cover (Fig. 18). Glass cleaner can
be used as a lubricate to ease the removal of the bow.

INSTALLATION

CAUTION: To avoid damage to the sunvisors, rotate
the driver’s and passenger’s sunvisor down before
lowering or raising the convertible top.

(1) To install bow(s) (Fig. 20) place bow into posi-

tion.

(2) Connect both stay pads from number 3 bow.
(3) Install four screws attaching bow.
(4) With the bow installed, start plastic retainer

strip into position.

(5) Snap top cover retainer strip into channel in

roof bows, by tapping with a hand or a soft mallet.

(6) Install headliner. (Refer to 23 - BODY/CON-

VERTIBLE TOP/HEADLINER - INSTALLATION).

(7) Lower top and latch top.
(8) Raise all windows.

SIDE CENTER RAIL

REMOVAL

(1) Lower all windows.
(2) Unlatch top and raise top half way.
(3) Remove rear seat cushion. (Refer to 23 - BODY/

SEATS/SEAT CUSHION - REMOVAL).

(4) Remove rear seat back. (Refer to 23 - BODY/

SEATS/REAR SEAT BACK - REMOVAL).

(5) Remove sill plate as necessary. (Refer to 23 -

BODY/INTERIOR/DOOR SILL TRIM - INSTALLA-
TION).

(6) Remove speaker grille. (Refer to 23 - BODY/IN-

TERIOR/QUARTER PANEL TRIM - REMOVAL).

(7) Remove quarter trim panel. (Refer to 23 -

BODY/INTERIOR/QUARTER

PANEL

TRIM

-

REMOVAL).

(8) Disconnect fasteners attaching headliner and

top cover straps.

(9) Disconnect headliner push pin fasteners at

quarter panel.

(10) Remove weatherstrip for side glass on the

center side rail (Fig. 21), and weatherstrip retainer
(Fig. 22).

(11) Prop the top up with a suitable device.
(12) Remove lower rear pivot bolt.
(13) Remove pivot arm bolt at side rail (Fig. 23).
(14) Remove front pivot bolt (Fig. 24).
(15) Remove center side rail from vehicle.

Fig. 19 BOW 3

1 - CUT LINE

Fig. 20 BOWS

1 - BOW 1
2 - BOW 2
3 - BOW 3

23 - 24

CONVERTIBLE TOP

JR

BOW (Continued)


Content   ..  654  655  656  657   ..