Chrysler Sebring, Stratus sedan, Sebring Convertible. Manual - part 492
 

  Index      Chrysler     Chrysler Sebring, Stratus sedan, Sebring Convertible - service repair manual 2001-2007 year


Search            


Content   ..  490  491  492  493   ..


Chrysler Sebring, Stratus sedan, Sebring Convertible. Manual - part 492


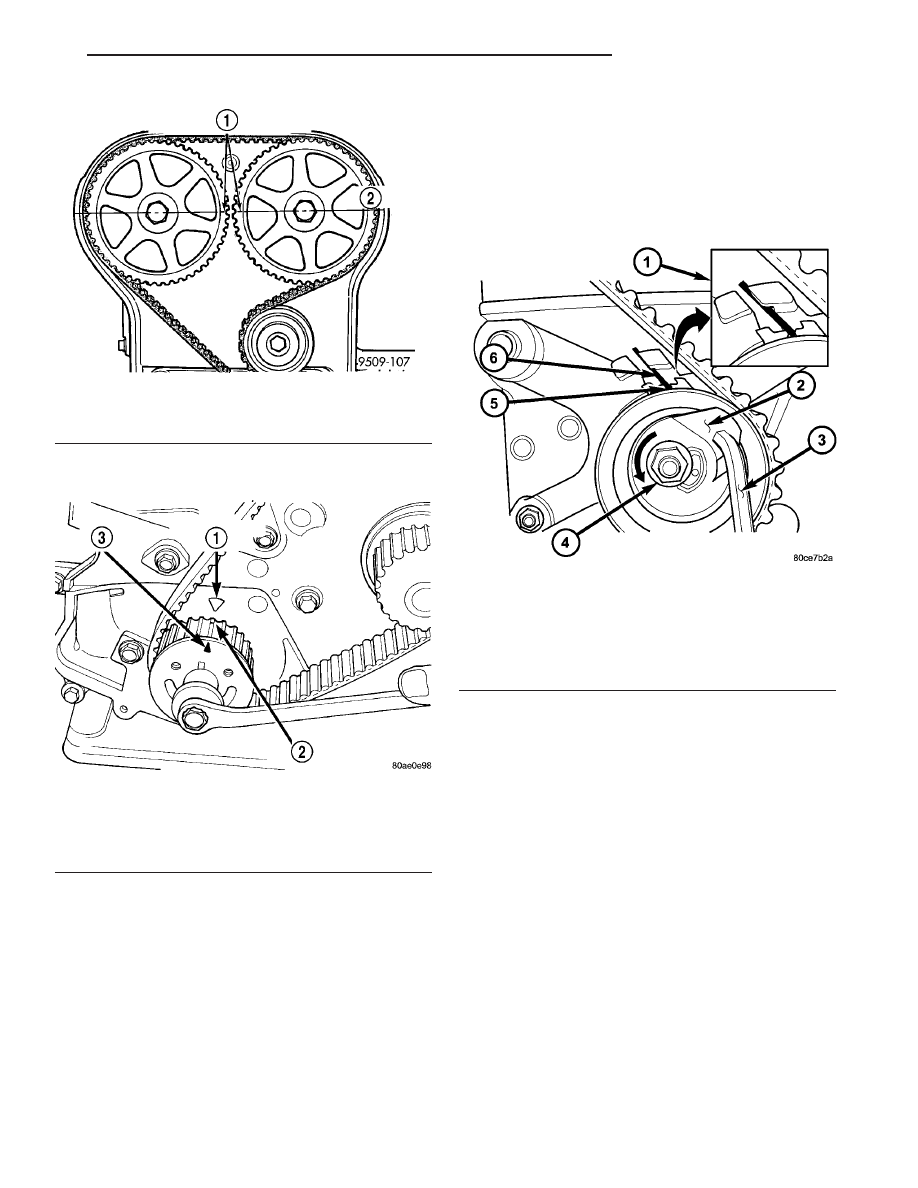
(3) Rotate crankshaft 1/2 tooth counterclockwise

from TDC (Fig. 119).

(4) Install the timing belt. Starting at the crank-

shaft, go around the water pump sprocket, idler pul-
ley, camshaft sprockets, and finally route the back
side of the timing belt around the timing belt ten-
sioner pulley.

(5) Move crankshaft sprocket to TDC to take up

belt slack.

(6) Insert a 6 mm Allen wrench into the hexagon

opening located on the top plate of the belt tensioner
pulley. Rotate the top plate COUNTERCLOCK-
WISE
. The tensioner pulley will move against the
belt and the tensioner setting notch will eventually
start to move clockwise. Watching the movement of

the setting notch, continue rotating the top plate
counterclockwise until the setting notch is aligned
with the spring tang (Fig. 120). Using the allen
wrench to prevent the top plate from moving, torque
the tensioner lock nut to 30 N·m (22 ft. lbs.). Setting
notch and spring tang should remain aligned after
lock nut is torqued.

(7) Remove allen wrench and torque wrench.

NOTE: Repositioning the crankshaft to the TDC
position must be done only during the CLOCKWISE
rotation movement. If TDC is missed, rotate a fur-
ther two revolutions until TDC is achieved. DO NOT
rotate crankshaft counterclockwise as this will
make verification of proper tensioner setting impos-
sible.

(8) Rotate the crankshaft CLOCKWISE two com-

plete revolutions manually for seating of the belt,
until the crankshaft is repositioned at the TDC posi-
tion. Verify that the camshaft and crankshaft timing
marks are in proper position.

(9) Check if the spring tang is within the tolerance

window (Fig. 121). If the spring tang is within the
tolerance window, the installation process is complete
and nothing further is required. If the spring tang is
not within the tolerance window, repeat Steps 6
through 8.

Fig. 118 Camshaft Timing Marks

1 - ALIGN CAMSHAFT SPROCKET TIMING MARKS TOGETHER
2 - CENTERLINE

Fig. 119 Adjusting Crankshaft Sprocket for Timing

Belt

1 - TDC REFERENCE MARK
2 - 1/2 NOTCH LOCATION
3 - TDC MARK

Fig. 120 Timing Belt Tension Adjustment

1 - ALIGN SETTING NOTCH WITH SPRING TANG
2 - TOP PLATE
3 - 6mm ALLEN WRENCH
4 - LOCK NUT
5 - SETTING NOTCH
6 - SPRING TANG

JR

ENGINE 2.0L DOHC

9 - 71

TIMING BELT AND SPROCKETS (Continued)

(10) Install the front timing belt cover (Fig. 110)

(Refer to 9 - ENGINE/VALVE TIMING/TIMING
BELT COVER(S) - INSTALLATION).

(11) Connect negative battery cable.

TIMING BELT TENSIONER &
PULLEY

REMOVAL

(1) Remove the timing belt (Refer to 9 - ENGINE/

VALVE TIMING/TIMING BELT AND SPROCKETS -
REMOVAL).

(2) Remove bolts attaching the timing belt ten-

sioner assembly to engine.

(3) Remove the timing belt tensioner assembly

(Fig. 122).

INSTALLATION

(1) Position timing belt tensioner assembly to the

engine. To ensure proper alignment of tensioner to
engine block, temporarily install the engine mount
bracket bolts into the upper holes of the timing belt
tensioner. Install timing belt tensioner lower mount-
ing bolts. Tighten lower mounting bolts to 31 N·m
(23 ft. lbs.). Remove temporarily installed engine
mount bracket bolts.

(2) Install the timing belt (Refer to 9 - ENGINE/

VALVE TIMING/TIMING BELT AND SPROCKETS -
INSTALLATION).

Fig. 121 Timing Belt Tension Verification

1 - SPRING TANG
2 - TOLERANCE WINDOW

Fig. 122 Timing Belt Tensioner Assembly

1 - SPRING TANG
2 - LOCK NUT
3 - TOP PLATE
4 - PULLEY
5 - SETTING NOTCH
6 - BRACKET

9 - 72

ENGINE 2.0L DOHC

JR

TIMING BELT AND SPROCKETS (Continued)

ENGINE 2.4L DOHC

TABLE OF CONTENTS

page

page

ENGINE 2.4L DOHC

DESCRIPTION

. . . . . . . . . . . . . . . . . . . . . . . . . 75

DIAGNOSIS AND TESTING

ENGINE DIAGNOSIS - INTRODUCTION

. . . . 75

ENGINE DIAGNOSIS - PERFORMANCE

. . . . 76

ENGINE DIAGNOSIS - MECHANICAL

. . . . . . 78

CYLINDER COMPRESSION PRESSURE

TEST . . . . . . . . . . . . . . . . . . . . . . . . . . . . . . . 80

CYLINDER COMBUSTION PRESSURE

LEAKAGE TEST . . . . . . . . . . . . . . . . . . . . . . 80

ENGINE OIL LEAK INSPECTION

. . . . . . . . . . 81

STANDARD PROCEDURE

REPAIR OF DAMAGED OR WORN

THREADS . . . . . . . . . . . . . . . . . . . . . . . . . . . 82

HYDROSTATIC LOCKED ENGINE

. . . . . . . . . 82

FORM-IN-PLACE GASKETS AND SEALERS

. 82

ENGINE GASKET SURFACE PREPARATION

. 83

MEASURING BEARING CLEARANCE USING

PLASTIGAGE . . . . . . . . . . . . . . . . . . . . . . . . 83

ENGINE CORE AND OIL GALLERY PLUGS

. . 84

REMOVAL - ENGINE ASSEMBLY

. . . . . . . . . . . 84

INSTALLATION - ENGINE ASSEMBLY

. . . . . . . . 85

SPECIFICATIONS

2.4L ENGINE

. . . . . . . . . . . . . . . . . . . . . . . . . 87

TORQUE

. . . . . . . . . . . . . . . . . . . . . . . . . . . . 91

SPECIAL TOOLS

2.4L ENGINE

. . . . . . . . . . . . . . . . . . . . . . . . . 92

AIR CLEANER ELEMENT

REMOVAL

. . . . . . . . . . . . . . . . . . . . . . . . . . . . . 96

INSTALLATION

. . . . . . . . . . . . . . . . . . . . . . . . . 96

AIR CLEANER HOUSING

REMOVAL

. . . . . . . . . . . . . . . . . . . . . . . . . . . . . 96

INSTALLATION

. . . . . . . . . . . . . . . . . . . . . . . . . 96

CYLINDER HEAD

DESCRIPTION

. . . . . . . . . . . . . . . . . . . . . . . . . 97

DIAGNOSIS AND TESTING

CYLINDER HEAD GASKET

. . . . . . . . . . . . . . 97

REMOVAL - CYLINDER HEAD

. . . . . . . . . . . . . 98

CLEANING

. . . . . . . . . . . . . . . . . . . . . . . . . . . . 98

INSPECTION

. . . . . . . . . . . . . . . . . . . . . . . . . . 99

INSTALLATION - CYLINDER HEAD

. . . . . . . . . . 99

CAMSHAFT OIL SEAL(S)

REMOVAL

. . . . . . . . . . . . . . . . . . . . . . . . . . . . 100

INSTALLATION

. . . . . . . . . . . . . . . . . . . . . . . . 100

CAMSHAFT(S)

DESCRIPTION

. . . . . . . . . . . . . . . . . . . . . . . . 101

OPERATION

. . . . . . . . . . . . . . . . . . . . . . . . . . 101

STANDARD PROCEDURE

MEASURING CAMSHAFT END PLAY

. . . . . 102

REMOVAL

. . . . . . . . . . . . . . . . . . . . . . . . . . . . 102

CLEANING

. . . . . . . . . . . . . . . . . . . . . . . . . . . 102

INSPECTION

. . . . . . . . . . . . . . . . . . . . . . . . . 102

INSTALLATION

. . . . . . . . . . . . . . . . . . . . . . . . 103

CYLINDER HEAD COVER

REMOVAL

. . . . . . . . . . . . . . . . . . . . . . . . . . . . 103

CLEANING

. . . . . . . . . . . . . . . . . . . . . . . . . . . 103

INSPECTION

. . . . . . . . . . . . . . . . . . . . . . . . . 103

INSTALLATION

. . . . . . . . . . . . . . . . . . . . . . . . 104

HYDRAULIC LASH ADJUSTERS

DIAGNOSIS AND TESTING

HYDRAULIC LASH ADJUSTER NOISE

DIAGNOSIS . . . . . . . . . . . . . . . . . . . . . . . . . 104

REMOVAL

. . . . . . . . . . . . . . . . . . . . . . . . . . . . 105

INSTALLATION

. . . . . . . . . . . . . . . . . . . . . . . . 105

INTAKE/EXHAUST VALVES & SEATS

DESCRIPTION

. . . . . . . . . . . . . . . . . . . . . . . . 105

OPERATION

. . . . . . . . . . . . . . . . . . . . . . . . . . 105

CLEANING

. . . . . . . . . . . . . . . . . . . . . . . . . . . 105

ROCKER ARMS

REMOVAL

. . . . . . . . . . . . . . . . . . . . . . . . . . . . 105

INSPECTION

. . . . . . . . . . . . . . . . . . . . . . . . . 105

INSTALLATION

. . . . . . . . . . . . . . . . . . . . . . . . 105

VALVE SPRINGS & SEALS

REMOVAL

REMOVAL - CYLINDER HEAD ON

. . . . . . . . 106

CYLINDER HEAD OFF

. . . . . . . . . . . . . . . . 106

INSPECTION

. . . . . . . . . . . . . . . . . . . . . . . . . 107

INSTALLATION

INSTALLATION - CYLINDER HEAD ON

. . . . 107

CYLINDER HEAD OFF

. . . . . . . . . . . . . . . . 107

ENGINE BLOCK

DESCRIPTION

. . . . . . . . . . . . . . . . . . . . . . . . 108

STANDARD PROCEDURE

CYLINDER BORE HONING

. . . . . . . . . . . . . 108

CLEANING

. . . . . . . . . . . . . . . . . . . . . . . . . . . 109

INSPECTION

. . . . . . . . . . . . . . . . . . . . . . . . . 109

CRANKSHAFT

STANDARD PROCEDURE

MEASURING CRANKSHAFT END PLAY

. . . 109

REMOVAL - CRANKSHAFT

. . . . . . . . . . . . . . . 110

INSPECTION

. . . . . . . . . . . . . . . . . . . . . . . . . . 111

INSTALLATION - CRANKSHAFT

. . . . . . . . . . . 111

CRANKSHAFT OIL SEAL - FRONT

REMOVAL

. . . . . . . . . . . . . . . . . . . . . . . . . . . . 113

INSTALLATION

. . . . . . . . . . . . . . . . . . . . . . . . 114

CRANKSHAFT OIL SEAL - REAR

REMOVAL

. . . . . . . . . . . . . . . . . . . . . . . . . . . . 114

INSTALLATION

. . . . . . . . . . . . . . . . . . . . . . . . 115

JR

ENGINE 2.4L DOHC

9 - 73

FLEX PLATE

REMOVAL

. . . . . . . . . . . . . . . . . . . . . . . . . . . . 116

INSTALLATION

. . . . . . . . . . . . . . . . . . . . . . . . 116

PISTON & CONNECTING ROD

DESCRIPTION

. . . . . . . . . . . . . . . . . . . . . . . . 116

STANDARD PROCEDURE - PISTON TO

CYLINDER BORE FITTING

. . . . . . . . . . . . . . 116

REMOVAL

. . . . . . . . . . . . . . . . . . . . . . . . . . . . 116

INSTALLATION

. . . . . . . . . . . . . . . . . . . . . . . . 117

CONNECTING ROD BEARINGS

STANDARD PROCEDURE

CONNECTING ROD - FITTING

. . . . . . . . . . 119

PISTON RINGS

STANDARD PROCEDURE

PISTON RING - FITTING

. . . . . . . . . . . . . . . 119

REMOVAL

. . . . . . . . . . . . . . . . . . . . . . . . . . . . 120

INSTALLATION

. . . . . . . . . . . . . . . . . . . . . . . . 120

VIBRATION DAMPER

REMOVAL

. . . . . . . . . . . . . . . . . . . . . . . . . . . . 121

INSTALLATION

. . . . . . . . . . . . . . . . . . . . . . . . 122

STRUCTURAL COLLAR

REMOVAL

. . . . . . . . . . . . . . . . . . . . . . . . . . . . 122

INSTALLATION

. . . . . . . . . . . . . . . . . . . . . . . . 122

ENGINE MOUNTING

ADJUSTMENTS

ENGINE SUPPORT ADJUSTMENT

. . . . . . . 123

LEFT MOUNT

REMOVAL

. . . . . . . . . . . . . . . . . . . . . . . . . . . . 123

INSTALLATION

. . . . . . . . . . . . . . . . . . . . . . . . 123

REAR MOUNT

REMOVAL

. . . . . . . . . . . . . . . . . . . . . . . . . . . . 124

INSTALLATION

. . . . . . . . . . . . . . . . . . . . . . . . 124

RIGHT MOUNT

REMOVAL

. . . . . . . . . . . . . . . . . . . . . . . . . . . . 124

INSTALLATION

. . . . . . . . . . . . . . . . . . . . . . . . 124

FRONT MOUNT

REMOVAL

. . . . . . . . . . . . . . . . . . . . . . . . . . . . 125

INSTALLATION

. . . . . . . . . . . . . . . . . . . . . . . . 125

LUBRICATION

DESCRIPTION

. . . . . . . . . . . . . . . . . . . . . . . . 126

OPERATION

. . . . . . . . . . . . . . . . . . . . . . . . . . 127

DIAGNOSIS AND TESTING

CHECKING ENGINE OIL PRESSURE

. . . . . 127

OIL

STANDARD PROCEDURE

ENGINE OIL LEVEL CHECK

. . . . . . . . . . . . 127

STANDARD PROCEDURE - ENGINE OIL

AND FILTER CHANGE . . . . . . . . . . . . . . . . . 127

OIL FILTER

DESCRIPTION

. . . . . . . . . . . . . . . . . . . . . . . . 129

REMOVAL

. . . . . . . . . . . . . . . . . . . . . . . . . . . . 129

INSTALLATION

. . . . . . . . . . . . . . . . . . . . . . . . 129

OIL PAN

REMOVAL

. . . . . . . . . . . . . . . . . . . . . . . . . . . . 129

INSTALLATION

. . . . . . . . . . . . . . . . . . . . . . . . 130

OIL PRESSURE SENSOR/SWITCH

REMOVAL

. . . . . . . . . . . . . . . . . . . . . . . . . . . . 131

INSTALLATION

. . . . . . . . . . . . . . . . . . . . . . . . 131

OIL PUMP

REMOVAL

. . . . . . . . . . . . . . . . . . . . . . . . . . . . 131

DISASSEMBLY

. . . . . . . . . . . . . . . . . . . . . . . . 131

CLEANING

. . . . . . . . . . . . . . . . . . . . . . . . . . . 131

INSPECTION

. . . . . . . . . . . . . . . . . . . . . . . . . 133

ASSEMBLY

. . . . . . . . . . . . . . . . . . . . . . . . . . . 133

INSTALLATION

. . . . . . . . . . . . . . . . . . . . . . . . 134

INTAKE MANIFOLD

DIAGNOSIS AND TESTING

INTAKE MANIFOLD LEAKS

. . . . . . . . . . . . . 135

REMOVAL

. . . . . . . . . . . . . . . . . . . . . . . . . . . . 135

CLEANING

. . . . . . . . . . . . . . . . . . . . . . . . . . . 136

INSPECTION

. . . . . . . . . . . . . . . . . . . . . . . . . 136

INSTALLATION

. . . . . . . . . . . . . . . . . . . . . . . . 136

EXHAUST MANIFOLD

REMOVAL

. . . . . . . . . . . . . . . . . . . . . . . . . . . . 137

CLEANING

. . . . . . . . . . . . . . . . . . . . . . . . . . . 137

INSPECTION

. . . . . . . . . . . . . . . . . . . . . . . . . 138

INSTALLATION

. . . . . . . . . . . . . . . . . . . . . . . . 138

TIMING BELT COVER(S)

REMOVAL

. . . . . . . . . . . . . . . . . . . . . . . . . . . . 138

INSTALLATION

. . . . . . . . . . . . . . . . . . . . . . . . 140

TIMING BELT AND SPROCKET(S)

REMOVAL

REMOVAL - TIMING BELT

. . . . . . . . . . . . . . 140

REMOVAL - CAMSHAFT SPROCKETS

. . . . 140

REMOVAL - CRANKSHAFT SPROCKET

. . . 140

CLEANING

. . . . . . . . . . . . . . . . . . . . . . . . . . . 141

INSTALLATION

INSTALLATION - CRANKSHAFT

SPROCKET . . . . . . . . . . . . . . . . . . . . . . . . . 142

INSTALLATION - CAMSHAFT SPROCKETS

. 142

INSTALLATION - TIMING BELT

. . . . . . . . . . 142

TIMING BELT TENSIONER & PULLEY

REMOVAL

. . . . . . . . . . . . . . . . . . . . . . . . . . . . 144

INSTALLATION

. . . . . . . . . . . . . . . . . . . . . . . . 144

BALANCE SHAFTS AND CARRIER ASSEMBLY

DESCRIPTION

. . . . . . . . . . . . . . . . . . . . . . . . 146

OPERATION

. . . . . . . . . . . . . . . . . . . . . . . . . . 146

REMOVAL

. . . . . . . . . . . . . . . . . . . . . . . . . . . . 146

INSTALLATION

. . . . . . . . . . . . . . . . . . . . . . . . 148

9 - 74

ENGINE 2.4L DOHC

JR


Content   ..  490  491  492  493   ..