Chrysler Le Baron, Dodge Dynasty, Plymouth Acclaim. Manual - part 169


  Index      Chrysler     Chrysler Le Baron, Dodge Dynasty, Plymouth Acclaim - service repair manual 1993 year


Search            


Content   ..  167  168  169  170   ..


Chrysler Le Baron, Dodge Dynasty, Plymouth Acclaim. Manual - part 169


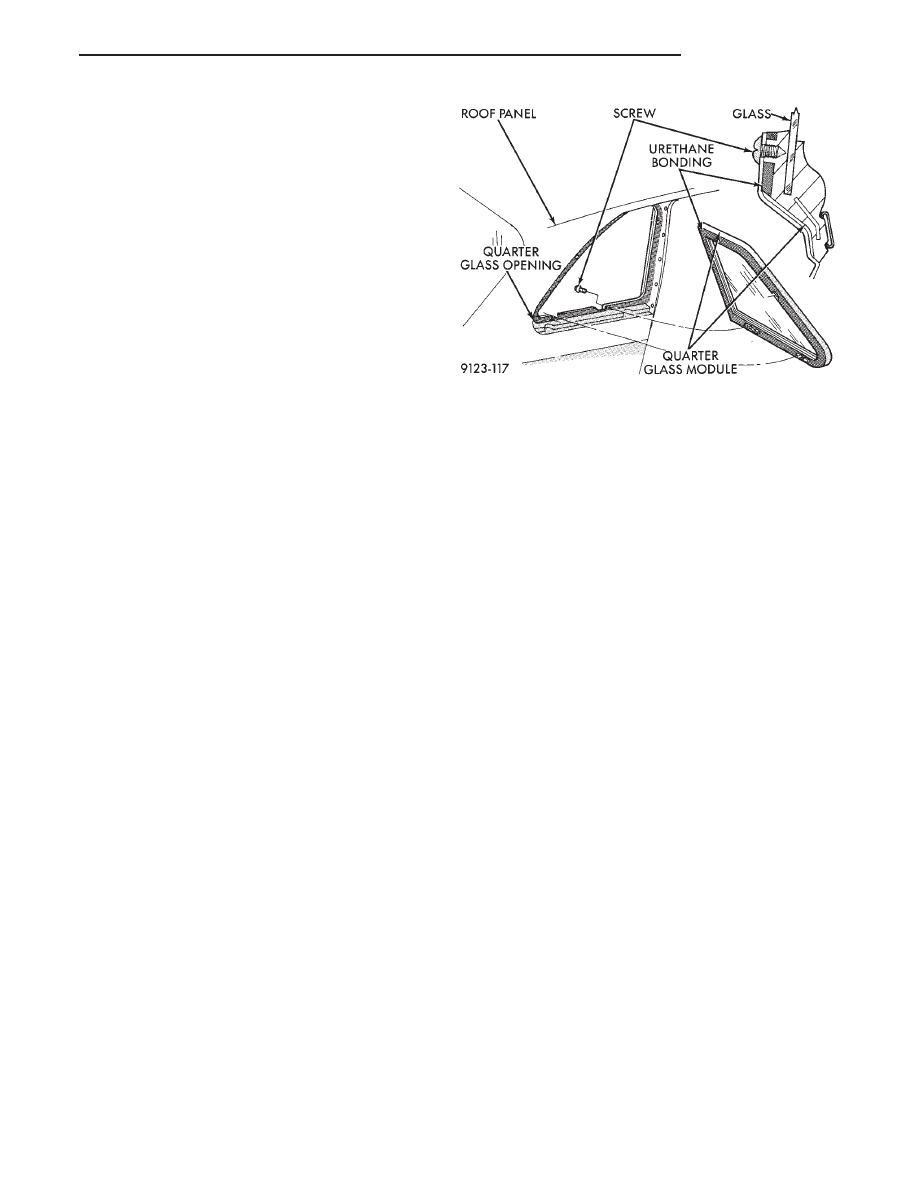
QUARTER GLASS MODULE

REMOVAL (FIG. 29)

(1) Remove quarter trim panel as necessary.
(2) Remove screws holding quarter glass module to

quarter glass opening.

(3) Cut urethane from around perimeter of quarter

glass opening with a suitable cold knife.

(4) Push quarter glass module out of quarter glass

opening.

INSTALLATION

(1) Clean cured urethane from quarter glass open-

ing fence.

(2) Prepare quarter glass opening fence and glass

module using the same procedure described in the
Windshield section of this group.

(3) Insert quarter glass module into quarter glass

opening and push inward.

(4) Install screws holding module to quarter panel.
(5) Install quarter trim panel.

Fig. 29 Quarter Glass Module

Ä

AJ-BODY

23 - 85

AJ/27-VEHICLE CONVERTIBLE BODY COMPONENT SERVICE

INDEX

page

page

Adjustment Procedures

. . . . . . . . . . . . . . . . . . . . 92

Folding Top Cover

. . . . . . . . . . . . . . . . . . . . . . . 90

Folding Top Headlining

. . . . . . . . . . . . . . . . . . . . 87

Folding Top Storage Sling Well

. . . . . . . . . . . . . . 87

Hydraulic Cylinder

. . . . . . . . . . . . . . . . . . . . . . . . 95

Hydraulic Cylinder Line Seals

. . . . . . . . . . . . . . . 95

Hydraulic Pump Assembly

. . . . . . . . . . . . . . . . . . 95

Hydraulic Pump Line Seals

. . . . . . . . . . . . . . . . . 95

Hydraulic System Tests

. . . . . . . . . . . . . . . . . . . . 95

Hydraulic Systems

. . . . . . . . . . . . . . . . . . . . . . . . 95

Quarter Window

. . . . . . . . . . . . . . . . . . . . . . . . . 87

Rear Seat Back

. . . . . . . . . . . . . . . . . . . . . . . . . . 86

Rear Seat Belt Retractors

. . . . . . . . . . . . . . . . . . 86

Rear Seat Cushion

. . . . . . . . . . . . . . . . . . . . . . . 86

Rear Window and Zipper

. . . . . . . . . . . . . . . . . . . 88

Rear Window—Without Zipper

. . . . . . . . . . . . . . . 88

REAR SEAT CUSHION

REMOVAL (FIG. 1)

(1) Using a large flat blade screw driver, pry up-

ward at the retainer loop at each end of the seat
cushion.

(2) Disengage retainer loops from retainer cups in

floor pan.

(3) Separate seat cushion from vehicle.

INSTALLATION

Reverse the preceding operation.

REAR SEAT BACK

REMOVAL (FIG. 1)

(1) Remove rear seat cushion.
(2) Remove bolts holding rear seat back to floor

pan kick-up.

(3) Push seat back downward and disengage hook

retainers at top of back frame.

(4) Separate seat back from vehicle.

INSTALLATION

Reverse the preceding operation.

REAR SEAT BELT RETRACTORS

REMOVAL (FIG. 2)

(1) Remove rear seat cushion and back.
(2) Remove bolt holding shoulder belt turning loop

to seat back reinforcement panel.

(3) Remove bolts holding rear seat belt retractor to

floor kick-up.

(4) Remove bolts holding retractor to quarter panel

reinforcement.

(5) Remove bolts holding lap belt to lower quarter

panel reinforcement.

(6) Separate seat belt retractor from vehicle.

INSTALLATION

Reverse the preceding operation.

Fig. 1 Rear Seat Cushion

Fig. 2 Rear Seat Belts

23 - 86

AJ/27-BODY

Ä

QUARTER WINDOW

REMOVAL

(1) Disengage snaps holding sling well to rear deck

panel.

(2) From each side of vehicle, Disengage clips hold-

ing sling well to belt reinforcement brace. Drape
sling well over rear seat back into passenger com-
partment.

(3) Remove screw holding quarter trim panel and

door weatherstrip to door opening.

(4) Remove the cowl trim and scuff plate covers.
(5) Remove the rear seat cushion.
(6) Disconnect rear speaker wire connectors.
(7) Remove screws holding seat back to floor

brackets and rear shoulder belt retractors (Fig. 1).
Separate rear seat back from vehicle.

(8) Remove screws holding quarter trim to quarter

panel at the boot latches.

(9) Remove screws holding quarter trim to floor

pan kick up.

(10) Separate quarter trim from rear reinforce-

ment. Position trim panel out of quarter window re-
moval path (Fig. 3).

(11) Raise quarter window approximately 100 mm

(4 in.) from the down position.

(12) Remove bolt holding glass stabilizer bumper

to top of quarter panel opening.

(13) Disconnect power window motor wire connec-

tor.

(14) Remove bolts holding quarter window assem-

bly to quarter panel and lift the assembly through
the opening at the top of the quarter panel.

INSTALLATION

Reverse the preceding operation. Align the quarter

glass to have adequate pressure on the weatherstrips
for proper sealing. Insert sling well drain tubes into
the holes in the floor pan.

FOLDING TOP STORAGE SLING WELL

REMOVAL (FIG. 4)

(1) Disengage snaps holding sling well to rear deck

inner panel.

(2) Disengage snaps holding sling well to quarter

inner panels.

(3) Disengage snaps holding sling well to back of

quarter trim panels.

(4) Remove bolts upper seat back support bar to

quarter trim panels.

(5) Separate support bar from vehicle.
(6) Disconnect drain tubes from bottom of sling

well.

(7) Pull sling well from the end of the support bar

retainer channel.

INSTALLATION

Reverse the preceding operation.

FOLDING TOP HEADLINING

REMOVAL (FIG. 5)

(1) Disengage snaps and hook and loop fasteners

holding headlining to quarter inner panels.

(2) Disengage hook and loop fasteners holding

headlining to roof rails and top header.

(3) Disengage clips holding headlining to roof rail

rearward of quarter glass opening.

(4) Remove screws holding headlining to third roof

bow.

(5) Remove screws holding headlining to second

roof bow.

(6) Remove screws holding headlining to first roof

bow.

(7) Remove

screws

holding

headlining

to

top

header.

(8) Separate headlining from vehicle.

INSTALLATION

Reverse the preceding operation.

Fig. 3 Quarter Trim Panel

Fig. 4 Folding Top Storage Sling Well

Ä

AJ/27-BODY

23 - 87

REAR WINDOW—WITHOUT ZIPPER

If the rear window zipper is damaged, perform

Rear Window and Zipper replacement procedures.

REMOVAL

(1) Release folding top latches and allow top cover

to relax.

(2) Disengage hook and loop fasteners holding

headlining to quarter panel areas.

(3) Pull headlining forward from behind quarter

trim panels and tape headlining around roof rails,
out of the way.

(4) Disengage snaps holding folding top storage

sling well to inner quarter and deck panels.

(5) Position sling well out of the way.
(6) Disengage wire connectors from terminals on

heated rear window.

(7) Pull wire harnesses from pockets at each side

of rear window.

(8) Remove bolts holding rear tack strip to inner

deck panel (Fig. 6).

(9) Separate rear tack strip from deck panel.
(10) Position rear tack strip to gain access to sta-

ples holding material to tack strip.

(11) Using a grease pencil, mark location of outer

top cover on rear tack strip to aid installation.

(12) Remove staples holding top cover to rear tack

strip (Fig. 7).

(13) Unzip rear window from upper zipper listing.
(14) Separate window and rear tack strip from ve-

hicle.

(15) Place rear window on a suitable work surface.
(16) Using a grease pencil, mark location of rear

window apron on rear tack strip to aid installation.

(17) Remove staples holding rear window lower

apron to tack strip.

(18) Separate rear window from tack strip.

INSTALLATION

(1) Using old rear window as a pattern, mark new

window to the same size and shape as the old win-
dow.

(2) Trim excess material from new window.
(3) Position window at index marks on rear tack

strip.

(4) Install staples to hold window apron to tack

strip (Fig. 7).

(5) Trim excess material from around bolt holes in

tack strip.

(6) Position rear window and tack strip in opening

behind rear seat.

(7) Position top cover at index marks on rear tack

strip.

(8) Install staples to hold top cover to rear tack

strip.

(9) Zip rear window to upper zipper listing.
(10) Place rear tack strip in proper position under

deck panel (Fig. 6).

(11) Install bolts to hold rear tack strip to deck

panel.

(12) Latch top header to windshield header and in-

spect top cover for excess wrinkling. If wrinkling is
apparent, the top cover and rear window apron must
be repositioned on the tack strips.

(13) Route wire harnesses through pockets at each

side of window and connect ends to terminals on
glass.

(14) Install sling well and rear section of headlin-

ing.

REAR WINDOW AND ZIPPER

If the window zipper is not damaged and an origi-

nal equipment rear window is being installed, use
Rear Window Glass—Without Zipper replacement
procedures.

REMOVAL

(1) Release folding top latches and allow top cover

to relax.

(2) Disengage hook and loop fasteners holding

headlining to quarter panel areas.

(3) Pull headlining forward from behind quarter

trim panels and tape headlining around roof rails,
out of the way.

(4) Disengage snaps holding folding top storage

sling well to inner quarter and deck panels.

Fig. 5 Folding Top Headlining

23 - 88

AJ/27-BODY

Ä


Content   ..  167  168  169  170   ..