Bobcat S150. Manual - part 20


  Index      Bobcat     Bobcat S150 Skid Steer Loader - service manual 2005 year


Search            


Content   ..  18  19  20  21   ..


Bobcat S150. Manual - part 20


S150 Bobcat Loader

65

Operation & Maintenance Manual

AIR CLEANER SERVICE (CONT’D)

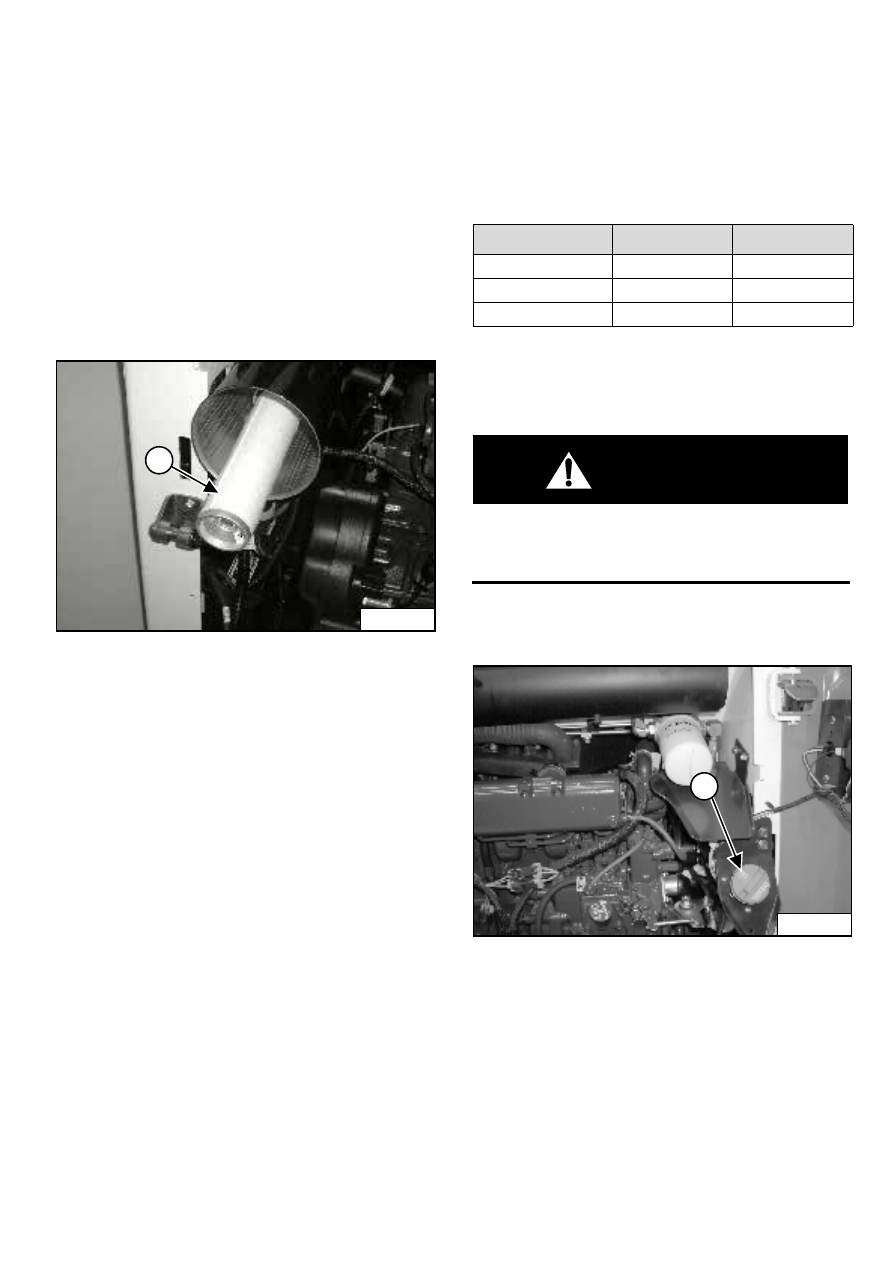
Replacing Filter Elements (Cont’d)

Inner Filter

Only replace the inner filter element under the following
conditions:

Replace the inner filter element every third time the
outer filter is replaced.

After the outer element has been replaced, start the
engine and run at full RPM. If the HOURMETER /
CODE DISPLAY shows [01-17] (Air Filter Plugged),
replace the inner filter element.

Figure 128

Remove the inner filter element (1) [Figure 128].

NOTE: Make sure all sealing surfaces are free of dirt

and debris.

Install the new inner element [Figure 128].

Install the outer element and install the dust cover and
the wing nut.

FUEL SYSTEM

Fuel Specifications

Use only clean, high quality diesel fuel, Grade No. 2 or
Grade No. 1.

The following is one suggested blending guideline which
should prevent fuel gelling during cold temperatures:

Contact your fuel supplier for local recommendations.

Filling The Fuel Tank

WARNING

Stop and cool the engine before adding fuel.
NO SMOKING! Failure to obey warnings can cause
an explosion or fire.

W-2063-0887

Open the rear door.

Figure 129

Remove the fill cap (1) [Figure 129].

Use a clean, approved safety container to add fuel of the
correct specification. Add fuel only in an area that has
free movement of air and no open flames or sparks
NO SMOKING.

Install and tighten the fuel cap (1) [Figure 129].

P-31838

1

TEMP C (F)

No. 2

No. 1

-9° (15°)

100%

0%

Down to -29° (-20°)

50%

50%

Below -29° (-20°)

0%

100%

P-48470

1

S150 Bobcat Loader
Operation & Maintenance Manual

66

FUEL SYSTEM (CONT’D)

Fuel Filter

For the service interval for removing water from, or
replacing the fuel filter (See SERVICE SCHEDULE on
Page 53).

Figure 130

Loosen the drain (1) [Figure 130] at the bottom of the
filter element to remove water from the filter.

Remove the filter element (2) [Figure 130].

Clean the area around the filter housing. Put clean oil on
the seal of the new filter element. Install the fuel filter, and
hand tighten.

Remove air from the fuel system. (See Removing Air
From The Fuel System on Page 66.)

WARNING

Always clean up spilled fuel or oil. Keep heat, flames,
sparks or lighted tobacco away from fuel and oil.
Failure to use care around combustibles can cause
explosion or fire which can result in injury or death.

W-2103-1285

Removing Air From The Fuel System

After replacing the filter element or when the fuel tank
has run out of fuel, the air must be removed from the fuel
system before starting the engine.

WARNING

Diesel fuel or hydraulic fluid under pressure can
penetrate skin or eyes, causing serious injury or
death. Fluid leaks under pressure may not be visible.
Use a piece of cardboard or wood to find leaks. Do
not use your bare hand. Wear safety goggles. If fluid
enters skin or eyes, get immediate medical attention
from a physician familiar with this injury.

W-2072-0496

Figure 131

Open the vent (1[Figure 131] on the fuel filter housing.

Squeeze the hand pump (priming bulb) (2) [Figure 131]
until fuel flows from the vent with no air bubbles.

Close the vent (1[Figure 131].

It may be necessary to open the vent (3) [Figure 131]
briefly while engine is running. Close the vent when the
engine runs smoothly.

P-48388

1

2

P-48389

1

2

3

S150 Bobcat Loader

67

Operation & Maintenance Manual

ENGINE LUBRICATION SYSTEM

Checking Engine Oil

Check the engine oil level every day before starting the
engine for the work shift.

Figure 132

Open the rear door and remove the dipstick (1)
[Figure 132].

Keep the oil level between the marks on the dipstick.

Replacing The Oil And Filter

For the service interval for replacing the engine oil and
filter (See SERVICE SCHEDULE on Page 53).

Run the engine until it is at operating temperature. Stop
the engine.

Figure 133

Open the rear door and remove the drain hose from its
storage position (1) [Figure 133].

Remove the drain plug (2) [Figure 133] and drain the oil
into a container and recycle or dispose of used oil in an
environmentally safe manner.

Reinstall the drain plug.

Remove the oil filter (2) [Figure 132] and clean the filter
housing surface.

Use genuine Bobcat filter only.

Put oil on the new filter gasket, install the filter and hand
tighten.

Remove the fill cap (3) [Figure 132].

Figure 134.

Use good quality motor oil that meets API Service
Classification of CD or better (See Oil Chart,
[Figure 134]).

Put oil in the engine (See Fluid Capacities on Page 103).
For the correct quantity and install the fill cap.

Start the engine and let it run for several minutes. Stop
the engine and check for leaks at the filter.

Remove the dipstick (1) [Figure 132] and check the oil
level.

Add oil as needed if it is not at the top mark on the
dipstick.

Install the dipstick and close the rear door.

WARNING

Always clean up spilled fuel or oil. Keep heat, flames,
sparks or lighted tobacco away from fuel and oil.
Failure to use care around combustibles can cause
explosion or fire which can result in injury or death.

W-2103-1285

P-48392A

P-48390

1

2

3

P-48391

2

P-24679

1

S150 Bobcat Loader
Operation & Maintenance Manual

68

ENGINE COOLING SYSTEM

Cleaning The Cooling System

WARNING

Wear safety glasses to prevent eye injury when any
of the following conditions exist:

When fluids are under pressure.

Flying debris or loose material is present.

Engine is running.

Tools are being used.

W-2019-1285

Check the cooling system every day to prevent
over-heating, loss of performance or engine damage.

Remove the rear grill. (See REAR GRILL on Page 63.)

Figure 135

Use low air pressure or water pressure to clean the top of
the oil cooler (1) [Figure 135].

Raise the oil cooler and use low air pressure or water
pressure to clean the top of the radiator (2[Figure 135].

Lower the oil cooler.

Check the cooling system for leaks.

Install the rear grill. (See REAR GRILL on Page 63.)

Checking Coolant Level And Adding Coolant

Open the rear door.

NOTE: The machine uses a pressurized coolant

recovery system.

Figure 136

Check the coolant level on the side of the recovery
tank (1)  [Figure 136]. The level must be between the
MIN and MAX marks.

Remove the cover (2) [Figure 136] from the coolant
recovery tank.

Add premixed coolant to the recovery tank and install the
cover.

IMPORTANT

AVOID ENGINE DAMAGE

Always use the correct ratio of water to antifreeze.

To much antifreeze reduces cooling system
efficiency and may cause serious premature engine
damage.

Too little antifreeze reduces the additives which
protect the internal engine components; reduces the
boiling point and freeze protection of the system.

Always add a premixed solution. Adding full strength
concentrated coolant can cause serious premature
engine damage.

I-2124-0497

P-45101

1

2

P-45245

P-45246

1

2


Content   ..  18  19  20  21   ..