Acura TL (1995-1998) body repair. Manual - part 12


  Index      Acura     Acura TL (1995-1998) body repair manual


Search            


Content   ..  10  11  12  13   ..


Acura TL (1995-1998) body repair. Manual - part 12


Replacement

1. Remove the related parts:

• Hood
• Front fender
• Front door
• Windshield

• Front side trim
• Door opening trim
• Side cowl lining
• Dashboard
• Front pillar trim

• Wire harness, etc.

• Steering column
• Steering hanger pipe

NOTE: Make sure that the right and left pillars are
parallel with the windshield surface. Check the door for
proper opening and closing.

2. Pull out and straighten the damaged area.

• Pull out the damaged area with the frame straight-

ener before cutting off the front pillar extension and
front pillar.

NOTE: Pull out until the pillar is lined up with the

surface of the windshield.

• With the pillar pulled out, pull out and straighten the

related lower dashboard and floor section.

• After pulling, check the inner pillar position using the

body dimensional drawings (see 

section 6

).

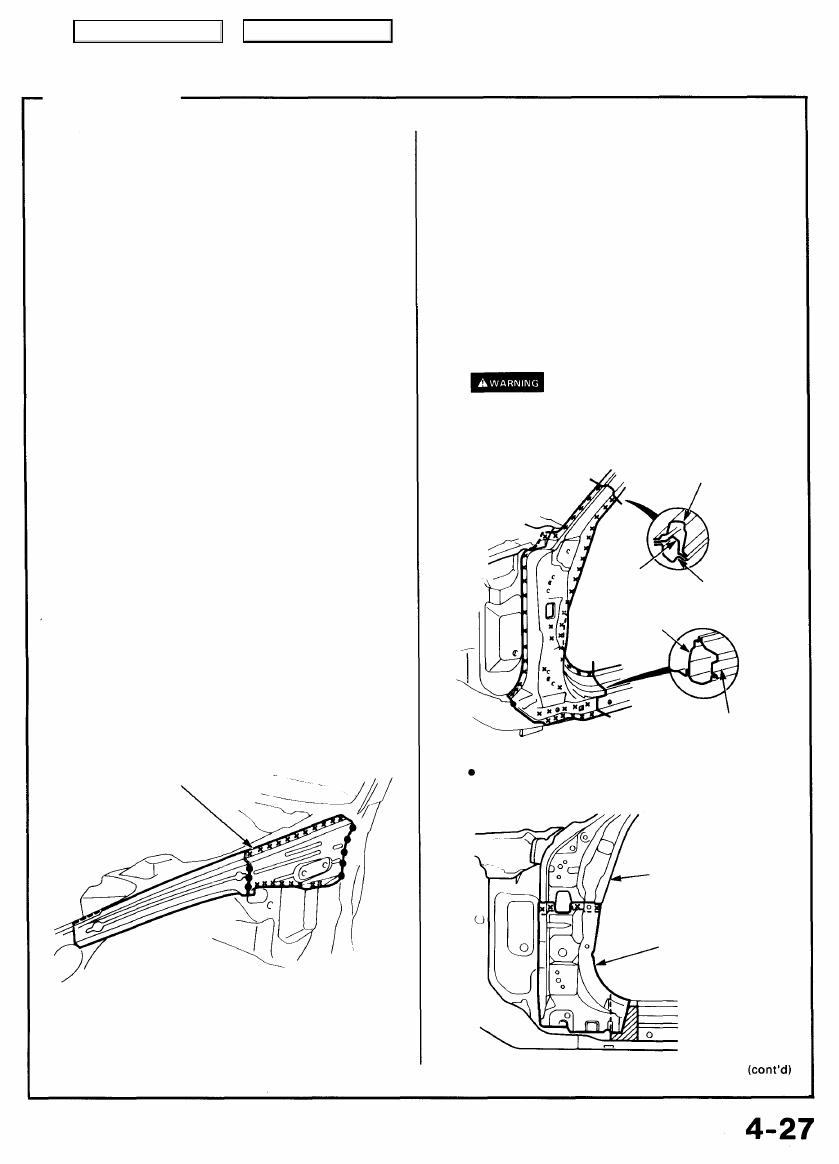
3. Remove the wheelhouse upper rear member.

WHEELHOUSE

UPPER REAR MEMBER

4. Cut off the front pillar.

• Cut off the front pillar along the bold line shown in

the figure to the right with a gas cutter.

• Use a handsaw to cut the windshield and side sill

areas.

NOTE: Be careful not to cut the inner section.

• Center punch around the spot weld imprints.
• Drill holes using a spot cutter.
• Chisel off the weld flanges.
• Finish the burrs at the drilled areas with a disc

sander.

To prevent eye injury, wear goggles

or safety glasses whenever sanding, cutting or
grinding.

OUTER
PANEL

INNER
UPPER

OUTER PANEL

Repair the front pillar lower stiffener if necessary.

FRONT INNER UPPER
PILLAR

FRONT PILLAR LOWER
STIFFENER

UPPER
STIFFENER

INSIDE SILL

Main Menu

Table of Contents

Front Pillar (Outer Panel)

Replacement (cont'd)

5. Mold the related parts.

Fill any holes by MIG or gas welding, and even out with a
hammer and dolly.

To prevent eye injury and burns

when welding, wear an approved welding helmet,
gloves and safety shoes.

6. Set the repair part

• Align the repair part with the top cut section, then

cut it with a handsaw.

NOTE: Cut the side sill joint with a handsaw leaving an
overlap of 30 mm (1.2 in).

• Remove the undercoat from both sides of the areas

to be spot welded with a sander to expose the steel

plate.

NOTE: Apply the spot sealer to the welding surface

when spot welding.

• Clamp with vise-grips as shown.
• Check the body dimensions (see 

section 6

).

REPAIR PART

FRONT PILLAR
LOWER STIFFENER

7. Tack welds the clamped sections.

To prevent eye injury and burns

when welding, wear an approved welding helmet,
gloves and safety shoes.

8. Temporarily mount the door and front fender.

• Remove the vise-grips, then mount the door.
• Check the clearance and level differences of the

door and fender.

9. Perform main welding.

• Weld the front pillar and side sill outer joints with a

MIG welder.

• Make 20% to 30% more spot welds than there were

holes drilled.

To prevent eye injury and burns

when welding, wear an approved welding helmet,

gloves and safety shoes.

• Make 5 mm (0.2 in) holes in the MIG weld holes

with the repair part, and weld the lower stiffener
extension, lower stiffener and dashboard upper side

member with a MIG welder.

• Weld the wheelhouse upper rear member.

WHEELHOUSE

UPPER REAR MEMBER

Main Menu

Table of Contents

10. Finish the welding areas.

• Finish grind the finishing allowance with a disc

sander until it is smooth.

To prevent eye injury, wear goggles

or safety glasses whenever sanding, cutting or
grinding.

• Smooth the flanged section of the door opening

with a hammer and dolly.

11. Apply the sealer (see 

section 5

).

12. Apply the paint.

See Paint Repair section.

• Ventilate when spraying paint. Most paint

contains substances that are harmful if inhaled
or swallowed. Read the paint label before
opening the paint container.

• Avoid contact with skin. Wear an approved

respirator, gloves, eye protection and appropriate
clothing when painting.

• Paint is flammable. Store it in a safe place, and

keep it away from sparks, flames or cigarettes.

13. Apply anti-rust agent to the inside of the front pillar,

wheelhouse upper member and side sill (see 

section 7

).

14. Install the related parts.

• Install in the reverse order of removal.

• Check the door for proper installation and level

difference from the fenders.

15. Clean and check.

• After installing the dashboard, check the lights and

gauges for proper operation.

• Clean the passenger compartment and check for

water leaks.

Main Menu

Table of Contents

Windshield Lower

Description

Impact damage to the windshield lower area may spread to

the back of the panel and wiper mounting area, calling for

replacement of the affected skins.

Mass Production Body Welding Diagram

Main Menu

Table of Contents


Content   ..  10  11  12  13   ..