Acura RL. Manual - part 433


  Index      Acura     Acura RL - service repair manual 2005-2008 year


Search            


Content   ..  431  432  433  434   ..


Acura RL. Manual - part 433


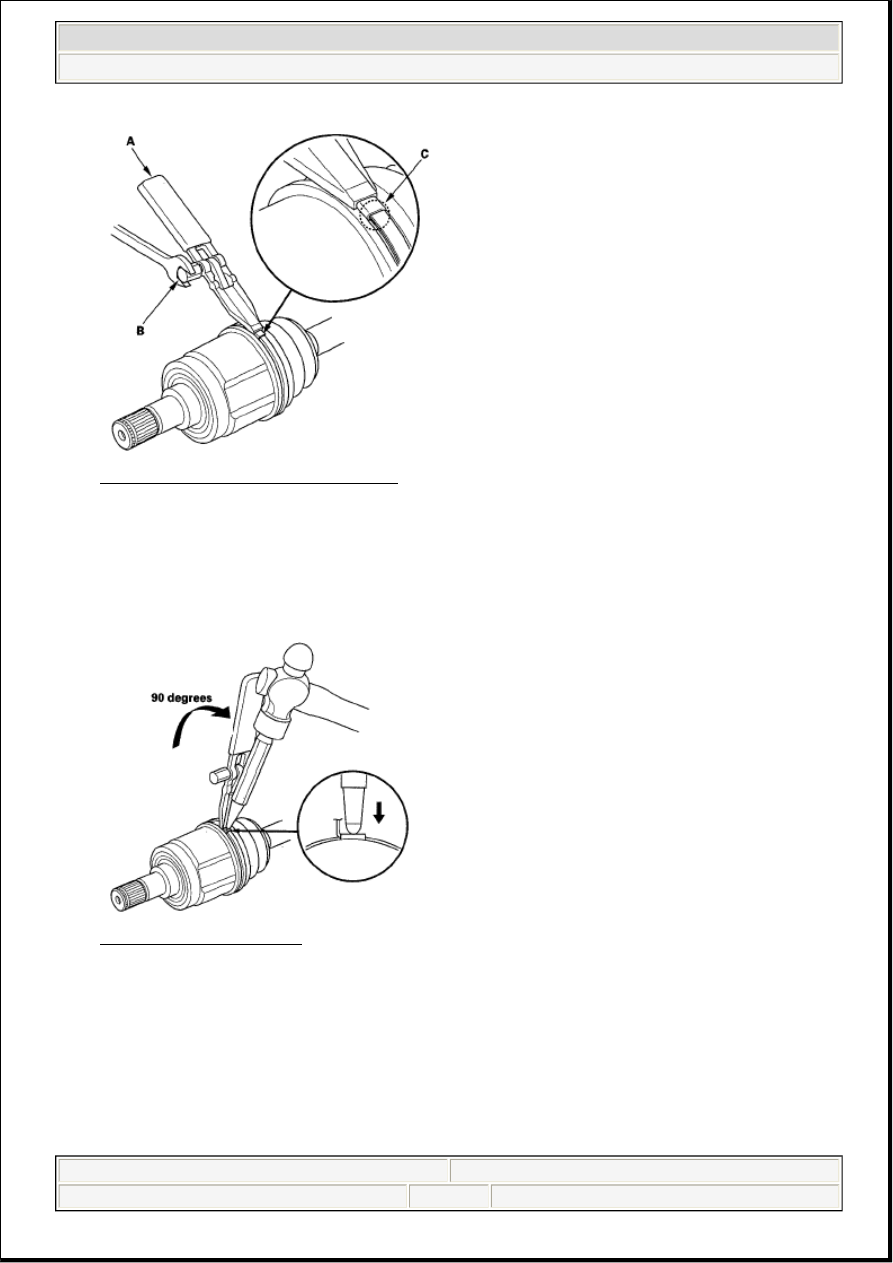
Fig. 37: Tightening Band Marked Spot 
Courtesy of AMERICAN HONDA MOTOR CO., INC. 

13. Using a wrench on the winding mandrel of the boot band tool, tighten the band until the marked spot 

(C) on the band meets the edge of the clip.  

14. Lift up the boot band tool to bend the free end of the band 90 degrees to the clip. Center-punch the 

clip, then fold over the remaining tail onto the clip. 

Fig. 38: Lifting Boot Band 
Courtesy of AMERICAN HONDA MOTOR CO., INC. 

15. Unwind the boot band tool, and cut off the excess free end of the band to leave a 5-10 mm (0.2-0.4 

in.) tail protruding from the clip. 


2007 Acura RL 

2005-08 DRIVELINE/AXLES Driveline/Axle - RL


me 


Friday, June 05, 2009 3:01:08 PM

Page 18 

© 2005 Mitchell Repair Information Company, LLC. 

Fig. 39: Identifying Boot Band Gap 
Courtesy of AMERICAN HONDA MOTOR CO., INC. 

16. Bend the band end (A) by tapping it down with a hammer. 

17. Repeat steps 9 through 16 for the band on the other end of the boot, then go to step 18.  

18. Install the new set ring. 

NOTE:

Make sure the band and clip do not interfere with anything on the 
vehicle and the band does not move.  

Remove any grease remaining on the surrounding surfaces. 

Fig. 40: Tapping Boot Bend 
Courtesy of AMERICAN HONDA MOTOR CO., INC. 


2007 Acura RL 

2005-08 DRIVELINE/AXLES Driveline/Axle - RL


me 


Friday, June 05, 2009 3:01:08 PM

Page 19 

© 2005 Mitchell Repair Information Company, LLC. 

Fig. 41: Identifying Set Ring 
Courtesy of AMERICAN HONDA MOTOR CO., INC. 

OUTBOARD JOINT SIDE 

1. Wrap the splines with vinyl tape (A) to prevent damage to the outboard boot. 

Fig. 42: Wrapping Drieshaft Splines With Vinyl Tape 
Courtesy of AMERICAN HONDA MOTOR CO., INC. 

2. Install the new ear clamp bands (B) and outboard boot, then remove the vinyl tape. Be careful not to 

damage the outboard boot.  

3. Install the new stop ring in the driveshaft groove (A). 

Fig. 43: Identifying Stop Ring In Driveshaft Groove 
Courtesy of AMERICAN HONDA MOTOR CO., INC.


2007 Acura RL 

2005-08 DRIVELINE/AXLES Driveline/Axle - RL


me 


Friday, June 05, 2009 3:01:08 PM

Page 20 

© 2005 Mitchell Repair Information Company, LLC. 

4. Pack about half of the grease included in the new joint boot set into the driveshaft hole in the outboard 

joint. Insert the driveshaft (A) into the outboard joint (B) until the stop ring (C) is close to the joint. 

Fig. 44: Inserting Driveshaft Into Outboard Joint 
Courtesy of AMERICAN HONDA MOTOR CO., INC. 

5. To completely seat the outboard joint, pick up the driveshaft and joint, and tap or hit them from a 

height of about 10 cm (4 in.) onto a hard surface. Do not use a hammer as excessive force may 
damage the driveshaft. Be careful not to damage the threaded section (A) of the outboard joint. 

Fig. 45: Seating Outboard Joint To Driveshaft (Do Not Use Excessive Force) 
Courtesy of AMERICAN HONDA MOTOR CO., INC. 

6. Check the alignment of the paint mark (A) with the outboard joint end (B). 


2007 Acura RL 

2005-08 DRIVELINE/AXLES Driveline/Axle - RL


me 


Friday, June 05, 2009 3:01:08 PM

Page 21 

© 2005 Mitchell Repair Information Company, LLC. 


Content   ..  431  432  433  434   ..