Volvo C70 Convertible (2010 year). Instruction - part 4
 

  Index      Volvo     Volvo C70 Convertible - instruction 2010 year in english


Search            


Content   ..  2  3  4  5   ..


Volvo C70 Convertible (2010 year). Instruction - part 4


02 Instruments and controls

12-volt sockets 

02

58

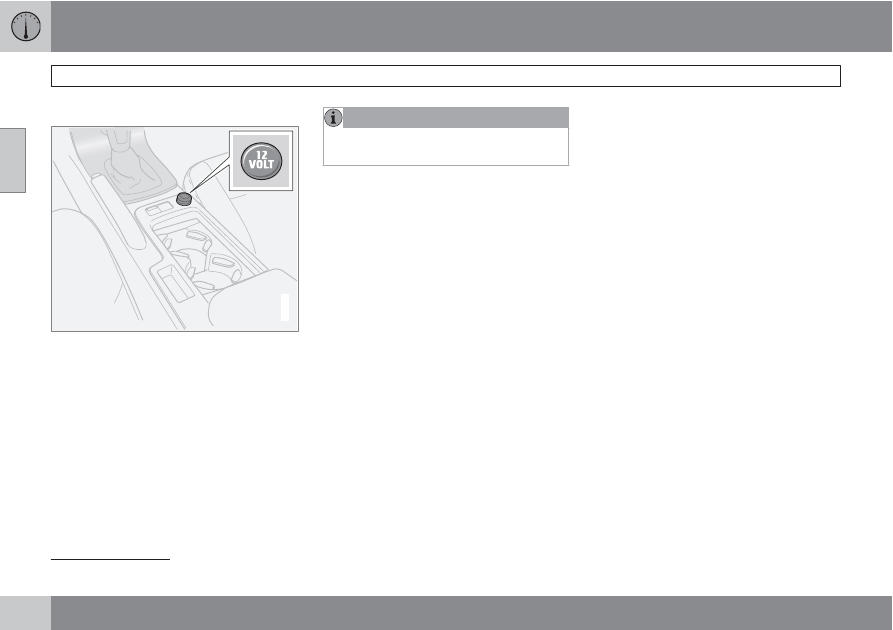
12-volt socket (front seat)

G026349

12-volt socket, auxiliary equipment

The 12-volt socket can be used to plug in cer-
tain accessories such as cellular telephones,
etc. The maximum current is 10 A. The key
must be in position I (or higher) for the auxiliary
socket to function.

Ashtrays/cigarette lighter

The auxiliary socket can also be used for a cig-
arette lighter

1

, and ashtrays, which can be pur-

chased from your Volvo retailer.

NOTE

The cover should be kept on when the aux-
iliary socket is not in use.

1

Accessory.

02 Instruments and controls

 Lighting panel

02

``

*


Option/accessory, for more information, see Introduction.

59

Parking lights

G026415

Light switch

Thumb wheel for adjusting brightness of
instrument lighting

Daytime running lights

To unlock the fuel filler door

Rear fog light

Pos.

Lighting

All lighting off. Low beam head-
lights (daytime running lights)
will automatically come on if the
ignition key is in position II.
Front and rear parking lights
and license plate lights will also
be on. High beams can be
briefly flashed. The headlights
switch off automatically when
the ignition key is removed.

Parking lights

Daytime running lights. High
beams and high beam flash can
be used in this position.

The front and rear parking lights can be turned
on even when the ignition is switched off.


Turn switch (1) to the parking light position.

The license plate lights also illuminate when the
parking lights are switched on.

Headlights

1.

Turn the ignition key to position II.

2.

The low beam headlights (daytime running
lights) illuminate automatically, except
when the light switch (1) is in the parking
light position

1

.

NOTE

See page 61 for information on switching
between high and low beams.

Brake lights

The brake lights come on automatically when
the brakes are applied.

Fog lights

Front fog lights*

The front fog lights can be used in combination
with either the headlights or the parking lights.

1.

Turn the ignition key to position II.

2.

Press button (3) to turn on the front fog
lights.

An indicator light in the button illuminates when
the front fog lights are on.

1

On Canadian models, the daytime running lights will remain on with the light switch in this position.

02 Instruments and controls

Lighting panel 

02

60

Rear fog light

The single rear fog light is located in the driver's
side taillight cluster.

The rear fog light will only function in combi-
nation with the high/low beam headlights or the
optional front fog lights.

1.

Turn the ignition key to position II.

2.

Press button (5) to turn on the rear fog light.

An indicator light in the button illuminates when
the rear fog light is on.

NOTE

The rear fog light is considerably brighter
than the normal taillights and should be
used only when conditions such as fog, rain,
snow, smoke or dust reduce visibility for
other vehicles to less than 500 ft.
(150 meters).

Instrument panel lighting

The instrument panel lighting illuminates when
the ignition is in position II and the light

switch (1) is in either position 

 or 

.

NOTE

To make it easier to read the odometer, trip
odometer, clock, and ambient temperature,
these gauges illuminate when the vehicle is
unlocked and when the key has been
removed from the ignition switch. The light-
ing will go out when the vehicle is locked.

Move the thumb wheel (2) up to increase
brightness or down to decrease brightness.

Unlocking the fuel filler door

With the ignition switched off, press button (4)
to unlock the fuel filler door. Please note that
the fuel filler door will remain unlocked until the
car begins to move forward.

An audible click will be heard when the fuel filler
door re-locks.

Manually unlocking the fuel filler door

G020951

If it should be necessary to manually unlock the
fuel filler door from the trunk, the power retract-
able hard top should be up.

1.

Remove the panel covering the taillight
housing on the right side of the trunk.

2.

Pull the cord that is attached to a hook to
pop open the fuel filler door.

When the fuel filler door has opened, return the
cord to the hook and replace the taillight cover
panel.

02 Instruments and controls

 Left-side steering wheel lever

02

``

61

Lever positions

G026954

Turn signals, lane change position

Turn signals, position for normal turns

High beam flash

Toggle between high and low beams,
Home Safe lighting

Turn signals

When turning


Move the lever as far up or down as pos-
sible (to position 2) to start the turn signals.

The turn signals will be cancelled automatically
by the movement of the steering wheel, or the
lever can be returned to its initial position by
hand.

When changing lanes

The driver can automatically flash the turn sig-
nals 3 times by:

Moving the turn signal lever up or down to
position 1 and releasing it.

Moving the lever up or down to position 2
and immediately back to its original posi-
tion.

NOTE

This automatic flashing sequence can
be interrupted by immediately moving
the lever in the opposite direction.

If the turn signal indicator flashes faster
than normal, check for a burned-out
turn signal bulb.

High/low beam headlights

Continuous high beams

1.

Turn the ignition key to position II.

2.

With the light switch (1) in position 

 ,

see page 59, pull the turn signal lever
toward the steering wheel (position 4) to
toggle between high and low beams.

High beam flash

1.

Turn the ignition key to position II.

2.

Pull the turn signal lever to position 3. The
high beams will remain on until the lever is
released.

Home safe lighting

When you leave your car at night, you can
make use of the home safe lighting function to
illuminate the area in front of the car.

1.

Remove the key from the ignition switch.

2.

Pull the direction indicator lever as far as
possible towards the steering wheel (to
position 4) and release it.

3.

Exit the car and lock the doors.

The headlights and parking lights will illuminate
and remain on for 30

1

, 60 or 90 seconds. The

time interval can be changed according to your

1

Factory setting.

02 Instruments and controls

Left-side steering wheel lever 

02

62

preferences by using the Personal Settings
function, see page 75 for more information.

02 Instruments and controls

 Trip computer

02

``

63

G029052

READ (press to acknowledge/confirm/
erase a message)

Thumb wheel (used to scroll among the trip
computer menus)

RESET

The trip computer stores information gathered
from several systems in your car and has four
menus (five on Canadian models) that can be
shown in the information display.

MILES TO EMPTY TANK

AVERAGE

 (average fuel consumption)

INSTANTANEOUS

 (current fuel con-

sumption)

AVERAGE SPEED

ACTUAL SPEED

 (current speed in mph,

Canadian models only)

DSTC

, see page 152

NOTE

Warning messages from the car's monitor-
ing systems will override the trip computer
function.

If a warning message is shown in the informa-
tion display while you are using the trip com-
puter:

1.

Acknowledge the message by pressing the
READ (button 1).

2.

Press READ again to return to the trip
computer function.

Controls

The trip computer functions can be accessed
by twisting the thumb wheel (2) one step at a
time in either direction. Twisting a final time
returns you to the original function.

Resetting

AVERAGE

 (average fuel consumption) and

AVERAGE SPEED

 can be reset.

1.

Select one of these functions.

2.

Press RESET (3).

MILES TO EMPTY TANK

This function shows the approximate distance
that can be driven on the fuel remaining in the
tank. The calculation is based on average fuel
consumption during the last 20 miles (30 km)
of driving and the amount of fuel remaining in
the tank when the reading was taken.

When the message 

---- miles to empty tank

appears in the display, refuel as soon as pos-
sible.

AVERAGE

This value indicates fuel consumption since the
last time the trip computer was reset, by press-
ing RESET (button 3). When the engine is
switched off, information on fuel consumption
is stored and remains in system memory until
RESET (button 3) is pressed again.

INSTANTANEOUS

This value indicates the current fuel consump-
tion, based on readings taken once per sec-
ond. When the car is not moving, "

----

" will be

displayed.

AVERAGE SPEED

This value indicates average speed since the
last time the trip computer was reset, by press-
ing RESET (button 3). When the engine is
switched off, information on average speed is
stored and remains in system memory until the
RESET (button 3) is pressed again.

02 Instruments and controls

Trip computer 

02

64

ACTUAL SPEED (Canadian models only)

This function provides the driver with an instan-
taneous conversion of the car's current speed
from km/h to mph.

NOTE

Trip computer readings may vary slightly
depending on the circumference of the tires
on the car, tire inflation, or driving style.

02 Instruments and controls

 Cruise control*

02

``

*


Option/accessory, for more information, see Introduction.

65

Engaging the cruise control function

G020141

The cruise control buttons are located on the
left side of the steering wheel hub.

NOTE

This does not set the vehicle's speed.

1.

Press the CRUISE button. 

CRUISE

 will

appear in the function display in the center
of the instrument panel.

2.

Press + or  to set the current speed.

CRUISE ON

 will be displayed.

Increasing or decreasing speed

G031667

Use + or  in the following ways to increase or
decrease the vehicle's speed:

1.

Press and hold down + or  until the vehicle
reaches the desired speed. This will
become the set speed when the button is
released.

2.

Press + or  for approximately a half sec-
ond and release the button to increase or
decrease vehicle speed by approximately
1 mph (1.6 km/h).

NOTE

Cruise control will not function at
speeds below 20 mph (30 km/h).

Momentary acceleration, for less than
1 minute (e.g. when passing another
car), does not affect cruise control oper-
ation. The car will automatically return
to the previously set speed when the
accelerator pedal is released.

Temporarily disengaging the cruise
control

Press 0 to temporarily disengage cruise
control.

CRUISE

 will appear in the function display.

The currently set speed is stored in the sys-
tem's memory.

Cruise control is also automatically
disengaged:

If the speed drops below approximately
20 mph (30 km/h) when driving uphill.

When the brake or clutch pedal is
depressed.

If the gear selector is moved to posi-
tion N.

02 Instruments and controls

Cruise control* 

02

66

*


Option/accessory, for more information, see Introduction.

During wheel spin or wheel lock-up.

If the vehicle's speed is increased by using
the accelerator pedal for more than
1 minute.

Returning to the set speed

Press the button to resume the
previously set speed. 

CRUISE

ON

 will be displayed.

Disengaging cruise control

Cruise control can also be disengaged by:

Pressing the 

CRUISE

 button (

CRUISE

ON

 will no longer be shown in the function

display).

Putting the gear selector in Neutral (N).

WARNING

Cruise control should not be used in heavy
traffic or when driving on wet or slippery
roads. Cruise control may not maintain set
speed on steep downgrades.

02 Instruments and controls

 Right-side steering wheel lever

02

``

67

Windshield wipers

0

0

A

C

B

G025419

Windshield/headlight washers

Rain sensor – on/of, see page 67

Thumb wheel

Windshield wipers off

The windshield wipers are off when
the lever is in position 0.

Manual wiper function

From position 0, move the lever
upward. The windshield wipers will
sweep one stroke at a time for as
long as the lever is held up.

Intermittent wiper function

With the lever in this position, you
can set the wiper interval by mov-
ing the thumb wheel (C) upward to
increase wiper speed or down-
ward to decrease the speed.

Continuous wiper function

The wipers operate at "normal"
speed.

High speed wiper function.

 – Windshield washers

Pull the lever toward the steering wheel and
release it. The wipers will make 2–3 sweeps
across the windshield after the lever has been
released.

CAUTION

Use ample washer fluid when washing
the windshield. The windshield should
be thoroughly wet when the wipers are
in operation.

Before using the wipers, ice and snow
should be removed from the wind-
shield/rear window. Be sure the wiper
blades are not frozen in place.

Headlight washers (certain models)

When the lever has been pulled, high pressure
jets mounted in the bumper will spray the head-
lights.

The following applies to conserve washer fluid,
see page 59 for information on the light switch
positions:

Low/high beam headlights on

The headlights will be washed the first time the
windshield is washed. Thereafter, the head-
lights will only be washed once for every five
times the windshield is washed within a
10 minute period.

Parking lights on

Optional Dual Xenon headlights will be washed
once for every five times the windshield is
washed.

Normal halogen headlights will not be washed.

02 Instruments and controls

Right-side steering wheel lever 

02

68

*


Option/accessory, for more information, see Introduction.

 – Rain sensor*

G031469

The rain sensor regulates windshield wiper
speed according to the amount of water on the
windshield. The sensitivity of the rain sensor is
adjusted by moving the thumb wheel (C in the
illustration on the previous page) up (the wipers
will sweep the windshield more frequently) or
down (the wipers will sweep the windshield
less frequently).

On/Off

Activating the rain sensor

1.

Switch on the ignition.

2.

Put the windshield wiper lever in posi-
tion 0.

3.

Press button B (see page 67). The rain sen-
sor symbol will appear in the lower display.

Manual deactivation

The rain sensor can be deactivated by:

Pressing button (B).

or

Moving the windshield wiper lever down.

NOTE

The rain sensor function will remain acti-
vated if the lever is briefly moved up to acti-
vate the "manual sweep" function.

CAUTION

The rain sensor should be deactivated when
washing the car in an automatic car wash,
etc. If the rain sensor function is left on, the
wipers will start inadvertently in the car
wash and could be damaged.

Automatic deactivation

The rain sensor is deactivated automatically in
the following situations:

When the key is removed from the ignition.

Five minutes after the ignition is switched
off if the key is left in the ignition.

 – Thumb wheel

The thumb wheel is used to set the wiper inter-
val when intermittent wiping is selected, or the
sensitivity to the amount of rain on the wind-
shield when the rain sensor is selected. Move
the wheel upward or downward to increase/
decrease wiper speed when the intermittent
function is selected, or to increase/decrease
the optional rain sensor's sensitivity when the
this function is activated.

02 Instruments and controls

 Steering wheel adjustment, Hazard warning flashers

02

69

Steering wheel adjustment

G027308

Both the height and the reach of the steering
wheel can be adjusted to a comfortable posi-
tion for the driver.

1.

Pull down the lever on the steering column
to release the steering wheel.

2.

Adjust the steering wheel to a suitable
position.

3.

Press the lever back into place to lock the
steering wheel in the new position. If nec-
essary, press the steering wheel slightly
while pressing the lever into the locked
position.

Check that the steering wheel is locked in the
new position.

WARNING

Never adjust the steering wheel while driv-
ing.

Hazard warning flashers

G020144

The four-way flasher should be used to indi-
cate that the vehicle has become a traffic haz-
ard.

1.

Press the triangular button in the center
dash.

2.

Press the button again to turn off the flash-
ers.

NOTE

Regulations regarding the use of the
hazard warning flasher may vary,
depending on where you live.

The hazard warning flashers will be acti-
vated automatically if an airbag
deploys.

02 Instruments and controls

Parking brake 

02

70

Parking brake (hand brake)

G026348

The parking brake lever is located between the
front seats.

NOTE

The indicator light will illuminate even if the
parking brake has only been partially
applied.

When applying the parking brake

1.

Press firmly on the brake pedal.

2.

Pull the parking brake lever up firmly to its
full extent.

3.

Release the brake pedal and ensure that
the vehicle is at a standstill.

4.

If the vehicle rolls, the parking brake lever
must be pulled more firmly.

5.

When parking a vehicle always put the gear
selector in first gear (for manual transmis-
sion) or P (for automatic transmission).

Parking on a hill

If the vehicle is pointing uphill, turn the front
wheels so that they point away from the
curb.

If the vehicle is pointing downhill, turn the
front wheels so that they point toward the
curb.

Releasing the parking brake

1.

Press firmly on the brake pedal.

2.

Pull the lever up slightly, press the button
at the end of the lever and lower the lever
completely.

WARNING

Pull up the parking brake lever up firmly to
its full extent.

02 Instruments and controls

 Power windows

02

71

Operation

G032090

Control panel in driver's door

Open/close front windows

Open/close rear windows

The power windows are controlled by buttons
in the arm rests.

The ignition must be ON (ignition key in
position III or the engine running) for the
power windows to function.

The power windows will also function after
the ignition has been switched off as long
as neither of the front doors has been
opened.

Opening a window

Lightly press down the front edge of any of the
buttons (A or B) to the first detent ("stop") to
open a window to the position of your choice.

WARNING

Always remove the ignition key when
the vehicle is unattended.

Never leave children unattended in the
vehicle.

Make sure that the windows are com-
pletely unobstructed before they are
operated.

1.

Press down the front part of one or both
buttons A as far as possible and release to
automatically open the front window(s)
completely.

2.

To stop the window at any time, pull the
button up.

NOTE

To reduce buffeting wind noise if the rear
windows are opened, also open the front
windows slightly.

Closing a window

1.

Lightly pull up the front edge of any of the
buttons (A or B) to the first detent ("stop")

to close a window to the position of your
choice.

2.

Pull up the front part of one or both buttons
(A) as far as possible and release to auto-
matically close the front window(s) com-
pletely.

Power window control – front
passenger's side

G01951

1

The control for the power window in the front
passenger's door operates that window only.

02 Instruments and controls

Mirrors 

02

72

*


Option/accessory, for more information, see Introduction.

Rearview mirror

G008130

Auto-dim function

An integrated sensor reacts to headlights from
following traffic and automatically reduces
glare.

Rearview mirror with compass*

G020991

The upper right-hand corner of the rearview
mirror has an integrated display that shows the
compass direction toward which the car is
pointing. Eight different directions can be dis-
played: 

N

NE

E

SE

S

SW

W

 and 

NW

. The

display shows your car's orientation with
respect to true north.

Calibrating the compass

G020992

The earth is divided into 15 magnetic zones.
The compass is initially set for the zone to
which the car was delivered, and should
always be adjusted if the car is driven to a new
magnetic zone. A "

C

" will be displayed if cali-

bration becomes necessary.

To calibrate the compass:

1.

Stop the car in a large, open area, away
from traffic.

2.

Using a pen or similar object, hold the but-
ton (1) depressed for at least 6 sec-
onds. "

C

" will be displayed.

02 Instruments and controls

 Mirrors

02

``

*


Option/accessory, for more information, see Introduction.

73

G026409

Magnetic zones

3.

Press button (1) for at least 3 seconds to
display the number of the current magnetic
zone.

4.

Press button (1) repeatedly until the num-
ber for the required geographical area (

1

15

) is displayed. "

C

" will be displayed

again.

5.

Drive slowly in a circle at a maximum speed
of 6 mph (10 km/h) until a compass direc-
tion is displayed.

Calibration is complete.

Power door mirrors

G0321

10

The mirror control switches are located on the
driver's door armrest.

Adjusting the mirrors

WARNING

The mirrors should always be adjusted
prior to driving.

Objects seen in the passenger's side
wide-angle door mirror are closer than
they appear to be.

Driver's door mirror:


Press the L button (a light in the switch will
go on) to activate the adjustment control.

Use this control to adjust the driver's door
mirror.

Passenger's door mirror:

1.

Press the R switch (a light in the switch will
go on) to activate the adjustment control.
Use this control to adjust the passenger's
door mirror.

2.

After you have adjusted the mirror(s), press
the L or R switch again (the LED will go out)
to deactivate the adjustment control.

Storing the mirrors' position

The position of the door mirrors is stored when
the vehicle is locked. The next time the driver's
door is unlocked with the same remote key and
that door is opened within 2 minutes, the
optional power driver's seat and side door mir-
rors will automatically move to the position that
they were in when the doors were most
recently locked with the same remote key.

Folding power door mirrors*

The mirrors can be folded in for parking/driving
in narrow spaces.

Folding the mirrors in

1.

Press down the L and R mirror control but-
tons on the driver's door at the same time.

2.

Release them after approximately one sec-
ond. The mirrors automatically fold in to the
fully retracted position.


Content   ..  2  3  4  5   ..