Volvo V90 (2019 year). Instruction - part 37
MAINTENANCE AND SERVICE
}}
* Option/accessory.
619
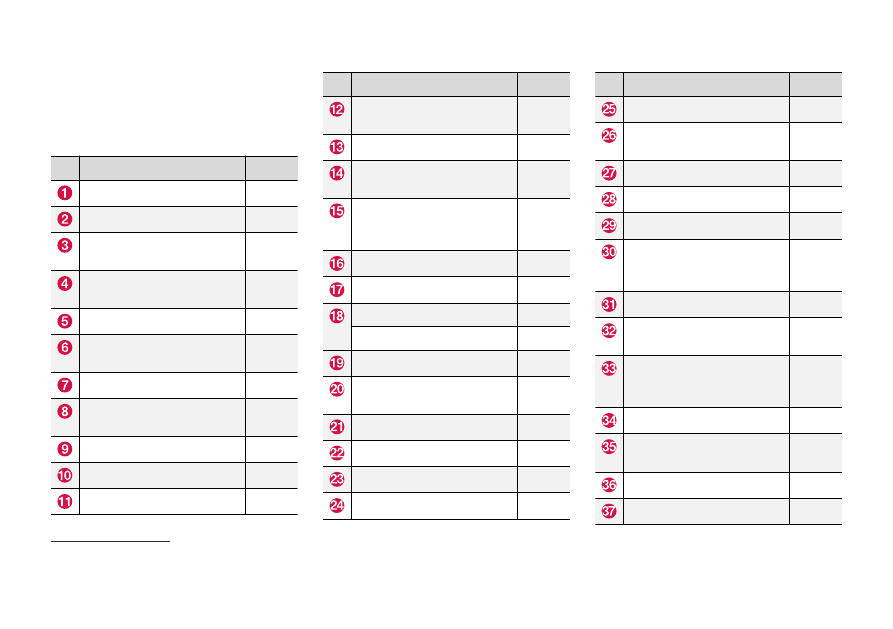
Positions
•
Fuses 13-17 and 21-36 are "Micro" fuses.
•
Fuses 1-12, 18-20 and 37 are "MCase"
fuses and should only be replaced by a work-
shop
22
.
Function
Ampere
Heated rear window
30
–
–
Pneumatic suspension* com-
pressor
40
Lock motor for rear seat back-
rest, right side
15
–
Lock motor for rear seat back-
rest, left side
–
–
Control module for reduction
of nitrous oxides (diesel)
30
Power tailgate*
25
Power front passenger seat*
20
Towbar* control module
40
Function
Ampere
Seat belt tensioner module
(right side)
40
Internal relay windings
5
Control module for reduction
of nitrous oxides (diesel)
15
Foot movement detection
module for opening the power
tailgate*
5
USB hub/accessory port
–
–
–
Towbar* control module
25
Accessory module
40
Power driver seat*
20
Seat belt tensioner module
(left side)
40
Park Assist Camera*
5
–
–
–
–
–
–
Function
Ampere
–
–
Control module for airbags
and seat belt tensioners
5
–
–
Heated rear seat (left side)*
15
–
–
Blind Spot Information
(BLIS)*; Exterior reverse signal
control module
5
–
–
Modules for seat belt tension-
ers
5
Emissions system actuator
(gasoline, certain engine vari-
ants)
5
–
–
All Wheel Drive (AWD) control
module*
15
Heated rear seat (right side)*
15
–
–
22
An authorized Volvo workshop is recommended.