Volvo V60 Cross Country (2018 year). Instruction - part 7


  Index      Volvo     Volvo V60 Cross Country - instruction 2018 year in english


Search            


Content   ..  5  6  7  8   ..


Volvo V60 Cross Country (2018 year). Instruction - part 7


||

INSTRUMENTS AND CONTROLS

* Option/accessory.

110

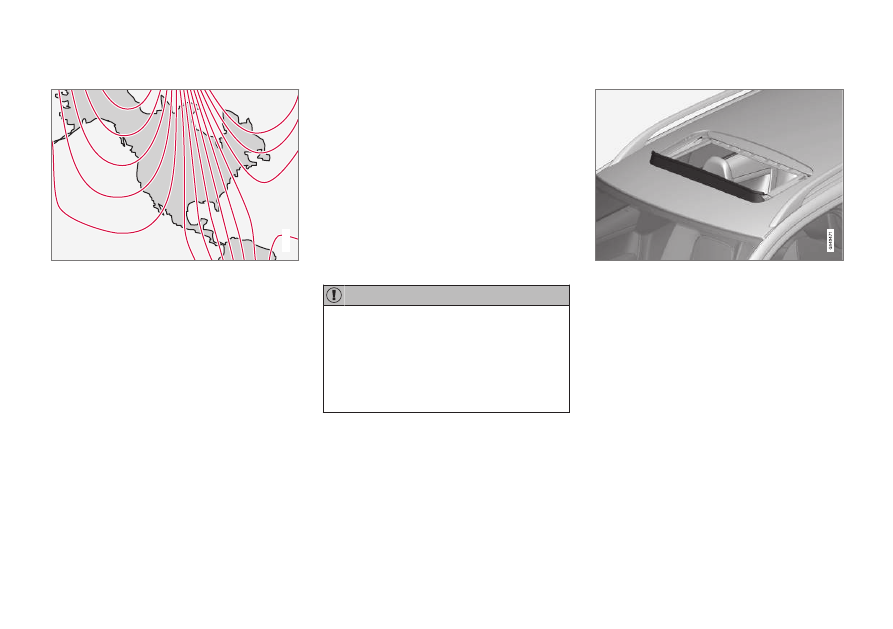
Selecting a magnetic zone

15

14

13

12

11

9

8

7

6

5

4

3

2

1

10

G018632

Magnetic zones.

The earth is divided into 15 magnetic zones. The
correct zone must be selected for the compass
to work correctly.

1. Put the ignition in mode II.

2. Using a pen or similar object, press and hold

the button on the rear side of mirror for at
least 3 seconds. The number for the current
area will be shown.

3. Press the button repeatedly until the number

for the required geographic area (1 – 15) is
shown.

4. The display will revert to showing the com-

pass direction after several seconds.

Power moonroof* – introduction

The moonroof controls are located in the ceiling
console near the rearview mirror.

The moonroof's sun visor opens automatically
but has to be closed manually.

There is a wind blocker in the moonroof's front
edge.

The moonroof controls are located in the ceiling
console near the rearview mirror. The moonroof
can be opened vertically and horizontally. The
vehicle's ignition must be in mode I or II for the
moonroof to be operated.

CAUTION

Remove ice and snow before opening the
moonroof.

Do not operate the moonroof if it is fro-
zen closed.

Never place heavy objects on the moon-
roof.

Visor

The moonroof features a sliding visor. The visor
slides open automatically when the moonroof is
opened, and must be closed manually.

Wind blocker

The moonroof is equipped with a wind blocker
that folds up when the moonroof is open.

INSTRUMENTS AND CONTROLS

}}

* Option/accessory.

111

Power moonroof* – operation

The moonroof controls are located in the ceiling
console near the rearview mirror.

The moonroof's sun visor opens automatically
but has to be closed manually.

There is a wind blocker in the moonroof's front
edge.

Sliding moonroof

G017823

Sliding moonroof, forward/rearward

Opening, automatic

Opening, manual

Closing, manual

Closing, automatic

Automatic opening

Pull the switch as far back as possible (to
the position for automatic opening) and
release it to open the moon roof to a position
that helps reduce wind noise while driving.
Pull the switch again to slide open the moon-
roof completely.

Manual opening

Pull the switch back to the first stop (the
position for manual opening) and hold it until
the moonroof has opened to the position of
your choice.

Manual closing

Push the switch forward to the first stop (the
position for manual closing) and hold it until
the moonroof has closed to the position of
your choice, or has closed completely.

Automatic closing

Push the switch as far forward as possible
(the position for automatic closing) and
release it to automatically close the moon-
roof.

WARNING

During manual closing, if the moonroof is
obstructed, immediately open it again.

Never open or close the moonroof if it is
obstructed in any way.

Never allow a child to operate the moon-
roof.

Never leave a child alone in a vehicle.

When leaving the vehicle, ensure that the
ignition is in mode 0 (see Ignition modes
(p. 82) for information about the various
ignition modes) to disable the moonroof.
Never leave the remote key in the vehicle.

Never extend any object or body part
though the open moonroof, even if the
vehicle's ignition is completely switched
off.

||

INSTRUMENTS AND CONTROLS

* Option/accessory.

112

Tilt position

G028900

Tilt position, raised at the rear edge

Open by pressing the rear edge of the con-
trol upward.
Close by pulling the rear edge of the control
downward and hold it until the moonroof has
closed completely.

HomeLink

®

 Wireless Control

System* – introduction

HomeLink

®

 can be used to open garage doors,

gates, etc.

WARNING

If you use HomeLink

®

 to open a garage

door or gate, be sure no one is near the
gate or door while it is in motion.

When programming a garage door
opener, it is advised to park outside of the
garage.

Do not use HomeLink

®

 with any garage

door opener that lacks safety stop and
reverse features as required by U.S. fed-
eral safety standards (this includes any
garage door opener model manufactured
before April 1, 1982). A garage door that
cannot detect an object - signaling the
door to stop and reverse - does not meet
current U.S. federal safety standards. For
more information, contact HomeLink at:
www.homelink.com.

The HomeLink

®18

 Wireless Control System pro-

vides a convenient way to replace up to three
hand-held radio-frequency (RF) transmitters used
to activate devices such as gate operators,
garage door openers, entry door locks, security
systems, even home lighting. Additional informa-
tion can be found on the Internet at,
www.homelink.com/www.youtube.com/
HomeLinkGentex or by phoning the hotline at 1–
800–355–3515.

18

HomeLink and the HomeLink house are registered trademarks of Gentex Corporation.

INSTRUMENTS AND CONTROLS

}}

* Option/accessory.

113

Retain the original transmitter of the RF device
you are programming for use in other vehicles as
well as for future HomeLink programming. It is
also suggested that upon the sale of the vehicle,
the programmed HomeLink buttons be erased
for security purposes. Refer to “Resetting Home-
Link Buttons” in HomeLink

®

 Wireless Control

System

* – programming (p. 113).

Using HomeLink

To operate, simply press and hold the pro-
grammed HomeLink button until the trained
device begins to operate (this may take several
seconds). Activation will now occur for the trained
device (i.e., garage door opener, gate operator,
security system, entry door lock, home/office
lighting, etc.). For convenience, the hand-held
transmitter of the device may also be used at any
time. In the event that there are still programming
difficulties or questions, contact HomeLink at:
www.homelink.com/www.youtube.com/
HomeLinkGentex or by phoning the hotline at 1–
800–355–3515.

NOTE

If the ignition is switched off, HomeLink will
function for 30 minutes after the driver's door
has been opened.

HomeLink

®

 Wireless Control

System* – programming

The HomeLink Wireless Control System pro-
vides a convenient way to replace up to three
hand-held radio-frequency (RF) transmitters
used to activate devices such as gate operators,
garage door openers, entry door locks, security
systems, even home lighting. Additional informa-
tion can be found on the Internet
atwww.homelink.com/www.youtube.com/
HomeLinkGentex or by phoning the hotline at 1–
800–355–3515.

NOTE

Some vehicles may require the ignition to be
switched on or be in the “accessories” posi-
tion for programming and/or operation of
HomeLink. It is also recommended that a new
battery be placed in the hand-held transmitter
of the device being programmed to Home-
Link for quicker training and accurate trans-
mission of the radio-frequency signal. The
HomeLink buttons must be reset first. When
this has been completed, Homelink is in
learning mode so that you can perform pro-
gramming.

1. Position the end of your hand-held transmit-

ter 1–3 inches (5–14 cm) away from the
HomeLink button you wish to program while
keeping the indicator light in view.

2. Simultaneously press and hold both the

chosen HomeLink and hand-held transmitter
buttons until the HomeLink indicator light
changes from a slow to a rapidly blinking
light. Now you may release both the Home-
Link and hand-held transmitter buttons.

NOTE

Some devices may require you to replace this
Programming Step 2 with procedures noted
in the “Gate Operator / Canadian Program-
ming” section. If the HomeLink indicator light
does not change to a rapidly blinking light
after performing these steps, contact Home-
Link at www.homelink.com/
www.youtube.com/HomeLinkGentex or by
phoning the hotline at 1–800–355–3515.

||

INSTRUMENTS AND CONTROLS

114

3. Firmly press, hold for five seconds and

release the programmed HomeLink button
up to two separate times to activate the door.
If the door does not activate, press and hold
the just-trained HomeLink button and
observe the indicator light.

If the indicator light stays on constantly,
programming is complete and your
device should activate when the Home-
Link button is pressed and released.

If the indicator light blinks rapidly for two
seconds and then turns to a constant
light continue with “Programming”
steps 4-6 to complete the programming
of a rolling code equipped device (most
commonly a garage door opener).

4. At the garage door opener receiver (motor-

head unit) in the garage, locate the “learn” or
“smart” button. This can usually be found
where the hanging antenna wire is attached
to the motor-head unit.

5. Firmly press and release the “learn” or

“smart” button. (The name and color of the
button may vary by manufacturer.) There are
30 seconds to initiate step 6.

6. Return to the vehicle and firmly press, hold

for two seconds and release the pro-
grammed HomeLink button. Repeat the
“press/hold/release” sequence a second
time, and, depending on the brand of the
garage door opener (or other rolling code
equipped device), repeat this sequence a
third time to complete the programming
process.

HomeLink should now activate your rolling code
equipped device.

Gate Operator/Canadian Programming

Canadian radio-frequency laws require transmit-
ter signals to “time-out” (or quit) after several
seconds of transmission – which may not be long
enough for HomeLink to pick up the signal dur-
ing programming. Similar to this Canadian law,
some U.S. gate operators are designed to “time-
out” in the same manner.

If you live in Canada or you are having difficulties
programming a gate operator or garage door
opener by using the “Programming” procedures,
replace “Programming HomeLink” step 2
with the following:

Continue to press and hold the HomeLink
button while you press and release - every
two seconds (“cycle”) your hand-held trans-

mitter until the HomeLink indicator light
changes from a slow to a rapidly blinking
light. Now you may release both the Home-
Link and hand-held transmitter buttons.

Proceed with “Programming” step 3 to complete.

Resetting HomeLink Buttons

Use the following procedure to reset (erase pro-
gramming) from the three HomeLink buttons
(individual buttons cannot be reset but can be
“reprogrammed” as outlined in the following sec-
tion):

1. Press and hold the two outer HomeLink but-

tons until the indicator light begins to flash.

2. Release both buttons.

> HomeLink is now in the training (or learn-

ing) mode and can be programmed at any
time beginning with “Programming” - step
1.

Reprogramming a Single HomeLink
Button

To program a device to HomeLink using a Home-
Link button previously trained, follow these steps:

1. Press and hold the desired HomeLink but-

ton. DO NOT release the button.

2. The indicator light will begin to flash after 20

seconds. Without releasing the HomeLink
button, proceed with “Programming” - step 1.

INSTRUMENTS AND CONTROLS

}}

* Option/accessory.

115

For questions or comments, contact HomeLink
at: www.homelink.com/www.youtube.com/
HomeLinkGentex or by phoning the hotline at 1–
800–355–3515.

This device complies with FCC rules part 15 and
Industry Canada (IC) RSS-210. Operation is sub-
ject to the following two conditions: (1) This
device may not cause harmful interference, and
(2) This device must accept any interference that
may be received including interference that may
cause undesired operation.

NOTE

The transmitter has been tested and complies
with FCC and IC rules. Changes or modifica-
tions not expressly approved by the party
responsible for compliance could void the
user’s authority to operate the device.

19

Volvo Sensus

Volvo Sensus is the core of the contact interface
with your vehicle. Sensus provides information,
entertainment and offers access to functions
that make owning and operating a Volvo easier.

Volvo Sensus is the operating system in your
vehicle and it enables you to interact intuitively
with the vehicle’s various features and functions,
including accessing the Internet, when it suits
you.

Volvo Sensus uses the center console screen to
display information and menus, and to offer a
user interface that enables you to make person-
alized settings for e.g., vehicle, infotainment and
climate system functions.

The buttons on the center console or the steer-
ing wheel keypad are used to activate/deactivate
functions and change numerous settings.

Pressing the MY CAR button on the center con-
sole displays all of the settings related to driving
and operating the vehicle, such as City Safety,
lock and alarm functions, automatic blower
speed, setting the clock, etc.

Pressing the source buttons on the center con-
sole (RADIO, MEDIA, TEL, 

, NAV

* and CAM*,

etc.) make it possible to select e.g., AM or FM
radio, play a CD or DVD, use the Bluetooth

®

hands-free feature, the navigation system

* or the

park assist camera

*.

See your on-board owner’s manual or the sepa-
rate printed supplements for detailed information
about the functionality offered by Volvo Sensus.

19

The term “IC:” before the certification/registration number only signifies that Industry Canada technical specifications were met.

||

INSTRUMENTS AND CONTROLS

* Option/accessory.

116

Center console control panel

Volvo Navigation System (VNS)

* – NAV: see

the separate VNS manual for operating
instructions.
Infotainment (RADIO, MEDIA, TEL)

Vehicle-related settings - MY CAR.

Internet connected vehicle.

Climate system.

Park assist camera - CAM

*.

Related information

My Car – introduction (p. 79)

Climate – general information (p. 128)

Rear Park Assist Camera (PAC) – introduc-
tion (p. 247)

Information display – menu controls

The controls on the left steering wheel lever are
used to access the menus (p. 117) that are dis-
played in the instrument panel (p. 71). The
menus displayed depend on the current ignition
mode (p. 82).

Analog Instrument panel and menu controls

Digital Instrument panel

* and menu controls

OK: access to the list of messages (p. 117)
and message confirmation.
Thumb wheel: browse among menus and
options in the list of functions.
RESET: reset the active function. Used in
certain cases to select/activate a function,
see the explanation under each respective
function.

The menus shown on the information displays in
the instrument panel are controlled with the left
lever. The menus displayed depend on ignition
mode. Press OK to erase a message and return
to the menus.

INSTRUMENTS AND CONTROLS

}}

* Option/accessory.

117

Information display – menu

overview

The menus displayed depend on the current
ignition mode (p. 82).

The following menu alternatives may vary,
depending on the equipment installed in the vehi-
cle.

Analog instrument panel

Digital speed

Trip comp. opt.

Service status

Messages (##)

20

Digital instrument panel

*

Settings

Themes

Contrast mode/Color mode

Service status

Messages

Trip computer reset

Related information

Information displays – introduction (p. 71)

Information display – menu controls (p. 116)

Information display – messages (p. 117)

Information display – messages

The controls on the left steering wheel lever are
used to scroll among messages displayed in the
instrument panel and to confirm selections.

When information, indicator or warning symbols
illuminate, an explanatory message will be dis-
played in the instrument panel.

When a warning (p. 77), information (p. 75) or
indicator symbol (p. 75) comes on, a correspond-
ing message appears in the information panel. An
error message is stored in a memory list until the
fault is rectified.

Press OK to acknowledge and scroll among the
messages.

NOTE

If a warning message appears while you are
using the trip computer, the message must be
read and confirmed by pressing OK before
the previous activity can be resumed.

Message

Description

Stop engine

A

Stop and switch off the
engine as soon as possible.
Serious risk of damage. Con-
tact an authorized Volvo
workshop.

Stop safely

A

Stop and switch off the
engine. Serious risk of dam-
age. Contact an authorized
Volvo workshop.

Service
urgent

A

Have the vehicle checked by
an authorized Volvo work-
shop immediately.

Service
required

A

Have the vehicle checked by
an authorized Volvo work-
shop as soon as possible.

See manual

A

Read the owner's manual.

Book time
for mainte-
nance

Time to book service at an
authorized Volvo retailer.

20

Number of messages in parentheses

||

INSTRUMENTS AND CONTROLS

118

Message

Description

Time for reg-
ular mainte-
nance

Time for regular service at an
authorized Volvo workshop.
The timing is determined by
the number of miles driven,
number of months since the
last service, engine running
time.

Maintenance
overdue

If the service intervals are not
followed, the warranty does
not cover any damaged parts.
Contact an authorized Volvo
workshop for service.

Temporarily
OFF

A

A function has been tempo-
rarily switched off and is
reset automatically while driv-
ing or after starting again.

Low battery
Power save
mode

The audio system is switched
off to save current. Charge
the battery.

A

There will also be a system-specific part of this message

Related information

Information displays – introduction (p. 71)

Information display – menu overview (p. 117)

Information display – menu controls (p. 116)

Trip computer – introduction 

The content and appearance of the trip com-
puter varies depending on whether the vehicle is
equipped with an 

Analog or Digital instrument

panel.

Analog information display and controls

Digital information displays and controls

The instrument panel illuminates as soon as the
vehicle is unlocked and trip computer settings
can be made. If none of the trip computer's con-
trols are used within 30 seconds after the driver's
door has been opened, the instrument panel
lighting will go out and the trip computer cannot
be used again until:

the ignition is put in mode II

21

the engine is started

NOTE

If a warning message appears while you are
using the trip computer, this message must
be acknowledged in order to return to the trip
computer function. Acknowledge a message
by pressing OK.

21

See Ignition modes (p. 82) for information about the various ignition modes.

INSTRUMENTS AND CONTROLS

120

Trip computer – functions, analog

instrument panel

Information display and controls

OK–press to access the trip computer's
functions or acknowledge/confirm/erase a
message
Thumb wheel–turn to access the list of trip
computer information headings and to
scroll among the alternatives
RESET–press to cancel/reset/exit a function
after a selection has been made

The trip computer has two different menu groups:

Trip computer functions

Trip computer information headings in the
instrument panel

Functions

To open and make settings in the trip computer
functions:

1. Ensure that none of the trip computer con-

trols are being used in a command
sequence; reset them by pressing RESET
twice.

2. Press OK to open the list of functions.

3. Use the thumb wheel to scroll among the

functions and select/confirm your choice by
pressing OK.

4. After completing your selection, exit by

pressing RESET twice.

The following table lists the analog trip comput-
er's functions:

INSTRUMENTS AND CONTROLS

}}

121

Function

Description

Digital speed

– km/h

– mph

– None

This displays the vehicle's speed digitally in the center of the instrument panel

Open by pressing OK, scroll using the thumb wheel, confirm by pressing OK and exit by pressing ENTER.

Trip comp. opt.

– 

Distance to empty

– 

Fuel consumption

– 

Average speed

– Trip odometer 

T1 and total dist.

– Trip odometer 

T2 and total dist.

Selections among the trip computer information headings are made here. The symbols that have already been
selected have a check mark and are displayed in white. Those not selected are not checked and are displayed in
gray:

1. Open the function by pressing OK and scroll to the desired heading using the thumb wheel.
2. Confirm by pressing OK. The symbol will change colors from gray to white and will be checked.
3. Continue this procedure or exit by pressing RESET.

Service status

Shows the number of months and mileage until the next scheduled service.

Messages (##)

For additional information, see Information display – menu controls (p. 116).

Information headings

Any of the information headings in the following
table can be displayed. To do so:

1. Ensure that none of the trip computer con-

trols are being used in a command
sequence; reset them by pressing RESET
twice.

2. Turn the thumb wheel to begin displaying

the information headings. Stop on the
desired heading.

3. See the table for an explanation of the head-

ing or the actions that can be taken.

||

INSTRUMENTS AND CONTROLS

122

Information headings in the instrument panel

Description

Trip odometer 

T1 and total dist.

Press and hold RESET to reset trip odometer T1.

Trip odometer 

T2 and total dist.

Press and hold RESET to reset trip odometer T2.

Distance to empty

See 

Distance to empty

 in Trip computer – Supplementary information (p. 125).

Fuel consumption

Current fuel consumption.

Average speed

Press and hold RESET to reset 

Average speed

.

-

No information will be displayed. This also indicates the beginning/end of the list of information headings.

Scroll among the trip computer information head-
ings at any time by turning the thumb wheel
until the desired heading is displayed.

Related information

Trip computer – introduction (p. 118)

Trip computer – functions, digital instrument
panel (p. 123)

Trip computer – Supplementary information
(p. 125)

Trip computer – Trip statistics (p. 126)

INSTRUMENTS AND CONTROLS

}}

* Option/accessory.

123

Trip computer – functions, digital

instrument panel

Information displays and controls

OK–press to access the trip computer's
functions or to activate a selection
Thumb wheel–turn to access the list of trip
computer information headings and to
scroll among the alternatives
RESET–press to cancel/reset/exit a function
after a selection has been made

The trip computer has two different menu groups:

Trip computer functions

Trip computer information headings in the
instrument panel

Functions

To open and make settings in the trip computer
functions:

1. Ensure that none of the trip computer con-

trols are being used in a command
sequence; reset them by pressing RESET
twice.

2. Press OK to open the list of functions.

3. Use the thumb wheel to scroll among the

functions and select/confirm your choice by
pressing OK.

4. After completing your selection, exit by

pressing RESET twice.

The following table lists the digital trip computer's
functions:

Function

Description

Trip computer reset

– Average fuel consumption

– Average speed

NOTE: This function does not reset the trip odometers, see Trip computer – Supplementary information (p. 125)
for a description of how this is done.

Messages

For additional information, see Information display – menu controls (p. 116).

Themes

Set the way in which information is displayed in the instrument panel, see Information displays – introduction
(p. 71).

Settings*

Select 

Auto On

 or 

Off

.

||

INSTRUMENTS AND CONTROLS

124

Function

Description

Contrast mode/Color mode

Adjust the instrument panel's contrast and color.

Service status

Shows the number of months and mileage until the next scheduled service.

Information headings

Three trip computer headings can be displayed at
the same time; one in each of the displays (see
the previous illustration). One of the combinations
of information headings in the following table can
be displayed. To do so:

1. Ensure that none of the trip computer con-

trols are being used in a command
sequence; reset them by pressing RESET
twice.

2. Turn the thumb wheel to begin displaying

the combinations of information headings.
Stop on the desired combination.

3. See the table for an explanation of the head-

ing or the actions that can be taken.

Scroll among the combinations of trip computer
information headings at any time by turning the
thumb wheel until the desired combination is
displayed.

Heading combinations

Description

Average fuel consumption

Trip odometer T1 + mileage

Average speed

Press and hold RESET to reset trip odometer T1.

Current fuel consumption

Trip odometer T2 + mileage

Distance to empty

Press and hold RESET to reset trip odometer T2.

Current fuel consumption

Mileage

mph<>km/h

Change between mph<>km/h – see "Digital speed display" in Trip com-
puter – Supplementary information (p. 125).

-

No trip computer information

displayed

-

No information will be displayed. This also indicates the beginning/end
of the list of information headings.

Scroll among the trip computer information head-
ings at any time by turning the thumb wheel
until the desired heading is displayed.

Related information

Trip computer – introduction (p. 118)

Trip computer – functions, analog instrument
panel (p. 120)

Trip computer – Supplementary information
(p. 125)

Trip computer – Trip statistics (p. 126)

INSTRUMENTS AND CONTROLS

* Option/accessory.

125

Trip computer – Supplementary

information

General information for both Analog and Digital
trip computer functions.

Average fuel consumption

Fuel consumption since the last time this func-
tion was reset.

Average speed

The vehicle's average speed since the last time
this function was reset.

Current fuel consumption

Current fuel consumption is calculated approxi-
mately once a second. When the vehicle is mov-
ing at low speed, fuel consumption is displayed
per unit of time. At higher speeds, it is displayed
in terms of distance.

Miles or kilometers can be displayed, see the
heading "Changing units".

Distance to empty

This function shows the approximate distance
that can be driven on the fuel remaining in the
tank. When 

Distance to empty

 shows "----",

there is very little useable fuel remaining in that
tank; refuel as soon as possible. The calculation
is based on average fuel consumption during the
last 20 miles (30 km) of driving and the amount
of fuel remaining in the tank (the accuracy of this
figure may vary if your driving style changes). An

economical driving style will generally increase
this distance.

See Economical driving (p. 291) for information
about driving economically.

Digital speed display

*

Speed is expressed in the unit not used by the
instrument panel's speedometer e.g., if the nor-
mal speedometer is in mph, the trip computer will
display in the speed in km/h and vice versa.

Resetting an analog instrument panel

Trip odometer(s) and average speed

1. Display trip odometer T1 or T1, or Average

speed.

2. Press and hold RESET until selected func-

tion is reset.

Each trip computer heading must be reset indi-
vidually.

Resetting a digital instrument panel

Trip odometer

1. Turn the thumb wheel to select the combi-

nation of headings containing the trip odom-
eter to be reset.

2. Press and hold RESET until selected trip

odometer is reset.

Average speed and fuel consumption

1. Select 

Trip computer reset

 and press OK.

2. Select one of the following alternatives using

the thumb wheel and press OK:

mpg

mph

Reset both

3. Finish by pressing RESET.

Changing units

To change the unit (miles/km) used to measure
distance and speed, go to 

MY CAR

Settings

System options

Distance and fuel units

.

NOTE

In addition to changing units in the trip com-
puter, this also changes the units used in the
Volvo Navigation System (VNS)

*.

Related information

Trip computer – introduction (p. 118)

Trip computer – functions, analog instrument
panel (p. 120)

Trip computer – functions, digital instrument
panel (p. 123)

Trip computer – Trip statistics (p. 126)

INSTRUMENTS AND CONTROLS

* Option/accessory.

126

Trip computer – Trip statistics

Trip information from previous trips regarding
average fuel consumption and average speed is
stored and can be displayed in the form of a bar
chart.

Function

Trip statistics

22

Each bar represents a driving distance of 1 mile
or 10 miles, depending on the current scale; the
bar at the far right shows the value for the cur-
rent mile/10 miles.

Use TUNE to change between 1 mile and
10 miles; the marker at the right will also change
according to the scale selected.

Settings

Settings can be made in the MY CAR menu sys-
tem as follows:

MY CAR

My V60

Trip statistics

:

Start new trip

: press ENTER to erase all

pervious statistics. Exit the menu by pressing
EXIT.

Reset for every driving cycle

: select by

pressing ENTER. Exit the menu by pressing
EXIT.

Selecting 

Reset for every driving cycle

 erases

all trip statistics automatically if the ignition is
switched off for at least 4 hours. When the
engine is restarted, new statistics will be stored.

To get new statistics if the engine is restarted
before 4 hours have elapsed, the existing ones
have to be erased manually by selecting 

Start

new trip

.

For additional information, see Information display
– menu controls (p. 116).

See also the information about Eco Guide in Eco
Guide

* and Power Meter* (p. 74).

Related information

Trip computer – introduction (p. 118)

Trip computer – functions, analog instrument
panel (p. 120)

Trip computer – functions, digital instrument
panel (p. 123)

Trip computer – Supplementary information
(p. 125)

22

The illustration is generic; certain details may vary from model to model


Content   ..  5  6  7  8   ..