Volvo V50 (2012 year). Instruction - part 11


  Index      Volvo     Volvo V50 - instruction 2012 year in english


Search            


Content   ..  9  10  11  12   ..


Volvo V50 (2012 year). Instruction - part 11


07 Wheels and tyres

 General

07

195

The reason for this is that tyres age and decom-
pose, even if they are hardly ever or never used.
The function can therefore be affected due to
the tyre's constituent materials being broken
down. In such a case the tyre should then not
be used. This also applies to spare tyres, winter
tyres and tyres saved for future use. Examples
of external signs which indicate that the tyre is
unsuitable for use are cracks or discoloration.

The age of the tyre can be determined by the
DOT marking, see previous illustration.

More even wear and maintenance

The correct tyre pressure results in more even
wear, see page 198. Driving style, tyre pres-
sure, climate and road condition affect how
quickly your tyres age and wear. To avoid dif-
ferences in tread depth and to prevent wear
patterns arising, the front and rear wheels can
be switched with each other. A suitable dis-
tance for the first change is approx. 5000 km
and then at 10 000 km intervals. Volvo recom-
mends that you contact an authorised Volvo
workshop for checking if you are uncertain
about tread depth. If significant differences in
wear (>1 mm difference in tread depth)
between tyres have already occurred, the least
worn tyres must always be placed on the rear.
Understeer is normally easier to correct than
oversteer, and leads to the car continuing for-

wards in a straight line rather than having the
rear end skidding to one side, resulting in pos-
sible complete loss of control over the car. This
is why it is important for the rear wheels never
to lose grip before the front wheels.

Wheels should be stored lying down or hanging
up, and not standing up.

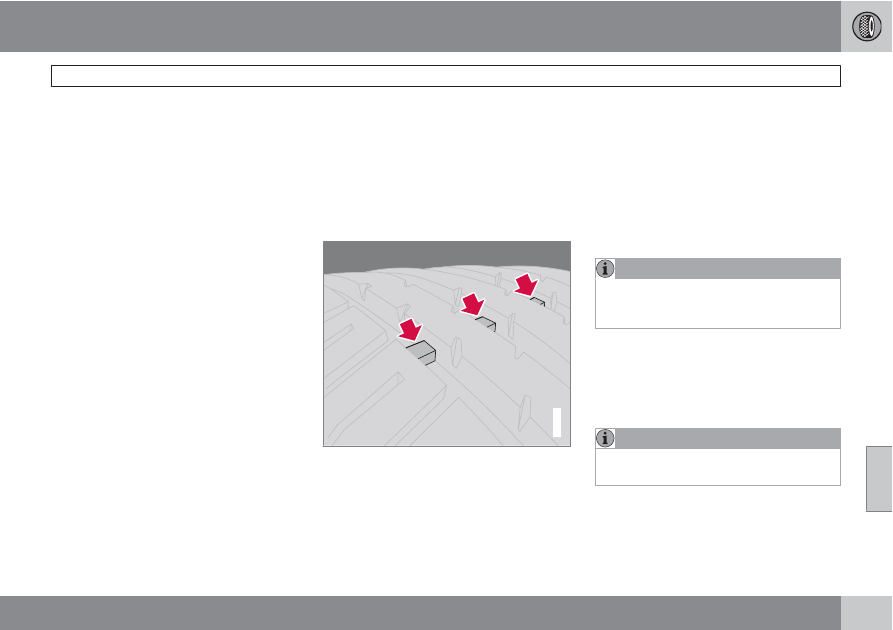
Tyres with tread wear indicators

G020323

Tread wear indicators.

Tread wear indicators are narrow treadless
bands across the width of the tread. On the
side of the tyre are the letters TWI (Tread Wear
Indicator). When the tyre's tread depth is down
to 1.6 mm, the tread depth will be level in height
with the tread wear indicators. Change to new
tyres as soon as possible. Remember that

tyres with little tread depth provide very poor
grip in rain and snow.

Winter tyres

Volvo recommends winter tyres with specific
winter tyre dimensions. Tyre dimensions are
dependent on engine variant. When driving on
winter tyres, they must be fitted to all four
wheels.

NOTE

Volvo recommends that you consult a Volvo
dealer about which wheel rim and tyre types
are most suitable.

Studded tyres

Studded winter tyres should be run in gently for
500-1000 km, so that the studs settle properly
into the tyres. This gives the tyre, and espe-
cially the studs, a longer service life.

NOTE

The legal provisions for the use of studded
tyres vary from country to country.

Tread depth

Road conditions with ice, slush and low tem-
peratures place considerably higher demands
on tyres than summer conditions. It is therefore

07 Wheels and tyres

General 

07

196

recommended not to drive on winter tyres that
have a tread depth of less than 4 mm.

Snow chains

Snow chains may only be used on the front
wheels. This also applies to all-wheel-drive
cars.

Never drive faster than 50 km/h with snow
chains. Avoid driving on bare ground as this
wears out both the snow chains and tyres.

WARNING

Use Volvo genuine snow chains or equiva-
lent chains designed for the car model, and
tyre and rim dimensions. In the event of
uncertainty Volvo recommends that you
consult an authorised Volvo workshop. The
wrong snow chains may cause serious
damage to your car and lead to an accident.

Rims and wheel nuts

Only use wheel rims that are tested and
approved by Volvo and which are included in
the Volvo genuine accessories range.

Standard wheel nuts.

Bulge acorn wheel nuts.

There are two types of wheel nut, depending
on whether the wheel rims are made of steel or
aluminium.

1.

Tighten the wheel nuts of model (1) to 110
Nm. Tighten the wheel nuts of model (2) to
130 Nm.

2.

Check the torque with a torque wrench.

IMPORTANT

The wheel nuts (1) should be tightened to
110 Nm and (2) to 130 Nm respectively.
Overtightening can damage the nuts and
the bolts.

Steel rims – standard wheel nuts (1)

Steel rims are normally mounted with the
standard wheel nuts, but the bulge acorn vari-
ety may also be used.

WARNING

Never use standard nuts for aluminium rims.
The wheel could come loose.

Aluminium rims – bulge acorn wheel nuts
(2)

Only use the bulge acorn variety of nuts with
aluminium rims.

NOTE

These nuts may also be used with steel rims.

Locking wheel nuts

Locking wheel nuts can be used on both alu-
minium and steel rims. If steel rims with locking
wheel nuts are used in combination with wheel
covers, the locking wheel nut should be moun-

07 Wheels and tyres

 General

07

*


Option/accessory, for more information, see Introduction.

197

ted on the bolt nearest the air valve. Otherwise
the wheel cover cannot be fitted to the rim.

NOTE

Tighten the lockable wheel nuts to 110 Nm.

Spare wheel Temporary Spare*

The spare wheel (Temporary spare) is only
intended for use temporarily and must be
replaced by an ordinary wheel as soon as pos-
sible. The car's handling may be altered by the
use of the spare wheel. The spare wheel is
smaller than the normal wheel. The car's
ground clearance is affected accordingly. Pay
attention to high kerbs and do not machine
wash the car. If the spare wheel is fitted on the
front axle, you cannot use snow chains at the
same time. On all-wheel drive cars the drive on
the rear axle can be disconnected. The spare
wheel must not be repaired. The correct tyre
pressure for the spare wheel is stated in the
tyre pressure table, see page 299.

IMPORTANT

Never drive faster than 80 km/h with a spare
wheel on the car.

IMPORTANT

The car must never be driven fitted with
more than one "Temporary Spare" wheel.

Summer and winter wheels

G020325

The arrow shows the tyre's direction of rotation.

When summer and winter wheels are changed,
see page 201, the wheels should be marked
with which side of the car they were mounted
on, for example L for left and R for right. Tyres
with a tread pattern which are designed to only
turn in one direction have the direction of rota-
tion marked with an arrow.

The tyre must always rotate in the same direc-
tion throughout its lifespan. Tyres should only

be switched between front and rear positions,
never between left and right-hand sides, or
vice versa.

If the tyre is mounted incorrectly, the car's
braking characteristics and capacity to force
rain, snow and slush out of the way are
adversely affected.

Tyres with the greatest tread depth should
always be fitted to the rear of the car (to
decrease the risk of skidding).

Volvo recommends that you contact an author-
ised Volvo workshop for checking if you are
uncertain about tread depth.

07 Wheels and tyres

Tyre pressure 

07

198

*


Option/accessory, for more information, see Introduction.

Recommended tyre pressure

G020791

The tyre pressure label on the driver's side door
pillar shows which pressures the tyres should
have at different load and speed conditions.

Tyre pressure for the car's recommended
tyre size

ECO pressure

1

Spare tyre pressure (Temporary Spare).

Checking the tyre pressure

Check the tyre pressure regularly.

NOTE

Tyre pressure decreases over time, this is a
natural phenomenon. Tyre pressure also
varies depending on ambient temperature.

Even after several kilometres of driving, the
tyres warm up and the pressure increases. So
air must not be released if the pressure is
checked when the tyres are warm. While the
pressure must be increased if it is too low.

Inadequately inflated tyres increase fuel con-
sumption, shorten tyre lifespan and impair the
car's roadholding. Driving on tyres with tyre
pressure that is too low can also result in the
tyres overheating and disintegrating.

For information on the correct tyre pressure,
refer to the tyre pressure table. The specified
tyre pressures refer to "cold tyres". ("Cold
tyres" means the tyres are the same tempera-
ture as the ambient temperature.)

Fuel economy, ECO pressure

At speeds under 160 km/h the general tyre
pressure for maximum load is recommended
in order to obtain optimum fuel economy.

Tyre pressure affects travelling comfort, road
noise and steering characteristics.

DRIVe*

An important detail in connection with environ-
mentally-conscious driving is to use the right
type of tyres and to drive with the correct air
pressure inside them.

Dimensions

When fitting new tyres, the same type and
brand as the car was equipped with from the
factory are recommended - they are designed
for low fuel consumption.

The 195/65 R15 and 205/55 R16 dimensions
generally provide a slightly lower consumption
than wider variants.

Pressure

Inadequately inflated tyres increase fuel con-
sumption. For this reason, check the pressure
in the tyres regularly.

By using so-called ECO pressure

2

 fuel con-

sumption is minimised. A certain impact on ride
comfort, road noise and steering characteris-
tics may be experienced, but this does not
affect safety.

See the decal with the recommended tyre
pressure adjacent to the driver's door pillar.

1

ECO pressure results in improved fuel economy.

2

The pressure that is recommended for maximum load.

07 Wheels and tyres

 Warning triangle* and spare wheel *

07

*


Option/accessory, for more information, see Introduction.

199

Warning triangle

Follow the regulations for the use of a warning
triangle*. Place the warning triangle in a suita-
ble place with regard to the traffic.

1.

Undo the case containing the warning tri-
angle, it is secured with Velcro straps. Take
the warning triangle from the case.

2.

Lower the warning triangle's support legs.

Ensure the warning triangle and its case are
firmly secured in the cargo area after use.

Spare wheel* and jack *

The car's original jack*

The original jack must only be used for chang-
ing wheels. The jack's thread should always be
well greased. The spare wheel* plus jack* and
wheel wrench* are stored under the floor in the
cargo area.

NOTE

Volvo recommends only using the jack* that
belongs to the car model in question, which
is indicated on the jack's label.

The label also indicates the jack's maximum
lift capacity at a specified minimum lifting
height.

Taking out the spare wheel

1.

Fold the rear edge of the floor mat forward.

2.

Release the spare wheel and lift it out.

3.

Take out the jack* plus crank and the wheel
wrench*.

07 Wheels and tyres

Warning triangle* and spare wheel *  

07

200

*


Option/accessory, for more information, see Introduction.

Putting the spare wheel* and jack* into
the cargo area

1.

Crank the jack (3) to halfway in order that
the jack shall fit horizontally in the bracket.

2.

Fold in the handle (6) and place the wheel
wrench (2) on the jack.

3.

Put the jack (3) back in the hole on the right
(4). Fasten the spare wheel (1) in the hole
on the left (5).

Tools - returning into place

Tools and jack* must be returned into place in
the correct manner after use.

For cars equipped with spare wheel, the
jack must be cranked so that it fits into the
spare wheel.

For cars equipped with emergency punc-
ture repair kit, the jack must be fully
cranked together and returned into the
foam block.

IMPORTANT

The tools and jack* must be stored in the
intended location in the car's cargo area
when not in use.

First aid*

A case with first aid equipment is located in the
cargo area.

07 Wheels and tyres

 Changing wheels

07

*


Option/accessory, for more information, see Introduction.

201

Removing wheels

G020331

Set up the warning triangle if a wheel must be
changed at a busy location. Make sure that the
car and jack are on a firm horizontal surface.

WARNING

Check that the jack is not damaged, that the
threads are thoroughly lubricated and that it
is free from dirt.

NOTE

Volvo recommends only using the jack* that
belongs to the car model in question, which
is indicated on the jack's label.

The label also indicates the jack's maximum
lift capacity at a specified minimum lifting
height.

1.

Take out the spare wheel*, jack* and wheel
wrench* that are located under the carpet
in the cargo area. If another jack is
selected, see page 219.

2.

Apply the parking brake and engage
reverse gear, or position P if the car has an
automatic gearbox.

3.

Place chocks in front of and behind the
wheels which will remain on the ground.
Use heavy wooden blocks or large stones.

4.

Cars with steel rims have removable wheel
covers. Prize off the wheel cover with the
end of the wheel wrench, or pull it off by
hand.

5.

Loosen the wheel nuts ½-1 turn anticlock-
wise with the wheel wrench.

G020332

Telescopic wheel wrench.

WARNING

Never position anything between the
ground and the jack, nor between the jack
and the car's jacking point.

6.

There are two jacking points on each side
of the car. There is a recess in the plastic
cover at each point. Crank the foot of the
jack down so it is pressed squarely on the
ground. Check that the jack is seated cor-
rectly in the intended jacking point, as illus-
trated, and that the base is located directly
under it.

07 Wheels and tyres

Changing wheels 

07

202

IMPORTANT

The ground must be firm, smooth and level.

7.

Lift the car so that the wheel is free.
Remove the wheel nuts and lift off the
wheel.

Fitting the wheel

1.

Clean the contact surfaces between wheel
and hub.

2.

Put on the wheel. Tighten the wheel nuts.

3.

Lower the car so that the wheel cannot
rotate.

4.

Tighten the wheel nuts crosswise. It is
important that the wheel nuts are tightened
properly.

Standard wheel nuts - tightening tor-
que: 110 Nm

Domed wheel nuts - tightening torque:
130 Nm

Check the torque with a torque wrench.

5.

Put on the wheel cover (steel rim).

WARNING

Never crawl under the car when it is raised
on the jack.

Passengers must leave the car when it is
raised on the jack.

Ensure that passengers wait with the car -
or preferably a crash barrier - between them
and the road.

07 Wheels and tyres

 Emergency puncture repair*

07

*


Option/accessory, for more information, see Introduction.

203

Emergency puncture repair, general
information

The emergency puncture repair kit is used to
seal a puncture as well as to check and adjust
the tyre pressure. It consists of a compressor
and a bottle with sealing fluid. The kit works as
a temporary repair. The sealing fluid bottle
must be replaced before its expiration date and
after use.

The sealing fluid effectively seals tyres punc-
tured in the tread.

NOTE

The emergency puncture repair kit is only
intended for sealing tyres with a puncture in
the tread.

The emergency puncture repair kit has limited
capacity to seal tyres which have punctures in
the wall. Do not seal tyres with the emergency
puncture repair kit if they have larger slits,
cracks or similar damage.

12V sockets for the compressor are located by
the centre console in the front, by the rear seat
and in the cargo area*. Choose the electrical
socket that is nearest the punctured tyre.

WARNING

You should not drive faster than 80 km/h
after the emergency tyre repair kit has been
used. Volvo recommends that you visit an
authorised Volvo workshop for inspection of
the sealed tyre (maximum driving distance
is 200 km). The staff there can determine
whether or not the tyre can be repaired or if
it needs to be replaced.

Taking out the emergency puncture
repair kit

The emergency puncture repair kit with com-
pressor and tools are stored under the floor in
the cargo area.

1.

Fold up the cargo area floor.

2.

Lift up the emergency puncture repair kit.

Overview

G020400

Decal, maximum permitted speed

Switch

Cable

Bottle holder (orange cap)

Protective cap

Pressure reducing valve

Air hose

07 Wheels and tyres

Emergency puncture repair* 

07

204

*


Option/accessory, for more information, see Introduction.

Sealing fluid bottle

Pressure gauge

Sealing punctured tyres

G019723

For information on the function of the parts, see
preceding illustration.

1.

Open the lid of the emergency puncture
repair kit.

2.

Detach the decal for maximum permitted
speed and affix it to the steering wheel.

WARNING

The sealing fluid can irritate the skin. In the
case of contact with skin, wash away the
fluid with soap and water.

3.

Check that the switch is in position 0 and
locate the cable and the air hose.

NOTE

Do not break the bottle's seal before use.
The seal is broken automatically when the
bottle is screwed in.

4.

Unscrew the orange cap and unscrew the
bottle's stopper.

WARNING

Do not unscrew the bottle, it is equipped
with a reverse catch to prevent leakage.

5.

Screw the bottle into its holder.

6.

Unscrew the wheel's dust cap and screw
in the air hose valve connection to the bot-
tom of the thread on the tyre's air valve.

WARNING

Do not leave children in the car without
supervision when the engine is running.

7.

Plug the cable into the 12 V socket and
start the car.

WARNING

Never stand next to the tyre when the com-
pressor is running. If cracks or unevenness
arise then the compressor must be
switched off immediately. The journey
should not be continued. Contacting an
authorised tyre centre is recommended.

NOTE

When the compressor starts, the pressure
can increase up to 6 bar but the pressure
drops after approximately 30 seconds.

8.

Flick the switch to position I.

IMPORTANT

Risk of overheating. The compressor must
not run for more than 10 minutes.

9.

Inflate the tyre for 7 minutes.

07 Wheels and tyres

 Emergency puncture repair*

07

*


Option/accessory, for more information, see Introduction.

205

WARNING

If the pressure is below 1.8 bar then the hole
in the tyre is too big. The journey should not
be continued. Contacting an authorised tyre
centre is recommended.

10. Switch off the compressor to check the

pressure on the pressure gauge. Minimum
pressure is 1.8 bar and maximum is
3.5 bar.

11. Switch off the compressor and unplug the

cable from the 12 V socket.

12. Detach the hose from the tyre valve and fit

the valve cap.

13. As soon as possible, drive approximately 3

km at a maximum speed of 80 km/h so that
the sealing fluid can seal the tyre.

Rechecking the repair and pressure

1.

Reconnect the equipment.

2.

Read the tyre pressure on the pressure
gauge.

3.

If it is below 1.3 bar then the tyre is insuf-
ficiently sealed. The journey should not be
continued. Contact a tyre centre.

4.

If the tyre pressure is higher than 1.3 bar,
the tyre must be inflated to the pressure

specified on the tyre pressure decal.
Release air using the pressure reducing
valve if the tyre pressure is too high.

WARNING

Do not unscrew the bottle, it is equipped
with a reverse catch to prevent leakage.

5.

Switch off the compressor. Detach the air
hose and cable. Refit the dust cap.

NOTE

The sealing fluid bottle and the hose must
be replaced after use. Volvo recommends
that this replacement is performed by an
authorised Volvo workshop.

WARNING

Check the tyre pressure regularly.

6.

Return the emergency puncture repair kit
to the cargo area.

7.

Volvo recommends that you drive to the
nearest authorised Volvo workshop for the
replacement/repair of the damaged tyre.
Advise the workshop that the tyre contains
sealing fluid.

WARNING

You should not drive faster than 80 km/h
after the emergency tyre repair kit has been
used. Volvo recommends that you visit an
authorised Volvo workshop for inspection of
the sealed tyre (maximum driving distance
is 200 km). The staff there can determine
whether or not the tyre can be repaired or if
it needs to be replaced.

Inflating the tyres

The car's original tyres can be inflated by the
compressor.

1.

The compressor must be switched off.
Make sure that the switch is in position 0
and locate the cable and air hose.

2.

Unscrew the wheel's dust cap and screw
in the air hose valve connection to the bot-
tom of the thread on the tyre's air valve.

WARNING

Inhaling car exhaust fumes could result in
danger to life. Never leave the engine run-
ning in sealed areas or areas that lack suf-
ficient ventilation.

07 Wheels and tyres

Emergency puncture repair* 

07

206

*


Option/accessory, for more information, see Introduction.

WARNING

Do not leave children in the car without
supervision when the engine is running.

3.

Connect the cable to one of the car's
12 V sockets and start the car.

4.

Start the compressor by flicking the switch
to position I.

IMPORTANT

Risk of overheating. The compressor must
not run for more than 10 minutes.

5.

Inflate the tyre to the pressure specified on
the tyre pressure decal. (Release air using
the pressure reducing valve if the tyre pres-
sure is too high.)

6.

Switch off the compressor. Detach the air
hose and cable.

7.

Refit the dust cap.

Changing the sealing fluid canister

Replace the bottle before the expiration date
has passed. Treat the old bottle as environ-
mentally hazardous waste.

WARNING

The bottle contains 1.2-Ethanol and natural
rubber-latex.

Harmful if ingested. Could result in allergic
reaction in the event of skin contact.

Avoid contact with the skin and eyes.

Store out of the reach of children.

NOTE

Leave the container at a collection point for
storing dangerous waste.

08 Car care

Cleaning 

08

210

Washing the car

Wash the car as soon as it becomes dirty. Use
car shampoo. Dirt and road salt can lead to
corrosion.

Do not park the car in direct sunlight.
Washing a car with hot paintwork can
cause permanent paintwork damage.
Wash the car in a car wash with waste
water separator.

Hose down the underbody thoroughly.

Wash using a sponge, car shampoo and
plenty of lukewarm water.

If the dirt is difficult to dislodge, wash the
car using a cold degreasing agent.

Dry the car using a clean, soft chamois or
a water scraper.

WARNING

Always have the engine cleaned by a work-
shop. There is a risk of fire if the engine is
hot.

IMPORTANT

Dirty headlamps have impaired functional-
ity. Clean them regularly, when refuelling for
example.

NOTE

Outside lighting such as headlamps, fog
lamps and rear lamps may temporarily have
condensation on the inside of the lens. This
is a natural phenomenon, all outside lighting
is designed to withstand this. Condensation
is normally vented out of the lamp when it
has been switched on for a time.

Cleaning the wiper blades

Asphalt, dust and salt residue on wiper blades,
as well as insects, ice etc. on the windscreen,
impair the service life of wiper blades.

NOTE

Wash the wiper blades and windscreen reg-
ularly with lukewarm soap solution or car
shampoo.

Do not use any strong solvents.

Removing bird droppings

Wash away bird droppings from the paintwork
as soon as possible. Bird droppings contain
chemicals that affect and discolour paintwork
very quickly. This discoloration can only be
removed by a specialist.

Chromed wheels

IMPORTANT

Rim cleaning agents can cause stains on
chrome-plated wheels. Wash using a
sponge, car shampoo and plenty of luke-
warm water.

Automatic car washes

An automatic car wash is a simple and quick
way of washing the car, but it can never replace
a proper handwashing. The brushes of an auto-
matic car wash cannot reach everywhere.

IMPORTANT

Washing by hand is gentler to the paintwork
than an automatic car wash. Paintwork is
also more sensitive when it is new. For this
reason, handwashing is recommended dur-
ing the first few months with a new car.

High-pressure washing

When using high-pressure washing, use
sweeping movements and make sure that the
nozzle does not come closer than 30 cm to the
surface of the car (the distance applies to all
exterior parts).

08 Car care

 Cleaning

08

*


Option/accessory, for more information, see Introduction.

211

IMPORTANT

Rinse the entire car to remove loose dirt.
When using a pressure washer: Make sure
that the nozzle of the pressure washer is not
closer than 30 cm to the bodywork. Do not
spray directly onto the locks.

Testing the brakes

WARNING

Always test the brakes after washing the
car, including the parking brake, to ensure
that moisture and corrosion do not attack
the brake linings and reduce braking per-
formance.

Lightly depress the brake pedal now and then
when driving long distances in rain or slush.
This heats and dries the brake pads. Do the
same thing after starting in very damp or cold
weather.

Exterior plastic, rubber and trim
components

A special cleaning agent available from Volvo
dealers is recommended for the cleaning and
care of coloured plastic parts, rubber and trim
components (such as glossy trim mouldings).
When using such a cleaning agent the instruc-
tions must be followed carefully.

IMPORTANT

Avoid waxing and polishing on plastic and
rubber.

When using degreasant on plastic and rub-
ber, only rub with light pressure if it is nec-
essary. Use a soft washing sponge.

Polishing glossy trim mouldings could wear
away or damage the glossy surface.

Polishing agent that contains abrasive must
not be used.

Polishing and waxing

Polish and wax the car if the paintwork is dull
or to give the paintwork extra protection.

The car does not need to be polished until it is
at least one year old. However, the car can be
waxed before this time. Do not polish or wax
the car in direct sunlight.

Wash and dry the car thoroughly before you
begin polishing or waxing. Clean off asphalt
and tar stains using tar remover or white spirit.
More stubborn stains can be removed using
fine rubbing paste designed for car paintwork.

Polish first with a polish and then wax with liq-
uid or solid wax. Follow the instructions on the
packaging carefully. Many preparations con-
tain both polish and wax.

IMPORTANT

Only paint treatment recommended by
Volvo should be used. Other treatment such
as preserving, sealing, protection, lustre
sealing or similar could damage the paint-
work. Paintwork damage caused by such
treatments is not covered by Volvo war-
ranty.

Water-repellent coating*

Never use products such as car wax,
degreaser or similar on glass surfa-

ces as this could ruin their water-repellent
properties.

Take care when cleaning so as not to damage
the glass surface.

To avoid damaging glass surfaces when
removing ice – only use plastic ice scrapers.

There is natural wear of the water-repellent
coating.

NOTE

Treatment with a special finishing agent
available from Volvo dealers is recom-
mended in order to maintain the water-
repellent properties. This should be used
first after three years and then each year.

08 Car care

Cleaning 

08

212

Cleaning the interior

Only use cleaning agents and car care prod-
ucts recommended by Volvo. Clean regularly
and follow the instructions included with the
car care product.

Vacuuming is important prior to using cleaning
agents.

Carpets and cargo area

Remove inlaid carpets for separate cleaning of
the floor carpet and the inlaid carpets. Use a
vacuum cleaner to remove dust and dirt.

Each inlay mat is secured with pins.

Take hold of the inlay mat at each pin and
lift the mat straight up.

Fit the inlay mat in place by pressing it in at
each pin.

WARNING

Before setting off check that the inlaid mat
in the driver area is firmly affixed and
secured in the pins in order to avoid getting
caught adjacent to and under the pedals.

A special textile cleaner is recommended for
stains on the floor mat after vacuuming. Floor
mats should be cleaned with agents recom-
mended by your Volvo dealer!

Treatment of stains on textile upholstery
and headliner

A special fabric cleaning agent, available from
authorised Volvo dealers, is recommended to
avoid impairing the fire retardant qualities of
the upholstery.

IMPORTANT

Sharp objects and Velcro may damage the
fabric upholstery.

Treating stains on leather upholstery

Volvo's leather upholstery is chromium-free
and is treated to preserve its original appear-
ance.

Leather upholstery ages and acquires a beau-
tiful patina over time. The leather is refined and
processed so that it retains its natural charac-
teristics. It is given a protective coating, but
regular cleaning is required in order to maintain
both characteristics and appearance. Volvo
offers a comprehensive product for the clean-
ing and treatment of leather upholstery which,
when used in accordance with the instructions,
preserves the leather's protective coating.
After a period of use the natural appearance of
the leather will nevertheless emerge, depend-
ing more or less on the surface texture of the
leather. This is a natural maturing of the leather
and shows that it is a natural product.

To achieve best results Volvo recommends
cleaning and the application of protective
cream once to four times per year (or more if
necessary). The Volvo Leather Care kit is avail-
able from your Volvo dealer.

IMPORTANT

Certain items of coloured clothing (for
example, jeans and suede garments)
may stain the upholstery.

Never use strong solvents. Such prod-
ucts may damage fabric, vinyl and
leather upholstery.

Washing instructions for leather
upholstery

1.

Pour the leather cleaner on the dampened
sponge and squeeze out a strong foam.

2.

Work the dirt away with gentle circular
movements.

3.

Dab accurately with the sponge on the
stains. Allow the sponge to absorb the
stain. Do not rub.

4.

Wipe off with soft paper or a cloth and
allow the leather to dry completely.

08 Car care

 Cleaning

08

213

Protective treatment of leather
upholstery

Vacuuming is important prior to using leather
care agents.

1.

Pour a small amount of the protective
cream on the felted cloth and massage in
a thin layer of cream with gentle circular
movements on the leather.

2.

Allow the leather to dry for 20 minutes
before use.

The leather has now been given improved pro-
tection against stains and improved UV pro-
tection.

IMPORTANT

Sharp objects may damage the leather, (e.g.
rings).

Washing instructions for the leather
steering wheel

Remove dirt and dust with a soft pre-mois-
tened sponge and neutral soap.

Leather needs to breathe. Never cover the
leather steering wheel with protective plas-
tic.

Use natural oils. Volvo's leather care
agents are recommended for best results.

If the steering wheel has stains:

Group 1 (ink, wine, coffee, milk, sweat and
blood)

Use a soft cloth or sponge. Mix a 5%
ammonia solution. (For blood stains, use a
solution of 2 dl water and 25g salt.)

Group 2 (fats, oils, sauces and chocolate)

1.

Same procedure as group I.

2.

Polish with an absorbent paper or cloth.

Group 3 (dry dirt, dust)

1.

Use a soft brush to remove the dirt.

2.

Same procedure as group I.

Treating stains on interior plastic, metal
and wood parts

A special cleaning agent, available from Volvo
dealers, is recommended for cleaning interior
parts and surfaces. Do not scrape or rub stains.
Never use strong stain removers.

Cleaning seatbelts

Use water and a synthetic detergent. A special
textile cleaning agent is available from your
Volvo dealer. Make sure the seatbelt is dry
before allowing it to retract.


Content   ..  9  10  11  12   ..