Volvo S60 Inscription (2016 year). Instruction - part 15


  Index      Volvo     Volvo S60 Inscription - instruction 2016 year in english


Search            


Content   ..  13  14  15  16   ..


Volvo S60 Inscription (2016 year). Instruction - part 15


09 Wheels and tires

09

250

Tires – storage and age

When storing complete wheels (tires mounted

on rims), they should be suspended off the

floor or placed on their sides on the floor.

New Tires

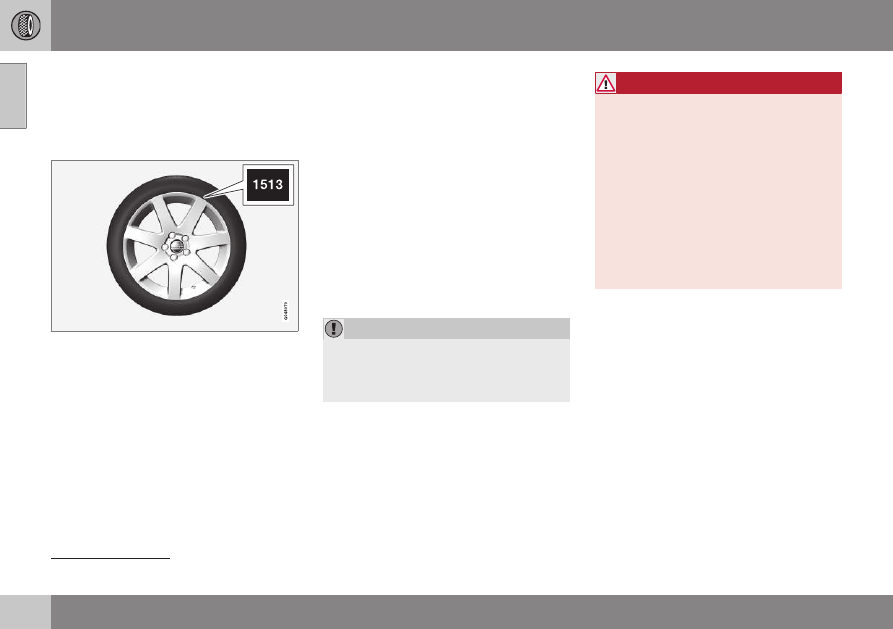
Remember that tires are perishable goods. As

of 2000, the manufacturing week and year

(Department of Transportation (DOT) stamp)

will be indicated with 4 digits (e.g., 1513

means that the tire illustrated was manufac-

tured during week 15 of 2013).

Tire age
Tires degrade over time, even when they are

not being used. It is recommended that tires

generally be replaced after 6 years of normal

service. Heat caused by hot climates, fre-

quent high loading conditions or Ultra Violet

(U.V.) exposure can accelerate the aging

process. The temporary spare

1

 should also

be replaced at 6-year intervals, even if it has

never been used.
A tire's age can be determined by the DOT

stamp on the sidewall (see the illustration).
A tire with e.g., visible cracks or discoloration

should be replaced immediately.

Storing wheels and tires
When storing completes wheels (tires moun-

ted on rims), they should be suspended off

the floor or placed on their sides on the floor.
Tires not mounted on rims should be stored

on their sides or standing upright, but should

not be suspended.

CAUTION

Tires should preferably be stored in a cool,

dry, dark place, and should never be

stored in close proximity to solvents, gaso-

line, oils, etc.

WARNING

The wheel and tire sizes for your Volvo

are specified to meet stringent stability

and handling requirements. Unap-

proved wheel/tire size combinations

can negatively affect your vehicle's

stability and handling.

Any damage caused by installation of

unapproved wheel/tire size combina-

tions will not be covered by your new

vehicle warranty. Volvo assumes no

responsibility for death, injury, or

expenses that may result from such

installations.

Related information

Tire inflation – pressure table (p. 260)

Tire specifications (p. 257)

Tire specifications (p. 257)

Changing a wheel – direction of rotation

(p. 252)

Tires – tread wear indicator (p. 251)

1

Option or accessory on some models

09 Wheels and tires

09

251

Tires – tread wear indicator

The tires have wear indicator strips running

across or parallel to the tread.

G021829

The letters TWI are printed on the side of the

tire. When approximately 1/16" (1.6 mm) is

left on the tread, these strips become visible

and indicate that the tire should be replaced.

Tires with less than 1/16" (1.6 mm) tread offer

very poor traction.
When replacing worn tires, it is recommended

that the tire be identical in type (radial) and

size as the one being replaced. Using a tire of

the same make (manufacturer) will prevent

alteration of the driving characteristics of the

vehicle.

Related information

Tire inflation – pressure table (p. 260)

Tire specifications (p. 257)

Changing a wheel – direction of rotation

(p. 252)

Tires – storage and age (p. 250)

Tires – tire economy

A smooth driving style and correct inflation

pressure can help prolong the tires' service

life.

Maintain correct tire pressure. The tire

inflation table, see Tire inflation – pressure

table (p. 260).

Avoid fast starts, hard braking and tire

screeching.

Tire wear increases with speed.

Correct front wheel alignment is very

important.

Unbalanced wheels impair tire economy

and driving comfort.

Tires must maintain the same direction of

rotation throughout their lifetime.

When replacing tires, the tires with the

most tread should be mounted on the

rear wheels to reduce the chance of over-

steer during hard braking.

Hitting curbs or potholes can damage the

tires and/or wheels permanently.

09 Wheels and tires

09

252

Changing a wheel – direction of

rotation

Incorrectly mounted tires impair the car's

braking properties and ability to force aside

rain, snow and slush.

Summer and winter tires

G021778

The arrows shows the direction of rotation of the

tire

The tires with the most tread should

always be on the rear axle (to help reduce

the risk of skidding).

When switching between summer and

winter tires, mark the tires to indicate

where they were mounted on the car,

e.g., LF = left front, RR = right rear

Tires with tread designed to roll in only

one direction are marked with an arrow

on the sidewall.

Contact a Volvo workshop if you are

unsure about the tread depth.

Related information

Tire inflation – pressure table (p. 260)

Tire specifications (p. 257)

Tires – storage and age (p. 250)

Tires – tread wear indicator (p. 251)

Changing a wheel – removing wheel

Wheel changes should always be carried out

correctly.

Changing a wheel
1. Apply the parking brake and put the gear

selector in P.

2.

Tool for removing the plastic covers on the wheel

nuts

Remove the wheel cover (where applica-

ble) using the removal tool or remove the

wheel cover by hand.

3. Block the wheels that are on the ground

with wooden blocks or large stones.

09 Wheels and tires

09

}}

253

Lug wrench and towing eyelet

4. Screw the towing eyelet into the lug

wrench as shown in the illustration.

CAUTION

The towing eyelet must be screwed into

the lug wrench as far as possible.

5. With the vehicle still on the ground,

remove the plastic covers on the wheel

nuts with the tool provided and use the

lug wrench/towing eyelet to loosen the

wheel nuts ½ – 1 turn by exerting down-

ward (counterclockwise) pressure.

6. There are two jack attachment points on

each side of the vehicle. Position the jack

under the attachment point to be used on

a level, firm, non-slippery surface and

crank it up until it is correctly aligned and

seated in the attachment point. Before

raising the vehicle, check that the jack is

still correctly positioned in the attach-

ment.

7. Unscrew the wheel nuts completely and

remove the wheel.

WARNING

The jack must correctly engage the

jack attachment.

Be sure the jack is on a firm, level,

non-slippery surface.

Never allow any part of your body to

be extended under a vehicle suppor-

ted by a jack.

Use the jack intended for the vehicle

when changing a tire. For any other

job, use stands to support the vehicle.

Apply the parking brake and put the

gear selector in the Park (P) position.

Block the wheels standing on the

ground, use rigid wooden blocks or

large stones.

The jack should be kept well-greased

and clean, and should not be dam-

aged.

No objects should be placed between

the base of jack and the ground, or

between the jack and the attachment

bar on the vehicle.

||

09 Wheels and tires

09

254

NOTE

The jack provided with your vehicle is

intended to be used only in temporary sit-

uations such as changing wheels in the

event of a flat tire. Only the jack that came

with your particular model should be used

to lift the vehicle. If the vehicle needs to be

lifted more frequently or for a prolonged

period, using a garage jack or hoist is rec-

ommended. Always follow this device’s

instructions for use.

Related information

Changing a wheel – installing a wheel

(p. 255)

Changing a wheel – spare wheel

Wheel changes should always be carried out

correctly.

Spare wheel

WARNING

Current legislation prohibits the use of the

“Temporary Spare” tire other than as a

temporary replacement for a punctured

tire. It must be replaced as soon as possi-

ble by a standard tire. Road holding and

handling may be affected with the “Tem-

porary Spare” in use.

CAUTION

The vehicle must never be driven with

more than one temporary spare wheel.

Related information

Changing a wheel – installing a wheel

(p. 255)

Changing a wheel – removing wheel

(p. 252)

Changing a wheel – accessing the

spare wheel

The following procedure explains how to

access the spare wheel (where applicable).

09 Wheels and tires

09

}}

255

Changing a wheel – installing a wheel

It is important to re-install wheels properly.

Re-installing the wheel
1. Clean the contact surfaces on the wheel

and hub.

2. Lift the wheel and place it on the hub.

Tighten the wheel nuts

3. Install the wheel nuts and tighten hand-

tight. Using the lug wrench, tighten cross-

wise until all nuts are snug.

4. Lower the vehicle to the ground and alter-

nately tighten the bolts crosswise to

103 ft. lbs. (140 Nm).

5. Press the plastic covers onto the wheel

nuts and Install the wheel cover (where

applicable). The opening in the wheel

cover for the tire's inflation valve must be

positioned over the valve.

Related information

Changing a wheel – spare wheel (p. 254)

Changing a wheel – removing wheel

(p. 252)

Tire inflation – general information

Check tire inflation pressure regularly.

Inflation placard

G032521

Tire inflation placard

Tire inflation
See the tire inflation table in Tire inflation –

pressure table (p. 260). A tire inflation pres-

sure placard is also located on the driver's

side B-pillar (the structural member at the

side of the vehicle, at the rear of the driver's

door opening). This placard indicates the des-

ignation of the factory-mounted tires on your

vehicle, as well as load limits and inflation

pressure.

||

09 Wheels and tires

09

256

NOTE

The placards shown indicate inflation

pressure for the tires installed on the

vehicle at the factory only.

A certain amount of air seepage from

the tires occurs naturally and tire pres-

sure fluctuates with seasonal changes

in temperature. Always check tire

pressure regularly.

Use the recommended cold inflation

pressure for optimum tire performance

and wear.

Under-inflation or over-inflation may

cause uneven treadwear patterns.

WARNING

Under-inflation is the most common

cause of tire failure and may result in

severe tire cracking, tread separation,

or "blow-out," with unexpected loss of

vehicle control and increased risk of

injury.

Under-inflated tires reduce the load

carrying capacity of your vehicle.

When weather temperature changes occur,

tire inflation pressures also change. A 10-

degree temperature drop causes a corres-

ponding drop of 1 psi (7 kPa) in inflation pres-

sure. Check your tire pressures frequently

and adjust them to the proper pressure,

which can be found on the vehicle's tire infor-

mation placard or certification label.

Related information

Tire specifications (p. 257)

Tires – storage and age (p. 250)

Tires – tread wear indicator (p. 251)

Tire inflation – pressure table (p. 260)

Tire inflation – checking pressure

Inflation pressure should be checked when

the tires are cold.

Cold tires

The tires are considered to be cold when

they have the same temperature as the

surrounding (ambient) air.
This temperature is normally reached after the

vehicle has been parked for at least 3 hours.
After driving a distance of approximately

1 mile (1.6 km), the tires are considered to be

hot. If you have to drive farther than this dis-

tance to pump your tire(s), check and record

the tire pressure first and add the appropriate

air pressure when you get to the pump.
If checking tire pressure when the tire is hot,

never "bleed" or reduce air pressure. The

tires are hot from driving and it is normal for

pressures to increase above recommended

cold pressures. A hot tire at or below recom-

mended cold inflation pressure could be sig-

nificantly under-inflated.

09 Wheels and tires

09

}}

257

To check inflation pressure:

1. Remove the cap from the valve on one

tire, then firmly press the tire gauge onto

the valve.

2. Add air to reach the recommended air

pressure.

3. Replace the valve cap.

CAUTION

After inflating the tires, always reinstall

the valve cap to help avoid damage to

the valve from dirt, gravel, etc.

Use plastic valve caps only. Metal caps

could corrode and become difficult to

remove.

4. Visually inspect the tires to make sure

there are no nails or other objects

embedded that could puncture the tire

and cause an air leak.

5. Check the sidewalls to make sure there

are no gouges, cuts, bulges or other

irregularities.

6.

NOTE

If you overfill the tire, release air by

pushing on the metal stem in the cen-

ter of the valve. Then recheck the

pressure with your tire gauge.

Related information

Tire specifications (p. 257)

Tire inflation – pressure table (p. 260)

Tires – storage and age (p. 250)

Tires – tread wear indicator (p. 251)

Tire specifications

The following information can be found on a

tire's sidewall.

Tire ratings

Speed ratings

The speed ratings in the table translate as fol-

low:

Speed ratings

M

81 mph (130 km/h)

Q

100 mph (160 km/h)

T

118 mph (190 km/h)

H

130 mph (210 km/h)

V

149 mph (240 km/h)

W

168 mph (270 km/h)

Y

186 mph (300 km/h)

||

09 Wheels and tires

09

258

Information on the sidewall

Federal law mandates that tire manufacturers

place standardized information on the side-

wall of all tires (see the illustration).
The following information is listed on the tire

sidewall:
The tire designation:

NOTE

Please be aware that the following tire

designation is an example only and that

this particular tire may not be available on

your vehicle.

1. 215: the width of the tire (in millimeters)

from sidewall edge to sidewall edge. The

larger the number, the wider the tire.

2. 65: The ratio of the tire's height to its

width in percent.

3. R: Radial tire (the designation RF and the

 symbol indicate that the vehicle is

equipped with optional self-supporting
run flat tires

2

.

4. 15: The diameter of the wheel rim (in

inches).

5. 95: The tire's load index. In this example,

a load index of 95 equals a maximum

load of 1521 lbs (690 kg).

6. H: The tire's speed rating, or the maxi-

mum speed at which the tire is designed

to be driven for extended periods of time,

carrying a permissible load for the vehi-

cle, and with correct inflation pressure.

For example, H indicates a speed rating

of 130 mph (210 km/h).

NOTE

The tire's load index and speed rating may

not appear on the sidewall because they

are not required by law.

7. M+S or M/S = Mud and Snow, AT = All

Terrain, AS = All Season

8. U.S. DOT Tire Identification Number

(TIN): This begins with the letters "DOT"

and indicates that the tire meets all fed-

eral standards. The next two numbers or

letters are the plant code where it was

manufactured, the next two are the tire

size code and the last four numbers rep-

resent the week and year the tire was

built. For example, 1510 means that the

tire was manufactured during week 15 of

2010. The numbers in between are mar-

keting codes used at the manufacturer's

discretion. This information helps a tire

manufacturer identify a tire for safety

recall purposes.

9. Tire Ply Composition and Material

Used: Indicates the number of plies indi-

cates or the number of layers of rubber-

coated fabric in the tire tread and side-

wall. Tire manufacturers also must indi-

cate the ply materials in the tire and the

sidewall, which include steel, nylon, poly-

ester, and others.

10. Maximum Load: Indicates the maximum

load in pounds and kilograms that can be

carried by the tire. Refer to the vehicle's

tire information placard located on the B-

Pillar for the correct tire pressure for your

vehicle.

2

Self-supporting run flat tires may not be available on all models

09 Wheels and tires

09

259

11. Treadwear, Traction, and Temperature

grades: see Tire specifications – Uniform

Tire Quality Grading (p. 263) for more

information.

12. Maximum permissible inflation

pressure: the greatest amount of air

pressure that should ever be put in the

tire. This limit is set by the tire manufac-

turer.

09 Wheels and tires

09

260

Tire inflation – pressure table

The following tire pressures are recom-

mended by Volvo for your vehicle. Refer to

the tire inflation placard (see Tire inflation –

general information (p. 255) for its location) for

information specific to the tires installed on

your vehicle at the factory.
Some of the tire sizes listed here may not

be available for all models in all markets.

Tire size

Cold tire pressure for up to five persons

Front
psi (kPa)

Rear
psi (kPa)

36 (250)??????

36 (250)

235/45 R18 Extra load
235/40 R19 Extra load

38 (260)?????

38 (260)

Temporary spare tire

A

T125/80R17

61 (420)

61 (420)

A

Available as an accessory

NOTE

Please consult a Volvo retailer’s Parts

department for the most up-to-date speci-

fications.

09 Wheels and tires

09

}}

261

Loading specifications

Properly loading your vehicle will provide

maximum return of vehicle design perform-

ance.

Before loading your vehicle, familiarize your-

self with the following terms for determining

your vehicle's weight ratings, with or without

a trailer, from the vehicle's Federal/Canadian

Motor Vehicle Safety Standards (FMVSS/

CMVSS) label, and the vehicle's tire informa-

tion placard:

Curb weight
The weight of the vehicle including a full tank

of fuel and all standard equipment. It does

not include passengers, cargo, or optional

equipment.

Capacity weight
All weight added to the curb weight, including

cargo and optional equipment. When towing,

trailer hitch tongue load is also part of cargo

weight.

Permissible axle weight
The maximum allowable weight that can be

carried by a single axle (front or rear). These

numbers are shown on the Federal/Canadian

Motor Vehicle Safety Standards (FMVSS/

CMVSS) label. The total load on each axle

must never exceed its maximum permissible

weight.

Gross vehicle weight (GVW)
The vehicle's curb weight + cargo + passen-

gers.

NOTE

The location of the various labels in

your vehicle, see Label information

(p. 315).

A table listing important weight limits

for your vehicle, see Weights (p. 320).

Loading specifications – load limit

The load limit of your vehicle is the combined

weight of the occupants and cargo.

Steps for Determining Correct Load
Limit
1. Locate the statement "the combined

weight of occupants and cargo should

never exceed XXX pounds" on your vehi-

cle's placard.

2. Determine the combined weight of the

driver and passengers that will be riding

in your vehicle.

3. Subtract the combined weight of the

driver and passengers from XXX kilo-

grams or XXX pounds.

4. The resulting figure equals the available

amount of cargo and luggage load

capacity. For example, if the "XXX"

amount equals 1400 lbs. and there will be

five 150 lb. passengers in your vehicle,

the amount of available cargo and lug-

gage load capacity is 650 lbs. (1400 –

 750 (5 × 150) = 650 lbs.)

5. Determine the combined weight of lug-

gage and cargo being loaded on the vehi-

cle. That weight may not safely exceed

the available cargo and luggage load

capacity calculated in Step 4.

09 Wheels and tires

09

262

6. If your vehicle will be towing a trailer, load

from your trailer will be transferred to your

vehicle.

WARNING

Exceeding the permissible axle weight,

gross vehicle weight, or any other

weight rating limits can cause tire

overheating resulting in permanent

deformation or catastrophic failure.

Do not use replacement tires with

lower load carrying capacities than the

tires that were original equipment on

the vehicle because this will lower the

vehicle's GVW rating. Use only tires

with the correct load carrying capacity.

Consult your Volvo retailer for informa-

tion.

Tire specifications – terminology

The following is a glossary of tire-related

terms.

The tire suppliers may have additional mark-

ings, notes or warnings such as standard

load, radial tubeless, etc.

Tire information placard: A placard

showing the OE (Original Equipment) tire

sizes, recommended inflation pressure,

and the maximum weight the vehicle can

carry.

Tire Identification Number (TIN): A

number on the sidewall of each tire pro-

viding information about the tire brand

and manufacturing plant, tire size and

date of manufacturer.

Inflation pressure: A measure of the

amount of air in a tire.

Standard load: A class of P-metric or

Metric tires designed to carry a maximum

load at 35 psi [37 psi (2.5 bar) for Metric

tires]. Increasing the inflation pressure

beyond this pressure will not increase the

tires load carrying capability.

Extra load: A class of P-metric or Metric

tires designed to carry a heavier maxi-

mum load at 41 psi [43 psi (2.9 bar) for

Metric tires]. Increasing the inflation pres-

sure beyond this pressure will not

increase the tire's load carrying capabil-

ity.

kPa: Kilopascal, a metric unit of air pres-

sure.

PSI: Pounds per square inch, a standard

unit of air pressure.

B-pillar: The structural member at the

side of the vehicle behind the front door.

Bead area of the tire: Area of the tire

next to the rim.

Sidewall of the tire: Area between the

bead area and the tread.

Tread area of the tire: Area of the perim-

eter of the tire that contacts the road

when mounted on the vehicle.

Rim: The metal support (wheel) for a tire

or a tire and tube assembly upon which

the tire beads are seated.

Maximum load rating: a figure indicating

the maximum load in pounds and kilo-

grams that can be carried by the tire. This

rating is established by the tire manufac-

turer.

Maximum permissible inflation

pressure: the greatest amount of air

pressure that should ever be put in the

tire. This limit is set by the tire manufac-

turer.

Recommended tire inflation pressure:

inflation pressure, established by Volvo,

which is based on the type of tires that

are mounted on a vehicle at the factory.

This information can be found on the tire

inflation placard(s) located on the driver's

09 Wheels and tires

09

}}

263

side B-pillar and in the tire inflation table

in this chapter.

Cold tires: The tires are considered to be

cold when they have the same tempera-

ture as the surrounding (ambient) air. This

temperature is normally reached after the

vehicle has been parked for at least

3 hours.

Tire specifications – Uniform Tire

Quality Grading

ALL PASSENGER VEHICLE TIRES MUST

CONFORM TO FEDERAL SAFETY

REQUIREMENTS IN ADDITION TO THESE

GRADES.

Quality grades can be found, where appli-

cable, on the tire sidewall between the

tread shoulder and maximum section

width. For example:
Treadwear 200 Traction AA Temperature A

TREADWEAR
The treadwear grade is a comparative rating

based on the wear rate of the tire when tes-

ted under controlled conditions on a specified

government test course. For example, a tire

graded 150 would wear one and one half

(1 ½) times as well on the government course

as a tire graded 100. The relative perform-

ance of tires depends upon the actual condi-

tions of their use, however, and many depart

significantly from the norm due to variation in

driving habits, maintenance practices and dif-

ferences in road characteristics and climate.

TRACTION
The traction grades, from highest to lowest,

are AA, A, B, and C, as measured under con-

trolled conditions on specified government

test surfaces of asphalt and concrete. A tire

marked C may have poor traction perform-

ance. The traction grade assigned to this tire

is based on braking (straight-ahead) traction

tests and is not a measure of cornering (turn-

ing) traction.

WARNING

The traction grade assigned to this tire is

based on braking (straight-ahead) traction

tests and is not a measure of cornering

(turning) traction.

TEMPERATURE
The temperature grades are A (the highest),

B, and C, representing the tire's resistance to

the generation of heat and its ability to dissi-

pate heat when tested under controlled con-

ditions on a specified indoor laboratory test

wheel. Sustained high temperature can cause

the material of the tire to degenerate and

reduce tire life, and excessive temperature

can lead to sudden tire failure. The grade C

corresponds to a minimum level of perform-

ance that all passenger vehicle tires must

meet under the Federal Motor Safety Stand-

ard No. 109. Grades B and A represent higher

levels of performance on the laboratory test

wheel than the minimum required by law.

09 Wheels and tires

09

264

WARNING

The temperature grade for this tire is

established for a tire that is properly infla-

ted and not overloaded. Excessive speed,

under-inflation, or excessive loading, either

separately or in combination, can cause

heat buildup and tire failure.

Snow chains

Snow chains can be used on your Volvo with

the following restrictions:

Snow chains should be installed on front

wheels only. Use only Volvo approved

snow chains.

If accessory, aftermarket or "custom"

tires and wheels are installed and are of a

size different than the original tires and

wheels, chains in some cases CANNOT

be used. Sufficient clearances between

chains and brakes, suspension and body

components must be maintained.

Some strap-on type chains will interfere

with brake components and therefore

CANNOT be used.

All Wheel Drive models: Snow chains

should only be installed on the front

wheels.

Certain size tires may not allow the

assembly of snow chains/traction devi-

ces.

Consult your Volvo retailer for additional

snow chain information.

CAUTION

Check local regulations regarding the

use of snow chains before installing.

Use single-sided snow chains only.

Always follow the chain manufactur-

er's installation instructions carefully.

Install chains as tightly as possible and

retighten periodically.

Never exceed the chain manufactur-

er's specified maximum speed limit.

(Under no circumstances should you

exceed 31 mph (50 km/h).

Avoid bumps, holes or sharp turns

when driving with snow chains.

The handling of the vehicle can be

adversely affected when driving with

chains. Avoid fast or sharp turns as

well as locked wheel braking.

09 Wheels and tires

09

}}

265

Snow tires/studded tires

3

Owners who live in or regularly commute

through areas with sustained periods of snow

or icy driving conditions are strongly advised

to fit suitable winter tires to help retain the

highest degree of traction.

Tires for winter use:

It is important to install winter tires on all

four wheels to help retain traction during

cornering, braking, and accelerating. Fail-

ure to do so could reduce traction to an

unsafe level or adversely affect handling.

Do not mix tires of different design as this

could also negatively affect overall tire

road grip.

Winter tires wear more quickly on dry

roads in warm weather. They should be

removed when the winter driving season

has ended.

Studded tires should be run-in 300 –

 600 miles (500 – 1000 km) during which

the vehicle should be driven as smoothly

as possible to give the studs the opportu-

nity to seat properly in the tires. The tires

should have the same rotational direction

throughout their entire lifetime.

NOTE

Please consult state or provincial regula-

tions restricting the use of studded winter

tires before installing such tires.

Tire pressure monitoring -

introduction

Volvo provides two different systems to moni-

tor tire pressure: Tire Pressure Monitoring

System (TPMS) or Tire Monitor.

Determining which tire monitoring
system is in your vehicle
To see which system is installed in your vehi-

cle, press the MY CAR button on the center
console. Go to 

Settings

Car settings

.

If your vehicle has a menu called 

Tire

monitoring

, see Tire Monitor - introduc-

tion (p. 270).

If your vehicle has a menu called 

Tire

pressure

, see Tire Pressure Monitoring

System (TPMS) – general information

(p. 266).

Introduction
Each tire, including the spare (if provided),

should be checked monthly when cold and

inflated to the inflation pressure recom-

mended by the vehicle manufacturer on the

vehicle placard or tire inflation pressure label.

(If your vehicle has tires of a different size

than the size indicated on the vehicle placard

or tire inflation pressure label, you should

determine the proper tire inflation pressure for

those tires.)

As an added safety feature, your vehicle has

been equipped with a tire pressure monitor-

ing system that illuminates a low tire pressure
telltale (

) when one or more of your tires

is significantly under-inflated. Accordingly,

when the low tire pressure telltale illuminates,

you should stop and check your tires as soon

as possible, and inflate them to the proper

pressure.
Driving on a significantly under-inflated tire

causes the tire to overheat and can lead to

tire failure. Under-inflation also reduces fuel

efficiency and tire tread life, and may affect

the vehicle's handling and stopping ability.

Please note that a tire pressure monitoring

system is not a substitute for proper tire

maintenance, and it is the driver's responsi-

bility to maintain correct tire pressure, even if

under-inflation has not reached the level to

trigger illumination of the system's low tire

pressure telltale.
Your vehicle has also been equipped with a

TPMS malfunction indicator to indicate when

the system is not operating properly. The

monitoring system's malfunction indicator is

combined with the low tire pressure telltale.
When the system detects a malfunction, the

telltale will flash for approximately one minute

and then remain continuously illuminated.

This sequence will continue upon subsequent

vehicle start-ups as long as the malfunction

3

Where permitted


Content   ..  13  14  15  16   ..