Volvo S60 Cross Country (2018 year). Instruction - part 15


  Index      Volvo     Volvo S60 Cross Country - instruction 2018 year in english


Search            


Content   ..  13  14  15  16   ..


Volvo S60 Cross Country (2018 year). Instruction - part 15


DRIVER SUPPORT

}}

* Option/accessory.

259

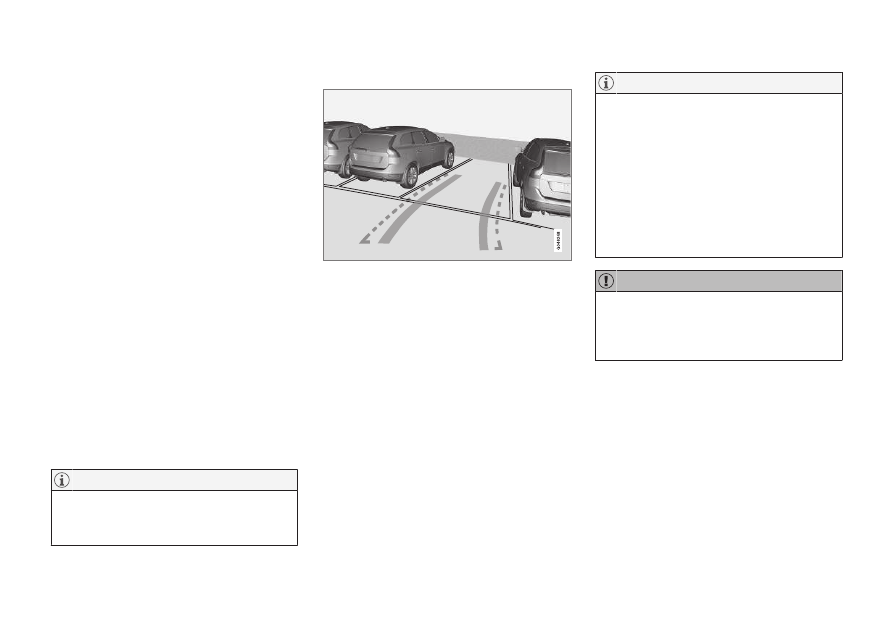
When reverse gear is selected, two unbroken
lines are shown graphically which illustrate where
the car's rear wheels will roll with the current
steering wheel angle - this facilitates parallel
parking, reversing into tight spaces and for hitch-
ing a trailer. The car's approximate external
dimensions are illustrated by means of dashed
lines. The park assist lines can be deactivated -
see section Settings (p. 261).

If the car is also equipped with Parking assis-
tance sensors (p. 254)

* then their information is

shown graphically as coloured areas in order to
illustrate distances to detected obstacles, see
heading "Cars with reversing sensors" later in the
text.

The camera is active approx. 5 seconds after
reverse gear has been disengaged or until the
car's speed exceeds 10 km/h (6 mph) forward or
35 km/h (22 mph) backward.

Light conditions

The camera image is adjusted automatically
according to prevailing light conditions. Because
of this, the image may vary slightly in brightness
and quality. Poor light conditions can result in a
slightly reduced image quality.

NOTE

Keep the camera lens clear of dirt, snow and
ice to ensure optimum function. This is partic-
ularly important in poor light.

Park assist lines

Examples of how the park assist lines can be displayed

for the driver.

The lines on the screen are projected as if they
were at ground level behind the car and are
directly related to steering wheel movement,
which shows the driver the path the car will then
take - also when the car is turning.

NOTE

When reversing with a trailer which is not
connected electrically to the car, the lines
on the display show the route the car will
take - not the trailer.

The screen shows no lines when a trailer
is connected electrically to the car's elec-
trical system.

The parking camera is deactivated auto-
matically when towing a trailer if a Volvo
genuine trailer cable is used.

IMPORTANT

Remember, that with the rear camera view
selected, the monitor only displays the area
behind the car. Be aware of the sides and
front of the car when manoeuvring in reverse.

||

DRIVER SUPPORT

* Option/accessory.

260

Boundary lines

The system's different lines.

Boundary line, free reversing zone

"Wheel tracks"

The dashed line (1) frames in a zone up to
about 1.5 m back from the bumper. It is also the
limit of the car's most protruding parts, such as
door mirrors and corners - also when the car is
turning.

The wide "wheel tracks" (2) between the side
lines indicate where the wheels will roll and can
extend about 3.2 m back from the bumper if no
obstacle is in the way.

Cars with reversing sensors

*

Coloured fields (one per sensor) show distance.

If the car is also equipped with Parking assis-
tance (p. 254) the distance is shown with col-
oured fields for each sensor that registers an
obstacle.

The colour of the areas changes with decreasing
distance to the obstacle - from light yellow to yel-
low, via orange to red.

Colour / paint

Distance (metres)

Light yellow

0,7–1,5

Yellow

0,5–0,7

Orange

0,3–0,5

Red

0–0.3

Related information

Park assist camera - settings (p. 261)

Park assist camera - limitations (p. 261)

Park Assist

* (p. 254)

Park Assist Pilot (PAP)

* (p. 262)

DRIVER SUPPORT

* Option/accessory.

261

Park assist camera - settings

Activate switched-off camera

The camera starts automatically when reverse
gear is selected, but it can also be activated man-
ually as follows:

Press CAM - the screen shows the current
camera view.

Change setting

The settings for the parking camera can be
changed when the screen shows a camera view:

1. Press OK/MENU when a camera view is

shown - the screenchanges to a menu with
various options.

2. Turn to reach the desired option with TUNE.
3. Highlight the option by pressing OK/MENU

once and go back out with EXIT.

Towbar

The camera can be used to advantage when
hitching a trailer. A park assist line for the tow-
bar's intended "trajectory" toward the trailer can
be shown on the screen - exactly as for the
"wheel tracks".

A choice can be made between showing the
"wheel tracks" or the towbar's trajectory - both
options cannot be shown simultaneously.

1. Press OK/MENU when a camera view is

shown.

2. Turn to reach the 

Tow bar trajectory guide

line

 option with TUNE.

3. Highlight the option by pressing OK/MENU

once and go back out with EXIT.

Zoom

If precise manoeuvring is required then the cam-
era view can be zoomed in:

Press CAM or turn TUNE - repeated press/
turn changes back to the normal view.

If more options are available, they are in a loop
- press/turn until the desired camera view is
shown.

Related information

Park assist camera

* (p. 258)

Park Assist

* (p. 254)

Park Assist Pilot (PAP)

* (p. 262)

Park assist camera - limitations

NOTE

A bike carrier or other accessory mounted on
the rear of the car could obscure the cam-
era's view.

To bear in mind

Pay attention to the possibility that, even if it only
looks like a relatively small part of the image is
obscured, it could be a relatively large sector that
is hidden from view. Obstacles could thereby go
undetected until they are very close to the car.

Keep the camera lens free from dirt, ice and
snow.

Clean the camera lens regularly with luke-
warm water and car shampoo - take care not
to scratch the lens.

Related information

Park assist camera

* (p. 258)

Park assist camera - settings (p. 261)

Park Assist

* (p. 254)

DRIVER SUPPORT

* Option/accessory.

262

Park Assist Pilot (PAP)*

The Park Assist Pilot (PAP – Park Assist Pilot)
helps the driver to park by first checking whether
a space is sufficiently large and then turning the
steering wheel and steering the car into the
space.

The combined instrument panel uses symbols,
graphics and text for when the different steps are
to be carried out.

The On/Off button is on located the centre console.

NOTE

When a towbar is configured with the car's
electrical system, the protrusion of the towbar
is included when the function measures the
parking space.

WARNING

The PAP function is supplementary driver
support intended to facilitate driving and
make it safer – it cannot handle all situa-
tions in all traffic, weather and road condi-
tions.

Be particularly aware of people and ani-
mals near the car.

PAP is not a substitute for the driver's
attention and judgement. The driver is
always responsible for ensuring the car is
driven in a safe manner, at the appropri-
ate speed, with an appropriate distance to
other vehicles, and in accordance with
current traffic rules and regulations.

Related information

Park Assist Pilot (PAP)

* - symbols and mes-

sages (p. 267)

Park Assist Pilot (PAP)

* - operation (p. 263)

Park Assist Pilot (PAP)

* - function (p. 262)

Park Assist Pilot (PAP)

* - limitations

(p. 265)

Park Assist

* (p. 254)

Park assist camera

* (p. 258)

Park Assist Pilot (PAP)* - function

NOTE

The PAP function measures the space and
steers the car - the driver's task is to:

keep a close watch around the car

follow the instructions in the combined
instrument panel

change gear (reverse/forward)

control and maintain a safe speed

brake and stop.

PAP can be activated if the following criteria are
met once the engine has been started:

DRIVER SUPPORT

}}

* Option/accessory.

263

The functions ABS

35

 or ESC

36

 must not

intervene when the PAP function is activated
- these can be activated in the event of e.g.
steep and slippery surfaces, see the sections
on Foot brake and Stability system ESC
(p. 182) for more information.

A trailer must not be connected to the car.

Speed must be lower than 50 km/h
(30 mph).

Principle for PAP.

The PAP function parks the car using the follow-
ing steps:

1. The function searches for a parking space

and measures it - during measurement,
speed must not exceed 30 km/h (20 mph).

2. The car is steered into the space during

reversing.

3. The car is positioned in the space by means

of driving forward/backward.

Related information

Park Assist Pilot (PAP)

* (p. 262)

Park Assist

* (p. 254)

Park assist camera

* (p. 258)

Park Assist Pilot (PAP)* - operation

NOTE

Remember that certain steering wheel posi-
tions may obstruct the combined instrument
panel's instructions when you turn it during
the parking manoeuvre.

1 - Searching and checking
measurements

35

(Anti-lock Braking System) - Anti-lock braking system.

36

(Electronic Stability Control) - Stability system.

||

DRIVER SUPPORT

264

NOTE

The PAP function measures the space and
steers the car - the driver's task is to:

keep a close watch around the car

follow the instructions in the combined
instrument panel

change gear (reverse/forward)

control and maintain a safe speed

brake and stop.

NOTE

The distance between the car and parking
spaces should be 0.5-1.5 metres (1.6-5.0 ft)
while PAP is searching for a parking space.

The PAP function searches for a parking space
and checks whether it is big enough. Proceed as
follows:

1. Activate PAP by pressing
this button and do not drive
faster than 30 km/h (20 mph).

2. Keep an eye on the combined instrument

panel and be prepared to stop the car when
the graphics and text so request.

3. Stop the car when the graphics and text so

request.

NOTE

PAP searches the area for parking, displays
instructions and guides the car in on its pas-
senger side. But if required the car can also
be parked on the driver's side of the street:

Activate the direction indicator to the
driver's side - then the system searches
for a parking space on that side of the
car instead.

2 - Reversing in

During the Reversing step, PAP will steer the car
into the parking space. Proceed as follows:

1. Check that the area behind the car is clear,

then engage reverse gear.

2. Reverse slowly and carefully without touching

the steering wheel - and no faster than
7 km/h (4 mph).

3. Keep an eye on the combined instrument

panel and be prepared to stop the car when
the graphics and text so request.

NOTE

Keep your hands away from the steering
wheel when the PAP function is acti-
vated.

Make sure that the steering wheel is not
hindered in any way and can rotate freely.

To achieve optimum results - wait until
the steering wheel is fully turned before
starting to drive backward/forward.

DRIVER SUPPORT

}}

* Option/accessory.

265

3 - Positioning

When the car has reversed into the parking
space, it must be straightened up and positioned.

1. Engage first gear or D position, wait until the

steering wheel has been turned, then drive
slowly forwards.

2. Stop the car when the graphics and text

message so request.

3. Engage reverse gear and drive backwards

slowly until the graphics and text message
tell you to stop.

The function is deactivated automatically and the
graphics and message show that parking is com-
plete. It may be necessary for the driver to correct
the positioning. Only the driver can determine
whether the car is properly parked.

IMPORTANT

The warning distance is shorter when the
sensors are used by PAP compared with
when Park Assist uses the sensors.

Related information

Park Assist Pilot (PAP)

* - symbols and mes-

sages (p. 267)

Park Assist Pilot (PAP)

* - function (p. 262)

Park Assist Pilot (PAP)

* - limitations

(p. 265)

Park Assist

* (p. 254)

Park assist camera

* (p. 258)

Park Assist Pilot (PAP)

* (p. 262)

Park Assist Pilot (PAP)* - limitations

The PAP sequence is stopped:

if the car is driven too quickly - above 7 km/h
(4 mph)

if the driver touches the steering wheel

if the ABS

37

 or ESC

38

 function is engaged -

e.g. if a wheel loses grip on a slippery road
surface.

A text message indicates where the PAP
sequence was stopped.

NOTE

Dirt, ice and snow covering the sensors will
reduce their function and may prevent meas-
urement.

IMPORTANT

Under certain circumstances, PAP is unable
to find parking spaces - one reason for this
may be the fact that there is interference with
the sensors from external sound sources
which emit the same ultrasound frequencies
as those with which the system works.

Examples of such sources include horns, wet
tyres on asphalt, pneumatic brakes and
exhaust noises from motorcycles etc.

37

(Anti-lock Braking System) - Anti-lock braking system.

38

(Electronic Stability Control) - Electronic stability control.

||

DRIVER SUPPORT

* Option/accessory.

266

To bear in mind

The driver should bear in mind that the Park
Assist Pilot is an aid – not an infallible, fully-auto-
matic function. The driver must therefore be pre-
pared to intervene. There are also a few details to
bear in mind while parking, e.g.:

PAP starts out from the current location of
the parked vehicles - if they are inappropri-
ately parked then the car's tyres and wheel
rims may be damaged against kerbs.

PAP is designed for parking on straight
streets, not sharp curves or bends. For this
reason, make sure the car is parallel to the
parking space when PAP measures the
space.

It is not always possible to find parking
spaces on narrow streets since there is not
enough space for manoeuvring. In such park-
ing situations, it helps the system to drive as
close to the side of the road as possible
where you intend to park.

Bear in mind that the front of the car may
swing out towards oncoming traffic while
being parked.

Objects situated higher than the detection
areas of the sensors are not included when
calculations are made for the parking
manoeuvre. This may cause PAP to swing

into the parking space too early, and hence
such parking spaces should be avoided.

The driver is responsible for determining
whether the space selected by PAP is suita-
ble for parking.

Use approved tyres

39

 with the correct tyre

pressure - this affects PAP's ability to park
the car.

Heavy rain or snow may cause the system to
measure the parking space incorrectly.

Do not use PAP if snow chains or a spare
wheel are fitted.

Do not use PAP if loaded objects are pro-
truding from the car.

IMPORTANT

Changing to another approved wheel rim
and/or tyre dimension may involve a changed
tyre circumference, which means that the
PAP system's parameters may then need to
be updated. Consult a workshop - an author-
ised Volvo workshop is recommended.

Maintenance

The PAP sensors are located in the bumpers

40

 - 6 front

and 4 rear.

For the PAP function to work correctly, its sen-
sors must be cleaned regularly with water and car
shampoo.

Related information

Park Assist

* (p. 254)

Park assist camera

* (p. 258)

Park Assist Pilot (PAP)

* (p. 262)

Park assist syst

* - cleaning the sensors

(p. 257)

39

"Approved tyres" refers to tyres of the same type and make as those fitted new on delivery from the factory.

40

NOTE: The illustration is schematic - details may vary depending on car model.

DRIVER SUPPORT

* Option/accessory.

267

Park Assist Pilot (PAP)* - symbols

and messages

The combined instrument panel uses symbols,
graphics and text for when the different steps are
to be carried out.

The combined instrument panel may display dif-
ferent combinations of symbols and text with
varying meaning - sometimes with self-explana-
tory advice on appropriate action.

If a message indicates that PAP is inoperative
then contact with an authorised Volvo workshop
is recommended.

Related information

Park Assist Pilot (PAP)

* - operation (p. 263)

Park Assist Pilot (PAP)

* - function (p. 262)

Park Assist Pilot (PAP)

* - limitations (p. 265)

Park Assist

* (p. 254)

Park assist camera

* (p. 258)

Park Assist Pilot (PAP)

* (p. 262)

STARTING AND DRIVING

* Option/accessory.

270

Starting the engine

The engine is started and switched off using the
remote control key and the 

START/STOP

ENGINE button.

Ignition switch with remote control key extracted/

inserted. and START/STOP ENGINE button.

IMPORTANT

Do not press in the remote control key incor-
rectly turned - hold the end with the detacha-
ble key blade, see Detachable key blade -
detaching/attaching (p. 161).

1. Insert the remote control key in the ignition

switch and press it in to its end position.

2. Hold the clutch pedal fully depressed

1

. (For

cars with automatic gearbox - Depress the
brake pedal.)

3. Press the START/STOP ENGINE button

and then release it.

When the engine is started the starter motor
works until the engine is started or until its over-
heating protection triggers.

IMPORTANT

If the engine fails to start after 3 attempts -
wait for 3 minutes before making a further
attempt. Starting capacity increases if the bat-
tery is allowed to recover.

WARNING

Never remove the remote control key from the

ignition switch after starting the engine or

when the car is being towed.

WARNING

Always remove the remote control key from

the ignition switch when leaving the car, and

make sure that the key position is 0 - in par-

ticular if there are children in the car. For

information on how this works - see Key posi-

tions (p. 77).

NOTE

The idling speed can be noticeably higher
than normal for certain engine types during
cold starting. This is done in order that the
emissions system can reach normal operating
temperature as quickly as possible, which
minimises exhaust emissions and protects the
environment.

Keyless starting (Keyless drive)

*

Follow steps 2-3 for keyless (p. 165) starting of
the engine.

NOTE

A prerequisite for the engine to start is that
one of the car's remote control keys with the
keyless start and lock function is in the pas-
senger compartment or cargo area.

WARNING

Never remove the remote control key from

the car while driving or during towing.

Related information

Switching off the engine (p. 271)

1

If the car is moving then it is enough to press the START/STOP ENGINE button to start the engine.

STARTING AND DRIVING

}}

* Option/accessory.

271

Switching off the engine

The engine is switched off using the 

START/

STOP ENGINE button.

To stop the engine:

Press START/STOP ENGINE - the engine
stops.

If the gear selector is not in P position or if the
car is moving:

Press twice on START/STOP ENGINE or
hold the button depressed until the engine
stops.

Related information

Key positions (p. 77)

Steering lock

The steering lock makes steering difficult if the
car is e.g. taken unlawfully. A mechanical noise
may be noticed when the steering lock unlocks
or locks.

Function

The steering lock is activated when the driv-
er's door is opened after the engine has
been switched off.

The steering lock is deactivated when the
remote control key is in the ignition switch

2

and the START/STOP ENGINE button is
depressed.

Related information

Starting the engine (p. 270)

Key positions (p. 77)

Steering wheel (p. 83)

Remote start (ERS)*

Remote start (ERS – Engine Remote Start)
means that the car's engine can be started
remotely in order to be able to warm up/cool
down the passenger compartment before depar-
ture. Remote start is activated via key and/or via
Volvo On Call

*.

The climate control system starts on automatic
settings. A remote-started engine is activated for
a maximum of 15 minutes; then it is switched off.
After two activations of remote start, the engine
must be started in the normal way before remote
start can be used again.

Engine remote start is only available in cars with
automatic gearbox and cars that have a
bonnet switch

3

 installed.

NOTE

The service life of the remote control key's
battery is affected by the remote start func-
tion. In the event of frequent use of remote
start, the battery should therefore be changed
once per year, see Remote control key -
replacing the battery (p. 164).

2

In cars with keyless start and lock system it is enough to have a remote control key inside the passenger compartment.

3

Available in the XC60, cars with alarm, most cars with 4-cylinder engines or if ERS is selected for new construction.

||

STARTING AND DRIVING

* Option/accessory.

272

NOTE

Follow local/national rules/regulations on
idling. Also take into account the local/
national rules/regulations regarding the noise
level when the engine is running.

WARNING

To remote-start the car, the following criteria

must be met:

The car must be supervised.

There must be no people or animals
inside or around the car.

The car must not be parked in a closed,
unventilated area - the exhaust gases
may seriously injure humans and animals.

Related information

Remote start (ERS) - operation (p. 272)

Remote start (ERS) - symbols and messages
(p. 273)

Remote start (ERS) - operation

The key's buttons for remote start.

Unlocking

Locking

Approach lighting

Unlocking, boot lid

Information

4

Remote starting the engine

To be able to remotely start the engine the car
must be locked and the bonnet closed.

Proceed as follows:

1. Briefly press on the key's button (2).
2. Follow this immediately afterwards with a

long press - at least 2 seconds - on
button (3).

If the conditions for remote start are fulfilled then
the following takes place:

1. The direction indicators flash quickly several

times.

2. The engine starts.
3. The direction indicators illuminate with a con-

stant glow for 3 seconds to verify that the
engine has started.

NOTE

After remote starting, the car continues to be
locked but with deactivated movement detec-
tor

*.

With PCC

5

 key

The light indication for Approach light-
ing

6

 flashes a few times when the but-

ton is pressed and then changes over
to constant glow if all criteria for

remote start have been fulfilled. However, this
does not mean that remote start has started the
engine.

4

Only on PCC key, see Remote control key with PCC

* - unique functions (p. 159).

5

For more information on the PCC key, see Remote control key with PCC

* - unique functions (p. 159).

6

For more information on Approach lighting, see Remote control key - functions (p. 158) and Approach lighting (p. 96).

STARTING AND DRIVING

}}

* Option/accessory.

273

To check whether remote start has started the
engine, the user can press the button (5) - if the
engine has started, there is a light indication by
the buttons (2) and (3).

Active functions

The following functions are activated with a
remote started engine:

Climate control system

Audio/video system

Approach lighting.

Deactivated functions

The following functions are deactivated with a
remote started engine:

headlamps

Position lamps

Number plate lighting

Windscreen wiper.

Remote start is stopped

The following steps switch off a remote-started
engine:

The remote control key's button
(1), (2) or (4) is depressed

The car is unlocked

A door is opened

Accelerator pedal or brake pedal is
depressed

The gear selector is moved out of P position

Active remote start time exceeds 15 minutes.

When a remote-started engine is switched off,
the direction indicators illuminate with a constant
glow for 3 seconds.

Related information

Remote start (ERS)

* (p. 271)

Remote start (ERS) - symbols and messages
(p. 273)

Remote start (ERS) - symbols and

messages

In situations where the ERS function fails or is
interrupted, a symbol is shown in the combined
instrument panel, supplemented by an explana-
tory text message.

ERS function unavailable

Message

Specification

No remote
start Too many
tries

ERS unavailable because a
maximum of 2 ERS activa-
tions in succession are
allowed.

No remote
start Low fuel
level

ERS unavailable because
fuel level too low.

No remote
start Gear not
in P

ERS unavailable because
gear selector is not in P
position.

No remote
start Driver in
car

ERS unavailable because
someone is in the passen-
ger compartment.

No remote
start Low bat-
tery

ERS unavailable due to low
battery voltage. Charge the
battery by starting the
engine.

||

STARTING AND DRIVING

* Option/accessory.

274

Message

Specification

No remote
start Engine
warning

ERS unavailable due to
warning message from
engine. Contact a work-
shop

A

.

Remote start
off Engine
coolant level
low

ERS unavailable due to
error message from cool-
ing system, see Coolant -
level (p. 357).

No remote
start Door
open

ERS unavailable because a
door/boot lid was not
closed.

No remote
start Bonnet
open

ERS did not activate
because the bonnet was
not closed.

No remote
start Car not
locked

ERS unavailable because
the car was not locked.

No remote star
Key in car

ERS did not activate
because the key was in the
car.

A

An authorised Volvo workshop is recommended.

Interrupted ERS function

Message

Specification

Remote start
off Gear not in
P

ERS interrupted because
gear selector is not in P
position.

Remote start
off Driver in car

ERS interrupted because
someone is in the passen-
ger compartment.

Remote start
off Engine
warning

ERS interrupted due to
error message from
engine. Contact a work-
shop

A

.

Remote start
off Engine
coolant level
low

ERS interrupted due to
error message from cool-
ing system.

Remote start
off Bonnet
open

ERS interrupted because
the bonnet is open.

Remote start
off Low battery

ERS interrupted since the
battery voltage is too low.

Remote start
off Low fuel
level

ERS interrupted since the
fuel level is too low.

A

An authorised Volvo workshop is recommended.

Related information

Remote start (ERS)

* (p. 271)

Remote start (ERS) - operation (p. 272)

STARTING AND DRIVING

}}

275

Jump starting with another battery

If the starter battery (p. 370) is discharged then
the car can be started with current from another
battery.

When jump starting the car, the following steps
are recommended to avoid short circuits or other
damage:

1. Set the car's electrical system in key position

0, see Key positions - functions at different
levels (p. 77).

2. Check that the donor battery has a voltage of

12 V.

3. If the donor battery is installed in another car

- switch off the donor car's engine and make
sure that the two cars do not touch each
other.

4. Connect one of the red jump lead's clamps

to the donor battery's positive terminal (1).

IMPORTANT

Connect the start cable carefully to avoid
short circuits with other components in the
engine compartment.

5. Open the clips on the front cover of the bat-

tery in your car and remove the cover, see
Starter battery - replacement (p. 372).

6. Connect the red jump lead's other clamp

onto the car's positive terminal (2).

7. Connect one of the black jump lead's clamps

to the donor battery's negative terminal (3).

8. Connect the other clamp to a grounding

point, e.g. right-hand engine mounting at the
top, the outer screw head (4).

9. Check that the jump lead clamps are affixed

securely so that there are no sparks during
the starting attempt.

10. Start the engine of the "donor car" and allow

it to run a few minutes at a speed slightly
higher than idle approx. 1500 rpm.

11. Start the engine in the car with the dis-

charged battery.

IMPORTANT

Do not touch the connections between cable
and car during the starting attempt. There is a
risk of sparks forming.

12. Remove the jump leads in reverse order -

first the black and then the red.
> Make sure that none of the black jump

lead's clamps comes into contact with the
battery's positive terminal or the clamp
connected to the red jump lead.

||

STARTING AND DRIVING

* Option/accessory.

276

WARNING

The battery can generate oxyhydrogen
gas, which is highly explosive. A spark can
be formed if a jump lead is connected
incorrectly, and this can be enough for
the battery to explode.

Do not connect the jump leads to any
fuel system component or any moving
part. Be careful of hot engine parts.

The battery contains sulphuric acid, which
can cause serious burns.

If sulphuric acid comes into contact with
eyes, skin or clothing, flush with large
quantities of water. If acid splashes into
the eyes - seek medical attention imme-
diately.

Never smoke near the battery.

Related information

Starting the engine (p. 270)

Gearboxes

There are two main types of gearbox. Manual
gearbox and automatic gearbox.

Manual gearbox (p. 276)

Automatic gearbox, Geartronic (p. 278)

IMPORTANT

To prevent damage to any drive system com-
ponents, the working temperature of the
gearbox is checked. If there is a risk of over-
heating, a warning symbol is illuminated in the
combined instrument panel in conjunction
with a text message being shown. Follow the
recommendation given in the text message.

Related information

Automatic gearbox - Geartronic

* (p. 278)

Manual gearbox

The function of the gearbox is to change the
gear ratio depending on speed and power
requirements.

Gearing pattern.

The manual gearbox has 6 gears, the shifting
pattern is imprinted on the gear lever.

Depress the clutch pedal fully during each
gear change.

Take your foot off the clutch pedal between
gear changes.

WARNING

Always apply the parking brake when parking

on a slope - leaving the car in gear is not suf-

ficient to hold the car in all situations.


Content   ..  13  14  15  16   ..