Volkswagen Touareg (2015 year). Instruction - part 21
 

  Index      Volkswagen     Volkswagen Touareg - instruction 2015 year in english


Search            copyright infringement  


Content   ..  19  20  21  22   ..


Volkswagen Touareg (2015 year). Instruction - part 21


  Touch the  OK  function key. 

The mailing address is now stored as a navigation destination. The navigation destination is displayed 
and can be edited again. 

  Press the 

 function key to close the menu. 

Favorite 

 and flagged destinations   


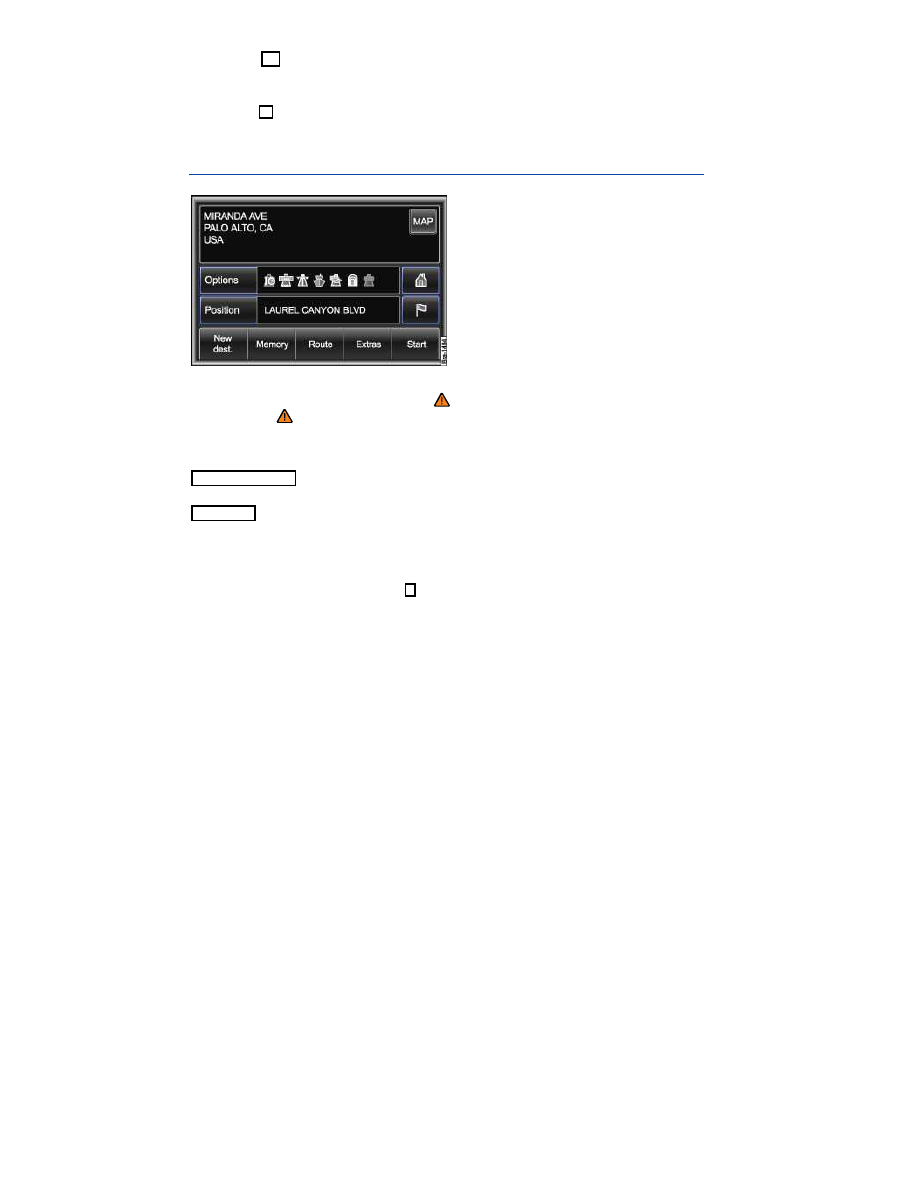
Fig. 194 Navigation main menu. 

 Please first read and heed the WARNINGS 

 note the introductory information and heed 

the WARNINGS 


Favorite destinations 


For faster selection of a stored destination and to display it on the map, you can specify the option 

Display as favorite  for frequently used destinations 

⇒ 

fig. 193

The list of destinations stored as favorites is called up from the Destination entry menu using the 

 Favorites  function key  

Favorite destinations can also be called up from the map view using the assigned icon (private   or 
business  )  

Special case of flagged destination   

In the Navigation main menu, pressing the   function key stores the current vehicle position without 
further confirmation under the “Flagged destination” name. 

Flagged destinations are stored in the directory under their respective creation date and can be re-
named or have further details added like other directory entries  


Importing contacts or exporting them as “VCards” 


Fig. 195 Selecting the address (VCards) for the import. 

 Please first read and heed the WARNINGS 

 note the introductory information and heed 

the WARNINGS 


Contacts can be imported into the directory from a compatible data medium (memory card or USB 
storage medium) if they are stored in a VCard format compatible with the unit. A maximum of 100 
contacts can be imported. 

Importing contacts (VCards) from a data medium 

  Insert the data medium into the Infotainment System  

  In the Directory settings menu, press the  Importing contacts  function key  

  Following this, press to select the data medium. 

The whole data medium is searched for contacts that can be imported. They are then displayed in a 

list 

⇒ 

fig. 195

  Select the contacts to be imported by pressing them  . 

  Press the   Options  function key. 

  In the pop-up window, press the  Import  function key. 

  Confirm the import message by pressing the  OK  function key. 

Exporting directory entries as VCards 

All address book entries can be exported to a data medium such as a memory card. Directory entries 
from the currently connected mobile phone or the inserted SIM card can also be exported  

  Insert the recordable data medium into the Infotainment System  

  In the Directory settings menu, press the  Exporting contacts  function key  

  Then select the data medium you wish to copy the contacts to by pressing on it. 
  Select the contacts to be exported by pressing them in the directory  . 

  Press the   Options  function key. 

  In the pop-up window, press the  Export  function key. 

The folder “VCards” is automatically created on the data medium during the export. The exported 
contacts are stored in VCard format (“.vcf”) in this folder. 

  Lists for importing or exporting contacts can be searched after pressing the Search function key 

in the   Options pop-up window by entering the entry name (input windows). 


  In some cases, an imported contact still needs to be converted for the navigation system  

Directory settings 


Fig. 196 Address book opened for editing. 


Fig. 197 Directory settings. 

 Please first read and heed the WARNINGS 

 note the introductory information and heed 

the WARNINGS 


  Open Address book menu for editing  

  Press the   Options  function key 

⇒ 

fig. 196

  In the pop-up window, press the  Settings  function key. 

The Directory settings menu opens 

⇒ 

fig. 197


Function key: Effect  

Memory capacity: Indicates how many directory entries are stored in the 

current user profile and the general contacts.  

Sort by: Defines the order and display of the directory entries.  


Function key: Effect  

 Show general contacts: Directory entries that are not assigned to a user 

profile are also displayed  

Delete profiles: Press the profile to be deleted in the list of stored user 

profiles and accept the confirmation dialog with Delete.  

Change profile name

15

: Renames currently loaded profile in an input win-

dow  

Read name tags

16

: Reads out recorded name tags  

Delete name tags

16

: Deletes recorded name tags  

Import directory

15

: Starts an immediate import of directory entries from a 

connected mobile phone to the directory.  

Import contacts: Imports navigation data (VCards) from an inserted data 

medium into the directory  

Export contacts: Copies selected directory entries on an inserted data 

medium  


15

  Only active when a mobile phone or a SIM card is currently connected to the Infotainment System 

⇒ page 360. 

16

  Only active if name tags have been recorded for directory entries 

⇒ page 240. 


Storing or editing the home address 


Fig. 198 Menu: Destination entry. 


Fig. 199 Menu: New home address. 

 Please first read and heed the WARNINGS 

 note the introductory information and heed 

the WARNINGS 


Only one address or position can be saved as the home address. The stored home address can be 
edited or deleted. 

  In the Navigation main menu, press the 

 function key 

⇒ 

fig. 194

If a home address has already been stored, the route guidance will be started  

A message appears if the home address has not been stored. 

  Confirm message to open New home address menu 

⇒ 

fig. 199

New home address menu 

The New home address menu allows you to set a new destination as the home address 

⇒ 

fig. 199

If a new home address is selected, the previously stored home address is overwritten. 

If a home address has already been stored, it is shown and can be edited when the  Address  function 
key in the Address entry menu  

Opening the home address to edit it 

  In the Navigation main menu, press the  New destination  function key 

⇒ 

fig. 194

  In the Destination entry menu, press the 

 Home address  function key 

⇒ 

fig. 183


The Favorites - home address menu with further feature keys opens. 

Start route guidance : Starts route guidance to the stored home address. 

Show destination on map : Shows the home address on the map. 

New home address : Opens the New home address menu 

⇒ 

fig. 199

Delete home address : Deletes the stored home address. 


Tour mode 

 Introduction 

In this section you’ll find information about: 

Entering a stopover


Selecting an additional destination and adding it to the tour


Tour mode in the Navigation main menu


Tour plan: creating or editing a tour


Tour memory


Leaving Tour mode


In Tour mode, multiple destinations can be travelled during route guidance 

⇒ 

fig. 204

If a stopover is added or deleted during route guidance, the route guidance will then need to be started 
again in some cases. 

A trip with multiple destinations is called a “Tour”. 

A tour always consists of a destination which is the end point of the tour and a maximum of ten 
stopovers

Displaying starting point, destination and stopovers 

The “starting point” of a tour is always the vehicle position determined by the navigation system (dis-
play:  ). 

“Stopovers” are driven to before the destination and numbered in order (Display: no.   or no.  ). 

The “destination” is the end point of a tour (display:  ). 

More information: 

  Safety information 

 for Infotainment System  

  Basic information on use  
  Introduction to navigation  
  Destination input  
  Destination guidance  

  WARNING 

Driving on today's roads demands the full attention of the driver at all times. Driver distrac-
tion causes accidents, collisions and serious personal injury! 

  Never let yourself be distracted when setting, adjusting, or using the Infotainment System, 

when using your mobile phone, or when operating the mobile phone controls. 

  Always drive attentively and responsibly. Use the Infotainment system, your mobile 

phone, and the mobile phone controls only if road, traffic, and weather conditions permit and 
you will not be distracted from your driving. 

  If you cannot use the Infotainment System, your mobile phone, or the mobile phone con-

trols safely while driving, wait until later or find a safe spot where you can pull off the road 
and park the vehicle. 

  Always set sound volume levels so that you can clearly hear horns, sirens, and other 

warning sounds outside the vehicle. 


Entering a stopover 


Fig. 200 Navigation main menu. 

 Please first read and heed the WARNINGS 

 note the introductory information and heed 

the WARNINGS 


A stopover can be input once a destination has been defined. A stopover can also be entered during 
route guidance. The route guidance then needs to be started again in some cases. 

  In the Navigation main menu, press the  Extras  function key 

⇒ 

fig. 200

  In the pop-up window, press the  Accept new stopover  function key. 

  Confirm the subsequent query by pressing the  Stopover  function key. 

  Select an additional destination and add it to the tour  

Finishing input of a stopover 

After the first stopover has been selected, the Navigation main menu is automatically opened in tour 

mode 

⇒ 

fig. 204

The displayed “New tour” can be saved or edited further in the tour plan  

Selecting an additional destination and adding it to the tour 


Fig. 201 Menu: Destination entry. 


Fig. 202 Move object: Specifying the position for a new destination. 

 Please first read and heed the WARNINGS 

 note the introductory information and heed 

the WARNINGS 


A new destination is selected as described for the destination entry  

When the new destination has been sufficiently defined, a message appears that the order in which 
the destinations are to be driven to is to be determined. 

  Press the  Next  function key. 

  In the Move object menu, press the  Starting point   function key to add the destination as the 

first stopover 

⇒ 

fig. 202

  OR: Press another destination after which the new destination should be driven to. 

  OR: Press the  ...   function key to define the destination as the new destination. 

The sequence in which the destinations will be driven can be changed subsequently in the Tour 

plan menu  

Tour mode in the Navigation main menu 


Fig. 203 Navigation main menu. 


Fig. 204 Navigation main menu in tour mode. 

 Please first read and heed the WARNINGS 

 note the introductory information and heed 

the WARNINGS 


After the first stopover has been selected, the Navigation main menu is automatically opened in tour 

mode 

⇒ 

fig. 204

Manually switching to tour mode 

It is possible to switch to tour mode manually from the Navigation main menu 

⇒ 

fig. 203

  Touch the  Extras  function key. 

  In the pop-up window, press the  Tour mode  function key. 

The Navigation main menu is opened in tour mode and the last destination is displayed in tour mode. 

Editing within Tour mode 

The tour is displayed in the upper third of the screen in the Navigation main menu 

⇒ 

fig. 204

. The 

name of the tour, the destination and the first stopover is displayed. Further destinations can be added 
to the displayed tour. 

  Press the display box to show the entire tour in the tour plan  

  OR: Press the  Destination entry  function key and confirm the subsequent query by pressing the 

Stopover  function key. 

  Select an additional destination and add it to the tour  


Tour plan: creating or editing a tour 


Fig. 205 Tour plan menu: Tour with a stopover. 

 Please first read and heed the WARNINGS 

 note the introductory information and heed 

the WARNINGS 


In the tour plan, an existing tour can be edited or a new tour can be created. 

When a new tour is created, the tour displayed in the Navigation main menu is overwritten if it has not 
been stored  

Opening the Tour plan menu 

  Change to tour mode  

  In the Navigation main menu, press the  Extras  function key 

⇒ 

fig. 204

  Press the  New tour  function key in the pop-up window to create a new tour. 

  OR: Press the  Edit tour  function key in the pop-up window to edit the displayed tour. 

The Tour plan menu opens 

⇒ 

fig. 205

When a new tour has been created, only its starting point is specified (vehicle position). Otherwise, all 
destinations in the tour are displayed in the sequence in which they are driven to during route guid-
ance. 

Displaying starting point, destination and stopover in the tour plan 

Starting point: “ ” 

Stopover: “no.  ” or “no.  ” 

Destination: “ ” 

Editing in the Tour plan menu 

  If you press a destination displayed in the tour plan, it is then only possible to start route guidance 

to this destination 

⇒ 

fig. 205

  Press the 

 function key following an entry to create a new tour or to edit the displayed tour. 

A pop-up window containing editing options is opened: 

Details : Opens the destination in the Detail view. 

Start : Starts route guidance only to this destination  

Delete : Deletes the destination from the tour plan. 

Move : Makes it possible to move the destination in the tour plan 

⇒ 

fig. 202

Add stopover : Starts the process of selecting an additional destination  


The Starting point   of a tour cannot be changed in the Tour plan menu. It is always deter-
mined by the current vehicle position. The  Add stopover  function key is only available via the 


function key. 

  Press the 

 function key to close the tour plan. Changes are applied automatically. 

Tour memory 


Fig. 206 Navigation main menu: Tour mode. 

 Please first read and heed the WARNINGS 

 note the introductory information and heed 

the WARNINGS 


A newly created tour is always displayed with the name “New tour” 

⇒ 

fig. 206

. The tour needs to be 

stored in the tour memory otherwise it will be overwritten during editing or deleted when the tour mode 
is ended. 

If changes to a stored tour are stored using the old tour name, this tour will be overwritten. If you do 
not wish to do this, save the tour under a different name. 

Storing a displayed tour 

  In tour mode, press the  Memory  function key 

⇒ 

fig. 206

  In the pop-up window, press the  Save tour  function key. 

  Enter a name for the tour being saved in the input window  

Saved tours can be edited further in the Tour plan  

Calling up a stored tour 

  In tour mode, press the  Memory  function key. 

  In the pop-up window, press the  Load tour  function key. 

The list of stored tours is opened. 

  Press the name of a tour to display it in the Navigation main menu. 
  OR: Press the function key 

 to display the tour in the detailed view. 

Managing stored tours 

  In tour mode, press the  Memory  function key. 

  In the pop-up window, press the  Manage tour memory  function key. 

  In the Manage tours menu, press the  Delete all  function key to delete all saved tours at once. 


  OR: Press the  Change tour  function key to show all tours in a list and then press the 

 function 

key to rename or delete individual tours. 

Leaving Tour mode 

 Please first read and heed the WARNINGS 

 note the introductory information and heed 

the WARNINGS 


A tour that has not been stored is deleted when you exit tour mode. The displayed tour can be stored 
before exiting  

  Press the  Extras  function key 

⇒ 

fig. 206

  In the pop-up window, press the  Leaving tour mode  function key. 

  Confirm the following message with  Leaving . 

The Navigation main menu now only displays the destination defined as the end point in tour mode 
⇒ 

fig. 203


Waypoint navigation (Off-road mode) 

 Introduction 

In this section you’ll find information about: 

Menu for waypoint navigation


Plotting a waypoint tour


Managing stored waypoint tours


Driving a stored waypoint tour


Stopping waypoint navigation


Waypoint navigation is a purely off-road feature as a means of orientation when driving in “Off-road 
areas” at low speeds. 

Off-road areas are areas that do not have any street or off-road information. Streets, buildings and 
natural boundaries such as mountains and rivers will not be recognized even if they are shown on the 
map. 

Waypoint navigation is not suitable for driving on normal roads. One-way streets, highway junctions 
and other such streets are not detected. 

Autozoom cannot be activated in the map display. 

More information: 

  Safety information 

 for Infotainment System  

  Basic information on use  
  Introduction to navigation  
  Destination input  

  WARNING 

Using the Infotainment System while the vehicle is moving can distract you from the road and 
lead to accidents. 

  Always drive attentively and responsibly. 
  Select volume settings so that acoustic signals from the outside are audible (for example, 

the sirens of emergency rescue vehicles). 


  WARNING 

Driving recommendations and traffic symbols displayed by the navigation system may differ 
from the current traffic situation. 

  Traffic signs and traffic regulations have priority over the recommendations and displays 

provided by the navigation system. 

  Always adjust your speed and driving style to road, traffic, weather, and visibility condi-

tions. 


Menu for waypoint navigation 


Fig. 207 Navigation main menu. 


Fig. 208 Waypoint navigation menu with opened waypoint tour. 

 Please first read and note the introductory information and heed the WARNINGS 


Starting waypoint navigation 

  In the Navigation main menu, press the  Extras  function key 

⇒ 

fig. 207

  In the pop-up window, press the  Off-road  function key. 

The Navigation main menu is opened as the Waypoint navigation menu 

⇒ 

fig. 208

Function keys in the waypoint navigation menu 
 

Function key: Effect  

Memory  


Load waypoint tour: Opens a list for selecting a 

stored waypoint tour.  


Function key: Effect  

Manage tour memory: Opens a menu for renaming 

or deleting stored waypoint tours.  

Waypoint tour  


New waypoint tour: Starts plotting a waypoint tour  

Exit waypoint mode: Closes waypoint navigation.  


Plotting a waypoint tour 


Fig. 209 Plotting a waypoint tour. 

 Please first read and note the introductory information and heed the WARNINGS 


waypoint tour consists of a chain of automatically stored “waypoints”. 

Starting recording 

  In the Waypoint navigation menu, press the  Waypoint tour  function key 

⇒ 

fig. 208

  In the pop-up window, press the  New waypoint tour  function key. 

  In the following input window, enter a name for the new waypoint tour  

The system will start to record the route driven. 

Points in the terrain can be marked by setting a manual waypoint. 

  In the Waypoint navigation menu, press the  Mark current position in recording  function key. 

Waypoints that have been set manually will be displayed on the map with a flag 

⇒ 

fig. 211

Ending plotting 

  In the Waypoint navigation menu, press the  Stop  function key. 

After plotting, the stored tour is displayed in the Waypoint navigation menu 

⇒ 

fig. 210


Content   ..  19  20  21  22   ..