Volkswagen Touareg (2015 year). Instruction - part 15
 

  Index      Volkswagen     Volkswagen Touareg - instruction 2015 year in english


Search            copyright infringement  


Content   ..  13  14  15  16   ..


Volkswagen Touareg (2015 year). Instruction - part 15


  In the storage compartment in the lower front center console. 

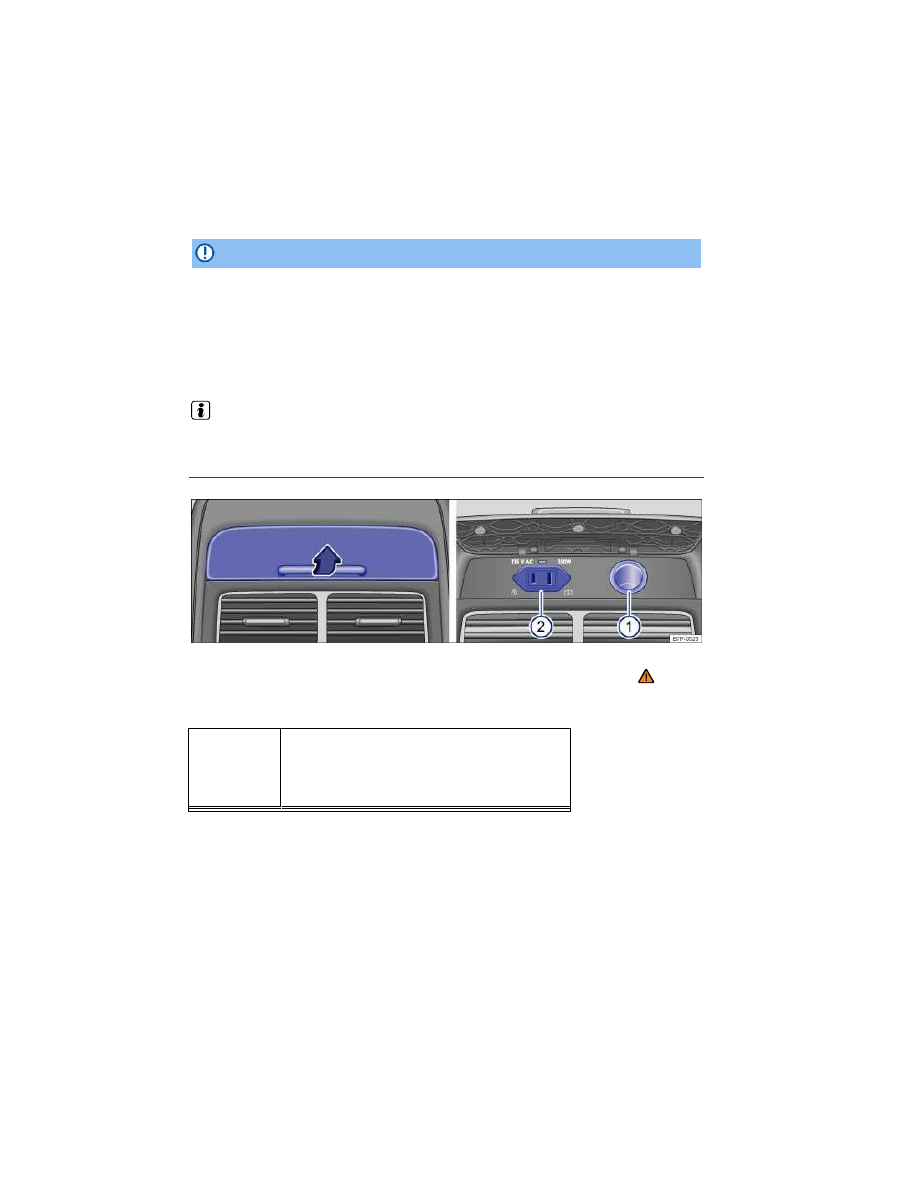
Opening and closing the cover in the rear center console 

  Reach into the recess from below 

⇒ 

fig. 128

; fold the cover up in the direction of the arrow and hold 

it open. 

  The cover is spring-loaded and closes when you let it go. 

Opening and closing the 12 Volt socket covers in the front center armrest storage 
compartment, luggage compartment, lower front center console 

  Grasp the cover on the side 

⇒ 

fig. 129

 and open it in the direction of the arrow; hold it open. 

  The cover is spring-loaded and closes when you let it go. 

  NOTICE 

  Follow the manufacturer's instructions for connected devices! 
  Never exceed the maximum power consumption, or the entire vehicle electrical system may 

become damaged. 

  12 Volt socket: 

–  Only use equipment that has been tested for electromagnetic compatibility and complies with 
applicable guidelines. 
–  Never feed current into the socket with a solar panel, for example. 

  Unshielded devices may interfere with radio reception or the vehicle's electrical system. 

115 Volt outlet in the vehicle 


Fig. 130 Rear center console: Open cover for access to the 115 Volt outlet (if equipped). 

 Please first read and note the introductory information and heed the WARNINGS 


Maximum power draw 
 

Outlet 
⇒ 

fig. 130


(2)


Maximum power draw  


Outlet 
⇒ 

fig. 130


(2)


Maximum power draw  

115 Volts  

150 watts (300 watts peak consumption) 


The maximum power draw at any one outlet must never be exceeded. Electrical devices should have 
information on them that says how much power they draw. 

115 Volt outlet 

The outlet can only be used if the engine is running . 

Connecting an electrical device: Insert the plug as far as it goes into the outlet in order to unlock the 
integrated childproof lock. There is electricity in the outlet only after the childproof lock is unlocked. 


LED display on the outlet  

Green continuous 
light:  

The child-proof lock is un-
locked. The outlet is opera-
tional.  

Red flashing light:  

Malfunction, such as cutoff due 
to current overload or over-
heating.  


Opening and closing the cover in the rear center console 

  Reach into the recess from below; fold the cover up in the direction of the arrow and hold it open. 
  The cover is spring-loaded and closes when you let it go. 

Overheating cutoff 

The inverter in the 115 Volt outlet shuts off automatically above a certain temperature. The shutoff 
prevents overheating in case of excessive power consumption of connected devices or at high ambi-
ent air temperatures. The inverter switches back on automatically after a cool-down period. Connected 
devices which were left switched on come back on again. For this reason, switch off connected electri-
cal devices if the inverter switches off due to overheating. 

  DANGER 

Improper use of the 115 Volt outlet can cause electrical shock, burns, and severe personal 
injury. 

  Never spill liquids on the socket. 
  Never plug an adapter or an extension cord into the 115 Volt outlet. Otherwise, the inte-

grated child-proof lock is switched off and the outlet is live. 

  Never stick anything that conducts electricity, such as a knitting needle, into the contacts 

of the 115 Volt outlet. 


  NOTICE 

  Follow the manufacturer's instructions for connected devices! 
  Never exceed the maximum power consumption, or the entire vehicle electrical system may 

become damaged. 

  115 Volt outlet: 

–  Do not connect devices or plugs which are too heavy, such as a grid power supply adapter or 
cord, directly onto the outlet. 
–  Do not connect lamps containing fluorescent tubes. 
–  Only connect devices to the outlet with voltage consistent with the voltage of the outlet. 
–  For devices with a high starting current, the integrated over-current shutoff will prevent them 
from being switched on. In this case, disconnect the power supply from the device and reconnect 
after about 10 seconds. 

  Some devices may not work very well when connected to the 115 Volt outlet due to low wattage. 

  Unshielded devices may interfere with radio reception or the vehicle's electrical system. 


Safety information on Infotainment System 

  WARNING 

Driving on today's roads demands the full attention of the driver at all times. Driver distrac-
tion causes accidents, collisions and serious personal injury! 

  Never let yourself be distracted when setting, adjusting, or using the Infotainment System, 

when using your mobile phone, or when operating the mobile phone controls. 

  Always drive attentively and responsibly. Use the Infotainment system, your mobile 

phone, and the mobile phone controls only if road, traffic, and weather conditions permit and 
you will not be distracted from your driving. 

  If you cannot use the Infotainment System, your mobile phone, or the mobile phone con-

trols safely while driving, wait until later or find a safe spot where you can pull off the road 
and park the vehicle. 

  Always set sound volume levels so that you can clearly hear horns, sirens, and other 

warning sounds outside the vehicle. 

  Setting the sound volume too high may damage your hearing. This applies even if you are 

exposed to high volumes for short periods only. 


  WARNING 

The volume level may suddenly get louder change when you switch media source or connect 
a new audio source. 

  Always lower the base volume before switching media source or connecting a new audio 

source. 


  WARNING 

Driving recommendations and traffic symbols displayed by the navigation system may differ 
from the current traffic situation. 

  Traffic signs and traffic regulations have priority over the recommendations and displays 

provided by the navigation system. 

  Always adjust your speed and driving style to road, traffic, weather, and visibility condi-

tions. 


  WARNING 

External devices that are loose in the vehicle or not properly secured could be thrown around 
the interior and cause injuries during a sudden driving or braking maneuver, or in a crash. 

  Never put or attach an external device on a door, on the windshield or above or near to the 

areas marked “AIRBAG” on the steering wheel, the instrument panel and the seat backrests, 
or between these areas and the vehicle occupants. External devices could cause serious 
injury in an accident, especially when the airbags inflate. 


  WARNING 

Connecting cables of external devices may obstruct visibility through the windshield or other 
windows. 

  Route cables so as not to interfere with the driver. 


  WARNING 

Opening a CD or DVD player's housing can lead to injuries from invisible laser radiation. 

  Always have CD or DVD players repaired only by a qualified workshop. 


  NOTICE 

Improper insertion or insertion of an improperly fitting memory card can damage the locking 
mechanism in the memory card slot.
 

  Pay attention to the proper insertion position 

⇒ page 269, Media mode: Introduction. 

  Excessive pressure can destroy the locking mechanism in the memory card slot. 
  Only use suitable memory cards. 


  NOTICE 

  When inserting and removing CDs and DVDs, always hold them at right angles to the front 

of the unit. Inserting or removing them at an angle to the DVD drive may lead to scratching. 

  Inserting a second CD or DVD while a CD or DVD is inserted or is being ejected can destroy 

the DVD drive. Always wait until the data storage device is completely ejected. 


  NOTICE 

Any foreign objects attached to a data medium and non-round data storage devices can dam-
age the DVD drive.
 

  Only clean 12-cm standard CDs or DVDs should be used! 

–  Do not attach stickers or other items to the date storage device. Stickers may peel off and 
damage the drive. 
–  Do not insert 8-cm single CDs or non-round CDs (shaped CDs) or DVDs. 
–  Do not insert DVD-Plus, Dual Discs and Flip Discs, as these are thicker than standard CDs. 


Operation basics 

 Introduction 

In this section you’ll find information about: 

Controls


Switching on or off


Adjusting the base volume


Function keys on screen


Browsing lists


Moving objects and displays on the screen


Using slider 

 to change settings


Input windows with on-screen keyboard


Additional displays and display options


Due to changes to its settings, some aspects of the unit's operation may differ from the descriptions 
given in this manual. For this reason, Volkswagen recommends that you reset the unit to its factory 
settings
 the first time you use it  

Before using the unit for the first time, carry out the following steps. This will enable you to use the unit 
safely and make full use of the functions it provides: 

Before using 

  Observe safety notes 


⇒  Safety information on Infotainment System

  Familiarize yourself with the controls of the Infotainment System. 

  Reset the unit to its original condition (factory settings) 

⇒  System settings

  Use data storage devices suitable for Media mode 

⇒  Data media and file requirements


More information: 

  Safety information 

 for Infotainment System  

  NOTICE 

Lightly pressing the buttons or briefly pressing the touchscreen is sufficient to operate the 
unit.
 

  Not all listed function keys and functions may be available due to the device software used in 

your market. The equipment is not faulty if a function key is missing from the screen. 

   Volkswagen recommends using the Volkswagen cleaning cloth for cleaning the screen. Re-

placement cloths are available from your Volkswagen dealership. 

  After making entries, the Infotainment System may need a few seconds for processing and may 

not respond to operation of controls. Nevertheless, do not continue to operate the unit, because oper-


ating sequences that have been input are “memorized” and “processed” in succession once the back-
ground processes have been completed. 

  Due to country-specific legal requirements, some functions are not selectable on the screen 

above a certain driving speed. 

  Using a mobile phone in the vehicle may cause noise from the vehicle speakers. 

  Some countries may have restrictions regarding the use of Bluetooth devices. Information can be 

obtained from the local authorities. 

Controls 


Fig. 131 Overview of rotary/push knobs and the Infotainment buttons. 

 Please first read and heed the WARNINGS 

 note the introductory information and heed 

the WARNINGS 


The labelled Infotainment buttons for accessing the different feature areas are operated by pressing
In this manual, the Infotainment buttons are shown as a button symbol with blue writing (such as  

MEDIA

). 

The Infotainment System screen is located above the Infotainment buttons. The screen is a 
touchscreen that is operated by touching with your finger or by touching the surface of the screen in 
another way. 

(1)


 Rotary/push knob. 

–  Press to switch on or off  
–  Turn to adjust the basic volume  

(2)


Infotainment buttons for selecting an audio or video source. 
– 

BAND

 / 

RADIO

: Switches to radio mode  

– 

MEDIA

: Switches to media mode (audio or video source)  

(3)


Adjustment knob: The feature depends on the operating mode. 
–  Turn to select menu options in long lists and press to call up the selected option (for in-

stance, select a station from the station list)  

–  Turn to change some settings (such as map scale). 
–  During active route guidance, press to repeat a navigation announcement  

(4)


Infotainment buttons for accessing the navigation functions. 
– 

NAV

: Open the Navigation main menu  

– 

TRAFFIC

: Displays stored traffic reports  

(5)


SETUP

 Infotainment button for accessing the Infotainment settings. 


(6)


CAR

 Infotainment button for accessing the vehicle settings  

(7)


CLIMATE

 Infotainment button for accessing the air conditioning settings  

(8)


PHONE

 Infotainment button

4

 for accessing the telephone functions  

Switching on or off 

 Please first read and heed the WARNINGS 

 note the introductory information and heed 

the WARNINGS 


To switch the unit on or off manually, briefly press the   rotary/push knob 

⇒ 

fig. 131


(1)

The system starts after being switched on. The most recently played audio source is played at the 
volume that was last set. 

  The Infotainment System is permanently linked to the vehicle. It will not work in another vehicle. 

  If the vehicle battery was disconnected, please switch on the ignition before switching on the 

device. 

Adjusting the base volume 

 Please first read and heed the WARNINGS 

 on page 229, note the introductory infor-

mation and heed the WARNINGS 

 on page 231. 


Function  

Response  

Increase vol-
ume.  

Turn the volume control    

⇒ 

fig. 131


(1)

 clockwise or 

press the button  

 on the multi-function steering wheel 

⇒ page 5⇒ page Error! Bookmark not defined..  

Reduce vol-
ume.  

Turn the volume control    counterclockwise or press the 

  button on the multi-function steering wheel.  


To mute the unit, turn the volume control   counterclockwise all the way (display:  ). Any media 
source being played will stop. 

In vehicles without mobile phone package, the unit can be muted with the 

PHONE

 Infotainment 

button. 

Changes to the volume are indicated by a “bar” on the Infotainment System screen. During this time 
the Infotainment System cannot be operated. 

It is possible to preset certain volume settings and adjustments in the Infotainment System  


4

  The current audio source is muted in vehicles without mobile phone package. 


  WARNING 

Using the Infotainment System while the vehicle is in motion can take your attention off the 
road and lead to accidents and serious personal injuries. 

  Always drive attentively and responsibly. 
  Always set volume levels so that you can clearly hear horns, sirens, and other warning 

sounds outside the vehicle. 

  Setting the volume too high may damage your hearing. This also applies if you are ex-

posed to high volumes for short periods only. 


  WARNING 

The volume may suddenly get louder when you switch media source or connect a new audio 
source. 

  Always lower the volume before switching media source or connecting a new audio 

source. 


  NOTICE 

Excessively loud or distorted playback can damage the vehicle speakers. 

  If the base volume on the Infotainment System has been considerably increased to play a certain 

audio source, lower the volume again before switching to another audio source. 

Function keys on screen 


Fig. 132 Setup main menu (SETUP). 


Fig. 133 Navigation settings. 

 Please first read and heed the WARNINGS 

 note the introductory information and heed 

the WARNINGS 


Active areas of the screen that call up a certain function are called “function keys”. These buttons are 
operated by briefly pressing the screen or by pressing and holding. Function keys are described in the 
manual as “function key” and with the  ...  button symbol. 

Function keys start functions or open submenus. In submenus the name of the currently selected 

menu is displayed in the title bar 

⇒ 

fig. 132


(A)

Press the 

 function key 

(B)

 in the title bar to switch back from a submenu. 

If a function key on the screen has a gray background, it is currently disabled (such as in  

fig. 138

). 

Pop-up window 

The selected setting is displayed in an “option window” behind some function keys. The option window 

is indicated by an arrow   

⇒ 

fig. 133


(D)

If you press one of these function keys, a pop-up window opens, displaying all the possible setting 
options. When the desired setting is pressed, the pop-up window closes and the modified setting is 
displayed in the  ...   option window. 

If you press the   function key in the Options pop-up window, the pop-up window will close without 
changes being made. 

Starting functions or activating via “check boxes” 

Some functions are started and stopped by pressing a button, for example the scan feature.  Other 
functions and displays are permanently activated or deactivated and are controlled via check boxes 

(E)

A check mark in a check box   indicates that the feature is activated, an empty check box  , that it is 
deactivated. 

Any functions enabled by check box can only be disabled by pressing the respective function key 
again. 


Browsing lists 


Fig. 134 List for selecting audio files for import. 


Fig. 135 Station list in radio mode. 

 Please first read and heed the WARNINGS 

 on page 229, note the introductory infor-

mation and heed the WARNINGS 

 on page 231. 

Selecting items in lists and searching lists (scrolling) 

If there are more items available in a list view than can be displayed on the screen, a scroll bar is 

displayed on the right of the screen 

⇒ 

fig. 133

  Browsing lists line-by-line: press the 

 or 

 function key briefly. 

  Browsing lists page-by-pagebriefly press the screen above or below the scroll marker 

⇒ 

fig. 133


(C)

OR: Briefly press the 

 or 

 function keys 

⇒ 

fig. 134

  Browsing long lists quickly page-by-pagepress and hold the screen above or below the scroll 

marker. 

  To quickly scan through a long list, place your finger on the scroll marker and move it over the 

screen without losing contact. When the desired position is reached, lift the finger from the screen. 

Selecting options in long lists with the setting knob 

(3)


You can also use the setting knob to browse through simple lists without additional function keys, 

which are provided for selecting an entry 

⇒ 

fig. 135

  Turn the setting knob to move a selection box and browse through the list. 
  Press the setting knob to call up the selected entry. 


Moving objects and displays on the screen 


Fig. 136 Destination on map. 

 Please first read and heed the WARNINGS 

 note the introductory information and heed 

the WARNINGS 


Some objects and displays can be moved on the screen. For example, you can move the map display 

behind the crosshair to select a destination from the map 

⇒ 

fig. 136

  Lightly press your finger against the movable object on the screen (in on the map). 
  Move your finger across the screen without losing contact. The object will follow the movement. 
  When the desired position is reached, lift the finger from the screen. 

Some objects can only be moved within a predefined range, such as the slider 

 in a setting bar 

⇒ 

fig. 137

Using slider 

 to change settings 


Fig. 137 Sound settings. 

 Please first read and heed the WARNINGS 

 note the introductory information and heed 

the WARNINGS 


Moving a slider 

 across its scale adjusts a setting 

⇒ 

fig. 137

  Place your finger on the slider 

 and drag it across the screen without losing contact

  OR: Tap the  -  or  +  function key on the screen to move the slider in steps. 


  OR: Press a point on the scale either side of the slider. The slider will then 

 “jump” straight to the 

selected point. 

Input windows with on-screen keyboard 


Fig. 138 General view of an input window with on-screen keyboard. 

 Please first read and heed the WARNINGS 

 note the introductory information and heed 

the WARNINGS 


Input windows with on-screen keyboard are used for functions such as entering an entry name, select-
ing a destination address or entering a search term for searching in long lists. 

Not all input windows contain all of the function keys listed here. 

Subsequent chapters only explain those functions that differ from the general view described here. 

The input line with the cursor is located on the left in the top line of the screen. All inputs are displayed 
here. 

Input screens for “free text input” 

An input window for free text entry allows any letter, number and special character to be entered in 
any combination. 

Touching the  OK  function key accepts the currently displayed character sequence. 

Input windows for selecting a saved entry (such as selection of a destination address) 

It is only possible to select a sequence of letters, numbers and special characters that matches a 

stored entry 

⇒ 

fig. 138

Every time a character is entered, a destination corresponding to the specifications is proposed in the 
input line (here: BRANDAUSTRASSE). When terms are made up of more than one word, it is necessary 
to enter the space as well (such as in SANKT AUGUSTIN). 

If fewer than 99 entries are available, the number of remaining entries is displayed after the input line 
(here: 14). Pressing this function key displays these remaining entries in a list. When fewer than six 
destinations are available, the list opens automatically. 

Overview of function keys 
 

Function keys  

Action and effect  


Function keys  

Action and effect  

Containing letters 
and digits  

Press to insert the character in the input line.  

Containing letters 
and   

Press and hold to open a pop-up window with spe-
cial characters based on this letter. 
Press the desired character to enter it. Some spe-
cial characters can also be written out (such as 
“AE” for “Ä”).  


Pressing briefly highlights all function keys for 
which special characters are available. 
Press a function key to open the pop-up window to 
select a special character.  


Press to switch between upper and lower case.  


Press to open the input window for numbers and 
special characters or to go back to the letter input 
window.  

OR: A-Z  


Press to enter a space.  

 and    

Press to move the cursor to the left or right in the 
input line.  

OK  

Press to accept the suggestion in the input line and 
close the input window.  


Press to delete characters in the input line from 
right to left.  


Press to open the list of remaining items that match 
the text you have entered.  

* (or here: 14)  

Displays the number and opens the list of entries 
that are still available corresponding to the specifi-
cations.  


Press to close the input window.  


Additional displays and display options 

 Please first read and heed the WARNINGS 

 note the introductory information and heed 

the WARNINGS 


The displays appearing on the screen can vary depending on the settings, and may differ from those 
described here. 

If the time display is activated in the system settings, the time will appear in the status bar within a 
few seconds in radio or audio mode. The station or track will then be displayed above or below it. This 
display feature can be deactivated  

All displays appear only after the Infotainment System has completed start-up. 

The screen can be switched off in some menus. 

  Touch the  Extras  function key. 

  In the pop-up window, press the  Display off  function key. 

  To switch on again, press any Infotainment button or touch screen. 


Voice operation 

 Introduction 

In this section you’ll find information about: 
Use of voice operation


Notes on voice operation


Voice operation settings


Some functions can be called up with voice commands. 

It is not possible to control the setting menus (

SETUP) with voice commands. 

During voice operation, voice guidance is issued as a help for operation. This can be output in long or 
short dialog  

Supported languages 

Voice operation is available only for the languages that can be selected in the Infotainment System. 

You need to use the language set in the Infotainment System for voice operation. 

  Set the preferred language in the 

System settings menu  

More information: 

  Safety information   for Infotainment System  
  Basic information on use  

  Voice operation is not possible during parking maneuvers. 

Use of voice operation 

 Please first read and heed the WARNINGS 

 and note the introductory information  

Starting and stopping the voice operation feature 

  Briefly press the 

  button on the multi-function steering wheel to activate voice operation  

The voice operation is activated with a signal tone. A help menu with the most important voice com-
mands for the current operating area is then displayed (such as media mode). Voice guidance pro-
vides assistance with the subsequent voice dialog. 

  Say the required voice command and follow the voice dialog. 
  Voice operation is ended once an action is completed. 
  To end voice operation manually, press and hold the 

  button on the multi-function steering 

wheel until the corresponding confirmation is given or press the 

 function key on the screen. 

The individual entries for voice operation are numbered in the list views. The numbers are displayed 
on the left in the function keys. Speaking a number opens or activates the corresponding entry. 

Often, the same feature can be called up using different voice commands. If in doubt, simply try out a 
voice command. 


Content   ..  13  14  15  16   ..