Volkswagen Tiguan (2015 year). Instruction - part 6


  Index      Volkswagen     Volkswagen Tiguan - instruction 2015 year in english


Search            copyright infringement  


Content   ..  4  5  6  7   ..


Volkswagen Tiguan (2015 year). Instruction - part 6


  WARNING 

Contact with parts of the vehicle interior can cause serious personal injury in a crash. 

  Always make sure that all vehicle occupants stay in a proper seating position and are 

properly restrained whenever the vehicle is moving. 

  Improper seating positions increase the risk of serious and fatal injury, especially when an 

airbag deploys and strikes a passenger in an improper seating position. 

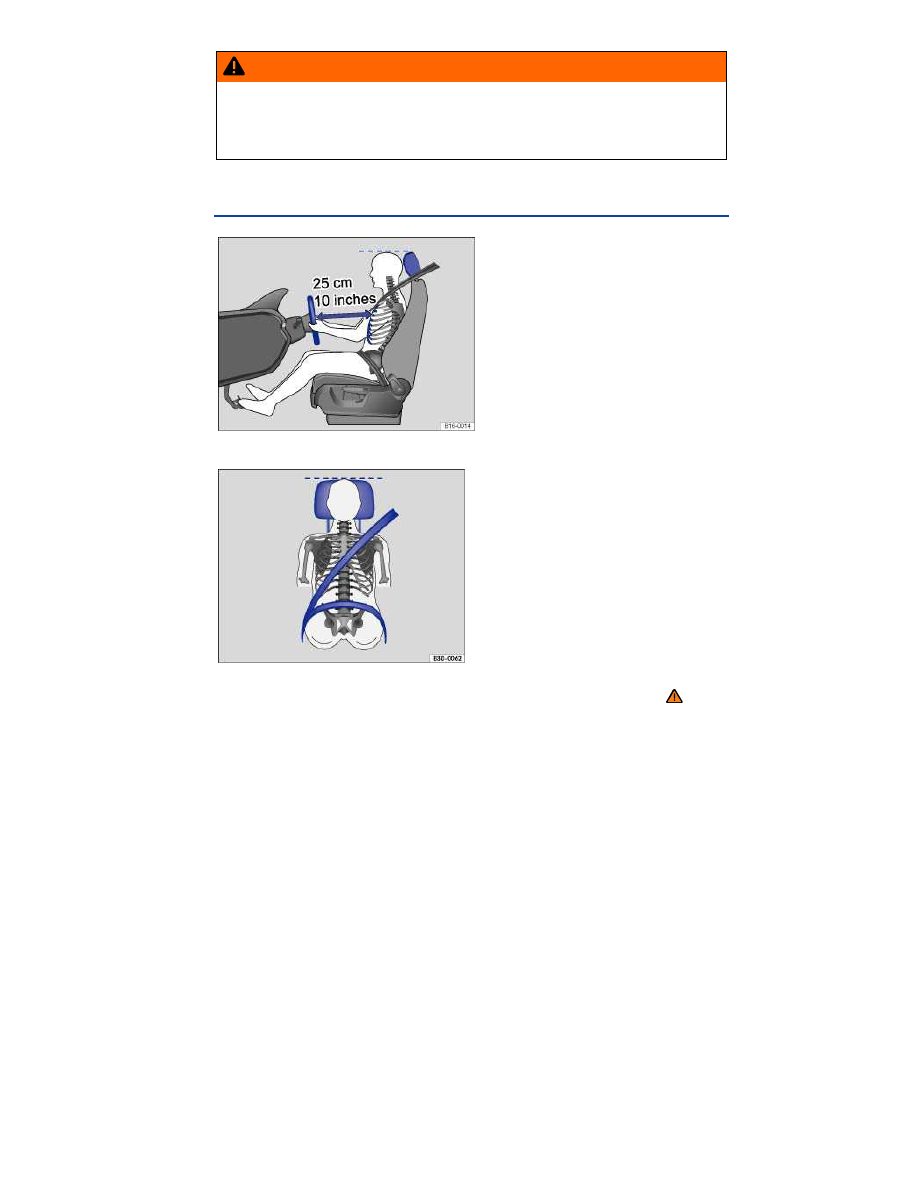
Proper seating position 


Fig. 39 The driver should never sit closer than 10 inches (25 cm) of the steering wheel. 


Fig. 40 Proper safety belt positioning and head restraint adjustment. 

 Please first read and note the introductory information and heed the WARNINGS 


The following describes the proper seating positions for the driver and passengers. 

If you have a physical impairment or condition that prevents you from sitting properly on the driver seat 
with the safety belt properly fastened and reaching the pedals, special modifications to your vehicle 
may be necessary. Only the proper seating position ensures optimum protection by the safety belt and 
airbag. 

Contact your authorized Volkswagen dealer or authorized Volkswagen Service Facility or call the 
Volkswagen Customer CARE Center at 1-800-822-8987 for information about possible modifications 
to your vehicle. 


For your own safety and to reduce injuries in the event of sudden braking maneuvers or accidents, 
Volkswagen recommends the following seating positions: 

Applies to all vehicle occupants: 

  Adjust head restraints so that the upper edge of the head restraint is at least at eye level or higher. 

Position the back of your head as close as possible to the head restraint 

⇒ 

fig. 39

 and 

⇒ 

fig. 40

  Push the head restraint completely down for short people, even if the top of the head is then below 

the upper edge of the head restraint. 

  Tall people should pull the head restraint all the way up. 
  Adjust the seat backrest angle to an upright position so that your back is in full contact with it when 

the vehicle is moving. 

  Always keep both feet on the floor and in the footwell whenever the vehicle is moving. 

  Always adjust and fasten safety belts properly 

⇒  Safety belts

Driver - seat and steering wheel adjustment: 

  Adjust the steering wheel so that there are at least 10 inches (25 cm) between the steering wheel 

and your breast bone 

⇒ 

fig. 39

. When adjusting the proper distance to the steering wheel, grasp the 

top of the steering wheel with your elbows slightly bent. 

  Always hold the steering wheel on the outside of the steering wheel rim with your hands at the 

9 o'clock and 3 o'clock positions to help reduce the risk of personal injury if the driver's airbag inflates. 

  Never hold the steering wheel at the 12 o'clock position or with your hands at other places inside 

the steering wheel rim or on the steering wheel hub. Holding the steering wheel the wrong way can 
cause serious injuries to the hands, arms, and head if the driver's airbag inflates. 

  Adjust the steering wheel so that the steering wheel cover points at your chest and not at your 

face. Pointing the steering wheel toward your face decreases the ability of the driver's airbag to help 
protect you in a collision. 

  Adjust the driver's seat so that you can easily push the pedals all the way to the floor while keeping 

your knee(s) slightly bent. 

  Adjust the seat height so that the top point of the steering wheel can be reached. 
  Always keep both feet in the footwell so that you are in control of the vehicle at all times. 

Passenger - front seat adjustment: 

  Push the passenger seat as far back as possible in order to ensure optimum protection if the 

airbag is deployed. 


Manual controls on the driver and front passenger seats 


Fig. 41 Controls on the driver seat. 


Fig. 42 Controls on the front passenger seat. 

 Please first read and note the introductory information and heed the WARNINGS 


There may be manual and electrical controls on the same seat. 
 

Driver seat: 

⇒ 

fig. 41


Front 

passenger 

seat:

⇒ 

fig. 42


Function  

Action  

(1)


Move the front seat backward or 
forward.  

Pull the lever up and move the front seat. The 
front seat must lock in place after the lever is 
released!  

(2)


Lumbar support control.  

Push the lever forward or pull it backward.  


Driver seat: 

⇒ 

fig. 41


Front 

passenger 

seat:

⇒ 

fig. 42


Function  

Action  

(3)


Adjust backrest angle.  

Driver seat: Lean forward and turn the adjuster 
wheel forward or backward. 
Front passenger seat: Move the lever in the 
direction of the arrow and adjust the backrest in 
the desired angle. The backrest must be securely 
latched in that position!  

(4)


Adjust seat height.  

Move the lever several times up or down.  


Electrical controls on the driver and front passenger seats 


Fig. 43 Driver seat controls to adjust the seat backward and forward, change seat cushion height and angle, 
and adjust backrest angle. 


Fig. 44 Lumbar support control. 

 Please first read and note the introductory information and heed the WARNINGS 


The controls on the front passenger seat mirror those on the driver seat. 

There may be both manual and electrical controls on the same seat. 


fig. 43

 Press the switch in the direction of the arrow:  

(A)


(1)


Slide the seat backward or forward.  

(2)

 and 

(3)


Raise or lower the seat cushion.  

(2)

 or 

(3)


Adjust seat cushion angle.  

(B)


Forward or 

backward.  

Adjust backrest angle.  


Press 

fig. 44

 switch for each area:  

(1)

 or 

(2)


Adjust lumbar support. 

(1)

 inflates, 

(2)

 deflates.  

(3)

 or 

(4)


Adjust lumbar support height. 

(3)

 moves the lumbar support up, 

(4)

 moves the 

lumbar support down.  


  WARNING 

Improper use of electrical seat controls can cause serious personal injuries. 

  The front seats in your vehicle can be electrically adjusted even when the vehicle key has 

been removed from the ignition or, on a vehicle with Keyless Access, even if there is no key 
in the vehicle. 

  Never leave children and persons who need help in the vehicle alone because the 

unsupervised use of the electric seat adjustments can result in serious personal injury. 

  Always make sure that no one is in the way while the front seats are being adjusted, or 

while calling up the stored memory settings for the front seats. In an emergency, stop 
automatic seat adjustment by pressing a seat adjustment switch. 


  NOTICE 

To help prevent damage to electrical parts in the seat, do not kneel on the front seats or apply 
concentrated pressure to a small area of the seat or backrest.
 

  If the vehicle battery is too weak, the electrical seat adjustment controls may not work. 

  Starting the engine stops seat adjustment. 

  When entering and exiting the vehicle, be careful not to come into contact with any switches that 

could change the seat adjustment. 


Adjusting the rear seat 


Fig. 45 Adjusting the rear seat. 


Fig. 46 Adjusting the rear backrest. 

 Please first read and note the introductory information and heed the WARNINGS 


The rear seat is divided asymmetrically into 2 sections. Each section can be adjusted separately. 

Pull right or left lever upwards 

⇒ 

fig. 45

 and push the respective rear seat section forward or backward. 

Release the lever and lock the rear seat section by gently sliding it forward or backward. 

Place one hand on the right or left rear backrest and pull the respective pull strap with the other hand 
⇒ 

fig. 46

. Move the rear backrest to the desired position by hand against the force of the spring. 

Release the pull strap and lock the rear backrest by gently tilting it forward or backward. 

  WARNING 

Improper adjustment of the rear seat can cause accidents and severe injuries. 

  Adjust the rear seat only when the vehicle is stopped, since the seat could otherwise 

move unexpectedly when the vehicle is moving. 

  Adjust the rear seat only if no one is in the way. 
  Always guide the backrest down by hand and never let it fall into place on its own. 


  NOTICE 

Items in the luggage compartment could be damaged or cause damage when the rear seat is 
adjusted in the fore and aft direction.
 

  If the rear seat is in a forward position, items can get into the area between the seat and the 

luggage compartment floor. When you slide the rear seat back again, make sure that the area 
behind the seat is clear of objects.
 

Adjusting front and rear head restraints 


Fig. 47 Adjusting the front head restraints. 


Fig. 48 Adjusting or folding the rear head restraints. 

 Please first read and note the introductory information and heed the WARNINGS 


All seats are equipped with head restraints. The rear center head restraint is designed only for the 
center seat on the rear bench. Therefore, only install the center head restraint in the center position. 

There are notches in the head restraint guide rods so that the head restraint can lock into place. Only 
properly installed head restraints can lock into place at the adjustment range notches. In order to 
prevent inadvertent removal of the head restraints after installation, there are stops at the top and 
bottom of the adjustment range. 


Adjusting the height 

  Push the head restraint up in the direction of the arrow or down when the button  

⇒ 

fig. 47


(1)

 or 

⇒ 

fig. 48


(1)

 is pressed 

⇒ 

  The head restraint must lock securely in the position selected. 

Folding the outer rear head restraints down 

  With the button 

(2)

 pressed, fold the head restraint forward and down 

⇒ 

  To use the seating area, fold the head restraint back up until it locks in place. 

Proper head restraint adjustment 

Adjust head restraints so that the upper edge of the head restraint is at least at eye level or higher. 
Position the back of the head as close as possible to the head restraint. 

Adjusting the head restraint for short people 

Push the head restraint down as far as it will go, even if this means the person's head is still below the 
top edge of the head restraint. A small gap may remain between the head restraint and the backrest 
when the head restraint is all the way down. 

Adjusting the head restraint for tall people 

Pull the head restraint up as far as it will go. 

  WARNING 

Driving without head restraints or with improperly adjusted head restraints increases the risk 
of serious injuries in a collision. 

  Always drive with the head restraints in place and properly adjusted to help minimize the 

risk of neck injury in a crash. 

  Every person in the vehicle must have a properly adjusted head restraint to minimize the 

risk of neck injury in a crash. Each head restraint must be adjusted according to the 
occupants' size so that the upper edge is even with the top of the person's head, but no lower 
than eye level. Always sit so that the back of your head is as close as possible to the head 
restraint. 

  Never adjust head restraint while driving. 


Removing and reinstalling head restraints 


Fig. 49 Removing the front head restraints. 


Fig. 50 Removing the rear head restraints. 

 Please first read and note the introductory information and heed the WARNINGS 


All seats are equipped with head restraints. The rear center head restraint is designed only for the 
center seat on the rear bench. Therefore, only install the center head restraint in the center position. 

Removing the front head restraints 

  Sit in the back seat behind the head restraint you want to remove. Pull the head restraint all the 

way up 

⇒ 

 in Adjusting front and rear head restraints . Recline the backrest with the head restraint 

so that there is enough overhead clearance to remove it. 

  Slide a flat object, such as a plastic credit card, underneath the right side of the cap on the right 

hand seat guide rod 

⇒ 

fig. 49


(2)

 to unlock the head restraint. 

  Use one hand to hold the release button in with the flat object. With your other hand, lift the same 

guide rod slightly to expose a notch in the rod at the bottom (can be seen and felt with fingers). The 
right-hand guide rod is now released. 

  To release the left-hand guide rod, press button 

(1)

 in (towards guide rod) and hold. 

  Pull the head restraint out completely while holding button 

(1)


Installing the front head restraints 

  Position head restraint properly over the head restraint guides of the respective seat backrest and 

insert the head restraint into the guides until it clicks. 

  Push the head restraint down while pressing button 

(1)

  Adjust the head restraint according to the occupant's size 

⇒  Adjusting front and rear head 

restraints

Removing the rear head restraints 

  Unlock the rear bench and fold it forward 

⇒ page 145, Luggage compartment

  Pull the head restraint all the way up 

⇒ 

  Slide a flat object, such as a plastic credit card, underneath the right side of the cap on the right-

hand seat guide rod 

⇒ 

fig. 50


(2)

 to unlock the head restraint. 

  Use one hand to hold the release button in with the flat object. With your other hand, lift the same 

guide rod slightly to expose a notch in the rod at the bottom (can be seen and felt with fingers). The 
right-hand guide rod is now released. 

  To release the left-hand guide rod, press button 

(1)

 in (towards guide rod) and hold. 

  Pull the head restraint out completely while holding button 

(1)

  Fold the backrest of the rear bench back so that it locks securely. 

Installing the rear head restraints 

  Unlock the rear bench and fold it forward 

⇒  Luggage compartment

  Position head restraint properly over the head restraint guides of the respective seat backrest and 

insert the head restraint into the guides. 

  Push the head restraint down while pressing button  

(1)

  Fold the backrest of the rear bench back so that it locks securely. 

  Adjust the head restraint according to the occupant's size 

⇒  Adjusting front and rear head 

restraints

  WARNING 

Driving without head restraints or with improperly adjusted head restraints increases the risk 
of serious injuries in a collision. 

  Always drive with the head restraints in place and properly adjusted to help minimize the 

risk of neck injury in crash. 

  Always reinstall head restraints as soon as possible so that vehicle occupants are 

properly protected. 


  NOTICE 

When removing or reinstalling the head restraint, take care that the head restraint does not 
strike the headliner or the back of the front seat. The headliner or other parts of the vehicle 
could otherwise be damaged.


Adjusting the steering wheel position 


Fig. 51 Manual adjustment for steering wheel position. 


Fig. 52 Steering wheel: 9 o'clock and 3 o'clock positions. 

 Please first read and note the introductory information and heed the WARNINGS 


Adjust the steering wheel only when the vehicle is not moving. 

  Push down on the lever 

⇒ 

fig. 51


(1)

  Adjust the steering wheel so that it can be held with hands at 9 o'clock and 3 o'clock positions 

⇒ 

fig. 52

 on the outside of the steering wheel rim and with the arms slightly bent at the elbow. 

  Pull the lever up firmly until it is flush with the steering column 

⇒ 


  WARNING 

Improper use of the steering column adjustment feature can result in serious personal injury 
and even death. 

  Always pull the lever 

⇒ 

fig. 51


(1)

 firmly upward after adjusting the steering column so that 

the steering wheel does not change position suddenly while the vehicle is moving. 

  Never adjust the steering column while the vehicle is moving. If you find that you need to 

adjust the steering wheel while driving, stop the vehicle in a safe place and make the proper 
adjustment. 

  Never adjust the steering wheel so that it points toward your face. Always make sure that 

the steering wheel points toward your chest. Otherwise, the airbag system cannot protect 
you properly in the event of a crash. 

  Always hold the steering wheel on the outside of the steering wheel rim with your hands 

at the 9 o'clock and 3 o'clock positions 

⇒ 

fig. 52

 to help reduce the risk of serious personal 

injury if the driver airbag inflates. 

  Never hold the steering wheel at the 12 o'clock position or with your hands anywhere 

inside the steering wheel or on the steering wheel hub. Holding the steering wheel the wrong 
way increases the risk of severe injury to the arms, hands, and head if the driver airbag 
deploys. 

Center armrest 


Fig. 53 Front center armrest. 


Fig. 54 Folded down rear center armrest. 

 Please first read and note the introductory information and heed the WARNINGS 


Front center armrest 

There is a storage compartment under the front center armrest 

⇒  Storage compartment in the front 

center armrest

To open, press button and lift the center armrest section up completely in the direction of the arrow 
⇒ 

fig. 53

To close, push the center armrest down until it latches in place. 

To move the center armrest forwards and backwards, pull it forward in the direction of the arrow 
⇒ 

fig. 53

 or slide it backward until it clicks into place. 

Rear center armrest 

There may be a fold-down armrest with cup holders in the backrest of the center rear seat 

⇒  Cup 

holders in the rear center armrest

To fold down the center armrest, push the head restraint of the middle seat all the way down 
⇒ page 78, Adjusting the seating position and fold the center armrest forward using the pull strap 
⇒ 

fig. 54


(1)

To fold up, push the center armrest up as far as it will go. 

  WARNING 

The center armrest can restrict the driver's arm movement and cause crashes and serious 
personal injury. 

  Always keep storage compartments in the center armrest closed while driving. 
  Never let a passenger, especially a child, ride on the center armrest. Improper seating 

position can increase the risk of serious personal injury in a crash. 

  Never put hot drinks or other liquids in the cup holder. Hot liquids can spill when the 

vehicle is moving as well as during braking or other sudden maneuvers. 


  NOTICE 

When the center armrest is folded up, the armrest cushion could be soiled or damaged by 
items in the luggage compartment.


Seat functions 

 Introduction 

In this section you’ll find information about: 

Seat heating


Memory seat


Folding the front passenger backrest forward


More information: 

  Adjusting the seating position  
  Safety belts  
  Airbag system  
  Child safety and child restraints  
  Outside mirrors  

  WARNING 

Improper use of seat adjustment controls can cause severe personal injuries. 

  Always sit properly at all times before starting to drive and while the vehicle is moving. 

Make sure all passengers, especially children, are properly seated whenever the vehicle is 
moving. 

  Keep hands, fingers, feet and other body parts away from moving parts and adjustment 

areas of the seats. 

Seat heating 


Fig. 55 In the center console: Seat heating control for front seats. 

 Please first read and note the introductory information and heed the WARNINGS 


When the ignition is switched on, the front seats can be electrically heated by heating elements that 
warm the seat backrest and cushion. 

Do not use the seat heating if any of the following conditions apply: 

  If the seat is not being used. 
  If there is a child restraint installed on the front passenger seat. 
  If there is a blanket or seat cover on the front passenger seat. 
  If the seat is damp or wet. 
  If the outside temperature or the temperature inside the passenger compartment is +77 °F (+25 °C) 

or more. 


Function  

Action for seat heating 

⇒ 

fig. 55


Switch on:  

Press the   or   button. Seat heating is switched 
on to maximum.  

Adjusting heating 
level:  

Press the button   or   repeatedly until the 
desired heating level is set.  

Switch off:  

Press the button   or   repeatedly until all 
indicator lights in the button are off.  


Special seat heating features 

On the driver side the seat heating will resume at the setting that was set when the ignition was 
switched off. However, this feature only works if the ignition is switched back on within 10 minutes. 

People suffering from a low level of perceived pain or a lowered awareness of pain as from 

medication, paralysis, or chronic illness (e.g. diabetes) should NEVER use the seat heating feature 

⇒ 

The use of seat heating by persons with these conditions could result in burns to the back, buttocks, 
and legs that may take a long time to heal and may never heal completely. If you have any of these 
conditions, you should take regular breaks and get out of the vehicle, particularly on long trips. Consult 
your doctor for advice regarding your specific condition. 

  WARNING 

Certain medical conditions, such as paralysis and diabetes, and certain medications, can 
increase the risk of serious burns when the seat heating feature is switched on. 

  Vehicle occupants who have a low level of perceived pain or a lowered awareness of pain 

can receive serious burns to the back, buttocks, and legs that take a long time to heal or may 
never heal completely. 

  Never use the seat heating feature if you or your passengers are at risk of being burned 

because of a medical condition. Take regular breaks and get out of the vehicle, particularly 
on long trips. Consult your doctor for advice regarding your specific condition. 

  Never let exposed skin remain in contact with the seat upholstery when the seat heating is 

being used. 


  WARNING 

A wet seat can cause the seat heating to malfunction and increase the risk of serious burns. 

  Always make sure the seats are dry before using the seat heating. 
  Never sit on the seat with wet clothes. 
  Never put damp or wet things including clothes on the seat. 
  Never spill liquids on the seats. 


  NOTICE 

  To help prevent damage to electrical and other parts in the seat, do not kneel on the front 

seats or apply concentrated pressure to a small area of the seat or backrest. 


  Liquids, sharp objects and things that do not let the heat in the seat escape into the air, 

including, for example, a child restraint, a blanket or seat covers on the seat can damage seat 
heating.
 

  If you smell an odor, immediately shut off seat heating and have it checked by an authorized 

Volkswagen dealer or authorized Volkswagen Service Facility. 

  Never install leather upholstery on a vehicle with seat heating that originally had cloth 

upholstery. The seat heating elements for seats with cloth seats will overheat if the cloth 
upholstery is replaced with leather upholstery.
 

  Switch off seat heating when it is not needed to help reduce unnecessary fuel consumption. 

Memory seat 


Fig. 56 On the outer side of the driver seat: Memory buttons. 

 Please first read and note the introductory information and heed the WARNINGS 


Depending on vehicle equipment, the vehicle may be equipped with seat memory functions for the 
driver seat. 

Memory buttons 

Personal settings for the driver seat, and the outside mirrors can be assigned to the memory buttons 
and to every remote control vehicle key. 

These settings can be assigned to individual remote control vehicle keys. The settings are applied 
after unlocking the vehicle and opening the driver door. 

Storing driver seat settings and forward driving settings for outside mirrors 

  Switch on the ignition. 
  Manual transmission: Shift the transmission to Neutral (N) and set the electronic parking brake. 
  Automatic transmission: Shift the transmission to Park (P)

  Adjust driver seat and outside mirrors. 

  Press the 

 button for at least 1 second 

⇒ 

fig. 56

  Press the desired memory button  1 ,  2 , or  3  within 10 seconds. A chime sounds to confirm that 

the setting has been stored. 

Storing passenger-side outside mirror settings for backing up 

  Switch on the ignition. 
  Manual transmission: Shift the transmission to Neutral (N) and set the electronic parking brake. 
  Automatic transmission: Shift the transmission to Park (P)


Content   ..  4  5  6  7   ..