Volkswagen Jetta GLI (2014 year). Instruction - part 7
 

  Index      Volkswagen     Volkswagen Jetta GLI - instruction 2014 year in english


Search            copyright infringement  


Content   ..  5  6  7  8   ..


Volkswagen Jetta GLI (2014 year). Instruction - part 7


  High beams can only be switched on when the low beams are on. 

Switching lights on and off 


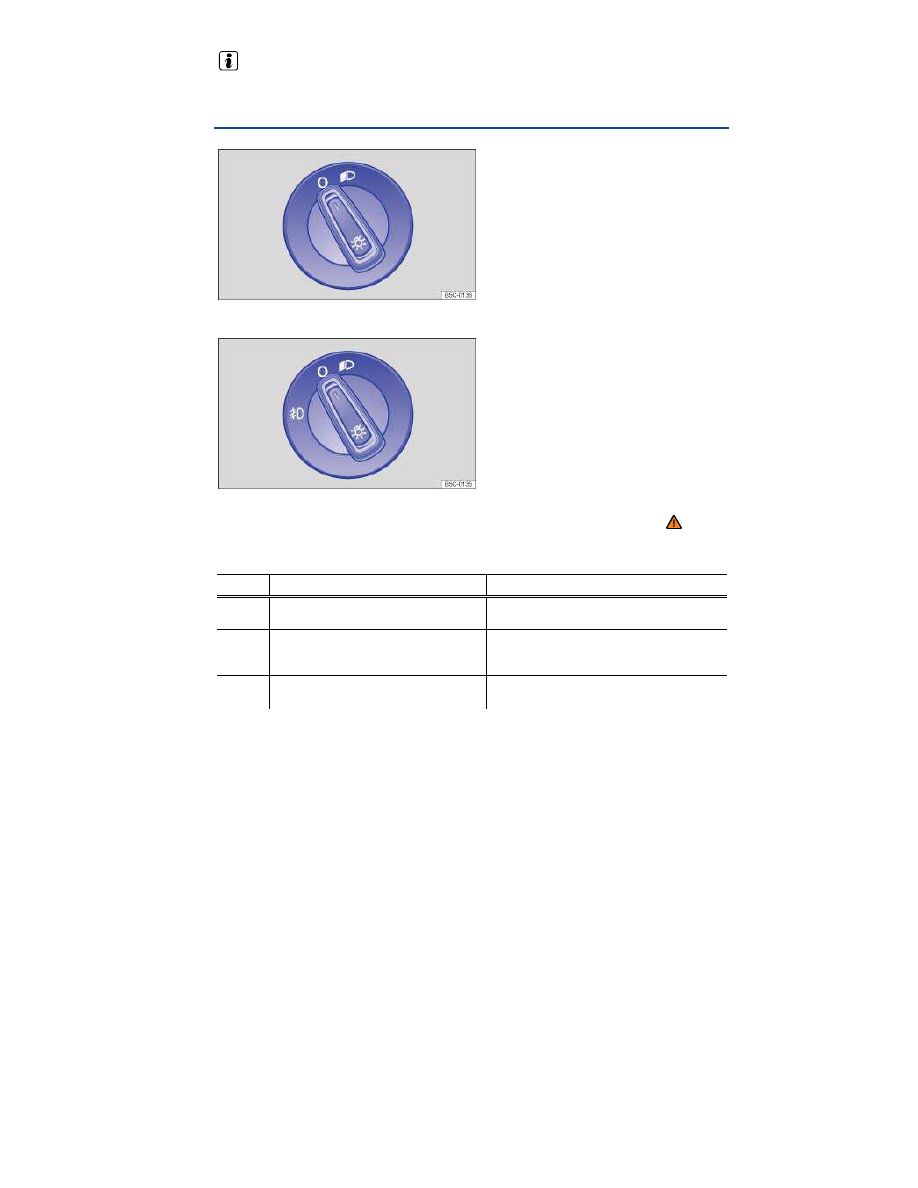
Fig. 74 Headlight switch next to the steering wheel. 


Fig. 75 Headlight switch next to the steering wheel (with fog lights). 

 Please first read and note the introductory information and heed the WARNINGS 


Adjust the light switch to the desired position 

⇒ 

fig. 74

 or 

⇒ 

fig. 75

Symbol  When the ignition is switched off

When the ignition is switched on 

O


Fog lights and low beams switched off. 

Headlights off, daytime running lights (DRL) 
on. 


Low beams switched off. The DRL may 
stay on. The length of time they stay on 
depends on the vehicle battery charge. 

Low beams switched on. 


Fog lights switched off. The DRL may 
stay on for some time. 

Headlights and fog lights switched on. 


Fog lights 

The indicator light   in the headlight switch or the instrument cluster shows that the fog lights are 
switched on. 

  To switch on the fog lights  : first turn the light switch to position 

, then pull the light switch out 

to the first detent. 


  To switch off the fog lights, push the switch back in from the first detent. To then turn off the 

headlights, turn the switch to position 

O

Acoustic warning when lights are not switched off 

In the following situation, a warning chime will sound if you take the key out of the ignition and open 
the driver door. This is to remind you that lights are still on. 

  Light switch in position 

  WARNING 

Daytime running lights are not bright enough to let you see ahead or be seen by others when 
it is dark. 

  Always switch on the low-beam headlights at dusk or when it is dark and whenever the 

weather is bad or visibility is poor. 

  Never use the daytime running lights to see where you are going. They are not bright 

enough and will not let you see far enough ahead for safety, especially at dusk or when it is 
dark. Always switch on the low-beam headlights at dusk or when it is dark. 

  The taillights do not come on with the daytime running lights. Unless the taillights are on, 

a vehicle cannot be seen by others in bad weather, at dusk, or when it is dark. 

  In cool or humid weather, the insides of the headlights, the rear lights, and turn signals can 

temporarily fog up. This is normal and does not affect the service life of the vehicle's lighting system. 

Lights and vision features 

 Please first read and note the introductory information and heed the WARNINGS 


Daytime running lights (DRL) 

Separate lamps are installed in the headlights or in the front bumper for the daytime running lights 
(DRL). 

When the daytime running lights are switched on, only these separate lamps come on 

⇒ 

The daytime running lights are switched on whenever the ignition is switched on and the light switch is 
in position 

O

. The indicator light 

'

 or 

DRL

 may come on in the instrument cluster to indicate that the 

feature is active 

⇒ page 154, Indicator lights

Daytime running lights (DRL) parking feature 

Some models are equipped with a daytime running lights (DRL) parking feature that switches the 
daytime running lights off when the vehicle is parked and the ignition is switched on. 


Function 

Action

Switching the DRL off: 

– Switch the ignition on. 
– Turn the light switch to the 

O

 position. 

– Set the parking brake. 

Switching the DRL back on: 

– Release the parking brake. 


Static cornering lights 

Your vehicle may have fog lights under the front bumper, which on some models are also static 
cornering lights. On some models the static cornering lights may be integrated in the headlights. At 


speeds below about 25 mph (40 km/h), the light on one side of the vehicle will come on automatically 
when you turn a corner. If you turn to the right, the right fog light comes on; turn left and the left fog 
light comes on. The light dims and goes out when the steering wheel is straightened out again. 

When you move the selector lever to Reverse (R), the static cornering lights on both sides of the 
vehicle may come on so that you can see the area around the vehicle better when backing up. 

The static cornering lights work only when the headlights are on. The static cornering lights do not 
come on when the headlight switch is in the 

O

 position or when the fog lights themselves have been 

switched on, Switching lights on and off

Adaptive Front Lighting System (AFS) 

The Adaptive Front Lighting System works only with the low beams switched on and only at speeds 
above about 6 mph (10 km/h). The swivel-mounted lamps automatically improve road illumination 
during cornering. 

On vehicles equipped with the Adaptive Front Lighting System, the feature is switched on and off via 
the Assistants menu in the instrument cluster display, Volkswagen Information System

  WARNING 

Crashes and other accidents can happen when you cannot see the road ahead and when you 
cannot be seen by other motorists. 

  Never use daytime running lights (DRL) to see where you are going. DRL are not bright 

enough to light up the roadway and be seen by other motorists. You will not be able to see far 
enough ahead for safety, especially at dusk or when it is dark. Always switch on the low-
beam headlights at dusk or when it is dark. 

  The taillights do not come on when the daytime running lights are switched on. A vehicle 

without taillights on cannot be seen by others in bad weather, at dusk, or when it is dark. 

  In cool or humid weather, the insides of the headlights, the rear lights, and turn signals can 

temporarily fog up. This is normal and does not affect the service life of the vehicle's lighting system. 

Instrument panel lighting and headlight range adjustment 


Fig. 76 To the left of the steering wheel: Thumbwheel to adjust instrument panel lighting 1. 

 Please first read and note the introductory information and heed the WARNINGS 

 on 

page 154. 

Instrument panel lighting 

When the lights are on, the brightness of the instrument panel lighting is adjusted by turning the 

thumbwheel 

⇒ 

fig. 76


(1)


Instrument cluster brightness 

When the lights are on, the brightness of the instrument cluster lighting is adjusted by turning the 
thumbwheel 

(1)

In some vehicles with daytime running lights (DRL), the instrument cluster lighting switches on 
automatically when it is dark outside or when driving through tunnels, for example. You will need to 
switch the headlights on manually when this happens, so that the vehicle's taillights will turn on, Lights 
and vision features
Lights and vision features

Dynamic headlight range adjustment 

In some vehicles with HID (Xenon) headlights, the headlight range is automatically adjusted to the 

vehicle loading condition once the low beams are switched on 

⇒ 

  WARNING 

Headlights that are aimed too high because of the way the vehicle is loaded can blind and 
distract other drivers. This can lead to a crash and serious personal injuries. 

  Always make sure the headlights are adjusted to loading conditions so that they do not 

blind others. 


  WARNING 

If dynamic headlight range adjustment does not work properly or at all, the headlights could 
blind and distract other drivers. This can lead to a crash and serious personal injuries. 

  Have headlight range adjustment checked immediately by an authorized Volkswagen 

dealer or an authorized Volkswagen Service Facility. 

Interior and reading lights 

 Please first read and note the introductory information and heed the WARNINGS 


Button 

Function 

O


Interior lights off. 


Interior lights on. 


Door contact switch - center position. 
Interior lights go on automatically when the vehicle is unlocked, a door is opened, or 
the vehicle key is removed from the ignition. 
The lights go out about 20 seconds after you close the doors. They also go out when 
you lock the vehicle or switch on the ignition. 


Reading light on or off. 


Glove and luggage compartment lights 

The glove and luggage compartments may have lights that come on automatically when they are 
opened and go off when they are closed. 


Background lighting 

When the ignition and headlights are switched on, the background lighting in the roof console lights 
up. 

There may also be footwell lighting. 

  The interior and reading lights go out when you lock the vehicle or a few minutes after you 

remove the vehicle key from the ignition. This helps to prevent unnecessary drain on the vehicle 
battery. 


Sun protection 

 Introduction 

In this section you’ll find information about: 

Sun visors


Windshield made of heat-insulating glass


  WARNING 

Sun visors can reduce visibility. 

  Always stow sun visors when not needed to block sun glare. 

Sun visors 


Fig. 77 In the headliner: Sun visor. 

 Please first read and note the introductory information and heed the WARNINGS 


Sun visor adjustment: 

  Flip the sun visor down toward the windshield. 

  Lift it out of the retaining clip 

⇒ 

fig. 77


(1)

 and swivel it over toward the door. 

Additional sun visor positions: 

On some vehicles, you can slide the sun visor towards the rear of the vehicle after swiveling it over to 
the door. 

Vanity mirror and lighting 

A vanity mirror is behind a cover in the sun visor. A light 

(3)

 may come on when you slide the cover 

(2)


open. 

The light goes out when you shut the cover or if you flip the sun visor up again. 

  The vanity mirror light and the interior light above the sun visor go out after several minutes. This 

helps to prevent unnecessary drain on the vehicle battery. 


Windshield made of heat-insulating glass 


Fig. 78 Heat-reflective windshield with communications window (blue shaded area). 

 Please first read and note the introductory information and heed the WARNINGS 


Windshields made of insulating glass have a transparent metallic infrared-reflecting coating. There is 

an uncoated area (communications window) just above the inside rearview mirror 

⇒ 

fig. 78

. This 

serves as a communications window for transmitting signals to and from electronic components and 
accessories. 

The uncoated area must not be blocked on the inside or outside or covered with stickers because this 
can cause the electronic components to malfunction. 


Windshield wipers and washer 

 Introduction 

In this section you’ll find information about: 

Indicator light


Windshield wiper lever


Windshield wiper functions


Windshield wiper service position


Checking and refilling windshield washer fluid


More information: 

  Exterior views  
  Climate control  
  Working in the engine compartment  
  Exterior care and cleaning  

  WARNING 

Windshield washer fluid without enough frost protection can freeze on the windshield and 
reduce visibility. 

  Use the windshield washer system with enough frost protection for winter temperatures. 
  Never use the windshield wipers/washers when it is freezing without first defrosting the 

windshield. The washer solution may freeze on the windshield and reduce visibility. 


  WARNING 

Worn or dirty wiper blades reduce visibility and increase the risk of accidents and severe 
injuries. 

  Always replace wiper blades that are worn, damaged, or do not keep the windshield clear. 


  NOTICE 

To help prevent damage to the wiper blades and the wiper motor when it is cold outside, 
always make sure that blades are not frozen to the windshield before operating the wipers. 
Using the windshield wiper service position can be helpful in cold weather so the wipers do not 
freeze to the windshield, Windshield wiper service position
. 

Indicator light 

 Please first read and note the introductory information and heed the WARNINGS 


Lights 

up 

Possible cause 

Proper response 


Not enough windshield washer fluid. 

Refill windshield washer reservoir at the next 
opportunity  


When the ignition is switched on, several warning and indicator lights come on briefly for a function 
check. They go out after a few seconds. 

  NOTICE 

Failure to heed warning lights or text WARNINGS can result in vehicle damage. 

Windshield wiper lever 


Fig. 79 Operating the front windshield wiper. 

 Please first read and note the introductory information and heed the WARNINGS 


Move the lever to the desired position 

⇒ 

(A)


OFF


Wiper switched off. 

(B)


Intermittent wiping for the windshield. 

Adjust the interval settings with switch 

⇒ 

fig. 79


(1)

(C)


LOW

Slow wiper speed. 

(D)


HI GH


Fast wiper speed. 

(E)


1

One-tap wiping – brief wiping. Hold the lever pressed down longer to wipe more often. 

(F)


Pull the lever toward the steering wheel to activate the windshield washers, then 
release. 


  NOTICE 

To help prevent damage to the wiper blades and the wiper motor when it is cold outside, 
always make sure that blades are not frozen to the windshield before operating the wipers. 


Using the service position can be helpful in cold weather so the wipers do not freeze to the 
windshield, Windshield wiper service position
. 

  If the ignition is switched off while the wipers are running, the wipers will continue at the 

same wiping speed when the ignition is switched on again. Frost, ice, snow, leaves, and other 
objects on the windshield can damage the wipers and the wiper motor.
 

  Remove snow and ice from the wipers before you begin driving. 
  If the wiper blades freeze to the windshield, loosen them carefully. Volkswagen 

recommends using a deicing spray. 


  NOTICE 

Never switch on the windshield wipers when the windshield is dry because the windshield can 
be scratched.
 

  On some vehicles, the windshield wipers work only if the ignition is switched on and the engine 

hood is closed. The windshield wipers turn off automatically when the engine hood is opened. 

  The intermittent wiping for the front windshield depends on the driving speed. The higher the 

speed, the faster the wipers move. 

  If the wiper blades freeze to the windshield, loosen them carefully. Volkswagen recommends 

using a deicing spray. 

Windshield wiper functions 

 Please first read and note the introductory information and heed the WARNINGS 


Wiper performance in different situations:

When the vehicle is not moving: 

The wiper speed changes temporarily to the next lower 
speed. 

During automatic wipe/wash: 

While the washer system is working, the Climatronic 
switches to recirculation for about 30 seconds to help 
prevent the washer fluid odor from entering the vehicle 
interior. 

During intermittent wiping: 

Speed-dependent interval control: The higher the vehicle 
speed, the faster the wipers move. 


Heated washer nozzles 

The heating thaws frozen washer nozzles, but not the fluid supply hoses. When the ignition is switched 
on, the heat applied to the washer nozzles is automatically regulated depending on the outside air 
temperature. 

  If there is something on the windshield, the wiper will try to wipe it away. If it continues to block 

the wiper, the wiper will stop moving. Remove the obstacle and switch the wiper on again. 


Windshield wiper service position 


Fig. 80 Windshield wiper in service position. 

 Please first read and note the introductory information and heed the WARNINGS 


In the service position, the wiper arms can be lifted away from the windshield 

⇒ 

fig. 80

. The wipers are 

moved to the service position as follows: 

  On some vehicles, the engine hood must be closed, Working in the engine compartment
  Switch the ignition off, turn it on briefly, and then off again. 

  Press the windshield wiper lever down briefly 

⇒ 

fig. 79


(E)

 when the ignition is off. 

  Wipers move into service position. 

Carefully fold the wiper arms back onto the windshield before driving! Switch the ignition on and press 

the windshield wiper lever down briefly 

⇒ 

fig. 79


(E)

. The wiper arms move back to their original 

position. 

Lifting the wiper blades and tilting them away from the windshield 

  Put the wiper arms in service position 

⇒ 

  Do not handle the wiper blades, handle the wiper arms only at the attachment above the wiper 

blades. 

  NOTICE 

  To help prevent damage to the engine hood and the windshield wiper arms, lift the wiper 

arms away from the windshield only when they are in the service position. 

  Always carefully fold the windshield wiper arms down against the windshield before driving 

the vehicle. 


Checking and refilling windshield washer fluid 


Fig. 81 In the engine compartment: Cap of the windshield washer fluid reservoir. 

 Please first read and note the introductory information and heed the WARNINGS 


Check the windshield washer fluid level regularly and refill as necessary. 

There is a filter screen in the filler neck of the windshield washer fluid reservoir. The screen helps to 
keep large particles and debris from getting into and clogging the windshield washer nozzles when 
adding windshield washer fluid. Take the screen out only to clean it. If the screen is damaged or 
missing, have it replaced immediately, otherwise the system may become clogged and not work 
properly. 

  Open the engine hood  , Working in the engine compartment

  The windshield washer fluid reservoir can be identified by the   symbol on its cap 

⇒ 

fig. 81

  Check if there is still enough windshield washer fluid in the reservoir. 

  Refill with an appropriate windshield washer fluid that is recommended by Volkswagen 

⇒ 

Follow the directions on the container. 

  In cold weather, always use a special windshield washer antifreeze solution that will help keep the 

water from freezing 

⇒ 

Recommended cleaners 

  For the warmer months, Windscreen Clear SummerG 052 184 A1 or equivalent. Mixing ratio 

1:100 (1 part concentrate to 100 parts water) in the windshield washer reservoir. 

  All-season Windscreen ClearG 052 164 A2 or equivalent. Mixing ratio in winter to 0 °F (-18 °C) 

about 1:2 (1 part concentrate to 2 parts water), otherwise, mixing ratio 1:4 in the windshield washer 
reservoir. 

Filling capacity 

The windshield washer fluid reservoir holds 3.1 – 4.2 quarts (about 3 to 4 liters). 

  WARNING 

Never mix antifreeze or similar additives into the windshield washer reservoir. This could 
produce an oily film on the windshield, which would considerably reduce visibility. 

  Use clear water with a cleaning solution recommended by Volkswagen. 
  If necessary, blend with a suitable windshield washer fluid antifreeze agent. 


  NOTICE 

  Never mix cleaning solutions recommended by Volkswagen with other cleaning agents. If 

you do, this could cause sediments or other by-products that can clog the windshield washer 
nozzles.
 

  When refilling, do not confuse one type of operating liquid with another! Otherwise serious 

malfunctions and engine damage can occur! 


Mirrors 

 Introduction 

In this section you’ll find information about: 

Inside mirror


Outside mirrors


For your driving safety, it is important that you properly adjust the outside mirrors and the inside mirror 

before you start driving 

⇒ 

The outside mirrors and the inside mirror help you see and adapt your driving to traffic behind you. 
Remember that the inside and outside rearview mirrors will not show everything behind you. There 
can be blind spots. Blind spots can be significantly larger if the mirrors are not properly adjusted. 

More information: 

  Exterior views  
  Volkswagen Information System  
  Adjusting the seating position  
  Shifting  
  Braking and parking  

  WARNING 

Adjusting mirrors when the vehicle is moving can cause driver distraction, accidents, and 
serious personal injury. 

  Always adjust the rearview mirrors when the vehicle is not moving. 
  Always be aware of what is happening around the vehicle when changing lanes, passing, 

turning, or parking. Another vehicle, pedestrian, or object could be in your blind spot. 

  Always make sure mirrors are properly adjusted and the view to the rear is not reduced by 

moisture, ice, snow, or other things. 

Inside mirror 


Fig. 82 Manually adjustable inside mirror. 

 Please first read and note the introductory information and heed the WARNINGS 


Adjust the inside mirror to make sure that there is good visibility through the rear window. 


For example, visibility through the rear window could be impaired if there is a sunshade on the rear 
window or clothing on the luggage compartment cover, or if the rear window is covered with ice, snow, 
or dirt. 

Manually adjustable inside mirror 

  Home position: Lever on the bottom edge of the mirror points forward. 

  To adjust to non-glare visibility, move the lever so that it points backward 

⇒ 

fig. 82

Outside mirrors 


Fig. 83 In the driver door: Adjusting knob for the outside mirrors. 

 Please first read and note the introductory information and heed the WARNINGS 


Turn the rotary knob in the driver door 

⇒ 

fig. 83

 to adjust the outside mirrors. 


Turn the rotary knob to the desired position:


Switch on outside mirror heating. Heats only at outside air 
temperatures below +68 °F (+20 °C). 

L


Adjust the left outside mirror by pressing the knob to left/right 
and up/down. 

R


Adjust the right outside mirror by pressing the knob to left/right 
and up/down. 

O


Neutral position. Outside mirror folded out, no heating or 
adjustment possible. 


Synchronous mirror adjustment 

  In the Settings - Convenience menu, select  Mirror adjust - Both mirrors for 

synchronous outside mirror adjustment, Volkswagen Information System

  Turn the adjusting knob to the L position. 

  Adjust the left outside mirror. The right (passenger) outside mirror will automatically adjust at the 

same time. 

  If needed, correct the position of the right mirror by turning the adjusting knob to the R position. 


  WARNING 

Improper use of the folding outside mirrors can cause personal injury. 

  Always make sure that nobody is in the way when folding the mirrors in or out. 
  Make sure that you do not get your finger caught between the mirror and the mirror base 

when moving the mirrors. 


  WARNING 

Incorrectly estimating distances with the right outside mirror can cause collisions and 
serious injury. 

  The right outside mirror has a convex (curved) surface. This widens your field of vision. 

But vehicles or other objects seen in a convex mirror will look smaller and farther away than 
they really are. 

  If you use the right outside mirror to judge distances from vehicles behind you when 

changing lanes, you could estimate incorrectly and cause a crash and serious injuries. 

  Whenever possible, use the inside mirror to more accurately judge distance and size of 

vehicles or other objects seen in the convex mirror. 

  Always make sure you have a clear view to the rear of the vehicle. 


  NOTICE 

Always fold in the outside mirrors when taking the vehicle through an automatic car wash. 

  To reduce fuel consumption, use outside mirror heating only when needed. 

  When first switched on, outside mirror heating works with maximum heat for about 2 minutes. 

  If power mirror adjustment does not work, the outside mirrors can be adjusted by hand by 

pressing on the edges of the mirror surface. 


Content   ..  5  6  7  8   ..