Volkswagen Golf SportWagen (2015 year). Instruction - part 20
 

  Index      Volkswagen     Volkswagen Golf SportWagen - instruction 2015 year in english


Search            copyright infringement  


Content   ..  18  19  20  21   ..


Volkswagen Golf SportWagen (2015 year). Instruction - part 20


  Emergency starting and starting the engine with a very weak vehicle battery or after the vehicle 

battery has been replaced may change or delete system settings (including time, date, personal con-
venience settings, and programming). Check the settings and correct as necessary once the vehicle 
battery has built up a sufficient charge. 

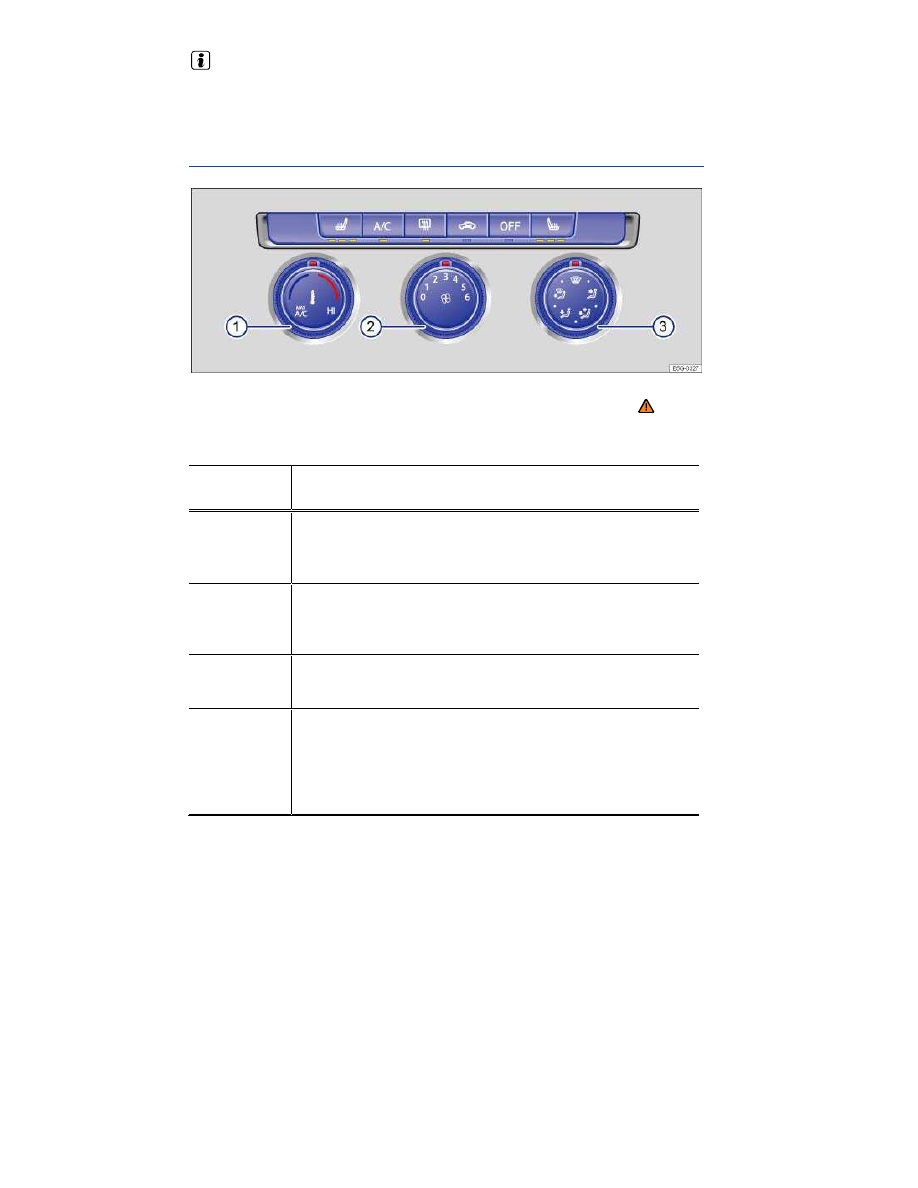
Manual controls 


Fig. 157 In the center console: Manual air conditioning controls. 

 Please first read and note the introductory information and heed the WARNINGS 


Press the corresponding button to switch a function on or off. If a function is switched on, an indicator 
light under the button lights up. To switch off a function, press the button again. 


Button/Knob   More information: Manual air conditioning 

⇒ 

fig. 157


Temperature 

(1)


 ...    

Turn knob to set the desired temperature. The 

 posi-

tion provides maximum cooling output. Recirculation mode 
and the cooling system switch on automatically.  

Fan 

(2)


Setting 0: the fan and manual air conditioning are switched 
off. 
Setting 6: highest fan speed.  

Air distribu-

tion 

(3)


Direct airflow by turning knob to any setting (continuously 
adjustable).  


Defog/defrost: Airflow is directed to the windshield. Recir-
culation mode switches off automatically in this position. 
Increases the fan speed to clear the windshield as quickly 
as possible. The cooling system switches on automatically 
to dehumidify the air.  


Button/Knob   More information: Manual air conditioning 

⇒ 

fig. 157


Air distribution to the upper instrument panel outlets.  


Air distribution to the upper instrument panel outlets and 
footwells.  


Air distribution to the footwells.  


Air distribution to the windshield and footwells.  


Rear window defroster: Works only when the engine is 
running and switches off automatically after 10 minutes or 
less.  


Air recirculation mode  

,    

Buttons for seat heating  


Press the button to switch the air conditioner on or off.  


Press the 

 button. If the system is switched off, the indi-

cator light under the 

 button lights up.  


  WARNING 

Stale air causes driver fatigue and reduces alertness, which can cause accidents, collisions, 
and serious personal injury. 

  Never switch off the fan for a long time because no fresh air will enter the passenger com-

partment. 


Climatronic controls 


Fig. 158 In the center console: Climatronic controls. 

 Please first read and note the introductory information and heed the WARNINGS 


Press the corresponding button to switch a function on or off. If a function is switched on, an indicator 
light in or under the button lights up. To switch off a function, press the button again. 


Button/Knob   More information: Climatronic 

⇒ 

fig. 158

.  

Temperature 

(1)


 ...    

Left and right sides of the vehicle can be set to different 
temperatures. Turn the knob to set the temperature.  

Fan 

(2)


...   

The fan speed is automatically controlled depending on the 
vehicle speed in order to help prevent unnecessary noise. 
The fan can also be adjusted manually.  

Air distribu-

tion 

(3)


Air flow is automatically adjusted to a comfortable level. It 
can also be manually adjusted with buttons 

(3)

.  

Displays 

(4)

   Left-side and right-side digital temperature displays.  


Defog/defrost button. The incoming outside air is directed 
to the windshield, and air recirculation automatically 
switches off. To defrost the windshield as quickly as possi-
ble, humidity is removed from the air at temperatures 
above about +35 °F (+1.5 °C), and the blower is set to a 
high speed.  


Air distribution to the upper instrument panel outlets.  


Button/Knob   More information: Climatronic 

⇒ 

fig. 158

.  


Air distribution to the footwells.  


Air is directed upward.  


Rear window defroster: Works only when the engine is 
running and switches off automatically after 10 minutes or 
less.  


Manual and automatic air recirculation  

,    

Buttons for seat heating  


Press the button to switch the air conditioner on or off.  


Press the button for maximum air conditioner cooling. The 
air recirculation and cooling system are switched on auto-
matically and the air distribution is automatically set to posi-
tion  .  


Applies the temperature settings for the driver side to the 
passenger side: If the indicator light in the 

 button lights 

up, the temperature settings for the driver side also apply 
to the passenger side. 
Press the button or turn the temperature knob for the pas-
senger side to set a different temperature for the passen-
ger side. The indicator light in the button goes out.  


Automatic temperature control, fan speed, and air distribu-
tion. 
Press the 

 button to switch on the feature. The indica-

tor light in the button lights up.  


Press the button to open the air conditioning settings in the 
Infotainment system  


Press the 

 button. If the system is switched off, the indi-

cator light in the 

 button lights up. 

OR: Turn the blower switch to the left as far as it will go. 
OR: Switch off using the Infotainment system  


  WARNING 

Stale air causes driver fatigue and reduces alertness, which can cause accidents, collisions, 
and serious personal injury. 

  Never switch off the fan for a long time because no fresh air will enter the passenger com-

partment. 

  When adjusting fan speed manually, LEDs in the knob 

(2)

 light up to indicate the current fan 

speed. During automatic regulation, the fan speed is not indicated. 

Operation via the Infotainment system 

 Please first read and note the introductory information and heed the WARNINGS 


For vehicles equipped with the Climatronic climate control system, various settings can also be adjust-
ed via the Infotainment system. 

Opening the Air conditioning menu 

  Press the 


⇒ 

fig. 158

 button. 

The current air conditioning settings are displayed in the upper section of the screen, for example, the 
temperatures that are currently set for the driver and passenger sides. Set temperatures up to +72 °F 
(+22 °C) are shown with blue arrows, while temperatures above +72 °F (+22 °C) are shown with red 
arrows. 

Tap the corresponding function key to switch a function on or off, or to select a submenu. 
 

Function 

key  

Effect  


Switch off the Climatronic.  


Switch on the Climatronic.  

Setup 


Open the submenu for air conditioning settings. The following 
settings can be made:  

Set the blower output in AUTO mode. You can choose be-
tween light, medium, and strong.  

Tap the Automatic air recirculation function key to switch au-
tomatic air recirculation on and off.  

Tap the function key 

 to close the submenu.  


Operation 

 Please first read and note the introductory information and heed the WARNINGS 


The air conditioner works only when the ignition is switched on. The cooling system for the passenger 
compartment works only when the engine is running and the fan is on. 

The air conditioner is most efficient when the windows and the power sunroof are closed. If the vehicle 
is stationary and the passenger compartment becomes very hot due to sunlight, briefly opening the 
windows and the power sunroof may speed up the cooling process. 

Keep the air intake slots in front of the windshield free of ice, snow, and leaves so that the heating and 
ventilation systems can work properly. 

Settings for optimum visibility 

When you switch on the cooling system, both the temperature and humidity in the vehicle are reduced. 
This will help make passengers feel more comfortable and help keep the windows from fogging up. 

For manual air conditioning 

  Switch off the air recirculation 

⇒  Air recirculation

  Set the fan to the desired speed. 
  Turn the temperature knob to the center position. 

  Open and adjust all air vents in the instrument panel 

⇒  Air vents

  Turn the air distribution knob to the desired setting. 
  Push the 

 button to turn on the air conditioner. The indicator light in the button lights up. 

For Climatronic 

  Press the 

 button. 

  Set the temperature to +72 °F (+22 °C). 

  Open and adjust all air vents in the instrument panel 

⇒  Air vents

Climatronic: Changing the temperature units 

The inside and outside temperatures can be displayed in either Fahrenheit (F) or Celsius (C). 

Press and hold the 

 and 

 buttons to switch the Climatronic temperature display from Celsius to 

Fahrenheit and vice versa. 

On appropriately equipped vehicles, you can also change the units in the Infotainment system by 
pressing the 

 button followed by the 

 and  Units  function keys 

⇒  Menu and system settings 

(SETUP)

Heating 

Maximum heating output and defrosting performance are not possible until the engine has reached 
operating temperature. 

Air conditioner does not work 

The air conditioner may not switch on for one of the following reasons: 

  The engine is not running. 
  The fan is switched off. 
  The air conditioner fuse has blown. 
  The outside air temperature is colder than about +38 °F (+3 °C). 
  The air conditioner compressor has been temporarily switched off due to excessive engine coolant 

temperature. 

  There is another malfunction in the vehicle. Have the air conditioner checked by an authorized 

Volkswagen dealer or authorized Volkswagen Service Facility. 


Special considerations 

When it is very hot and humid outside, water condensation can drip from the air conditioner evapora-
tor and form a puddle under the vehicle. This is normal and does not indicate a leak. 

  The climate control system adjusts the passenger compartment temperature as fast as possible 

considering the outside temperature. 

  Due to residual moisture in the air conditioner, the windshield may fog up after the engine is 

started. Switch on the windshield defroster to help evaporate the condensation as quickly as possible. 

  The air coming out of the vents flows through the passenger compartment and through the air 

vents in the luggage compartment. Do not cover these slots with clothing or other things. 

Air vents 


Fig. 159 In the instrument panel: Air vents. 

 Please first read and note the introductory information and heed the WARNINGS 


Air vents 

To help ensure sufficient heating, cooling, and ventilation in the passenger compartment, never close 

the air vents completely 

⇒ 

fig. 159


(1)

  To open and close the air vents, turn the respective thumbwheel (magnified view) in the desired 

direction. When the thumbwheel is turned all the way toward position  , the air vent is closed. 

  Use the lever on the vent grille to adjust the airflow direction. 

Additional, non-adjustable air vents are located in the instrument panel 

(2)

, in the footwells, as well as 

in the rear area of the passenger compartment. 

Some models also have an adjustable air vent inside the glove compartment 

⇒  Glove compartment

  NOTICE 

Do not place food, medications, or other temperature-sensitive things in front of the air vents. 
Food, medications, and other things that are sensitive to heat or cold can be damaged or made 
unusable by the air flow from the vents.
 

  The air coming out of the vents flows through the passenger compartment and through the air 

vents in the luggage compartment. Do not cover these slots with clothing or other things. 


Air recirculation 

 Please first read and note the introductory information and heed the WARNINGS 


General information 

There are different types of air recirculation: 


Manual air recirculation.  

Automatic air recirculation mode (Climatronic only).  


The air recirculation mode helps prevent outside air from entering the vehicle interior. 

In very hot outside temperatures, temporarily switch to manual air recirculation in order to cool the 
vehicle interior faster. 

For safety reasons, air recirculation is switched off in the following situations 

⇒  . 

  Manually: The 

 button is pushed (Climatronic) or the air distribution knob is turned to 


(manual air conditioning). 

  Automatically: A sensor detects conditions that could cause the windows to fog up. 

Switching manual air recirculation on and off 

Switching on: Press the 

 button. The indicator light under the button lights up. 

Switching off: Press the 

 button. The indicator light under the button goes out. 

Switching the automatic air recirculation mode on and off: Climatronic 

  Press the 

 button. 

  Touch the 

 function key. 

  Switch automatic recirculation mode on or off by touching the  Automatic air recirculation  function 

key. 

If the box in the function key is checked  , the automatic recirculation mode is switched on. 

Features of automatic air recirculation mode 

In automatic air recirculation mode, fresh air enters the passenger compartment. If the system detects 
an increased concentration of pollutants in the outside air, it automatically switches to air recirculation. 
As soon as the pollutant level is back in the normal range, air recirculation is switched off. 

Unpleasant odors cannot be detected by the system. 

To prevent condensation from forming on the windows, air recirculation does not automatically switch 
on in certain situations. 

  WARNING 

Stale air causes driver fatigue and reduces driver alertness, which can cause accidents, colli-
sions and serious personal injury. 

  Never use air recirculation mode over an extended period of time, since no fresh air will 

enter the passenger compartment. 

  When the air conditioner is off and recirculation mode is on, condensation can quickly 

form on the windows and greatly reduce visibility. 

  Always switch off recirculation mode when it is not needed. 


  NOTICE 

Do not smoke when air recirculation is switched on. Smoke drawn into the ventilation system 
can leave residue on the evaporator and on the dust and pollen active carbon filter, resulting in 
permanent odors whenever the air conditioner is switched on.
 

  Climatronic: When backing up and while the automatic wiper/washer is operating, air recircula-

tion is briefly activated to help keep exhaust fumes from getting into the passenger compartment. 


Refueling 

 Introduction 

In this section you’ll find information about: 

Indicator lights and fuel gauge


Refueling


Misfueling guard for diesel vehicles


Fuel capacities


Refueling checklist


The fuel filler flap is located on the rear right side of the vehicle. 

More information: 

  Exterior views  
  Fuel  
  Selective catalytic reduction (AdBlue)  
  Working in the engine compartment  

  WARNING 

Improper refueling or handling of fuel is dangerous and can cause fire, explosion, and severe 
burns. 

  Always make sure that the fuel filler cap is screwed on all the way. This helps keep fuel 

from spilling out or evaporating. 

  Fuel is highly flammable and explosive; it can cause severe burns and other severe inju-

ries. 

  Failure to shut the engine off while refueling and/or to insert the pump nozzle all the way 

into the fuel filler neck can cause fuel to overflow and to spray out. Fuel spray and overflow-
ing fuel are dangerous because they can cause fire and serious personal injury. 

  During refueling, the engine and the ignition must be switched off for safety reasons. 
  Never use a mobile telephone, CB radio, or other radio equipment while refueling. The 

electromagnetic radiation can cause sparks that can ignite fuel vapors and cause a fire. 

  Never get back into your vehicle while refueling. If in exceptional circumstances you must 

get back in your vehicle while refueling, make certain that you close the door and touch metal 
to discharge static electricity before touching the filler nozzle again. This helps avoid the 
buildup of static electricity, which can cause sparks that can ignite fuel vapors released dur-
ing refueling. 

  Never smoke or have an open flame (or sparks, cigarettes, or other smoldering objects) 

anywhere in or near your vehicle when refueling or filling a portable fuel container. 

  Follow all safety instructions and procedures that apply at the service station where you 

refuel. 

  Never spill fuel in the vehicle or the luggage compartment. 


  WARNING 

Even if empty, portable fuel containers can leak and cause a fire and serious personal inju-
ries, especially in a crash. 

  For your safety, we strongly recommend that you do not travel with a portable fuel con-

tainer in your vehicle. 

  If, under exceptional circumstances, you must transport a portable fuel container, please 

observe the following: 
 

–  Never fill a portable fuel container while it is anywhere in or on the vehicle (for exam-
ple, in the luggage compartment). Static electricity can build up while filling and can ignite 
fuel vapors, causing a fire. 


–  Always place a portable fuel container on the ground before filling. Never spill fuel 
inside the vehicle or luggage compartment. Fuel vapors are highly flammable. 


–  Always keep the filler nozzle completely inside the portable container before and dur-
ing filling. 


–  If filling a portable container made of metal, the filler nozzle must always be in contact 
with the container. This will help prevent static electricity from discharging and causing a 
fire. 


–  Always observe local and state or provincial laws about the use, storage, and transpor-
tation of portable fuel containers. 


–  Make certain that the portable fuel container meets industry standards, such as AN-
SI/ASTM F852-86. 


  NOTICE 

  Remove fuel spills from the vehicle immediately to help prevent damage to the paint, tires, 

and wheel housings. 

  Refueling with gasoline when your vehicle has a diesel engine or refueling with diesel fuel 

when your vehicle has a gasoline engine can cause very serious and expensive engine and 
fuel system damage that is not covered by any Volkswagen Limited Warranty.
 

  If you put any amount of incorrect fuel in the fuel tank, do not start the engine under any 

circumstances. Immediately contact the nearest authorized Volkswagen dealer or authorized 
Volkswagen Service Facility for assistance. These fuels contain substances that can severely 
damage the fuel system and the engine if the engine is started.
 

  Vehicles with diesel engines must never be refueled or driven with gasoline, kerosene, 

heating oil, or other non-specified fuels that have not been expressly approved for use with the 
diesel engine. Other kinds of fuel will cause serious damage to the fuel system and the engine 
that is not covered by any Volkswagen Limited Warranty.
 

  Fuels can pollute the environment. Spilled fuel must be collected and disposed of properly, 

following all applicable environmental regulations. 

  There is no emergency release for the fuel filler flap. Contact an authorized Volkswagen dealer or 

an authorized Volkswagen Service Facility for assistance. 


Indicator lights and fuel gauge 


Fig. 160 In the instrument cluster: Fuel gauge. 

 Please first read and note the introductory information and heed the WARNINGS 


Lights 

up  

Gauge posi-

tion 

⇒ 

fig. 160


Possible cause or 

meaning 

⇒    

Proper response  


Red range 

(arrow)  

Fuel tank almost empty.
Running on reserve  

Time to refuel 

⇒  .  


–  

Water in the diesel fuel 
(diesel engines only)

10

.  

Reduce speed imme-
diately! Drive to an 
authorized 
Volkswagen dealer or 
an authorized 
Volkswagen Service 
Facility. Avoid high 
engine speeds and 
heavy engine loads. 
If the indicator lights 
up immediately after 
filling the tank, switch 
off the engine and 
seek expert assis-
tance  


–  

Fuel filler cap not 
properly closed.

10


Stop and close the 
fuel filler cap properly.  


10

  Displayed in color on an instrument cluster with color display. 


When the ignition is switched on, several warning and indicator lights come on briefly for a function 
check. They go out after a few seconds. 

Fuel filler cap not properly closed 


If the indicator light 

 comes on or you see a text message in the instrument cluster display indicating 

that the fuel filler cap is not properly closed, stop the vehicle in a safe place and switch off the engine 
and the ignition. 

Open the fuel filler flap and take the fuel filler cap off the filler neck. Then put the fuel filler cap back on 
the filler neck and screw it on clockwise until you clearly hear a clicking sound. Close the fuel filler flap. 

After switching on the ignition, the indicator light 

 may stay on or the text message may still appear 

in the instrument cluster display, even if the fuel filler cap is now properly closed. This is normal and no 
reason to take your vehicle in for service. 

If, however, the malfunction indicator light 

 also comes on, drive to your nearest authorized 

Volkswagen dealer or authorized Volkswagen Service Facility and have the fuel system and the en-
gine checked. 

  WARNING 

Driving with a fuel tank that is almost empty can lead to stalling in traffic, a collision, and 
serious personal injuries. 

  When the fuel tank is almost empty, fuel supply to the engine can be interrupted, especial-

ly when driving over bumps, across slopes, and up and down hills. 

  Steering and braking assistance as well as ESC and related systems will not work if the 

engine “sputters” or stalls due to lack of fuel. 

  Always refuel when the tank is 1/4 full to reduce the risk of running out of fuel and stalling 

in traffic. 


  NOTICE 

  Failure to heed warning lights or text WARNINGS can result in vehicle damage. 
  Never drive until the fuel tank is completely empty. The irregular fuel supply can cause the 

engine to misfire. This allows unburned fuel to get into the exhaust system and damage the 
catalytic converter or the diesel particulate filter.
 

  The small arrow next to the gas pump symbol in the fuel gauge 

⇒ 

fig. 160

 shows the side of the 

vehicle with the fuel filler flap. 


Refueling 


Fig. 161 Right rear side of vehicle: Fuel cap placed on the open fuel filler flap. 

 Please first read and note the introductory information and heed the WARNINGS 


Before refueling, always switch off the engine, the ignition, and all mobile phones, and leave them 
switched off until refueling is complete. 

Opening the fuel filler cap 

  Unlock the vehicle from the outside with the vehicle key or press the central locking button in driver 

door   to unlock the vehicle from the inside 

⇒  Power locking system

  The fuel filler flap is located at the right rear of the vehicle. 
  Press on the back part of the fuel filler flap and fold open. 
  Unscrew the fuel cap counterclockwise and remove. Use the slot on the fuel filler flap hinge 

⇒ 

fig. 161

 to hold the cap while refueling. 

Refueling 

The correct fuel grade for your vehicle 

⇒  Fuel is listed on a sticker on the inside of the fuel filler flap 

⇒ 

fig. 161

 (arrow). 

  The fuel tank is full when the automatic filler nozzle pump switches off the first time 

⇒  . 

  Do not try to add fuel after the pump stops! Topping off the tank in this way may fill the expansion 

space that the tank needs and cause fuel to overflow, for example, if it gets warmer outside. 

Closing the fuel filler cap 

  Screw the fuel cap clockwise onto the fuel filler neck until you hear it click into place. 
  Close the fuel filler flap until you hear it latch shut. The fuel filler flap must be flush with the vehicle 

body. 

  WARNING 

Spilled fuel can cause fires, explosions, burns, and other severe injuries. 

  Always stop refueling once the pump nozzle switches off so that the tank does not over-

flow. 


  NOTICE 

Remove fuel spills from all vehicle surfaces immediately to help prevent damage to the paint, 
tires, and wheel housings.
 

  Fuel spills may pollute the environment. 

Misfueling guard for diesel vehicles 


Fig. 162 With open fuel cap: Misfueling guard in the fuel filler neck. 

 Please first read and note the introductory information and heed the WARNINGS 


The fuel filler neck of diesel vehicles is equipped with a misfueling guard 

⇒ 

fig. 162

. The misfueling 

guard helps prevent filling the fuel tank of a diesel vehicle with gasoline, because the guard makes it 
difficult to insert any type of filler nozzle other than the type commonly used for diesel fuel. 

Damaged, worn out, or incorrect nozzles, as well as other means of refueling (portable fuel containers, 
for example) will generally not open the misfueling guard and fuel from these sources cannot easily 
flow into the tank. Using these incorrect or non-standard nozzles to refuel your diesel vehicle can 
cause fuel spills, which can cause fires, explosions, burns, and other severe injuries. 

The misfueling guard can generally only be properly opened with a correct nozzle from a standard 
diesel fuel pump. Under certain circumstances it may be necessary to turn the nozzle back and forth 
slightly with light pressure to open the misfueling guard. If the misfueling guard cannot be opened this 
way, see the nearest authorized Volkswagen dealer or authorized Volkswagen Service Facility and 
have the fuel system checked. 

  WARNING 

Spilled fuel can cause fires, explosions, burns, and other severe injuries. 

  Do not refuel from devices other than correct, undamaged standard diesel fuel pump noz-

zles. 

  Always stop refueling once the pump nozzle switches off so that the tank does not over-

flow. 


  NOTICE 

  It is your responsibility to put the right fuel in your vehicle and any damage that results 

from using the wrong fuel is not covered under the Emissions warranties or any other 
Volkswagen Limited Warranty.
 

  If you put any amount of the wrong fuel in the fuel tank, do not start the engine under any 

circumstances. Immediately contact the nearest authorized Volkswagen dealer or authorized 
Volkswagen Service Facility for assistance.
 

  If diesel fuel should get on any rubber hose, it must be wiped off immediately. The same 

applies if diesel fuel gets onto other parts of the vehicle, especially paint, tires, or a plastic 
part. Wash the contaminated vehicle parts right away with soap and warm water to help pre-
vent leaks and serious damage.


  NOTICE 

Never force a fuel nozzle in the diesel misfueling guard. Forcing a fuel nozzle in the misfueling 
guard can damage it so that it can no longer help prevent misfueling.
 

  If you have problems inserting a diesel fuel nozzle, please check to make sure you are 

using the right kind of diesel fuel. 

  If you must refuel with a non-standard diesel fuel nozzle, an adapter is available from 

Volkswagen to allow refueling. Contact an authorized Volkswagen dealer or authorized 
Volkswagen Service Facility for assistance. Only use an adapter approved by Volkswagen for 
your vehicle.
 

  Remember that the nozzle on a portable fuel container will generally not open the 

misfueling guard. If you must refuel with a portable fuel container in an emergency, you can 
pour diesel fuel very slowly from a portable container into the fuel filler neck of your vehicle. 
The fuel will flow slowly past the misfueling guard and into the tank.
 

Fuel capacities 

 Please first read and note the introductory information and heed the WARNINGS 


Engine  

Fuel tank capacity  

Gasoline and diesel 

engines  

About 13.2 gallons (50.0 liters), 

including about 1.3 gallons (5.0 liters) reserve.  


Refueling checklist 

 Please first read and note the introductory information and heed the WARNINGS 


The engine compartment of any motor vehicle is a hazardous area. Never do any work on the engine 
or in the engine compartment unless you 

  know exactly how to carry out the job, 
  have the correct technical information and the proper tools and supplies, and 

  are familiar with the necessary safety precautions 

⇒  Working in the engine compartment


Content   ..  18  19  20  21   ..