Volkswagen Golf / Golf GTI / Jetta. Manual - part 534
 

  Index      Volkswagen     Volkswagen Golf / Golf GTI / Jetta - service repair manual 1999-2005 year


Search            copyright infringement  


Content   ..  532  533  534  535   ..


Volkswagen Golf / Golf GTI / Jetta. Manual - part 534


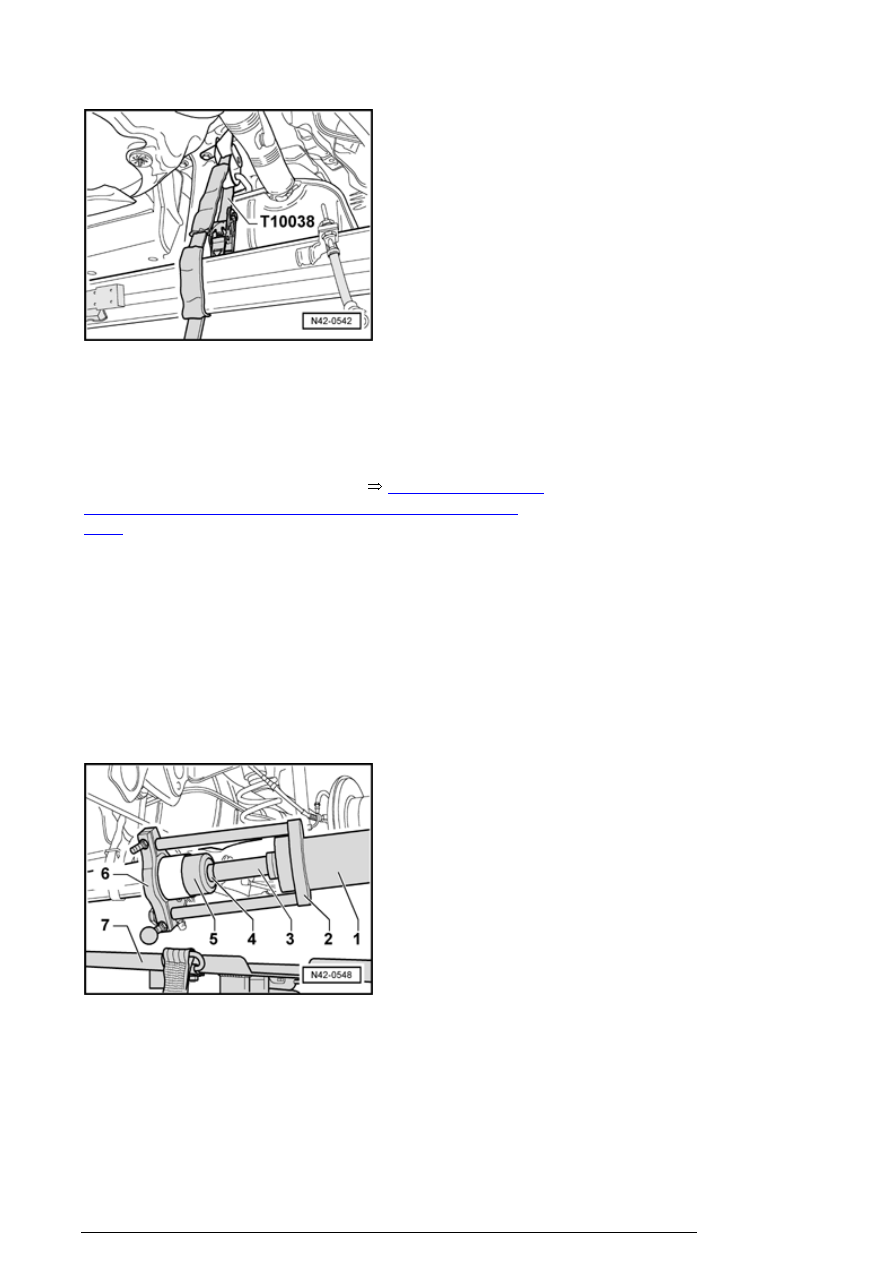
- Tighten rear axle with tensioning strap T10038 over 
mounting from muffler system. 

Vehicles with automatic headlight range control

- Removing coupling rod from Left Rear Level Control 
System Sensor G76 from rear axle 


40-2, Left rear level 

control system sensor G76 on rear axle for front wheel 
drive

 . 

Continue for all vehicles

Note

n

Place engine/transmission jack V.A.G1383A with 
universal transmission support V.A.G1359/2 under the 
control arm (danger of accident from falling parts 
when pulling out the wheel hub and the wheel 
bearing).  


- Pulling out bonded rubber bushing 

1 - VAS6178  

2 - VAS6180/1  

3 - VAS6180/4 long  

4 - VAS6180/3  

Rear axle, servicing


5 - Thrust tube 3416/2  

6 - VAS6180/2  

7 - V.A.G1383A with V.A.G1359/2  

Note

n

The edges of separating device VAS6180/2 must 
come in position between the collar of the bonded 
rubber bushing and the connection of the control arm.   


n

The note "Top" on the separating device VAS6180/2 
must point to the control arm.  


Installing


Bonded rubber bushing is marked on face with marks  - 1 - 

They must align with edge - arrow - on trailing arm - 2 - 

- Mark position of marks - 1 - on long side of bonded rubber 
bushing. 

- Install bonded rubber bushing and special tools on rear 
axle. 

1 - VAS6178  

2 - VAS6180/1  

Rear axle, servicing


3 - VAS6180/6  

4 - VAS6180/7  

5 - Bonded rubber bushing 

6 - VAS6180/8  

7 - V.A.G1383A with V.A.G1359/2  

Note

n

The note "Top" on the device VAS6180/8 points to the 
control arm.  


- Before installing bonded rubber bushing, make sure that 
the mark - arrow A - align with edge - arrowB - of trailing 
arm. 

- Press in bonded rubber bushing until a gap of 0.2 mm  
arrow - 
is available. 

- Measure this gap - arrow - with a measure gauge - A - 

- Check position of bonded rubber bushing after installing. 

Tighten vehicle to the lifting platform

If the vehicle is not secured, there is a risk that it may 
slip off the hoist.

Rear axle, servicing


- Remove plugs from trailing arm - 3 - and tighten 
tensioning strap . 

1 - Support arm of lifting platform  

2 - Tightening strap T10038  

- The vehicle must be tightened with tensioning straps on 
left and right side.  

- Grease bonded rubber bushing kidney shaped cavity with 
assembly paste G052150A2 before installing rear axle. 

If the rear axle is not "lubricated" when installed, it will 
be noisy when driving. 

Tightening bearing bracket is only possible, when the 
measured value - a - from the middle of wheel hub to 
lower edge bordering wheel housing is reached. 

Otherwise the bonded rubber bushing will be distorted, 
resulting in reduced service life.

- Turn wheel hub until one of the holes for wheel bolts is at 
the 12 o'clock position. 

- Install wheel hub support T10149 with a wheel bolt. 

- Lift wheel bearing housing using engine/transmission jack 
until dimension - a - is reached. 

Rear axle, servicing


Content   ..  532  533  534  535   ..