Volkswagen Jetta / Bora: Electrical System Manual - part 43
 

  Index      Volkswagen     Volkswagen Jetta (2005 year) / Bora (2006 year) - Electrical System manual


Search            copyright infringement  


Content   ..  41  42  43  44   ..


Volkswagen Jetta / Bora: Electrical System Manual - part 43


Removing and installing windscreen

washer spray jets

Removing:
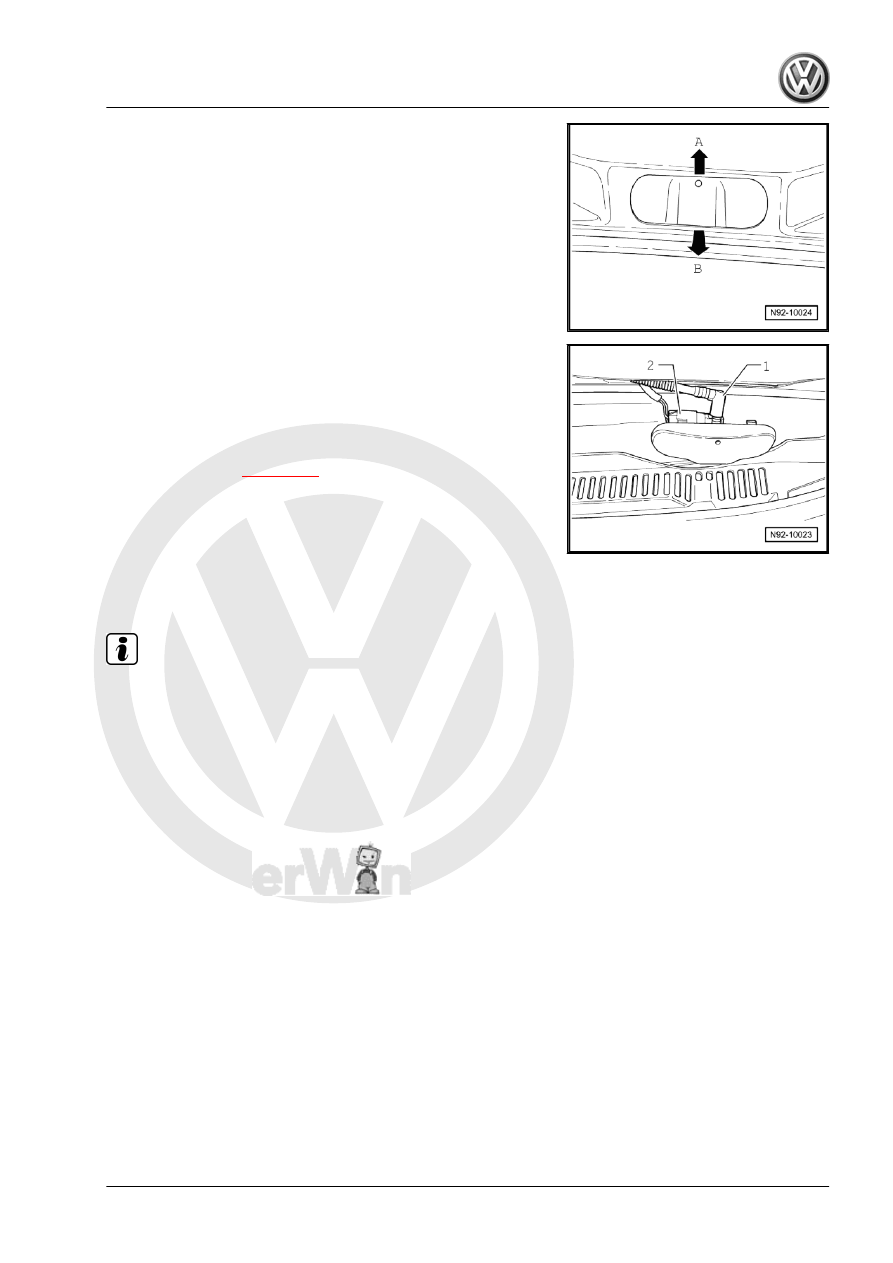
– Push spray jets upwards -arrow A- and pull out of bonnet from

rear -arrow B-.

– Pull hose -1- off spray jet and disconnect connector -2-.
Installing:
– Fit connector -2- and hose -1- on spray jet.
– Push spray jet in installation hole until it is heard to lock in

place.

– Adjust spray jets 

⇒ page 169

 .

2.5

Adjusting front windscreen washer sys‐

tem spray jets

Note

If the spray field is not uniform because the spray jet is soiled,

remove the spray jet and clean in opposite direction of spray with

water. In the following it is allowed to blow the spray jets in op‐

posite direction of spray with compressed air. Do not use objects

to clean the spray jets.

⇒ Maintenance ; Booklet  20.1

Jetta 2005 ➤ , Bora 2006 ➤

2. Windscreen washer system    

169

Headlight washer system

Note

Additional information:

⇒ Current flow diagrams, Electrical fault finding and Fitting loca‐

tions
⇒  Operating instructions
General description:
Every fifth time the front windscreen washer system is activated

the headlights are also washed if the windscreen wiper lever on

the steering wheel is pulled for at least 1.5 seconds - provided

either dipped beam or high beam are switched on.
The “active time” of the headlight washer system can be variably

adjusted to between 0 and 12.75 seconds 

⇒ page 294

 .

To guarantee sound functioning, the headlight washer system

must be vented following assembly work or when activated for the

first time 

⇒ page 173

 .

Fault detection and fault display:
The onboard supply control unit -J519- is equipped with self-di‐

agnosis, which is designed to ease fault finding.
For fault finding, use the vehicle diagnosis, testing and informa‐

tion system -VAS 5051A- in “guided fault finding” mode.

Jetta 2005 ➤ , Bora 2006 ➤

170

Assembly overview - headlight washer system

1 - Washer spray jet assembly

with right spray jets

❑ Removing and installing

spray jet assembly

⇒ page 173

❑ Adjusting spray jets

⇒ page 173

❑ Removing and installing

pop-up spray jet cylin‐

der 

⇒ page 172

2 - Washer spray jet assembly

with left spray jets

❑ Removing and installing

spray jet assembly

⇒ page 173

❑ Adjusting spray jets

⇒ page 173

❑ Removing and installing

pop-up spray jet cylin‐

der 

⇒ page 172

3 - Elbow

❑ Connection to left spray

jet pop-up cylinder

❑ Overview of washer wa‐

ter line hose couplings

⇒ page 174

4 - Hose
5 - Elbow

❑ Connection to right

spray jet pop-up cylin‐

der

❑ Distribution of washer

water to spray jets on

headlight washer sys‐

tem

❑ Overview of washer water line hose couplings 

⇒ page 174

6 - T-piece

❑ Distribution of washer water to spray jets on headlight washer system

7 - Elbow
8 - Headlight washer system pump -V11-

❑ Removing and installing 

⇒ page 171

9 - Windscreen washer system and headlight washer system reservoir

❑ Removing and installing 

⇒ page 166

10 - Filler pipe for reservoir for windscreen washer and headlight washer systems

❑ Removing and installing 

⇒ page 166

3.2

Removing and installing headlight

washer system pump -V11-

The headlight washer system pump -V11- is fitted on the wind‐

screen and headlight washer system in the right housing liner.

Jetta 2005 ➤ , Bora 2006 ➤

3. Headlight washer system    

171

ignition key.

– Remove front bumper cover ⇒  Body Repairs, exterior; Rep.

Gr.  63 ; Front bumper .

– Pull headlight washer system pump -V11- -9- upwards out of

the reservoir.

– Disconnect connector -10-.
– To remove the connecting pipe -8- pull securing clip on con‐

nection and pull connecting pipe -8- off headlight washer

system pump -V11- .

Installing:
Installation is carried out in the reverse order. When installing,

note the following:
– Tighten threaded connections to specified torque settings

⇒ page 178

 .

– Bleed the headlight washer system after completing work

⇒ page 173

 .

3.3

Removing and installing pop-up spray

jet cylinder

Removing:
– Switch off ignition and all electrical consumers and pull out

ignition key.

– Pull spray jets with cap -1- out of bumper cover onto stop.
– Unclip cap -1- from mounting points -arrows- on washer spray

jet assembly.

– Remove front bumper cover ⇒  Body Repairs, exterior; Rep.

Gr.  63 ; Front bumper .

– Pull the securing clip -4- off hose connection.
– Pull hose connection off pop-up cylinder -2-.
– Remove securing bolt -1-.
– Unclip pop-up spray jet cylinder -2- from bracket -3-.
Installing:
Installation is carried out in the reverse order. When installing,

note the following:
– The pop-up spray jet cylinder hose must be attached to the

securing clip on the bracket.

– Tighten threaded connections to specified torque settings

⇒ page 178

 .

– Bleed the headlight washer system after completing work

⇒ page 173

 .

Jetta 2005 ➤ , Bora 2006 ➤

172


Content   ..  41  42  43  44   ..