Toyota Land Cruiser Prado (2023 year). Manual in english - page 27
 

  Index      Manuals     Toyota Land Cruiser Prado (2023 year). Manual in english


Search            copyright infringement  


Content      ..     25      26      27      28     ..


Toyota Land Cruiser Prado (2023 year). Manual in english - page 27


432

4-5. Using the driving support systems

Conditions under which the system will not detect a vehicle

The RCTA function is not designed to detect the following types of vehicles
and/or objects:

Vehicles approaching from directly behind

Vehicles backing up in a parking space next to your vehicle

Guardrails, walls, signs, parked vehicles and similar stationary objects

*

Small motorcycles, bicycles, pedestrians, etc.

*

Vehicles moving away from your vehicle

Vehicles approaching from the parking spaces next to your vehicle

*

The distance between the sensor and approaching vehicle gets too close

*

: Depending on the conditions, detection of a vehicle and/or object may

occur.

Vehicles that the sensors cannot detect
due to obstructions

433

4-5. Using the driving support systems

4

D

riv

in

g

Situations in which the system may not operate properly

The RCTA function may not detect vehicles correctly in the following situa-
tions:

When the sensor is misaligned due to a strong impact to the sensor or its
surrounding area.

When mud, snow, ice, a sticker, etc., is covering the sensor or surrounding
area on the position above the rear bumper.

When driving on a road surface that is wet with standing water during bad
weather, such as heavy rain, snow, or fog.

When multiple vehicles are approaching with only a small gap between
each vehicle.

When a vehicle is approaching at high speed.

When equipment that may obstruct a sensor is installed, such as a towing
eyelet, bumper protector (an additional trim strip, etc.), bicycle carrier, or
snow plow.

When towing a trailer.

When there is a significant difference in height between your vehicle and the
vehicle that enters the detection area.

When a sensor or the area around a sensor is extremely hot or cold.

If the suspension has been modified or tires of a size other than specified
are installed.

When backing up on a slope with a
sharp change in grade.

When backing out of a sharp angle park-
ing spot.

434

4-5. Using the driving support systems

If the front of the vehicle is raised or lowered due to the carried load.

Situations in which the system may operate even if there is no possibil-
ity of a collision

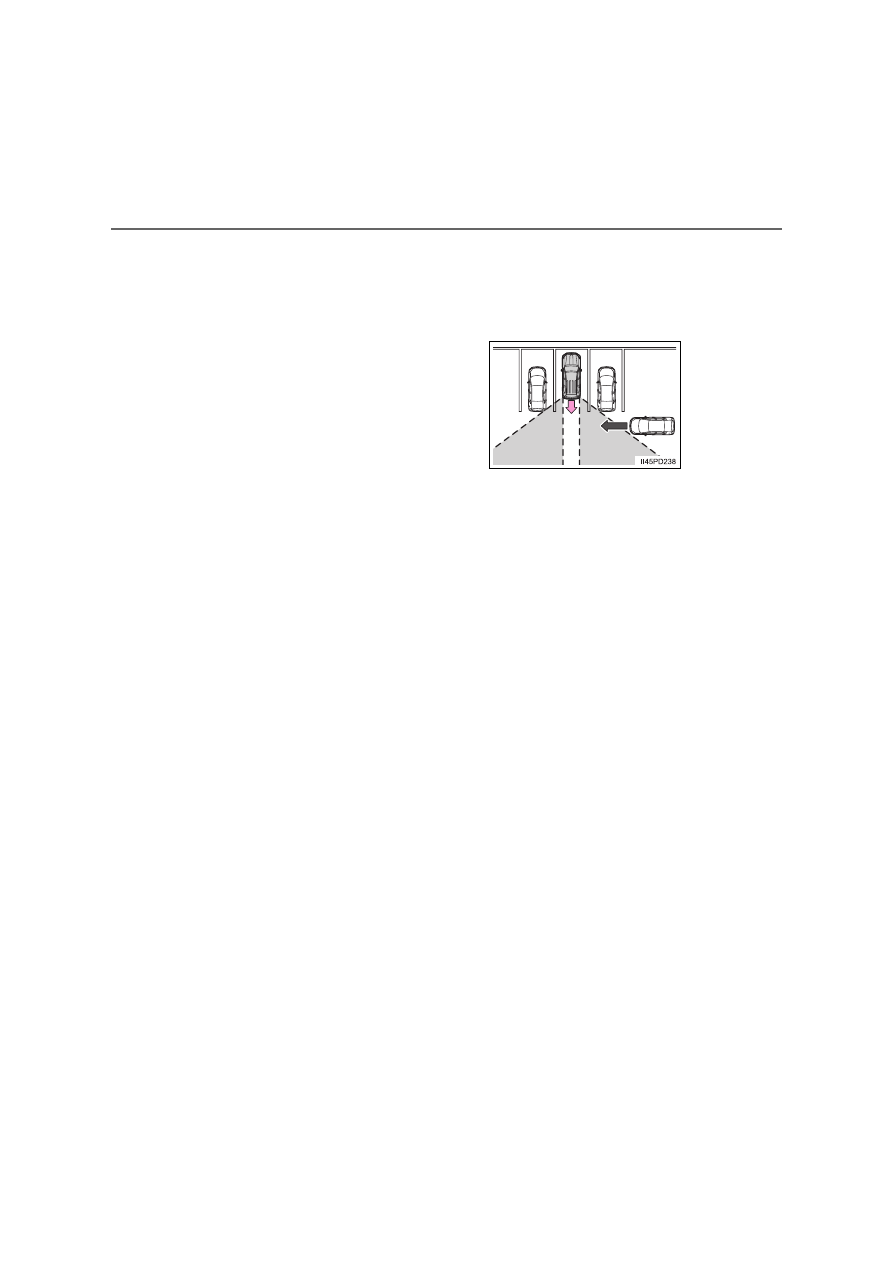
Instances of the RCTA function unnecessarily detecting a vehicle and/or
object may increase in the following situations:

When equipment that may obstruct a sensor is installed, such as a towing
eyelet, bumper protector (an additional trim strip, etc.), bicycle carrier, or
snow plow.

When turning while backing up.

When a vehicle turns into the detection
area.

When the parking space faces a street
and vehicles are being driven on the
street.

When the distance between your vehicle
and metal objects, such as a guardrail,
wall, sign, or parked vehicle, which may
reflect electrical waves toward the rear
of the vehicle, is short.

435

4-5. Using the driving support systems

4

D

riv

in

g

When there are spinning objects near your vehicle such as the fan of an air
conditioning unit.

When water is splashed or sprayed toward the rear bumper, such as from a
sprinkler.

Moving objects (flags, exhaust fumes, large rain droplets or snowflakes, rain
water on the road surface, etc.).

When the distance between your vehicle and a guardrail, wall, etc., that
enters the detection area is short.

Gratings and gutters.

When a sensor or the area around a sensor is extremely hot or cold.

If the suspension has been modified or tires of a size other than specified
are installed.

If the front of the vehicle is raised or lowered due to the carried load.

When a vehicle passes by the side of
your vehicle.

When a detected vehicle turns while
approaching the vehicle.

436

4-6. Driving tips

Winter driving tips

Use fluids that are appropriate to the prevailing outside tempera-
tures.

• Engine oil
• Engine coolant/intercooler coolant (if equipped)
• Washer fluid

Have a service technician inspect the condition of the battery.

Have the vehicle fitted with four snow tires or purchase a set of tire
chains for the rear tires.

Ensure that all tires are the same size and brand, and that chains match
the size of the tires.

Perform the following according to the driving conditions:

Do not try to forcibly open a window or move a wiper that is frozen.
Pour warm water over the frozen area to melt the ice. Wipe away
the water immediately to prevent it from freezing.

To ensure proper operation of the climate control system fan,
remove any snow that has accumulated on the air inlet vents in
front of the windshield.

Check for and remove any excess ice or snow that may have accu-
mulated on the exterior lights, vehicle’s roof, chassis, around the
tires or on the brakes.

Remove any snow or mud from the bottom of your shoes before
getting in the vehicle.

Carry out the necessary preparations and inspections before
driving the vehicle in winter. Always drive the vehicle in a man-
ner appropriate to the prevailing weather conditions.

Pre-winter preparations

Before driving the vehicle

437

4-6. Driving tips

4

D

riv

in

g

Accelerate the vehicle slowly, keep a safe distance between you and
the vehicle ahead, and drive at a reduced speed suitable to road con-
ditions.

Park the vehicle and move the shift lever to P (automatic transmis-
sion) or 1 or R (manual transmission) without setting the parking
brake. The parking brake may freeze up, preventing it from being
released. If the vehicle is parked without setting the parking brake,
make sure to block the wheels.
Failure to do so may be dangerous because it may cause the vehi-
cle to move unexpectedly, possibly leading to an accident.

For vehicles with an automatic transmission: If the vehicle is parked
without setting the parking brake, confirm that the shift lever cannot
be moved out of P

*

.

*

: The shift lever will be locked if it is attempted to be shifted from P to any

other position without depressing the brake pedal. If the shift lever can be
shifted from P, there may be a problem with the shift lock system. Have the
vehicle inspected by any authorized Toyota retailer or Toyota authorized
repairer, or any reliable repairer immediately.

Use the correct tire chain size when mounting the snow chains. 
Chain size is regulated for each tire size.

Side chain
(5 mm [0.20 in.] in diameter)
Cross chain
(6.3 mm [0.25 in.] in diameter)

When driving the vehicle

When parking the vehicle (in the winter time or in the cold lati-
tudes)

Selecting tire chains

1

2

438

4-6. Driving tips

Regulations regarding the use of tire chains vary depending on loca-
tion and type of road. Always check local regulations before installing
chains.

Tire chain installation

Observe the following precautions when installing and removing chains:

Install and remove tire chains in a safe location.

Install tire chains on the rear tires only. Do not install tire chains on the front
tires.

Install tire chains on rear tires as tightly as possible. Retighten chains after
driving 0.5 - 1.0 km (1/4 - 1/2 mile).

Install tire chains following the instructions provided with the tire chains.

Regulations on the use of tire chains

WARNING

Driving with snow tires

Observe the following precautions to reduce the risk of accidents.
Failure to do so may result in a loss of vehicle control and cause death or
serious injury.

Use tires of the specified size.

Maintain the recommended level of air pressure.

Do not drive at speeds in excess of the speed limit or the speed limit spec-
ified for the snow tires being used.

Use snow tires on all, not just some wheels.

Driving with tire chains

Observe the following precautions to reduce the risk of accidents.
Failing to do so may result in the vehicle being unable to be driven safely,
and may cause death or serious injury.

Do not drive in excess of the speed limit specified for the tire chains being
used, or 50 km/h (30 mph), whichever is lower.

Avoid driving on bumpy road surfaces or over potholes.

Avoid sudden acceleration, abrupt steering, sudden braking and shifting
operations that cause sudden engine braking.

Slow down sufficiently before entering a curve to ensure that vehicle con-
trol is maintained.

Do not use LDA (Lane Departure Alert with Yaw Assist Function) system.
(if equipped)

439

4-6. Driving tips

4

D

riv

in

g

NOTICE

Repairing or replacing snow tires (vehicles with the tire pressure warn-
ing system)

Request repairs or replacement of snow tires from any authorized Toyota
retailer or Toyota authorized repairer, or any reliable repairer or legitimate
tire retailers. 
This is because the removal and attachment of snow tires affects the opera-
tion of the tire pressure warning valves and transmitters.

Fitting tire chains (vehicles with the tire pressure warning system)

The tire pressure warning valves and transmitters may not function correctly
when tire chains are fitted.

441

5

Audio system

5-1. Basic Operations

Audio system types ...........442
Steering wheel audio 

switches...........................443

AUX port/USB port ............444

5-2. Using the audio system

Optimal use of the audio 

system .............................445

5-3. Using the radio

Radio operation .................447

5-4. Playing an audio CD and 

MP3/WMA discs

CD player operation...........451

5-5. Using an external device

Listening to an iPod ...........459
Listening USB memory 

device ..............................466

Using the AUX port............473

5-6. Using Bluetooth

®

 devices

Bluetooth

®

 audio/phone.....474

Using the steering 

wheel switches ................479

Registering a Bluetooth

®


device ..............................480

5-7. “SETUP” menu

Using the “SETUP” menu

(“Bluetooth

*

” menu).........481

Using the “SETUP” menu 

(“TEL” menu) ...................485

5-8. Bluetooth

®

 Audio

Operating a Bluetooth

®


enabled portable 
player...............................489

5-9. Bluetooth

®

 Phone

Making a phone call...........491
Receiving a phone call.......493
Speaking on the phone......494

5-10. Bluetooth

®

Bluetooth

®

.........................496

*

: Bluetooth is a registered trademark of Bluetooth SIG, Inc.

442

5-1. Basic Operations

Audio system types

Vehicles with a navigation system or a multimedia system

Refer to the “Navigation and multimedia system Owner’s manual”.

Vehicles without a navigation system or a multimedia system

CD player with AM/FM radio

This illustration is for left-hand drive vehicles. Some button positions
are reversed for right-hand drive vehicles.

Using cellular phones

Interference may be heard through the audio system’s speakers if a cellular
phone is being used inside or close to the vehicle while the audio system is
operating.

Trademarks and registered trademarks

The company names and product names regarding the audio system are the
trademarks or registered trademarks of their respective companies.

: If equipped

NOTICE

To prevent battery discharge

Do not leave the audio system on longer than necessary with the engine
stopped.

To avoid damaging the audio system

Be careful not to spill drinks or other fluids over the audio system.

443

5

5-1. Basic Operations

Au
dio
 sy
stem

Steering wheel audio switches

Radio mode:

• Press: Select a radio station
• Press and hold: Seek up/

down

CD, MP3/WMA disc,
Bluetooth

®

, iPod or USB mode:

• Press: Select a track/file/

song

• Press and hold: Select a folder or album (MP3/WMA disc,

Bluetooth

®

 or USB)

Volume switch

• Increases/decreases volume
• Press and hold: Continuously increases/decreases volume

“MODE” switch

• Turns the power on, selects audio source
• Press and hold this switch to mute or pause the current opera-

tion. To cancel the mute or pause, press and hold the switch
again.

: If equipped

Some audio features can be controlled using the switches on
the steering wheel.
Operation may differ depending on the type of audio system or
navigation system. For details, refer to the manual provided with
the audio system or navigation system.

Operating the audio system using the steering wheel switches

1

WARNING

To reduce the risk of an accident

Exercise care when operating the audio switches on the steering wheel.

2

3

444

5-1. Basic Operations

AUX port/USB port

iPod

Open the cover and connect an
iPod using an iPod cable.

Turn on the power of the iPod if
it is not turned on.

USB memory

Open the cover and connect the USB memory device.

Turn on the power of the USB memory device if it is not turned on.

Portable audio player

Open the cover and connect the portable audio player using an
AUX cable.

Turn on the power of the portable audio player if it is not turned on.

Connect an iPod, USB memory device or portable audio player
to the AUX port/USB port as indicated below. Press the “MODE”
button to select “iPod”, “USB” or “AUX”.

Connecting using the AUX port/USB port

WARNING

While driving

Do not connect a device or operate the device controls.

445

5

5-2. Using the audio system

Au
dio
 sy
stem

Optimal use of the audio system

Displays the “SETUP” menu/
Selecting the mode
Changes the following settings

• Sound quality and volume

balance

P. 446

The sound quality and balance
setting can be changed to pro-
duce the best sound.

• Automatic Sound Levelizer

P. 446

The sound quality, volume balance and ASL settings can be
adjusted.

1

2

446

5-2. Using the audio system

Changing sound quality modes

Press the tune/scroll knob.
Turn the knob to select “Sound settings”.
Press the knob.
Turn the knob as corresponds to the desired mode.

“BASS”, “TREBLE”, “FADER”, “BALANCE”, or “ASL” can be selected.

Press the knob.

Adjusting sound quality

Turning the tune/scroll knob adjusts the level.

*

: The sound quality level is adjusted individually in each audio mode.

Press the knob or 

 (BACK) to return to the sound setting

menu.

Adjusting the Automatic Sound Levelizer (ASL)

When ASL is selected, turn the tune/scroll knob to change the
amount of ASL.
“LOW”, “MID”, “HIGH”, or “OFF” can be selected.

ASL automatically adjusts the volume and tone quality according to
vehicle speed.

Press the knob or 

 (BACK) to return to the sound setting

menu.

Using the audio control function

1

2

3

4

5

Sound 

quality mode

Mode 

displayed

Level

Turn to the 

left

Turn to the 

right

Bass

*

“BASS”

-5 to 5

Low

High

Treble

*

“TREBLE”

-5 to 5

Front/rear volume 

balance

“FADER”

F7 to R7

Shifts to rear Shifts to front

Left/right 

volume 

balance

“BALANCE”

L7 to R7

Shifts to left

Shifts to right

447

5

5-3. Using the radio

Au
dio
 sy
stem

Radio operation

Search for the desired stations by turning the tune/scroll knob or
pressing the “<” or “>” button of “SEEK TRACK”.

Press and hold a desired station selector button until you hear a
beep.

Press the “MODE” button until “AM” or “FM” is displayed.

AM/FM mode button
Tune/scroll knob 
Press: AF/region  code/TA
mode setup
Turn: Adjusting the frequency
Seeking the frequency

Station selectors
Displaying the station list (FM
mode only)
Power/volume knob
Press: Turning the audio sys-
tem on or off
Turn: Adjusting the volume

Setting station presets

1
2

3

4
5

6

1

2

448

5-3. Using the radio

Updating the station list

Press  

(LIST).

The station list will be displayed.

Press 

 (UPDATE) to update the list.

“Updating” is displayed while the searching is in process, and then avail-
able stations will be listed on the display.
To cancel the updating process, press 

 (BACK).

Selecting a station from the station list

Press  

(LIST).

The station list will be displayed.

Turn the tune/scroll knob to select a station.

To return to the previous display, press 

 (BACK).

Press the knob to tune in the station.

This feature allows your radio to receive station.

Listening to stations of the same network

Press the tune/scroll knob.
Turn the knob to “RADIO” and press the knob.
Turn the knob as corresponds to the desired mode: “FM AF” or
“Region code”.
Press the knob to select “ON” or “OFF”.
FM AF ON mode:
The station among those of the same network with strong recep-
tion is selected.
Region code ON mode:
The station among those of the same network with strong recep-
tion and broadcasting the same program is selected.

Using the station list

RDS (Radio Data System)

1

2

1

2

3

1

2

3

4


Content      ..     25      26      27      28     ..