Toyota RAV4 Hybrid (2023 year). Manual in english - page 25
 

  Index      Toyota     Toyota RAV4 Hybrid (2023 year). Manual in english


Search            copyright infringement  


Content      ..     23      24      25      26     ..


Toyota RAV4 Hybrid (2023 year). Manual in english - page 25


402

6-3. Do-it-yourself maintenance

check the oil level on the dip-
stick.

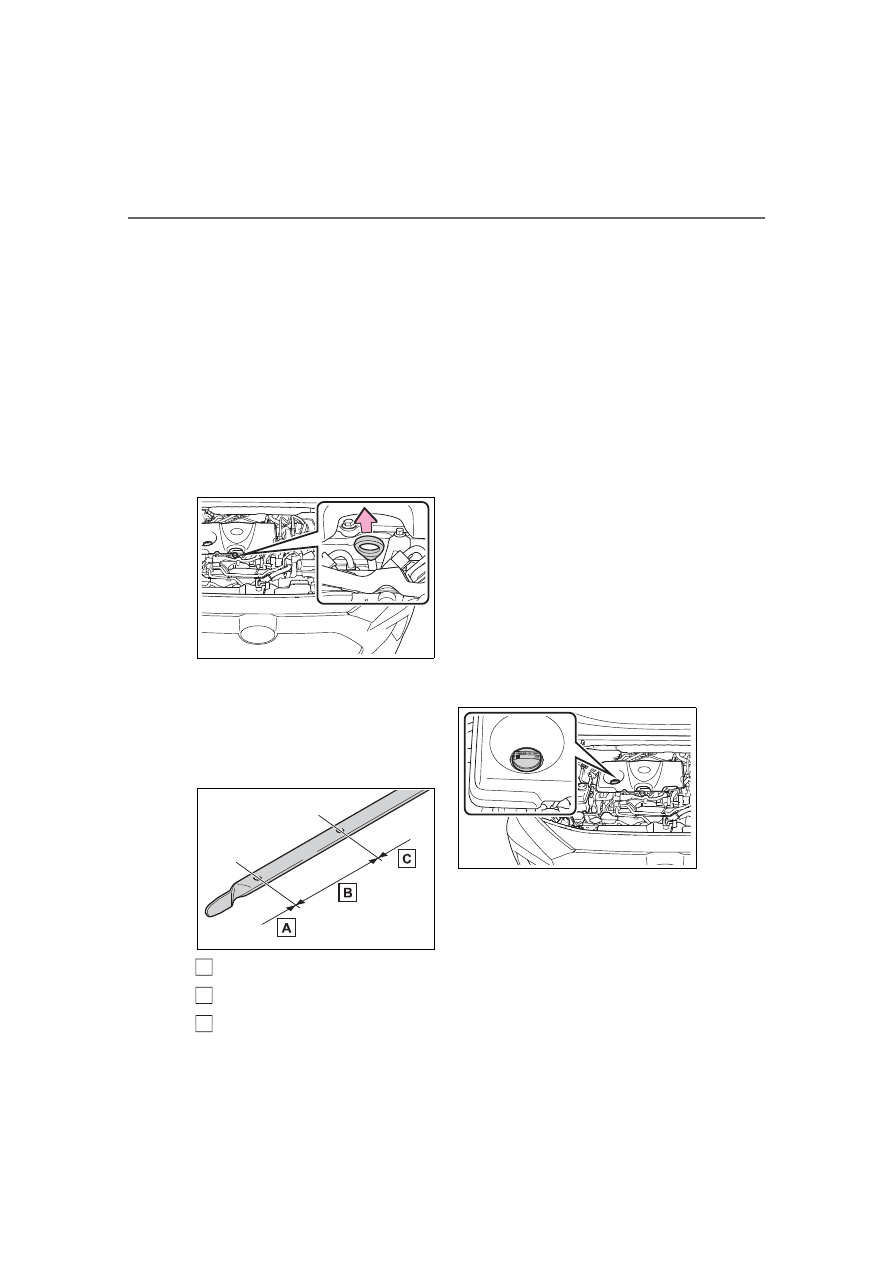
Checking the engine oil

1

Park the vehicle on level 
ground. After warming up the 
engine and turning off the 
hybrid system, wait more 
than 5 minutes for the oil to 
drain back into the bottom of 
the engine.

2

Holding a rag under the end, 
pull the dipstick out.

3

Wipe the dipstick clean.

4

Reinsert the dipstick fully.

5

Holding a rag under the end, 
pull the dipstick out and 
check the oil level.

Low

Normal

Excessive

The shape of the dipstick may differ 

depending on the type of vehicle or 

engine.

6

Wipe the dipstick and reinsert 
it fully.

Checking the oil type and 
preparing the items needed

Make sure to check the oil type 
and prepare the items needed 
before adding oil.

Engine oil selection

P.498

Oil quantity (Low 

 Full)

1.6 qt. (1.5 L, 1.3 Imp. qt.)

Item

Clean funnel

Adding engine oil

If the oil level is below or near 
the low level mark, add engine 
oil of the same type as that 
already in the engine.

1

Remove the oil filler cap by 
turning it counterclockwise.

2

Add engine oil slowly, check-
ing the dipstick.

3

Install the oil filler cap by 
turning it clockwise.

A

B

C

403

6-3. Do-it-yourself maintenance

6

Maintena

nce
 a

nd ca

re

Engine oil consumption

A certain amount of engine oil will 

be consumed while driving. In the 

following situations, oil consump-

tion may increase, and engine oil 

may need to be refilled in between 

oil maintenance intervals.

When the engine is new, for 

example directly after purchasing 

the vehicle or after replacing the 

engine

If low quality oil or oil of an inap-

propriate viscosity is used

When driving at high engine 

speeds or with a heavy load, 

when towing, or when driving 

while accelerating or decelerating 

frequently

When leaving the engine idling for 

a long time, or when driving fre-

quently through heavy traffic

The coolant level is satisfactory 
if it is between the “FULL” and 
“LOW” lines on the reservoir 
when the hybrid system is cold.

Engine coolant reservoir

WARNING

Used engine oil

Used engine oil contains poten-

tially harmful contaminants 

which may cause skin disorders 

such as inflammation and skin 

cancer, so care should be taken 

to avoid prolonged and 

repeated contact. To remove 

used engine oil from your skin, 

wash thoroughly with soap and 

water.

Dispose of used oil and filters 

only in a safe and acceptable 

manner. Do not dispose of used 

oil and filters in household trash, 

in sewers or onto the ground. 

Call your Toyota dealer, service 

station or auto parts store for 

information concerning recy-

cling or disposal.

Do not leave used engine oil 

within the reach of children.

NOTICE

To prevent serious engine 

damage

Check the oil level on a regular 

basis.

When replacing the engine oil

Be careful not to spill engine oil 

on the vehicle components.

Avoid overfilling, or the engine 

could be damaged.

Check the oil level on the dip-

stick every time you refill the 

vehicle.

Be sure the engine oil filler cap 

is properly tightened.

If oil is spilled on the engine 

cover

To prevent the engine cover from 

being damaged, remove any 

engine oil from the engine cover 

as soon as possible using a neu-

tral detergent. Do not use an 

organic solvent such as brake 

cleaner.

Checking the coolant

404

6-3. Do-it-yourself maintenance

Reservoir cap

“FULL” line

“LOW” line

If the level is on or below the “LOW” 
line, add coolant up to the “FULL” 
line. (

P.490)

Power control unit coolant 
reservoir

Reservoir cap

“FULL” line

“LOW” line

If the level is on or below the “LOW” 
line, add coolant up to the “FULL” 
line. (

P.491)

Coolant selection

Only use “Toyota Super Long Life 

Coolant” or a similar high quality 

ethylene glycol based non-silicate, 

non-amine, non-nitrite, and non-

borate coolant with long-life hybrid 

organic acid technology.

U.S.A.:

“Toyota Super Long Life Coolant” is 

a mixture of 50% coolant and 50% 

deionized water. (Minimum tem-

perature: -31°F [-35°C])

Canada:

“Toyota Super Long Life Coolant” is 

a mixture of 55% coolant and 45% 

deionized water. (Minimum tem-

perature: -44°F [-42°C])

For more details about coolant, con-

tact your Toyota dealer.

If the coolant level drops within 

a short time of replenishing

Visually check the radiators, hoses, 

engine/power control unit coolant 

reservoir caps, drain cock and water 

pump.

If you cannot find a leak, have your 

Toyota dealer, test the cap and 

check for leaks in the cooling sys-

tem.

Check the radiator and con-
denser, and clear away any for-
eign objects.
If either of the above parts is 
extremely dirty or you are not 
sure of their condition, have 

A

B

C

A

B

C

WARNING

When the hybrid system is 

hot

Do not remove the engine/power 

control unit coolant reservoir 

caps.
The cooling system may be under 

pressure and may spray hot cool-

ant if the cap is removed, causing 

serious injuries, such as burns.

NOTICE

When adding coolant

Coolant is neither plain water nor 

straight antifreeze. The correct 

mixture of water and antifreeze 

must be used to provide proper 

lubrication, corrosion protection 

and cooling. Be sure to read the 

antifreeze or coolant label.

If you spill coolant

Be sure to wash it off with water to 

prevent it from damaging parts or 

paint.

Checking the radiator and 
condenser

405

6-3. Do-it-yourself maintenance

6

Maintena

nce
 a

nd ca

re

your vehicle inspected by your 
Toyota dealer.

Checking fluid level

The brake fluid level should be 
between the “MAX” and “MIN” 
lines on the tank.

Adding fluid

1

Slide and lift up the rubber 
strip to partly remove it as 
shown.

2

Disconnect the claws and 
remove the service cover.

3

Remove the reservoir cap.

4

Add brake fluid slowly while 
checking the fluid level.

Make sure to check the fluid 
type and prepare the necessary 
item.

WARNING

When the hybrid system is 

hot

Do not touch the radiator or con-

denser as they may be hot and 

cause serious injuries, such as 

burns.

When the electric cooling fan 

is operating

Do not touch the engine compart-

ment.
With the power switch in ON, the 

electric cooling fan may automati-

cally start to run if the air condi-

tioning is on and/or the coolant 

temperature is high. Be sure the 

power switch is OFF when work-

ing near the electric cooling fan or 

radiator grille.

Checking and adding the 
brake fluid

406

6-3. Do-it-yourself maintenance

Brake fluid can absorb moisture 

from the air

Excess moisture in the brake fluid 

can cause a dangerous loss of brak-

ing efficiency. Use only newly 

opened brake fluid.

If any washer does not work or 
the warning message appears 
on the multi-information display, 
the washer tank may be empty. 
Add washer fluid.

Fluid 
type

FMVSS No.116 DOT 3 or 
SAE J1703 brake fluid
FMVSS No.116 DOT 4 or 
SAE J1704 brake fluid

Item

Clean funnel

WARNING

When filling the reservoir

Take care as brake fluid can harm 

your hands and eyes and damage 

painted surfaces.
If fluid gets on your hands or in 

your eyes, flush the affected area 

with clean water immediately.
If you still experience discomfort, 

see a doctor.

NOTICE

If the fluid level is low or high

It is normal for the brake fluid level 

to go down slightly as the brake 

pads wear out or when the fluid 

level in the accumulator is high.
If the reservoir needs frequent 

refilling, there may be a serious 

problem.

Adding the washer fluid

WARNING

When adding washer fluid

Do not add washer fluid when the 

hybrid system is hot or operating 

as washer fluid contains alcohol 

and may catch fire if spilled on the 

hybrid system, etc.

NOTICE

Do not use any fluid other 

than washer fluid

Do not use soapy water or engine 

antifreeze instead of washer fluid.

Doing so may cause streaking on 

the vehicle’s painted surfaces, as 

well as damaging the pump lead-

ing to problems of the washer 

fluid not spraying.

Diluting washer fluid

Dilute washer fluid with water as 

necessary.

Refer to the freezing tempera-

tures listed on the label of the 

washer fluid bottle.

407

6-3. Do-it-yourself maintenance

6

Maintena

nce
 a

nd ca

re

The 12-volt battery is located in 
the right-hand side of luggage 
compartment.

Before recharging

When recharging, the 12-volt bat-

tery produces hydrogen gas which 

is flammable and explosive. There-

fore, observe the following precau-

tions before recharging:

If recharging with the 12-volt bat-

tery installed on the vehicle, be 

sure to disconnect the ground 

cable.

Make sure the power switch on 

the charger is off when connecting 

and disconnecting the charger 

cables to the 12-volt battery.

After recharging/reconnecting 

the 12-volt battery (vehicles 

with smart key system)

Unlocking the doors using the 

smart key system may not be pos-

sible immediately after reconnect-

ing the 12-volt battery. If this 

happens, use the wireless remote 

control or the mechanical key to 

lock/unlock the doors.

Start the hybrid system with the 

power switch in ACC. The hybrid 

system may not start with the 

power switch turned off. How-

ever, the hybrid system will oper-

ate normally from the second 

attempt.

The power switch mode is 

recorded by the vehicle. If the 12-

volt battery is reconnected, the 

vehicle will return the power 

switch mode to the status it was in 

before the 12-volt battery was dis-

connected. Make sure to turn off 

the power switch before discon-

nect the 12-volt battery. Take 

extra care when connecting the 

12-volt battery if the power switch 

mode prior to discharge is 

unknown.

If the hybrid system will not start 

even after multiple attempts at all 

methods above, contact your 

Toyota dealer.

12-volt battery

Location

WARNING

Chemicals in the 12-volt bat-

tery

The 12-volt battery contains poi-

sonous and corrosive sulfuric acid 

and may produce hydrogen gas 

which is flammable and explosive. 

To reduce the risk of death or 

serious injury, take the following 

precautions while working on or 

near the 12-volt battery:

Do not cause sparks by touch-

ing the 12-volt battery terminals 

with tools.

Do not smoke or light a match 

near the 12-volt battery.

Avoid contact with eyes, skin 

and clothes.

Never inhale or swallow electro-

lyte.

Wear protective safety glasses 

when working near the 12-volt 

battery.

Keep children away from the 

12-volt battery.

408

6-3. Do-it-yourself maintenance

1

Open the deck board 
(

P.359)

2

Disengage the 12 claws and 
pull the luggage side cover to 
remove it.

When installing the luggage side 

cover, make sure that the claws are 

installed securely.

Make sure that the 12-volt bat-
tery terminals are not corroded 
and that there are no loose con-
nections, cracks, or loose 
clamps.

WARNING

Where to safely charge the 

12-volt battery

Always charge the 12-volt battery 

in an open area. Do not charge 

the 12-volt battery in a garage or 

closed room where there is insuf-

ficient ventilation.

Emergency measures regard-

ing electrolyte

If electrolyte gets in your eyes

Flush your eyes with clean water 
for at least 15 minutes and get 
immediate medical attention. If 
possible, continue to apply water 
with a sponge or cloth while trav-
eling to the nearest medical facil-
ity.

If electrolyte gets on your skin

Wash the affected area thor-
oughly. If you feel pain or burning, 
get medical attention immediately.

If electrolyte gets on your 

clothes

It can soak through clothing on to 
your skin. Immediately take off the 
clothing and follow the procedure 
above if necessary.

If you accidentally swallow elec-

trolyte

Drink a large quantity of water or 
milk. Get emergency medical 
attention immediately.

When there is insufficient 12-

volt battery fluid

Do not use if there is insufficient 

fluid in the 12-volt battery. There 

is a possible danger that the 12-

volt battery may explode.

NOTICE

When recharging the 12-volt 

battery

Never recharge the 12-volt bat-

tery while the hybrid system is 

operating. Also, be sure all acces-

sories are turned off.

Removing the 12-volt bat-
tery cover

Exterior

409

6-3. Do-it-yourself maintenance

6

Maintena

nce
 a

nd ca

re

Terminals

Hold-down clamp

Check if the treadwear indica-
tors are showing on the tires. 
Also check the tires for uneven 
wear, such as excessive wear 
on one side of the tread.
Check the spare tire condition 
and pressure if not rotated.

New tread

Worn tread

Treadwear indicator

The location of treadwear indicators 
is shown by a “TWI” or “

” mark, 

A

B

Tires

Replace or rotate tires in 
accordance with mainte-
nance schedules and tread-
wear.

Checking tires

A

B

C

410

6-3. Do-it-yourself maintenance

etc., molded into the sidewall of 
each tire.
Replace the tires if the treadwear 
indicators are showing on a tire.

When to replace your vehicle’s 

tires

Tires should be replaced if:

The treadwear indicators are 

showing on a tire.

You have tire damage such as 

cuts, splits, cracks deep enough 

to expose the fabric, and bulges 

indicating internal damage.

A tire goes flat repeatedly or can-

not be properly repaired due to 

the size or location of a cut or 

other damage.

If you are not sure, consult with your 

Toyota dealer.

Tire life

Any tire over 6 years old must be 

checked by a qualified technician 

even if it has seldom or never been 

used or damage is not obvious.

Maximum load of tire

Check that the number given by 

dividing the maximum load by 1.10 

of the replacement tire is greater 

than 1/2 of the Gross Axle Weight 

Ratings (GAWR) of either the front 

axle or the rear axle, whichever is 

greater.
For the GAWR, see the Certification 

Regulation Label. For the maximum 

load of the tire, see the load limit at 

maximum cold tire inflation pressure 

mentioned on the sidewall of the 

tire. (

P.507)

Tire types

Summer tires

Summer tires are high-speed perfor-
mance tires best suited to highway 
driving under dry conditions. Since 
summer tires do not have the same 
traction performance as snow tires, 
summer tires are inadequate for 
driving on snow-covered or icy 
roads. For driving on snow-covered 
roads or icy roads, the use of snow 
tires is recommended. When install-
ing snow tires, be sure to replace all 
four tires.

All season tires

All season tires are designed to pro-
vide better traction in snow and to 
be adequate for driving in most win-
ter conditions as well as for use 
year-round. All season tires, how-
ever, do not have adequate traction 
performance compared with snow 
tires in heavy or loose snow. Also, 
all season tires fall short in accelera-
tion and handling performance com-
pared with summer tires in highway 
driving.

Snow tires

For driving on snow-covered roads 
or icy roads, we recommend using 
snow tires. If you need snow tires, 
select tires of the same size, con-
struction and load capacity as the 
originally installed tires. Since your 
vehicle has radial tires as original 
equipment, make sure your snow 
tires also have radial construction. 
Do not install studded tires without 
first checking local regulations for 
possible restrictions. Snow tires 
should be installed on all wheels. 
(

P.334)

411

6-3. Do-it-yourself maintenance

6

Maintena

nce
 a

nd ca

re

If the tread on snow tires wears 

down below 0.16 in. (4 mm)

The effectiveness of the tires as 

snow tires is lost.

Rotate the tires in the order 
shown.

To equalize tire wear and extend 
tire life, Toyota recommends that 
tire rotation is carried out at the 
same interval as tire inspection.
Do not fail to initialize the tire pres-
sure warning system after tire rota-
tion. (if equipped)

Front

WARNING

When inspecting or replacing 

tires

Observe the following precautions 

to prevent accidents.

Failure to do so may cause dam-

age to parts of the drive train as 

well as dangerous handling char-

acteristics, which may lead to an 

accident resulting in death or seri-

ous injury.

Do not mix tires of different 

makes, models or tread pat-

terns.

Also, do not mix tires of remark-

ably different treadwear.

Do not use tire sizes other than 

those recommended by Toyota.

Do not mix differently con-

structed tires (radial, bias-belted 

or bias-ply tires).

Do not mix summer, all season 

and snow tires.

Do not use tires that have been 

used on another vehicle.

Do not use tires if you do not 

know how they were used previ-

ously.

Do not tow if your vehicle has a 

compact spare tire installed.

NOTICE

Driving on rough roads

Take particular care when driving 

on roads with loose surfaces or 

potholes.

These conditions may cause 

losses in tire inflation pressure, 

reducing the cushioning ability of 

the tires. In addition, driving on 

rough roads may cause damage 

to the tires themselves, as well as 

the vehicle’s wheels and body.

If tire inflation pressure of 

each tire becomes low while 

driving

Do not continue driving, or your 

tires and/or wheels may be 

ruined.

Tire rotation

A

412

6-3. Do-it-yourself maintenance

When rotating the tires (vehi-

cles with tire pressure warning 

system)

Make sure that the power switch is 

OFF. If the tires are rotated while 

the power switch is in ON, the tire 

position information will not be 

updated. If this accidentally occurs, 

either turn the power switch to OFF 

and then to ON, or initialize the sys-

tem after checking that the tire pres-

sure is properly adjusted.

Your vehicle is equipped with a 
tire pressure warning system 
that uses tire pressure warning 
valves and transmitters to detect 
low tire inflation pressure before 
serious problems arise.

If the tire pressure drops 
below a predetermined level, 
the driver is warned by a 
screen display and a warning 
light. (

P.462)

The tire pressure detected by 
the tire pressure warning sys-
tem can be displayed on the 
multi-information display. 
(

P.105)

The illustration used is intended 
as an example, and may differ 
from the image that is actually 
displayed on the multi-informa-
tion display.
With 7-inch display:

With 12.3-inch display:

Routine tire inflation pressure 

checks

The tire pressure warning system 

does not replace routine tire inflation 

pressure checks. Make sure to 

check tire inflation pressure as part 

of your routine of daily vehicle 

checks.

Tire inflation pressure

It may take a few minutes to dis-

play the tire inflation pressure 

after the power switch is turned to 

ON. It may also take a few min-

utes to display the tire inflation 

pressure after inflation pressure 

has been adjusted.

Tire inflation pressure changes 

with temperature. 

The displayed values may also be 

different from the values mea-

sured using a tire pressure gauge.

Situations in which the tire 

pressure warning system may 

not operate properly

In the following cases, the tire 

pressure warning system may not 

Tire pressure warning 
system (if equipped)

413

6-3. Do-it-yourself maintenance

6

Maintena

nce
 a

nd ca

re

operate properly.

• If non-genuine Toyota wheels are 

used.

• A tire has been replaced with a 

tire that is not an OE (Original 

Equipment) tire.

• A tire has been replaced with a 

tire that is not of the specified size.

• Tire chains, etc. are equipped.

• An auxiliary-supported run-flat tire 

is equipped.

• If a window tint that affects the 

radio wave signals is installed.

• If there is a lot of snow or ice on 

the vehicle, particularly around the 

wheels or wheel housings.

• If the tire inflation pressure is 

extremely higher than the speci-

fied level.

• If wheels without tire pressure 

warning valves and transmitters 

are used.

• If the ID code on the tire pressure 

warning valves and transmitters is 

not registered in the tire pressure 

warning computer.

Performance may be affected in 

the following situations.

• Near a TV tower, electric power 

plant, gas station, radio station, 

large display, airport or other facil-

ity that generates strong radio 

waves or electrical noise

• When carrying a portable radio, 

cellular phone, cordless phone or 

other wireless communication 

device

If tire position information is not cor-
rectly displayed due to the radio 
wave conditions, the display may be 
corrected by driving and changing 
the radio wave conditions.

When the vehicle is parked, the 

time taken for the warning to start 

or go off could be extended.

When tire inflation pressure 

declines rapidly for example when 

a tire has burst, the warning may 

not function.

Warning performance of the tire 

pressure warning system

The warning of the tire pressure 

warning system will change in 

accordance with the conditions 

under which it was initialized. For 

this reason, the system may give a 

warning even if the tire pressure 

does not reach a low enough level, 

or if the pressure is higher than the 

pressure that was adjusted to when 

the system was initialized.

When replacing tires or wheels, 
tire pressure warning valves and 
transmitters must also be 
installed.
When new tire pressure warning 
valves and transmitters are 
installed, new ID codes must be 
registered in the tire pressure 
warning computer and the tire 
pressure warning system must 
be initialized. (

P.417)

When replacing the tires and 

wheels

If the ID code of the tire pressure 

warning valve and transmitter is not 

registered, the tire pressure warning 

system will not work properly. After 

driving for about 20 minutes, the tire 

pressure warning light blinks for 1 

minute and stays on to indicate a 

system malfunction.

Installing tire pressure 
warning valves and trans-
mitters (if equipped)

414

6-3. Do-it-yourself maintenance

The tire pressure warning 
system must be initialized 
in the following circum-
stances:

When rotating the tires.

When changing the tire.

After registering the ID codes. 
(

P.417)

When the tire pressure warning 
system is initialized, the current 
tire inflation pressure is set as 
the benchmark pressure.

How to initialize the tire 
pressure warning system 
(with 7-inch display)

1

Park the vehicle in a safe 
place and stop the hybrid 
system for 20 minutes or 
more.

Initialization cannot be performed 

while the vehicle is moving.

2

Adjust the tire inflation pres-
sure to the specified cold tire 
inflation pressure level. 
(

P.502)

Make sure to adjust the tire pres-

sure to the specified cold tire infla-

tion pressure level. The tire 

pressure warning system will oper-

ate based on this pressure level.

3

Start the hybrid system.

4

Press 

 or 

 of the meter 

control switches on the steer-
ing wheel and select 

.

5

Press 

 or 

 of the meter 

control switches, select 
“Vehicle Settings” and then 
press and hold 

.

6

Press 

 or 

 of the meter 

control switches, select 
“TPWS” and then press 

.

NOTICE

Repairing or replacing tires, 

wheels, tire pressure warn-

ing valves, transmitters and 

tire valve caps

When removing or fitting the 

wheels, tires or the tire pressure 

warning valves and transmit-

ters, contact your Toyota dealer 

as the tire pressure warning 

valves and transmitters may be 

damaged if not handled cor-

rectly.

Make sure to install the tire 

valve caps. If the tire valve caps 

are not installed, water could 

enter the tire pressure warning 

valves and the tire pressure 

warning valves could be bound.

When replacing tire valve caps, 

do not use tire valve caps other 

than those specified. 

The cap may become stuck.

To avoid damage to the tire 

pressure warning valves and 

transmitters

When a tire is repaired with liquid 

sealants, the tire pressure warn-

ing valve and transmitter may not 

operate properly. If a liquid seal-

ant is used, contact your Toyota 

dealer as soon as possible. After 

use of liquid sealant, make sure to 

replace the tire pressure warning 

valve and transmitter when repair-

ing or replacing the tire. (

P.413)

Initializing the tire pres-
sure warning system (if 
equipped)

415

6-3. Do-it-yourself maintenance

6

Maintena

nce
 a

nd ca

re

7

Press 

 or 

 of the meter 

control switches, select the 
“Set Pressure”. Then press 
and hold 

.

“Setting Tire Pressure Warning 

System” will be displayed on the 

multi-information display and the 

tire pressure warning light will blink 

3 times.

When the message disappears, ini-

tialization is complete.
A message is displayed on the 

multi-information display. Also, “--” 

is displayed for inflation pressure of 

each tire on the multi-information 

display while the tire pressure 

warning system determines the 

position.

8

Drive straight (with occa-
sional left and right turns) at 
approximately 25mph (40 
km/h) or more for approxi-
mately 10 to 30 minutes.

When initialization is complete, the 

inflation pressure of each tire will be 

displayed on the multi-information 

display.
Even if the vehicle is not driven at 

approximately 25 mph (40 km/h) or 

more, initialization can be com-

pleted by driving for a long time. 

However, if initialization does not 

complete after driving for 1 hour or 

more, park the vehicle in a safe 

place for approximately 20 minutes 

and then drive the vehicle again.

How to initialize the tire 
pressure warning system 
(with 12.3-inch display)

1

Park the vehicle in a safe 
place and stop the hybrid 
system for 20 minutes or 
more.

Initialization cannot be performed 

while the vehicle is moving.

2

Adjust the tire inflation pres-
sure to the specified cold tire 
inflation pressure level. 
(

P.502)

Make sure to adjust the tire pres-

sure to the specified cold tire infla-

tion pressure level. The tire 

pressure warning system will oper-

ate based on this pressure level.

3

Start the hybrid system.

4

Press and hold 

 to display 

the cursor on the content dis-
play area (center) of the 
multi-information display.

5

Press 

 or 

 of the meter 

control switches to select 


and then press 

.

6

Press 

 or 

 of the meter 

control switches, select “


Vehicle Settings” and then 
press and hold 

.

7

Press 

 or 

 of the meter 

control switches, select 
“TPWS” and then press 

.

8

Press 

 or 

 of the meter 

control switches, select the 

416

6-3. Do-it-yourself maintenance

“Set Pressure”. Then press 
and hold 

.

“Setting Tire Pressure Warning 

System” will be displayed on the 

multi-information display and the 

tire pressure warning light will blink 

3 times.

When the message disappears, ini-

tialization is complete.
A message is displayed on the 

multi-information display. Also, “--” 

is displayed for inflation pressure of 

each tire on the multi-information 

display while the tire pressure 

warning system determines the 

position.

9

Drive straight (with occa-
sional left and right turns) at 
approximately 25mph (40 
km/h) or more for approxi-
mately 10 to 30 minutes.

When initialization is complete, the 

inflation pressure of each tire will be 

displayed on the multi-information 

display.
Even if the vehicle is not driven at 

approximately 25 mph (40 km/h) or 

more, initialization can be com-

pleted by driving for a long time. 

However, if initialization does not 

complete after driving for 1 hour or 

more, park the vehicle in a safe 

place for approximately 20 minutes 

and then drive the vehicle again.

When initializing

Initialization is performed while 

driving at a vehicle speed of 

approximately 25 mph (40 km/h) 

or more.

Make sure to carry out initializa-

tion after adjusting the tire inflation 

pressure. Also, make sure the 

tires are cold before carrying out 

initialization or tire inflation pres-

sure adjustment.

The tire pressure warning system 

can be initialized by yourself, but 

depending on the driving condi-

tions and driving environment, ini-

tialization may take some time to 

complete.

The initialization operation

If you have accidentally turned the 

power switch to OFF during initial-

ization, it is not necessary to 

restart the initialization again as 

initialization will restart automati-

cally when the power switch has 

been turned to ON for the next 

time.

If you accidentally perform initial-

ization when initialization is not 

necessary, adjust the tire inflation 

pressure to the specified level 

when the tires are cold, and con-

duct initialization again.

While the position of each tire is 

being determined and the inflation 

pressures are not being displayed 

on the multi-information display, if 

the inflation pressure of a tire 

drops, the tire pressure warning 

light will come on.

If the tire pressure warning sys-

tem is not initialized properly

In the following situations, initial-

ization may take longer than usual 

to be completed or may not be 

possible. Normally, initialization 

completes within approximately 

30 minutes.

• Vehicle is not driven at approxi-

mately 25 mph (40 km/h) or more

• Vehicle is driven on unpaved 

roads

• Vehicle is driven near other vehi-

cles and system cannot recog-

417

6-3. Do-it-yourself maintenance

6

Maintena

nce
 a

nd ca

re

nize tire pressure warning valve 

and transmitters of your vehicle 

over those of other vehicles.

• If the vehicle is driven in heavy 

traffic or another situation where 

other vehicles are driven close by, 

it may take time for the system to 

recognize the tire pressure warn-

ing valve and transmitters of your 

vehicle over those of other vehi-

cles.

If initialization does not complete 
after driving for 1 hour or more, park 
the vehicle in a safe place for 
approximately 20 minutes and then 
drive the vehicle again.

If the vehicle is reversed during 

initialization, the data up to that 

point is reset, so perform the ini-

tialization procedure again from 

the beginning.

In the following situations, initial-

ization will not be started or was 

not completed properly and the 

system will not operate properly. 

Perform the initialization proce-

dure again.

• If, when attempting to start initial-

ization, the tire pressure warning 

light does not blink 3 times.

• If, when the vehicle has been 

driven for about 20 minutes after 

performing initialization, the tire 

pressure warning light blinks for 

approximately 1 minute and then 

illuminates.

If the inflation pressure of each tire 
is still not displayed, have the vehi-
cle inspected by your Toyota dealer.

Every tire pressure warning 
valve and transmitter has a 
unique ID code. When replacing 
a tire pressure warning valve 
and transmitter, it is necessary 
to register the ID code.
When registering the ID codes, 
perform the following procedure.

Registering procedure (with 
7-inch display)

1

Park the vehicle in a safe 
place, wait for approximately 
20 minutes, and then start 
the hybrid system.

2

Press 

 or 

 of the meter 

control switches on the steer-
ing wheel and select 

.

3

Press 

 or 

 of the meter 

control switches and select 
“Vehicle Settings”, and then 
press and hold 

.

WARNING

When initializing the tire pres-

sure warning system

Do not initialize tire inflation pres-

sure without first adjusting the tire 

inflation pressure to the specified 

level. Otherwise, the tire pressure 

warning light may not come on 

even if the tire inflation pressure is 

low, or it may come on when the 

tire inflation pressure is actually 

normal.

Registering ID codes 
(vehicles with tire pres-
sure warning system)


Content      ..     23      24      25      26     ..