Toyota C-HR (2023 year). Manual in english - page 35
 

  Index      Toyota     Toyota C-HR (2023 year). Manual in english


Search            copyright infringement  


Content      ..     33      34      35      36     ..


Toyota C-HR (2023 year). Manual in english - page 35


654

6-3. Do-it-yourself maintenance

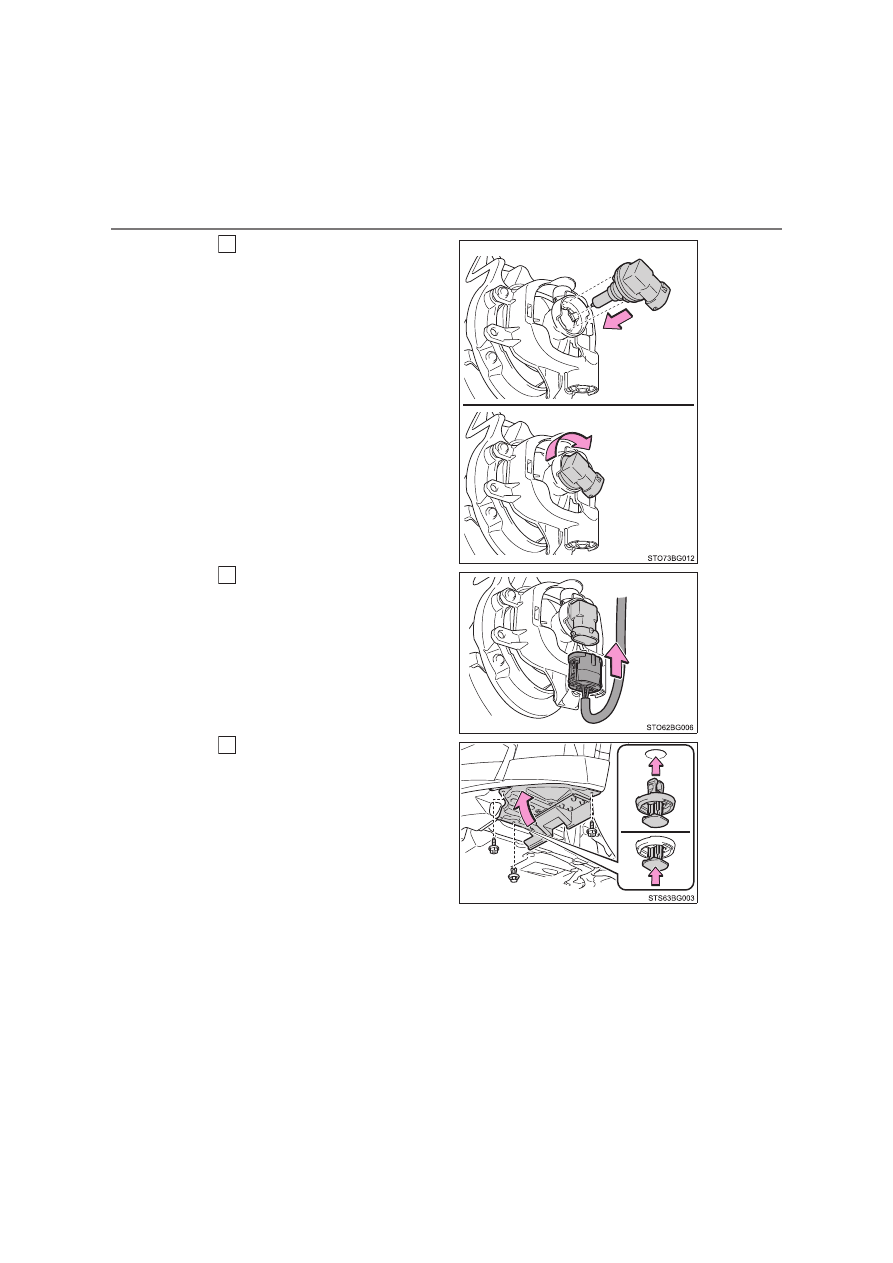
Install a new light bulb.

Align the 3 tabs on the light bulb
with  the  mounting  and  insert.
Turn  clockwise  and  secure  the
bulb base.

Install the connector.

Shake  the  bulb  base  gently  to
check  that  it  is  not  loose,  turn
the front fog lights on once and
visually  confirm  that  no  light  is
leaking through the mounting.

Reinstall the fender liner and
install the 2 screws and clip.

Make  sure  that  the  fender  liner
is  attached  to  the  inside  of  the
bumper.

4

5

6

655

6-3. Do-it-yourself maintenance

6

M

a

in

te

nan
ce 
and
 ca
re

Front turn signal lights (bulb type)

Turn  the  bulb  base  counter-
clockwise.

Remove the light bulb.

When installing, reverse the steps listed.

1

2

3

656

6-3. Do-it-yourself maintenance

Rear  turn  signal  lights  (bulb  type)  and  stop/tail  lights  (bulb
type)

Open  the  back  door  and
remove the cover.

To  prevent  damaging  the  vehi-
cle,  wrap  the  flathead  screw-
driver with a tape.

Remove  the  2  screws  and
pull  the  light  unit  toward  the
rear of the vehicle to remove
it.

Turn  the  bulb  base  counter-
clockwise.

Rear turn signal lights
Stop/tail lights

Remove the light bulb.

Rear turn signal lights
Stop/tail lights

When  installing  the  light  bulb,  install  by  conducting 

  and 

with the directions reversed.

1

2

3

4

5

3

4

657

6-3. Do-it-yourself maintenance

6

M

a

in

te

nan
ce 
and
 ca
re

Install the lamp assembly.

Align  the  guides  (

)  and  pins

( ) on the lamp assembly with
the mounting when installing it.

Install the 2 screws.

Install the cover.

6

7

8

658

6-3. Do-it-yourself maintenance

Back-up lights (bulb type)

Open  the  back  door  and
remove the cover.

To  prevent  damaging  the  vehi-
cle,  wrap  the  flathead  screw-
driver with a tape.

Turn  the  bulb  base  counter-
clockwise.

Remove the light bulb.

When installing, reverse the steps listed.

1

2

3

4

659

6-3. Do-it-yourself maintenance

6

M

a

in

te

nan
ce 
and
 ca
re

License plate lights

Open  the  back  door  and
remove the cover.

To  prevent  damaging  the  vehi-
cle,  wrap  the  flathead  screw-
driver with a tape.

Turn  the  bulb  base  counter-
clockwise.

Remove the light bulb.

When installing, reverse the steps listed.

1

2

3

4

660

6-3. Do-it-yourself maintenance

Rear fog light (bulb type)

Turn  the  bulb  base  counter-
clockwise.

Remove the light bulb.

When installing, reverse the steps listed.

1

2

3

661

6-3. Do-it-yourself maintenance

6

M

a

in

te

nan
ce 
and
 ca
re

Side turn signal lights

Insert  a  flathead  screwdriver
and  release  the  claw  for  the
outside  rear  view  mirror
cover.

To  prevent  damaging  the  vehi-
cle,  wrap  the  flathead  screw-
driver with a tape.

Release  the  cover  claws
spanning  over  the  entire
perimeter.

Release  the  claw  of  the  bot-
tom  part  of  the  cover  and
then remove the cover.

1

Claw

2

3

662

6-3. Do-it-yourself maintenance

Insert  a  flathead  screwdriver
and  remove  the  lens  to  the
outside.

Remove  the  socket  from  the
side turn signal light housing.

Remove the bulb.

Replace  the  bulb  and  install
the  socket  to  the  side  turn
signal light housing.

Align  the  grooves  of  the  socket
to the side turn signal light hous-
ing.

4

5

6

7

663

6-3. Do-it-yourself maintenance

6

M

a

in

te

nan
ce 
and
 ca
re

Install the lens.

Insert the claw of the lens.
Attach the lens.

Arrange  the  wire  harness  on
the back side of the lens.

Insert the claw of the cover.

Attach  the  claw  on  the  bot-
tom part of the cover.

8

9

10

664

6-3. Do-it-yourself maintenance

Attach the cover claws span-
ning  over  the  entire  perime-
ter.

Finally,  confirm  that  the  outside
claw is securely fitted.

Replacing the following bulbs

If any of the lights listed below has burnt  out, have it replaced by
any authorized Toyota retailer or Toyota authorized repairer, or any
reliable repairer.

Headlights

Front position lights/daytime running lights

Front turn signal lights (vehicles with LED type)

Front fog lights (vehicles with LED type)

Stop/tail lights (vehicles with LED type)

Rear turn signal lights (vehicles with LED type)

Back-up lights (vehicles with LED type)

Rear fog light (vehicles with LED type)

High mounted stoplight

Outer mirror illumination (if equipped)

11

665

6-3. Do-it-yourself maintenance

6

M

a

in

te

nan
ce 
and
 ca
re

LED light bulbs

The following lights consist of a number of LEDs. If any of the LEDs burn out,
take  your  vehicle  to  any  authorized  Toyota  retailer  or  Toyota  authorized
repairer, or any reliable repairer.

Headlights

Front position lights/daytime running lights

Front turn signal lights (vehicles with LED type)

Front fog lights (vehicles with LED type)

Stop/tail lights (vehicles with LED type)

Rear turn signal lights (vehicles with LED type)

Back-up lights (vehicles with LED type)

Rear fog light (vehicles with LED type)

High mounted stoplight

Outer mirror illumination (if equipped)

Condensation build-up on the inside of the lens

Temporary condensation build-up on the inside of the headlight lens does not
indicate a malfunction. 
Contact any authorized Toyota retailer or Toyota authorized repairer, or any
reliable repairer for more information in the following situations:

Large drops of water have built up on the inside of the lens.

Water has built up inside the headlight.

When replacing light bulbs

P. 650

666

6-3. Do-it-yourself maintenance

WARNING

Replacing light bulbs

Turn  off  the  lights.  Do  not  attempt  to  replace  the  bulb  immediately  after
turning off the lights. 
The bulbs become very hot and may cause burns.

Do not touch the glass portion of the light bulb with bare hands. When it is
unavoidable to hold the glass portion, use and hold with a clean dry cloth
to avoid getting moisture and oils on the bulb. 
Also, if the bulb is scratched or dropped, it may blow out or crack.

Fully install light bulbs and any parts used to secure them. Failure to do so
may result in heat damage, fire, or water entering the headlight unit. This
may damage the headlights or cause condensation to build up on the lens.

Do  not  attempt  to  repair  or  disassemble  light  bulbs,  connectors,  electric
circuits or component parts. 
Doing so may result in death or serious injury due to electric shock.

To prevent damage or fire 

Make sure bulbs are fully seated and locked. 

Check the wattage of the bulb before installing to prevent heat damage.

667

7

When trouble arises

7-1. Essential information

Emergency flashers...........668
If your vehicle has to be 

stopped in 
an emergency..................669

If the vehicle is submerged 

or water on the road is 
rising................................670

7-2. Steps to 

take in an emergency

If your vehicle needs to be 

towed ...............................672

If you think 

something is wrong..........678

If a warning light turns on or 

a warning buzzer 
sounds .............................679

If a warning message is 

displayed .........................690

If you have a flat tire 

(vehicles with an 
emergency tire puncture 
repair kit)..........................697

If you have a flat tire 

(vehicles with a 
spare tire) ........................727

If the hybrid system will not 

start..................................742

If the electronic key does 

not operate properly ........744

If the 12-volt battery is 

discharged .......................747

If your vehicle overheats....755
If the vehicle becomes 

stuck ................................760

668

7-1. Essential information

Emergency flashers

Press the switch.

All  the  turn  signal  lights  will  flash.
To  turn  them  off,  press  the  switch
once again.

Emergency flashers

If the emergency flashers are used for a long time while the hybrid system is
not operating (while the “READY” indicator is not illuminated), the 12-volt bat-
tery may discharge.

The emergency flashers are used to warn other drivers when the
vehicle has to be stopped in the road due to a breakdown, etc.

669

7-1. Essential information

7

W

hen
 trou

bl

e ari

se

s

If your vehicle has to be stopped in an 

emergency

Steadily step on the brake pedal with both feet and firmly depress it.

Do  not  pump  the  brake  pedal  repeatedly  as  this  will  increase  the  effort
required to slow the vehicle.

Shift the shift lever to N.

If the shift lever is shifted to N
After slowing down, stop the vehicle in a safe place by the road.
Stop the hybrid system.

If the shift lever cannot be shifted to N
Keep depressing the brake pedal with both feet to reduce vehicle
speed as much as possible.
To  stop  the  hybrid  system,
press  and  hold  the  power
switch  for  2  consecutive  sec-
onds or more, or press it briefly
3 times or more in succession.

Stop the vehicle in a safe place by the road.

Only in an emergency, such as if it becomes impossible to stop
the vehicle in the normal way, stop the vehicle using the follow-
ing procedure:

1

2

3
4

3

Press and hold for 2 seconds or 
more, or press briefly 3 times or 
more

4

WARNING

If the hybrid system has to be turned off while driving

Power assist for the steering wheel will be lost, making the steering wheel
heavier to turn. Decelerate as much as possible before turning off the hybrid
system.

5


Content      ..     33      34      35      36     ..