Toyota Corolla (2023 year). Manual in english - page 11
 

  Index      Toyota     Toyota Corolla (2023 year). Manual in english


Search            copyright infringement  


Content      ..     9      10      11      12     ..


Toyota Corolla (2023 year). Manual in english - page 11


164

4-2. Driving procedures

Shift lock system

The shift lock system is a system to 

prevent accidental operation of the 

shift lever in starting.

The shift lever can be shifted from P 

only when the engine switch is in 

ON and the brake pedal is being 

depressed.

If the shift lever cannot be 

shifted from P

First, check whether the brake pedal 

is being depressed.

If the shift lever cannot be shifted 

with your foot on the brake pedal, 

there may be a problem with the 

shift lock system. Have the vehicle 

inspected by your Toyota dealer 

immediately.

The following steps may be used as 

an emergency measure to ensure 

that the shift lever can be shifted.

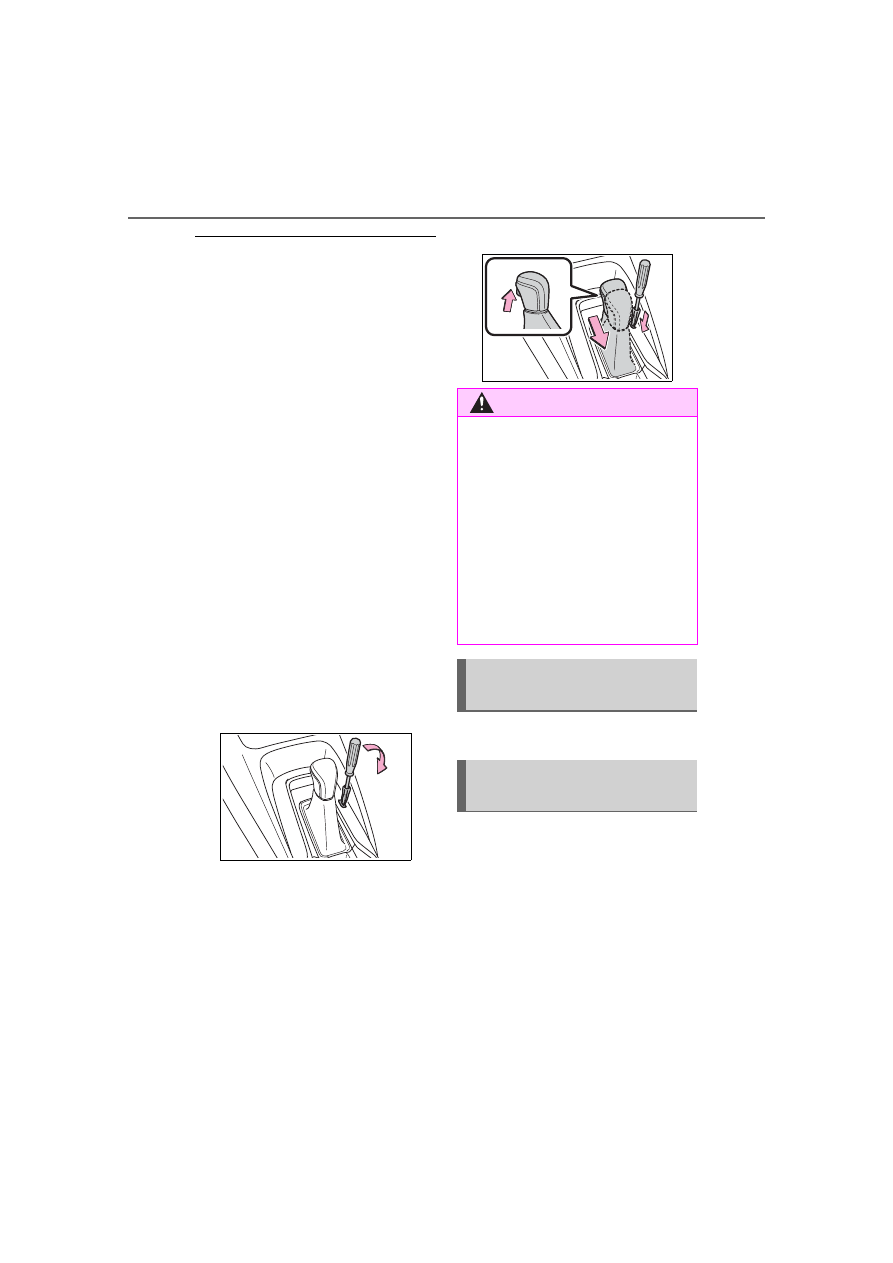
Releasing the shift lock:

1

Set the parking brake.

2

Turn the engine switch off.

3

Depress the brake pedal.

4

Ply the cover up with a flathead 

screwdriver or equivalent tool.

To prevent damaging the cover, 

wrap the tip of the flathead 

screwdriver with a tape.

5

Press and hold the shift lock 

override button and then push 

the shift release button on the 

shift knob.

The shift lever can be shifted while 

the button is pressed.

P.247

To drive using temporary shift 
range selection, operate the “-” 
or “+” paddle shift switch. 
When the “-” paddle shift switch 
is operated, the shift range 
switches to a range that enables 
engine braking force that is suit-
able to driving conditions. When 
the “+” paddle shift switch is 
operated, the shift range 
switches to a range that is one 

WARNING

To prevent an accident when 

releasing the shift lock

Before pressing the shift lock 

override button, make sure to set 

the parking brake and depress the 

brake pedal.

If the accelerator pedal is acci-

dentally depressed instead of the 

brake pedal when the shift lock 

override button is pressed and the 

shift lever is shifted out of P, the 

vehicle may suddenly start, possi-

bly leading to an accident result-

ing in death or serious injury.

Selecting the driving 
mode

Selecting shift ranges in 
the D position

165

4-2. Driving procedures

4

Dr

iv

ing

range higher than the current 
range. 
Changing the shift range allows 
restriction of the highest gear, 
preventing unnecessary upshift-
ing and enabling the level of 
engine braking force to be 
selected.

1

Upshifting

2

Downshifting

The selected shift range, from D1 to 
D10, will be displayed on the 
multi-information display.

Gear step functions

You can choose from 10 levels of 

engine braking force.

A lower gear step will provide 

greater engine braking force than 

a higher gear step, and the engine 

speed will also increase.

Deactivation of temporary 

10-speed Sport Sequential 

Shiftmatic mode

In the following situations, tempo-

rary 10-speed Sport Sequential 

Shiftmatic mode will be deactivated:

When the vehicle is stopped

If the accelerator pedal is 

depressed continuously for more 

than a certain amount of time 

while in one gear range

If the accelerator pedal is 

depressed abruptly and heavily

When the shift lever is shifted to a 

position other than D

When the “+” paddle shift switch is 

operated for a certain amount of 

time continuously

To enter 10-speed sport 
sequential shiftmatic mode, shift 
the shift lever to M position. 
Gear steps can then be selected 
by operating the shift lever or 
paddle shift switches, allowing 
you to drive in the gear step of 
your choosing.

1

Upshifting

2

Downshifting

The gear changes once every time 
the shift lever or paddle shift switch 
is operated.
The selected gear step, from M1 to 
M10, will be displayed on the 
multi-information display.

However, even when in the M 
position, the gear steps will be 
automatically changed if the 

Changing gears in the M 
position

166

4-2. Driving procedures

engine speed is too high, or too 
low.

Gear step functions

You can choose from 10 levels of 

engine braking force.

A lower gear step will provide 

greater engine braking force than 

a higher gear step, and the engine 

speed will also increase.

When the vehicle comes to a 

stop with the shift lever in the M 

position

The transmission will automati-

cally downshift to M1 once the 

vehicle is stopped.

After a stop, the vehicle will start 

off in M1.

When the vehicle is stopped, the 

transmission is set at M1.

Downshifting restriction warn-

ing buzzer

To help ensure safety and driving 

performance, downshifting opera-

tion may sometimes be restricted. In 

some circumstances, downshifting 

may not be possible even when the 

shift lever or paddle shift switch is 

operated. (A buzzer will sound 

twice.)

If the 10-speed sport sequential 

shiftmatic mode indicator does 

not come on even after shifting 

the shift lever to M

This may indicate a malfunction in 

the continuously variable transmis-

sion system. Have the vehicle 

inspected by your Toyota dealer 

immediately.

(In this situation, the transmission 

will operate in the same manner as 

when the shift lever is in D.)

Continuously variable transmis-

sion fail-safe control

The system detects malfunctioning 

parts targeted (all of the solenoids 

that perform the shifting function) by 

the On-Board Diagnostics, and per-

forms fail-safe mechanisms, such 

as restricting the shifting function or 

transmission ratio control.

In this event, the malfunction indica-

tor lamp turns on.

167

4-2. Driving procedures

4

Dr

iv

ing

1

Right turn

2

Lane change to the right 
(move the lever partway and 
release it)

The right hand signals will flash 3 
times.

3

Lane change to the left 
(move the lever partway and 
release it)

The left hand signals will flash 3 
times.

4

Left turn

Turn signals can be operated 

when

The engine switch is in ON.

If the indicator flashes faster 

than usual

Check that a light bulb in the front or 

rear turn signal lights has not 

burned out.

Turn signal lever

Operating instructions

168

4-2. Driving procedures

Using the manual mode

The parking brake can be set 
and released manually.

Parking brake indicator light 
(for the U.S.A.)
Parking brake indicator light 
(for Canada)

1

Pull the switch to set the 
parking brake.

The parking brake indicator light 
will turn on.
Pull and hold the parking brake 
switch if an emergency occurs and 
it is necessary to operate the park-
ing brake while driving.

2

Press the switch to release 
the parking brake.

• Operate the parking brake switch 

while depressing the brake pedal.

• Using the parking brake auto-

matic release function, the park-
ing brake can be released by 
depressing the accelerator pedal. 
When using this function, slowly 
depress the accelerator pedal. 
(

P.169)

Make sure that the parking brake 
indicator light turn off.

If the parking brake indicator 
light flash, operate the switch 
again. (

P.363)

Turning the automatic 
mode on

While the vehicle is stopped, 
pull and hold the parking brake 
switch until a buzzer sounds and 
a message is shown on the 
multi-information display.
When the automatic mode is 
turned on, the parking brake 
operates as follows.

When the shift lever is shifted 
from P, the parking brake will 
be released, and the parking 
brake indicator light will turn 
off.

When the shift lever is shifted 
to P, the parking brake will be 
set, and the parking brake 

Parking brake

The parking brake can be 
set or released automati-
cally or manually.

In automatic mode, the 
parking brake can be set or 
released automatically 
according to shift lever 
operation.

Also, even in automatic 
mode, the parking brake can 
be set or released manually.

Operating instructions

169

4-2. Driving procedures

4

Dr

iv

ing

indicator light will turn on.

Operate the shift lever with the 
vehicle stopped and the brake 
pedal depressed.

The auto function may not operate 
if the shift lever is moved extremely 
quickly. In this situation, apply the 
parking brake manually. (

P.168)

Turning the automatic 
mode off

While the vehicle is stopped and 
depressing the brake pedal, 
press and hold the parking 
brake switch until a buzzer 
sounds and a message is 
shown on the multi-information 
display.

Parking brake operation

When the engine switch is not in 

ON, the parking brake cannot be 

released using the parking brake 

switch.

When the engine switch is not in 

ON, automatic mode (automatic 

brake setting and releasing) is not 

available.

Parking brake automatic 

release function

When all of the following conditions 

are met, the parking brake can be 

released by depressing the acceler-

ator pedal.

The driver’s door is closed

The driver is wearing the seat belt

The shift lever is in a forward driv-

ing position or reverse driving 

position

The malfunction indicator lamp or 

brake system warning light is not 

illuminated.

When depressing the accelerator 

pedal, depress it slowly.

If the parking brake is not released 

when the accelerator pedal is 

depressed, release the parking 

brake manually.
When the shift lever is shifted from 

P, the parking brake will be released 

automatically.

Parking brake automatic lock 

function

The parking brake will be set auto-

matically under the following condi-

tions:

The brake pedal is not depressed

The driver’s door is open

The driver’s seat belt is not fas-

tened

The shift lever is in a position 

other than P or N

The malfunction indicator lamp 

and brake system warning light 

are not illuminated

If “Parking Brake Temporarily 

Unavailable” is displayed on 

the multi-information display

If the parking brake is operated 

repeatedly over a short period of 

time, the system may restrict opera-

tion to prevent overheating. If this 

happens, refrain from operating the 

parking brake. Normal operation will 

return after about 1 minute.

If “Parking Brake Unavailable” 

is displayed on the multi-infor-

mation display

Operate the parking brake switch. If 

the message does not disappear 

after operating the switch several 

times, the system may be malfunc-

tioning. Have the vehicle inspected 

by your Toyota dealer.

Parking brake operation sound

When the parking brake operates, a 

motor sound (whirring sound) may 

be heard. This does not indicate a 

malfunction.

Parking brake indicator light

Depending on the engine switch 

170

4-2. Driving procedures

position/mode, the parking brake 

indicator light will turn on and stay 

on as described below:

ON: Comes on until the parking 

brake is released.

Not in ON: Stays on for approxi-

mately 15 seconds.

When the engine switch is turned 

off with the parking brake set, the 

parking brake indicator light will 

stay on for about 15 seconds. This 

does not indicate a malfunction.

When the parking brake switch 

malfunctions

Automatic mode (automatic brake 

setting and releasing) will be turned 

on automatically.

Parking the vehicle

P.143

Parking brake engaged warning 

buzzer

A buzzer will sound if the vehicle is 

driven with the parking brake 

engaged. “Parking Brake ON” is dis-

played on the multi-information dis-

play (with the vehicle reaching a 

speed of 3 mph [5 km/h]).

If the brake system warning 

light comes on

P.356

Usage in winter time

P.253

WARNING

When parking the vehicle

Do not leave a child in the vehicle 

alone. The parking brake may be 

released unintentionally by a child 

and there is the danger of the 

vehicle moving that may lead to 

an accident resulting in death or 

serious injury.

Parking brake switch

Do not set any objects near the 

parking brake switch.

Objects may interfere with the 

switch and may lead the parking 

brake to unexpectedly operate.

Parking brake automatic lock 

function

Never use the automatic parking 

brake engagement function in 

place of normal parking brake 

operation. This function is 

designed to reduce the risk of a 

collision due to the driver forget-

ting to engage the parking brake. 

Over-reliance on this function to 

park the vehicle safely may lead 

to an accident resulting in death 

or serious injury.

NOTICE

When parking the vehicle

Before you leave the vehicle, shift 

the shift lever to P, set the parking 

brake and make sure that the 

vehicle does not move.

When the system malfunc-

tions

Stop the vehicle in a safe place 

and check the warning messages.

When the vehicle battery is 

discharged

The parking brake system cannot 

be activated. (

P.383)

When the parking brake can-

not be released due to a mal-

function

Driving the vehicle with the park-

ing brake set will lead to brake 

components overheating, which 

may affect braking performance 

and increase brake wear.
Have the vehicle inspected by 

your Toyota dealer immediately if 

this occurs.

171

4-2. Driving procedures

4

Dr

iv

ing

Turn the brake hold system on

The brake hold standby indicator 
(green) 

 comes on. While the 

system is holding the brake, the 
brake hold operated indicator (yel-
low) 

 comes on.

Brake hold system operating 

conditions

The brake hold system cannot be 

turned on in the following condi-

tions:

The driver’s door is not closed.

The driver is not wearing the seat 

belt.

The parking brake is engaged.

If any of the conditions above are 

detected when the brake hold sys-

tem is enabled, the system will turn 

off and the brake hold standby indi-

cator light will go off. In addition, if 

any of the conditions are detected 

while the system is holding the 

brake, a warning buzzer will sound 

and a message will be shown on the 

multi-information display. The park-

ing brake will then be set automati-

cally.

Brake hold function

If the brake pedal is left released 

for a period of about 3 minutes 

after the system has started hold-

ing the brake, the parking brake 

will be set automatically. In this 

case, a warning buzzer sounds 

and a message is shown on the 

multi-information display.

To turn the system off while the 

system is holding the brake, firmly 

depress the brake pedal and 

press the button again.

The brake hold function may not 

hold the vehicle when the vehicle 

is on a steep incline. In this situa-

tion, it may be necessary for the 

driver to apply the brakes. A warn-

ing buzzer will sound and the 

multi-information display will 

inform the driver of this situation. If 

a warning message is shown on 

the multi-information display, read 

the message and follow the 

instructions.

When do not wish for the parking 

brake to operate automatically, 

press and hold the brake hold 

Brake Hold

The brake hold system 
keeps the brake applied 
when the shift lever is in D, 
B (vehicles without paddle 
shift switches), M (vehicles 
with paddle shift switches) 
or N with the system on and 
the brake pedal has been 
depressed to stop the vehi-
cle. The system releases the 
brake when the accelerator 
pedal is depressed with the 
shift lever in D, B (vehicles 
without paddle shift 
switches) or M (vehicles 
with paddle shift switches) 
to allow smooth start off.

Enabling the system

172

4-2. Driving procedures

switch until the standby indicator 

(green) turns off, and then turn the 

engine switch off.

When the parking brake is set 

automatically while the system 

is holding the brakes

Perform any of the following opera-

tions to release the parking brake:

Depress the accelerator pedal. 

(The parking brake will not be 

released automatically if the seat 

belt is not fastened.)

Operate the parking brake switch 

with the brake pedal depressed.

Make sure that the parking brake 

indicator light goes off. (

P.168)

When an inspection at your 

Toyota dealer is necessary

When the brake hold standby indi-

cator (green) does not illuminate 

even when the brake hold switch is 

pressed with the brake hold system 

operating conditions met, the sys-

tem may be malfunctioning. Have 

the vehicle inspected at your Toyota 

dealer.

If “Brake Hold Malfunction 

Press Brake to Deactivate Visit 

Your Dealer” or “Brake Hold 

Malfunction Visit Your Dealer” 

is displayed on the multi-infor-

mation display

The system may be malfunctioning. 

Have the vehicle inspected by your 

Toyota dealer.

Warning messages and buzzers

Warning messages and buzzers are 

used to indicate a system malfunc-

tion or to inform the driver of the 

need for caution. If a warning mes-

sage is shown on the multi-informa-

tion display, read the message and 

follow the instructions.

If the brake hold operated indi-

cator flashes

P.363

WARNING

When the vehicle is on a 

steep incline

Take care when using the brake 

hold system on a steep incline, 

exercise caution. The brake hold 

function may not hold brakes in 

such situations.
Also, the system may not activate 

depending on the angle of the 

slope.

When stopped on a slippery 

road

The system cannot stop the vehi-

cle when the gripping ability of the 

tires has been exceeded. Do not 

use the system when stopped on 

a slippery road.

NOTICE

When parking the vehicle

The brake hold system is not 

designed for use when parking 

the vehicle for a long period of 

time. Turning the engine switch off 

while the system is holding the 

brake may release the brake, 

which would cause the vehicle to 

move. When operating the engine 

switch, depress the brake pedal, 

shift the shift lever to P and set 

the parking brake.

173

4-3. Operating the lights and wipers

4

Dr

iv

ing

4-3.Operating the lights and wipers

Operating the 

 switch 

turns on the lights as follows:

For the U.S.A.

1

 The headlights, daytime 

running lights (

P.173) and 

all the lights listed below turn 
on and off automatically.

2

 The side marker, park-

ing, LED accent (if 
equipped), tail, license plate, 
instrument panel lights, and 
daytime running lights 
(

P.173) turn on.

3

 The headlights and all 

lights listed above (except 
daytime running lights) turn 

on.

4

 Off

For Canada

1

 The headlights, daytime 

running lights (

P.173) and 

all the lights listed below turn 
on and off automatically.

2

 The side marker, park-

ing, LED accent (if 
equipped), tail, license plate, 
instrument panel lights, and 
daytime running lights 
(

P.173) turn on.

3

 The headlights and all 

lights listed above (except 
daytime running lights) turn 
on.

AUTO mode can be used when

The engine switch is in ON.

Daytime running light system

The daytime running lights illumi-

nate using the same lights as the 

headlights and illuminate darker 

than the headlights.

Headlight switch

The headlights can be oper-
ated manually or automati-
cally.

Operating instructions

174

4-3. Operating the lights and wipers

To make your vehicle more visible 

to other drivers during daytime 

driving, the daytime running lights 

turn on automatically when all of 

the following conditions are met. 

(The daytime running lights are 

not designed for use at night.)

• The engine is running

• The parking brake is released
• The headlight switch is in the 


or 

*

 position

*

: When the surroundings are bright

The daytime running lights remain 

on after they illuminate, even if the 

parking brake is set again.

For the U.S.A.: Daytime running 

lights can be turned off by operat-

ing the switch.

Compared to turning on the head-

lights, the daytime running light 

system offers greater durability 

and consumes less electricity, so 

it can help improve fuel economy.

Headlight control sensor

The sensor may not function prop-

erly if an object is placed on the sen-

sor, or anything that blocks the 

sensor is affixed to the windshield.

Doing so interferes with the sensor 

detecting the level of ambient light 

and may cause the automatic head-

light system to malfunction.

Automatic light off system

When the headlights are on: The 

headlights and tail lights turn off 

30 seconds after the driver’s door 

is opened and closed if the engine 

switch is turned to ACC or OFF. 

(Vehicles with a wireless remote 

control: The lights turn off immedi-

ately if 

 on the key is pressed 

after all the doors are closed.)

When only the tail lights are on: 

The tail lights turn off automati-

cally if the engine switch is turned 

to ACC or OFF and the driver’s 

door is opened.

To turn the lights on again, turn the 

engine switch to ON, or turn the light 

switch off once and then back to 

 or 

 (except for the Canada).

Light reminder buzzer

A buzzer sounds when the engine 

switch is turned to OFF or ACC and 

the driver’s door is opened while the 

lights are turned on.

Windshield wiper linked head-

light illumination

When driving during daytime with 
the headlight switch turned to 

, if 

the windshield wipers are used, the 

headlights will turn on automatically 

after several seconds to help 

enhance the visibility of your vehi-

cle.

Battery-saving function

In order to prevent the battery of the 

vehicle from discharging, if the 

headlights and/or tail lights are on 

when the engine switch is turned off 

the battery saving function will oper-

ate and automatically turn off all the 

lights after approximately 20 min-

utes. When the engine switch is 

turned to ON, the battery-saving 

function will be disabled.

When any of the following are per-

formed, the battery-saving function 

is canceled once and then reacti-

vated. All the lights will turn off auto-

matically 20 minutes after the 

Battery- saving function has been 

reactivated:

When the headlight switch is oper-

ated

When a door is opened or closed

175

4-3. Operating the lights and wipers

4

Dr

iv

ing

Customization

Some functions can be customized. 

(

P.412)

1

With the headlights on, push 
the lever away from you to 
turn on the high beams.

Pull the lever toward you to the 
center position to turn the high 
beams off.

2

Pull the lever toward you and 
release it to flash the high 
beams once.

You can flash the high beams with 
the headlights on or off.

1

Press the Automatic High 
Beam switch.

NOTICE

To prevent battery discharge

Do not leave the lights on longer 

than necessary when the engine 

is not running.

Turning on the high beam 
headlights

AHB (Automatic High 

Beam)

The Automatic High Beam 
uses a front camera located 
on the upper portion of the 
windshield to detect the 
brightness of the lights of 
vehicles ahead, street-
lights, etc., and automati-
cally changes the head 
lights between the high 
beams and low beams.

WARNING

For safe use

Do not overly rely on the Auto-

matic High Beam. Always drive 

safely, taking care to observe your 

surroundings and turning the high 

beams on or off manually if nec-

essary.

To prevent unintentional 

operation of the Automatic 

High Beam System

When it is necessary to disable 

the system: 

P.184

Using the Automatic High 
Beam system

176

4-3. Operating the lights and wipers

2

Turn the headlight switch to 

the 

 or 

 position.

When the headlight switch lever is 

in the low beam position, the AHB 

system will be enabled and the 

AHB indicator will illuminate.

Automatic operating condi-

tions of the high beams

When all of the following condi-

tions are met, the high beams will 

illuminate automatically:

• The vehicle speed is approxi-

mately 21 mph (34 km/h) or more.

• The area ahead of the vehicle is 

dark.

• There are no vehicles ahead with 

lights on.

• There are few streetlights or other 

lights on the road ahead.

If any of the following conditions 

are met, the headlights will 

change to the low beams:

• Vehicle speed drops below 

approximately 17 mph (27 km/h).

• The area ahead of the vehicle is 

not dark.

• There is a vehicle ahead with 

lights on.

• There are many streetlights or 

other lights on the road ahead.

Front camera detection

In the following situations, the high 

beams may not be automatically 

changed to the low beams:

• When a vehicle cuts in front of 

your vehicle

• When another vehicle crosses in 

front of the vehicle

• When vehicles ahead are repeat-

edly detected and then hidden 

due to repeated curves, road 

dividers or roadside trees

• When a vehicle ahead 

approaches from a far lane

• When a vehicle ahead is far away

• When a vehicle ahead has no 

lights

• When the lights of a vehicle ahead 

are dim

• When a vehicle ahead is reflecting 

strong light, such as own head-

lights

• Situations in which the sensors 

may not operate properly: 

P.188

The headlights may change to the 

low beams if a vehicle ahead that 

is using fog lights without its head-

lights turned on is detected.

House lights, street lights, traffic 

signals, and illuminated billboards 

or signs may cause the high 

beams to change to the low 

beams, or the low beams to 

remain on.

The following may change the tim-

ing at which the headlights 

change to the low beams:

• The brightness of lights of vehi-

cles ahead

• The movement and direction of 

vehicles ahead

• The distance between the vehicle 

and a vehicle ahead

• When a vehicle ahead only has 

lights illuminated on one side

• When a vehicle ahead is a 

two-wheeled vehicle

• The condition of the road (gradi-

ent, curve, condition of the road 

surface, etc.)

• The number of passengers and 

amount of luggage

The headlights may change 

between the high beams and low 

beams unexpectedly.

Bicycles and other small vehicles 

may not be detected.

In the following situations, the sys-

tem may not be able to correctly 

detect the brightness of the sur-

177

4-3. Operating the lights and wipers

4

Dr

iv

ing

roundings. This may cause the 

low beams to remain on or the 

high beams to flash or dazzle 

pedestrians or vehicles ahead. In 

such a case, it is necessary to 

manually change between the 

high beams and low beams.

• When there are lights similar to 

headlights or tail lights in the sur-

rounding area

• When headlights or tail lights of 

vehicles ahead are turned off, 

dirty, changing color, or not aimed 

properly

• When the headlights are repeat-

edly changing between the high 

beams and low beams.

• When use of the high beams is 

inappropriate or when the high 

beams may be flashing or daz-

zling pedestrians or other drivers.

• When the vehicle is used in an 

area in which vehicles travel on 

the opposite side of the road of 

the country for which the vehicle 

was designed, for example using 

a vehicle designed for right-hand 

traffic in a left-hand traffic area, or 

vice versa

• When it is necessary to disable 

the system: 

P.184

• Situations in which the sensors 

may not operate properly: 

P.188

Temporarily reducing front 

camera sensitivity (for the 

U.S.A.)

The sensitivity of the front camera 

can be temporarily reduced.

1

Turn the engine switch off with 

the following conditions met.

• The headlight switch is in the 


or 

 position.

• The headlight switch lever is in the 

low beam position.

• The automatic High Beam switch 

is on.

2

Press the engine switch to ON.

3

Within 60 seconds after perform-

ing step 2, push the headlight 

switch lever to the high beam 

position then pull it to the original 

position quickly 10 times, then 

leave the lever in its original posi-

tion.

Changing to the high 
beams

Push the lever forward.

The Automatic High Beam indicator 
will turn off and the high beam indi-
cator will turn on.
Pull the lever to its original position 
to enable the Automatic High Beam 
system again.

Changing to the low beams

Press the Automatic High Beam 
switch.

The Automatic High Beam indicator 
will turn off.
Press the switch to enable the 
Automatic High Beam system 
again.

Turning the high beams 
on/off manually

178

4-3. Operating the lights and wipers

Temporarily changing to 
the low beams

It is recommended to switch to 
the low beams when use of the 
high beams is inappropriate or 
when the high beams may 
cause problems or distress to 
other drivers or pedestrians 
nearby.
Pull the lever rearward and then 
return it to its original position.

The high beams will illuminate 
while the lever is pulled, however, 
after the lever is returned to its orig-
inal position, the low beams will 
remain on for a certain amount of 
time. After this, the Automatic High 
Beam system will operate.

Operating the 

 lever oper-

ates the wipers or washer as fol-
lows.

1

 (U.S.A.) or 

 (Canada)

Intermittent windshield wiper 
operation

2

 (U.S.A.) or 

 (Canada)

Low speed windshield wiper 

Windshield wipers and 

washer

Operating the lever can use 
the windshield wipers or the 
washer.

NOTICE

When the windshield is dry

Do not use the wipers, as they 

may damage the windshield.

Operating the wiper lever

179

4-3. Operating the lights and wipers

4

Dr

iv

ing

operation

3

 (U.S.A.) or 

 (Canada)

High speed windshield wiper 
operation

4

 (U.S.A.) or 

 (Canada)

Temporary operation

5

 Washer/wiper dual 

operation

Pulling the lever operates the wip-
ers and washer.
Wipers will automatically operate a 
couple of times after the washer 
squirts.

Interval adjustment type only:
Wiper intervals can be adjusted 
when intermittent operation is 
selected.

6

Increases the intermittent 
windshield wiper frequency

7

Decreases the intermittent 
windshield wiper frequency

The windshield wiper and 

washer can be operated when

The engine switch is in ON.

If no windshield washer fluid 

sprays

Check that the washer nozzles are 

not blocked if there is washer fluid in 

the windshield washer fluid reser-

voir.

When stopping the engine in an 

emergency while driving

If the windshield wipers are operat-

ing when the engine is stopped, the 

windshield wipers will operate in 

high speed operation. After the vehi-

cle is stopped, operation will return 

to normal when the engine switch is 

turned to ON.

WARNING

Caution regarding the use of 

washer fluid

When it is cold, do not use the 

washer fluid until the windshield 

becomes warm. The fluid may 

freeze on the windshield and 

cause low visibility. This may lead 

to an accident, resulting in death 

or serious injury.

NOTICE

When the washer fluid tank is 

empty

Do not operate the switch continu-

ally as the washer fluid pump may 

overheat.

When a nozzle becomes 

blocked

In this case, contact your Toyota 

dealer.Do not try to clear it with a 

pin or other object. The nozzle will 

be damaged.


Content      ..     9      10      11      12     ..