Toyota Camry Hybrid (2022 year). Manual in english - page 30
 

  Index      Toyota     Toyota Camry Hybrid (2022 year). Manual in english


Search            copyright infringement  


Content      ..     28      29      30      31     ..


Toyota Camry Hybrid (2022 year). Manual in english - page 30


478

6-3. Do-it-yourself maintenance

Front side marker lights (bulb type)

To  ensure  enough  space  to
perform work, turn the steer-
ing  wheel  to  move  the  front
wheel  away  from  the  light
bulb to be replaced.

Turn  the  steering  wheel  to  the
left when replacing the right side
light  bulb,  and  turn  the  steering
wheel  to  the  right  when  replac-
ing the left side light bulb.

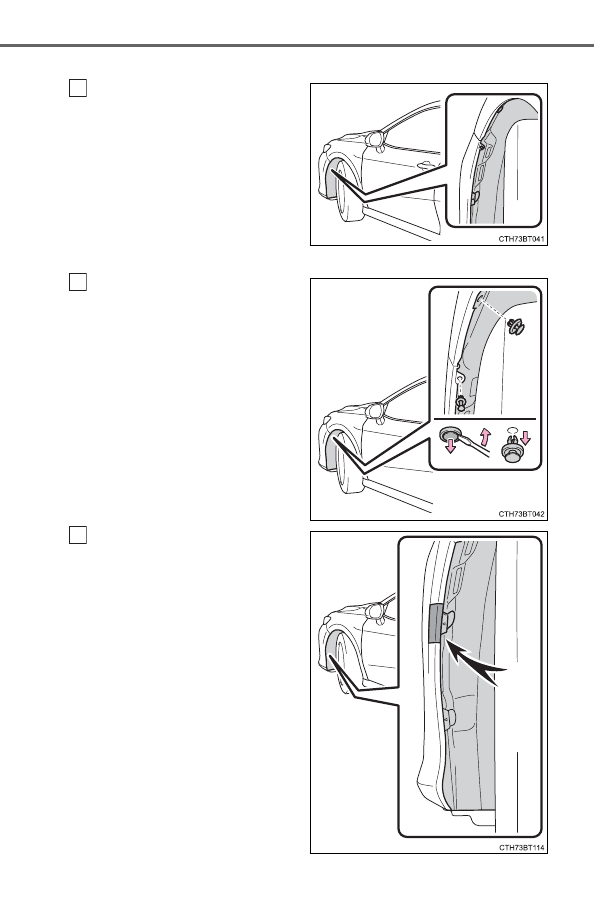
Remove  the  fender  liner
clips.

To  protect  the  front  bumper
from  being  damaged,  apply
protective  tape  around  the
clip  as  shown  in  the  illustra-
tion.

Use  masking  tape,  etc.  Do  not
use  duct  tape,  as  it  may  leave
residue  or  damage  the  paint
when removed.

1

2

3

479

6-3. Do-it-yourself maintenance

6

Mai
ntenan

ce and care

Insert a small flathead screw-
driver  between  the  front
bumper  and  fender  liner  at
the  position  marked  with  a

”  and  then  separate  the

front bumper from the fender
liner.

To  separate  the  front  bumper
from the fender liner, pry up the
fender  liner  while  pulling  the
front bumper outward as shown
in the illustration.

Pull back the fender liner and
turn  the  bulb  base  counter-
clockwise.

Remove the light bulb.

Install  a  new  light  bulb  and
then  install  the  bulb  base  to
the  light  unit  by  inserting  it
and turning it clockwise.

4

5

6

7

480

6-3. Do-it-yourself maintenance

Return  the  fender  liner  to  its
original  position,  and  install
the clips.

Make  sure  that  the  fender  liner
is  correctly  positioned  on  the
inner side of the front bumper.

To  Install  the  fender  liner  to
the front bumper, engage the
clip to the front bumper.

Remove the protective tape.

8

9

10

481

6-3. Do-it-yourself maintenance

6

Mai
ntenan

ce and care

Back-up lights (bulb type)

Open  the  trunk  lid  and
remove the clips.

Partly  remove  the  trunk  lid
cover.

Disconnect  the  connector
while  depressing  the  lock
release.  (When  replacing
right side bulb only.)

Turn  the  bulb  base  counter-
clockwise.

1

2

3

4

482

6-3. Do-it-yourself maintenance

Remove the light bulb.

Install  a  new  light  bulb  and
then  install  the  bulb  base  to
the  light  unit  by  inserting  it
and turning it clockwise.

Connect 

the 

connector.

(When  replacing  right  side
bulb only.)

Reinstall  the  trunk  lid  cover
with the clips.

5

6

7

8

483

6-3. Do-it-yourself maintenance

6

Mai
ntenan

ce and care

Rear turn signal lights (bulb type) and rear side marker lights
(bulb type)

Open  the  trunk  and  apply
protective tape to the vehicle
body around the light unit.

Use  masking  tape,  etc.  Do  not
use  duct  tape,  as  it  may  leave
residue  or  damage  the  paint
when removed.

Remove the cover.

Insert  a  flathead  screw-
driver  between  the  cover
and  the  light  unit  and  pry
up  the  cover  in  several
positions  as  shown  in  the
illustration  to  disengage
the  claws  (indicated  by  a
dotted line).
Pull  the  cover  toward  the
rear  of  the  vehicle  to  dis-
engage  the  claws  (indi-
cated by a dotted line) and
remove the cover.

To  prevent  scratching  the  vehi-
cle,  wrap  the  tip  of  the  flathead
screwdriver with a cloth, etc.

Remove the 2 bolts.

1

2

1

2

3

484

6-3. Do-it-yourself maintenance

Remove the light unit.

Attach  a  long  piece  of
packing  tape  to  the  light
unit and fold the excess in
half.
Hold  the  folded  portion
and  pull  it  toward  the  rear
of  the  vehicle  to  remove
the light unit.

Turn the bulb base counterclockwise.

Remove the light bulb.

4

1

2

5

Rear turn signal lights

Rear side marker lights

6

Rear turn signal lights

Rear side marker lights

485

6-3. Do-it-yourself maintenance

6

Mai
ntenan

ce and care

Install a new light bulb and then install the bulb base to the light
unit by inserting it and turning it clockwise.

Install the light unit.

Align the tabs and push the light
unit toward the front of the vehi-
cle to install it.

Install the 2 bolts.

7

Rear turn signal lights

Rear side marker lights

8

9

486

6-3. Do-it-yourself maintenance

Install the cover.

Remove the protective tape.

Replacing the following bulbs

If any of the lights listed below has burnt out, have it replaced by
your Toyota dealer.

Headlights

Daytime running lights

Parking lights (LED type)

Front turn signal lights (LED type)

Front side marker lights (LED type)

Side turn signal lights (if equipped)

Tail lights

Rear side marker lights (LED type)

Stoplights

Rear turn signal lights (LED type)

Back-up lights (LED type)

High mounted stoplight

License plate lights

LED light bulbs

The lights other than the front turn signal/parking lights (bulb type), front side
marker  lights  (bulb  type),  back-up  lights  (bulb  type),  rear  turn  signal  lights
(bulb  type)  and  rear  side  marker  lights  (bulb  type)  consist  of  a  number  of
LEDs. If any of the LEDs burn out, take your vehicle to your Toyota dealer to
have the light replaced.

Condensation build-up on the inside of the lens

Temporary condensation build-up on the inside of the headlight lens does not
indicate a malfunction.
Contact your Toyota dealer for more information in the following situations:

Large drops of water have built up on the inside of the lens.

Water has built up inside the headlight.

10

11

487

6-3. Do-it-yourself maintenance

6

Mai
ntenan

ce and care

WARNING

Replacing light bulbs

Turn  off  the  lights.  Do  not  attempt  to  replace  the  bulb  immediately  after
turning off the lights. 
The bulbs become very hot and may cause burns.

Do not touch the glass portion of the light bulb with bare hands. When it is
unavoidable to hold the glass portion, use and hold with a clean dry cloth
to avoid getting moisture and oils on the bulb.
Also, if the bulb is scratched or dropped, it may blow out or crack.

Fully install light bulbs and any parts used to secure them. Failure to do so
may result in heat damage, fire, or water entering the headlight unit. This
may damage the headlights or cause condensation to build up on the lens.

To prevent damage or fire 

Make sure bulbs are fully seated and locked.

488

6-3. Do-it-yourself maintenance

490

7-1. Essential information

Press the switch.

All the turn signal lights will flash.
To  turn  them  off,  press  the  switch
once again.

Emergency flashers

If the emergency flashers are used for a long time while the hybrid sys-

tem is not operating (while the “READY” indicator is not illuminated), the

12-volt battery may discharge.

If any of the SRS airbags deploy (inflate) or in the event of a strong rear

impact, the emergency flashers will turn on automatically.

The  emergency  flashers  will  turn  off  automatically  after  operating  for

approximately 20 minutes. To manually turn the emergency flashers off,

press the switch twice.

(The  emergency  flashers  may  not  turn  on  automatically  depending  on

the force of the impact and conditions of the collision.)

Emergency flashers

The emergency flashers are used to warn other drivers when the
vehicle has to be stopped on the road due to a breakdown, etc.

491

7-1. Essential information

7

W

hen
 troub

le arises

Steadily step on the brake pedal with both feet and firmly depress it.

Do  not  pump  the  brake  pedal  repeatedly  as  this  will  increase  the  effort
required to slow the vehicle.

Shift the shift lever to N.

If the shift lever is shifted to N
After slowing down, stop the vehicle in a safe place by the road.
Stop the hybrid system.

If the shift lever cannot be shifted to N
Keep depressing the brake pedal with both feet to reduce vehicle
speed as much as possible.
To  stop  the  hybrid  system,
press  and  hold  the  power
switch  for  2  consecutive  sec-
onds or more, or press it briefly
3 times or more in succession.

Stop the vehicle in a safe place by the road.

If your vehicle has to be stopped in an 

emergency

Only in an emergency, such as if it becomes impossible to stop
the vehicle in the normal way, stop the vehicle using the follow-
ing procedure:

1

2

3
4

3

Press and hold for 2 seconds or 
more, or press briefly 3 times or more

4

WARNING

If the hybrid system has to be turned off while driving

Power assist for the steering wheel will be lost, making the steering wheel
heavier to turn. Decelerate as much as possible before turning off the hybrid
system.

5

492

7-1. Essential information

If the door can be opened, open the door and exit the vehicle.

If the door can not be opened, open the window using the power
window switch and ensure an escape route.

If the window can be opened, exit the vehicle through the window.

If the door and window cannot be opened due to the rising water,
remain calm, wait until the water level inside the vehicle rises to the
point that the water pressure inside of the vehicle equals the water
pressure outside of the vehicle and then open the door after waiting
for the rising water to enter the vehicle, and exit the vehicle. When
the outside water level exceeds half the height of the door, the door
cannot be opened from the inside due to water pressure.

Water level exceeds the floor

When the water level exceeds the floor and time has passed, the electrical
equipment will get damaged, the power windows will not operate, the engine
and motor stop, and the vehicle may not be able to get moving.

Using an emergency escape hammer

*

Laminated glass is used in the  windshield on this  vehicle. Laminated glass
cannot be shattered with an emergency hammer

*

. Tempered glass is used in

the windows on this vehicle.

*

: Contact your Toyota dealer or aftermarket accessory manufacturer for fur-

ther information about an emergency hammer.

If the vehicle is submerged or water on the 

road is rising

This vehicle is not designed to be able to drive on roads that are
deeply  flooded  with  water.  Do  not  drive  on  roads  where  the
roads may be submerged or the water may be rising. It is dan-
gerous to remain in the vehicle, if it anticipated that the vehicle
will be flooded or set a drift. Remain calm and follow the follow-
ing.

WARNING

Caution while driving

Do not drive on roads where the roads may be submerged or the water may
be rising. Otherwise the vehicle may be damaged and cannot move, as well
as become flooded and set a drift, which may lead to death.

493

7

W

hen
 troub

le arises

7-2. Steps to take in an emergency

If your vehicle needs to be towed

If  towing  is  necessary,  we  recommend  having  your  vehicle
towed  by  your  Toyota  dealer  or  commercial  towing  service,
using a wheel-lift type truck or flatbed truck.
Use a safety chain system for all towing, and abide by all state/
provincial and local laws.
If towing your vehicle with a wheel-lift type truck from the front,
the vehicle's rear wheels and axles must be in good conditions.
(

P. 493, 495)

If they are damaged, use a towing dolly or flatbed truck.

WARNING

Observe the following precautions.
Failure to do so may result in death or serious injury.

When towing the vehicle

While towing

When towing using cables or chains, avoid sudden starts, etc. which place
excessive stress on the towing eyelets, cables or chains. The towing eye-
lets, cables or chains may become damaged, broken debris may hit peo-
ple, and cause serious damage.

Do  not  turn  the  power  switch  off. There  is  a  possibility  that  the  steering
wheel is locked and cannot be operated.

Be sure to transport the vehicle with the
front wheels raised or with all four wheels
raised  off  the  ground.  If  the  vehicle  is
towed  with  the  front  wheels  contacting
the  ground,  the  drivetrain  and  related
parts may be damaged or electricity gen-
erated by the operation of the motor may
cause  a  fire  to  occur  depending  on  the
nature of the damage or malfunction.


Content      ..     28      29      30      31     ..