Toyota Prius Prime (2022 year). Manual in english - page 43


  Index      Toyota     Toyota Prius Prime (2022 year). Manual in english


Search            copyright infringement  


Content      ..     41      42      43      44     ..


Toyota Prius Prime (2022 year). Manual in english - page 43


695

8-2. Steps to take in an emergency

8

Wh
en tro

uble

 a

ris

es

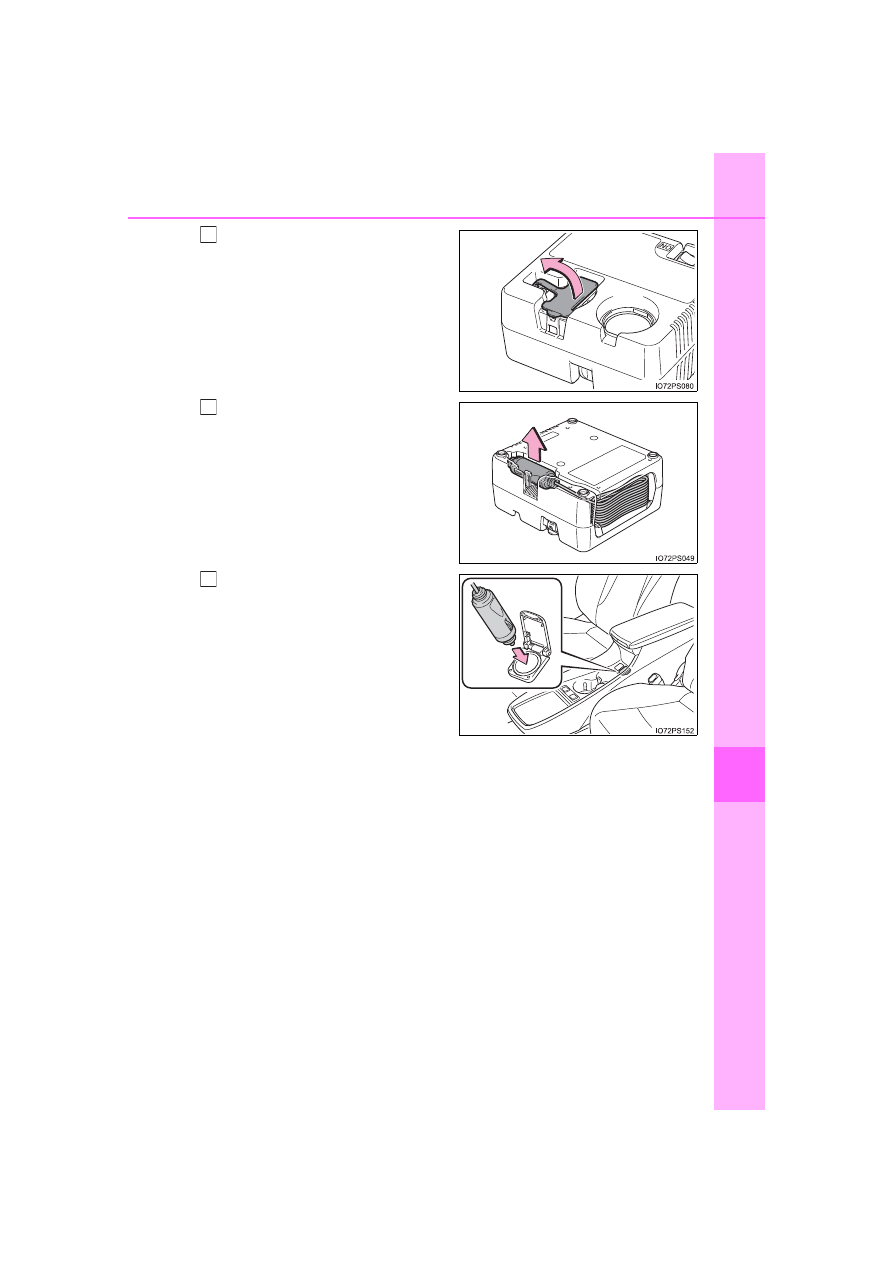
Lift  the  rubber  stopper  on  the
compressor.

Remove  the  power  plug  from
the compressor.

Connect  the  power  plug  to  the
power outlet socket. (

P. 550)

6

7

8

696

8-2. Steps to take in an emergency

Connect  the  bottle  to  the  com-
pressor.

As shown in the illustration, insert

the  bottle  securely  into  the  com-

pressor until the upper side of the

mark on the bottle is aligned with

the upper end of the notch.

Attach the sticker provided with
the  tire  puncture  repair  kit  to  a
position  easily  seen  from  the
driver’s seat.

Check the specified tire inflation
pressure.

Tire inflation pressure is specified

on  the  label  on  the  driver’s  side

pillar as shown. (

P. 733)

Start the hybrid system. (

P. 332)

9

10

11

12

697

8-2. Steps to take in an emergency

8

Wh
en tro

uble

 a

ris

es

To inject the sealant and inflate
the  tire,  turn  the  compressor
switch on. 

Inflate the tire until the specified air pressure is reached.

The  sealant  will  be  injected
and the pressure will spike to
between  44 psi  (300 kPa,
3.0 kgf/cm

2

  or  bar)  and

58 psi  (400 kPa,  4.0 kgf/cm

2

or  bar),  then  gradually
decrease.
The  air  pressure  gauge  will
display  the  actual  tire  infla-
tion  pressure  about  1  to  5
minutes  after  the  switch  is
turned on.

• Turn  the  compressor  switch

off  and  then  check  the  tire
inflation 

pressure. 

Being

careful  not  to  over  inflate,
check and repeat the inflation
procedure  until  the  specified
tire  inflation  pressure  is
reached.

• The tire can be inflated for about 5 to 20 minutes (depending on

the outside temperature). If the tire inflation pressure is still lower
than the specified point after inflation for 25 minutes, the tire is
too damaged to be repaired. Turn the compressor switch off and
contact your Toyota dealer.

• If the tire inflation pressure exceeds the specified air pressure, let

out some air to adjust the tire inflation pressure. (

P. 700, 733)

13

14

1

2

698

8-2. Steps to take in an emergency

With the compressor switch off, disconnect the hose from the valve
on the tire and then pull out the power plug from the power outlet
socket.

Some sealant may leak when the hose is removed.

Install the valve cap onto the valve of the emergency repaired tire.
Attach the air release cap to the
end of the hose.

If  the  air  release  cap  is  not

attached,  the  sealant  may  leak

and the vehicle may get dirty.

Temporarily store the bottle in the luggage compartment while it is
connected to the compressor.
To spread the liquid sealant evenly within the tire, immediately drive
safely for about 3 miles (5 km) below 50 mph (80 km/h).
After  driving,  stop  your  vehicle
in  a  safe  place  on  a  hard,  flat
surface  and  reconnect  the
repair kit.

Remove the air release cap from

the hose before reconnecting the

hose.

15

16

17

18

19

20

699

8-2. Steps to take in an emergency

8

Wh
en tro

uble

 a

ris

es

Turn the compressor switch on and wait for several seconds, then
turn it off. Check the tire inflation pressure.

If the tire inflation pressure is
under 

19 psi 

(130 kPa,

1.3 kgf/cm

2

  or  bar):  The

puncture cannot be repaired.
Contact your Toyota dealer.
If the tire inflation pressure is
19 psi  (130 kPa,  1.3 kgf/cm

2

or  bar)  or  higher,  but  less
than  the  specified  air  pres-
sure: Proceed to step 

.

If the tire inflation pressure is the specified air pressure (

P. 733):

Proceed to step 

.

Turn the compressor switch on to inflate the tire until the specified
air  pressure  is  reached.  Drive  for  about  3 miles  (5 km)  and  then
perform step 

.

Attach the air release cap to the
end of the hose.

If  the  air  release  cap  is  not

attached,  the  sealant  may  leak

and the vehicle may get dirty.

Store the bottle in the luggage compartment while it is connected to
the compressor.
Taking  precautions  to  avoid  sudden  braking,  sudden  acceleration
and  sharp  turns,  drive  carefully  at  under  50 mph  (80 km/h)  to  the
nearest Toyota dealer that is less than 62 miles (100 km) away for
tire repair or replacement.

When having the tire repaired or replaced, make sure to tell the Toyota

dealer that the sealant is injected.

21

1

2

22

3

23

22

20

23

24

25

700

8-2. Steps to take in an emergency

If the tire is inflated to more than the specified air pressure

Disconnect the hose from the valve.

Disconnect the hose  from the valve,  remove the air  release cap from

the hose and then reconnect the hose.
Turn the compressor switch on and wait for several seconds, and then

turn it off. Check that the air pressure indicator shows the specified air

pressure. (

P. 733)

If the air pressure is under the designated pressure, turn the compres-

sor switch on again and repeat the inflation procedure until the speci-

fied air pressure is reached.

The valve of a tire that has been repaired

After  a  tire  is  repaired  with  the  emergency  tire  puncture  repair  kit,  the

valve should be replaced.

After a tire is repaired with the emergency tire puncture repair kit

The tire pressure warning valve and transmitter should be replaced.

Even if the tire inflation pressure is at the recommended level, the tire

pressure warning light may come on/flash.

Note for checking the emergency tire puncture repair kit

Check the sealant expiry date occasionally.

The expiry date is shown on the bottle. Do not use sealant whose expiry

date has already passed. Otherwise, repairs conducted using the emer-

gency tire puncture repair kit may not be performed properly.

Install the air release cap to the end of

the  hose  and  push  the  protrusion  on

the air release cap into the tire valve

to let some air out.

1

2

3

4

701

8-2. Steps to take in an emergency

8

Wh
en tro

uble

 a

ris

es

Emergency tire puncture repair kit

The emergency tire puncture repair kit is for filling the car tire with air.

The  sealant  has  a  limited  life  span. The  expiry  date  is  marked  on  the

bottle. The sealant should be replaced before the expiry date. Contact

your Toyota dealer for replacement.

The sealant stored in the emergency tire puncture repair kit can be used

only once to temporarily repair a single tire. If the sealant in the bottle

and other parts of the kit have been used and need to be replaced, con-

tact your Toyota dealer.

The compressor can be used repeatedly.

The sealant can be used when the outside temperature is from -40°F

(-40°C) to 140°F (60°C).

The  kit  is  exclusively  designed  for  size  and  type  of  tires  originally

installed on your vehicle. Do not use it for tires that a different size than

the original ones, or for any other purposes.

If the sealant gets on your clothes, it may stain.

If the sealant adheres to a wheel or the surface of the vehicle body, the

stain may not be removable if it is not cleaned at once. Immediately wipe

away the sealant with a wet cloth.

During  operation  of  the  repair  kit,  a  loud  operation  noise  is  produced.

This does not indicate a malfunction.

Do not use to check or to adjust the tire pressure.

702

8-2. Steps to take in an emergency

WARNING

Do not drive the vehicle with a flat tire

Do not continue driving with a flat tire.

Driving even a short distance with a flat tire can damage the tire and the

wheel beyond repair.
Driving with a flat tire may cause a circumferential groove on the side

wall. In such a case, the tire may explode when using a repair kit.

Caution while driving

Store the repair kit in the luggage compartment. 

Injuries may result in the event of an accident or sudden braking.

The repair kit is exclusively only for your vehicle.

Do not use repair kit on other vehicles, which could lead to an accident

causing death or serious injury.

Do  not  use  repair  kit  for  tires  that  are  different  size  than  the  original

ones, or for any other purpose. If the tires have not been completely

repaired, it could lead to an accident causing death or serious injury.

Precautions for use of the sealant

Ingesting the sealant is hazardous to your health. If you ingest sealant,

consume as much water as possible, and then immediately consult a

doctor.

If sealant gets in eyes or adheres to skin, immediately wash it off with

water. If discomfort persists, consult a doctor.

703

8-2. Steps to take in an emergency

8

Wh
en tro

uble

 a

ris

es

WARNING

When fixing the flat tire

Stop your vehicle in a safe and flat area.

Do  not  touch  the  wheels  or  the  area  around  the  brakes  immediately

after the vehicle has been driven. 

After the vehicle has been driven, the wheels and the area around the

brakes may be extremely hot. Touching these areas with hands, feet or

other body parts may result in burns.

Connect the valve and hose securely with the tire installed on the vehi-

cle. If the hose is not properly connected to the valve, air leakage may

occur as sealant may be sprayed out.

If the hose comes off the valve while inflating the tire, there is a risk

that the hose will move abruptly due to air pressure.

After inflation of the tire has completed, the sealant may splatter when

the hose is disconnected or some air is let out of the tire.

Follow the operation procedure to repair the tire. If the procedures not

followed, the sealant may spray out.

Keep back from the tire while it is being repaired, as there is a chance

of  it  bursting  while  the  repair  operation  is  being  performed.  If  you

notice  any  cracks  or  deformation  of  the  tire,  turn  off  the  compressor

switch and stop the repair operation immediately.

The repair kit may overheat if operated for a long period of time. Do not

operate the repair kit continuously for more than 40 minutes.

Parts of the repair kit become hot during operation. Be careful handling

the repair kit during and after operation. Do not touch the metal part

connecting the bottle and the compressor. It will be extremely hot.

Do not attach the vehicle speed warning sticker to an area other than

the one indicated. If the sticker is attached to an area where an SRS

airbag is located, such as the pad of the steering wheel, it may prevent

the SRS airbag from operating properly.

704

8-2. Steps to take in an emergency

WARNING

Driving to spread the liquid sealant evenly

Observe the following precautions to reduce the risk of accidents. 

Failing to do so may result in a loss of vehicle control and cause death

or serious injury.

Drive the vehicle carefully at a low speed. Be especially careful when

turning and cornering.

If  the  vehicle  does  not  drive  straight  or  you  feel  a  pull  through  the

steering wheel, stop the vehicle and check the following.
• Tire condition. The tire may have separated from the wheel.

• Tire  inflation  pressure.  If  the  tire  inflation  pressure  is  19 psi

(130 kPa, 1.3 kgf/cm

2

 or bar) or less, the tire may be severely dam-

aged.

NOTICE

When performing an emergency repair

A tire should only be repaired with the emergency tire puncture repair

kit  if  the  damage  is  caused  by  a  sharp  object  such  as  nail  or  screw

passing through the tire tread.

Do not remove the sharp object from the tire. Removing the object may

widen the opening and disenable emergency repair with the repair kit.

The  repair  kit  is  not  waterproof.  Make  sure  that  the  repair  kit  is  not

exposed to water, such as when it is being used in the rain.

Do not put the repair kit directly onto dusty ground such as sand at the

side of the road. If the repair kit vacuums up dust etc., a malfunction

may occur.

Precautions for the emergency tire puncture repair kit

The  repair  kit  power  source  should  be  12  V  DC  suitable  for  vehicle

use. Do not connect the repair kit to any other source.

If  fuel  splatters  on  the  repair  kit,  the  repair  kit  may  deteriorate. Take

care not to allow fuel to contact it.

Place the repair kit in a storage to prevent it from being exposed to dirt

or water.

Store  the  repair  kit  in  the  luggage  compartment  out  of  reach  of  chil-

dren.

Do not disassemble or modify the repair kit. Do not subject parts such

as the air pressure indicator to impacts. This may cause a malfunction.

705

8-2. Steps to take in an emergency

8

Wh
en tro

uble

 a

ris

es

NOTICE

To avoid damage to the tire pressure warning valves and transmit-

ters

When  a  tire  is  repaired  with  liquid  sealants,  the  tire  pressure  warning

valve  and  transmitter  may  not  operate  properly.  If  a  liquid  sealant  is

used, contact your Toyota dealer or other qualified service shop as soon

as  possible. After  use  of  liquid  sealant,  make  sure  to  replace  the  tire

pressure warning valve and transmitter when repairing or replacing the

tire. (

P. 613)

706

8-2. Steps to take in an emergency

If the hybrid system will not start

One of the following may be the cause of the problem:

The charging cable may be attached to the vehicle. (

P. 147)

The electronic key may not be functioning properly.

*

 (

P. 708)

There may not be sufficient fuel in the vehicle’s tank.
Refuel the vehicle. (

P. 101)

There may be a malfunction in the immobilizer system.

*

 (

P. 83)

There may be a malfunction in the shift control system.

*


(

P. 336, 688)

The hybrid system may be malfunctioning due to an electrical prob-
lem such as electronic key battery depletion or a blown fuse. How-
ever, depending on the type of malfunction, an interim measure is
available to start the hybrid system. (

P. 707)

There  is  a  possibility  that  the  temperature  of  the  hybrid  battery
(traction  battery)  is  extremely  low  (approximately  below  -22°F
[-30°C]). (

P. 101, 334)

*

: It may not be possible to shift the shift position other than P.

One of the following may be the cause of the problem:

The 12-volt battery may be discharged. (

P. 712)

The 12-volt battery terminal connections may be loose or corroded. 
(

P. 605)

Reasons for the hybrid system not starting vary depending on
the  situation.  Check  the  following  and  perform  the  appropriate
procedure: 

The hybrid system will not start even though the correct starting
procedure is being followed. (

P. 332)

The interior lights and headlights are dim, or the horn does not
sound or sounds at a low volume.

707

8-2. Steps to take in an emergency

8

Wh
en tro

uble

 a

ris

es

One of the following may be the cause of the problem:

The 12-volt battery may be discharged. (

P. 712)

One or both of the 12-volt battery terminals may be disconnected.
(

P. 605)

Contact your Toyota dealer if the problem cannot be repaired, or if repair
procedures are unknown.

When  the  hybrid  system  does  not  start,  the  following  steps  can  be
used  as  an  interim  measure  to  start  the  hybrid  system  if  the  power
switch is functioning normally. 
Do not use this starting procedure except in cases of emergency.

Set the parking brake.
Turn the power switch to ACCESSORY mode.
Press  and  hold  the  power  switch  for  about  15  seconds  while
depressing the brake pedal firmly.

Even if the hybrid system can be started using the above steps, the
system  may  be  malfunctioning.  Have  the  vehicle  inspected  by  your
Toyota dealer.

The  interior  lights  and  headlights  do  not  turn  on,  or  the  horn
does not sound.

Emergency start function

1

2

3

708

8-2. Steps to take in an emergency

If the electronic key does not operate 

properly

Use the mechanical key (

P. 275) in order to perform the following

operations:

Locks all the doors
Closes the windows 
(turn and hold)

*

Unlocks the door

Turning  the  key  rearward  unlocks
the  driver’s  door.  Turning  the  key
once  again  within  3  seconds
unlocks the other doors.

Opens the windows 
(turn and hold)

*

*

: This setting must be customized at your Toyota dealer. (

P. 749)

If  communication  between  the  electronic  key  and  vehicle  is
interrupted  (

P.  293)  or  the  electronic  key  cannot  be  used

because  the  battery  is  depleted,  the  smart  key  system  and
wireless  remote  control  cannot  be  used.  In  such  cases,  the
doors can be opened and the hybrid system can be started by
following the procedure below.

Locking and unlocking the doors

1
2

3

4

709

8-2. Steps to take in an emergency

8

Wh
en tro

uble

 a

ris

es

Depress the brake pedal.
Touch  the  Toyota  emblem  side
of  the  electronic  key  to  the
power switch.

When  the  electronic  key  is
detected, a buzzer sounds and the
power switch will turn to ON mode.
When  the  smart  key  system  is
deactivated  in  customization  set-
ting,  the  power  switch  will  turn  to
ACCESSORY mode.

Firmly depress the brake pedal

and check that 

 is shown

on the multi-information display.

Press the power switch.

In the event that the hybrid system still cannot be operated, contact
your Toyota dealer.

Starting the hybrid system

1

IO82PH052

2

IO82PH053

3

4

710

8-2. Steps to take in an emergency

Locking the charging port lid

Close the charging port lid. (

P. 113)

Lock the doors using the mechanical key. (

P. 708)

The charging port lid can be locked if the steps   and   are performed
in reverse.

Unlocking the charging port lid

Unlock the doors using the mechanical key. (

P. 708)

Open the charging port lid. (

P. 112)

*

: Vehicles with smart lid & connector locking system only

Locking the charging connector

Unlock the doors using the mechanical key. (

P. 708)

Open the charging port lid. (

P. 112)

Insert the charging connector into the charging inlet. (

P. 148)

Push the charging connector lock switch. (

P. 149)

The charging connector will be locked.

Unlocking the charging port lid

Unlock the doors using the mechanical key. (

P. 708)

Push the charging connector lock switch. (

P. 151)

The charging connector will be unlocked.

*

: Vehicles with smart lid & connector locking system only

Locking and unlocking the charging port lid

*

Locking and unlocking the charging connector

*

1

2

1

2

1

2

1

2

3

4

1

2


Content      ..     41      42      43      44     ..