Toyota Highlander Hybrid (2022 year). Manual in english - page 28
 

  Index      Toyota     Toyota Highlander Hybrid (2022 year). Manual in english


Search            copyright infringement  


Content      ..     26      27      28      29     ..


Toyota Highlander Hybrid (2022 year). Manual in english - page 28


447

6-3. Do-it-yourself maintenance

6

Maintena

nce
 a

nd ca

re

1

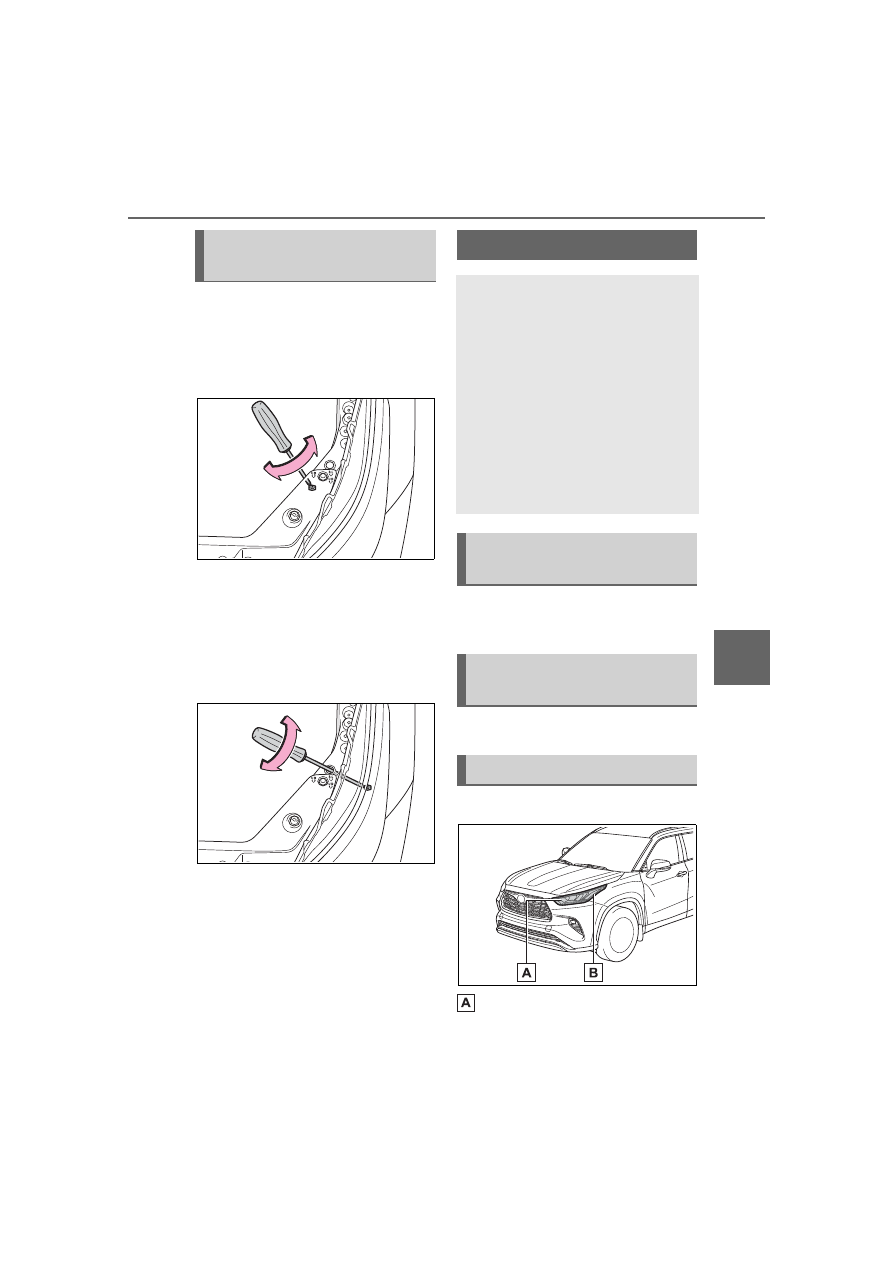
Using a Phillips-head screw-
driver, turn bolt A in either 
direction.

Remember the turning direction 

and the number of turns.

2

Turn bolt B the same number 
of turns and in the same 
direction as step 

1

.

If the headlight cannot be adjusted 

using this procedure, take the vehi-

cle to your Toyota dealer to adjust 

the headlight aim.

Check the wattage of the light 
bulb to be replaced. (

P.514)

P.533

Front (type A)

Front turn signal lights/park-
ing lights

Adjusting the headlight 
aim

Light bulbs

You may replace the follow-
ing bulbs by yourself. The 
difficulty level of replace-
ment varies depending on 
the bulb. If necessary bulb 
replacement seems difficult 
to perform, contact your 
Toyota dealer.

For more information about 
replacing other light bulbs, 
contact your Toyota dealer.

Preparing for light bulb 
replacement

Turning off the power 
back door main switch

Bulb locations

448

6-3. Do-it-yourself maintenance

Front side marker lights

Front (type B)

Front turn signal lights
Front side marker lights

Front (type C)

Front turn signal lights/park-
ing lights
Front side marker lights

Rear

Rear turn signal lights
Back-up lights

License plate lights

Lights that need to be 
replaced by your Toyota 
dealer

Headlight low beams

Headlight high beams

Daytime running lights (types 
A and C)

Daytime running lights/park-
ing lights (type B)

Front fog lights

Side turn signal lights

Tail lights/stop lights

Rear side marker lights

Tail lights

High mounted stoplight

Outer foot lights (if equipped)

LED lights

The lights other than the following 

lights each consist of a number of 

LEDs. If any of the LEDs burn out, 

take your vehicle to your Toyota 

dealer to have the light replaced.

Front turn signal lights/parking 

lights (types A and C)

Front turn signal lights (type B)

Front side marker lights

Rear turn signal lights

Back-up lights

License plate lights

Condensation build-up on the 

inside of the lens

Temporary condensation build-up 

on the inside of the light lens does 

not indicate a malfunction. Contact 

your Toyota dealer for more informa-

tion in the following situations:

Large drops of water have built up 

449

6-3. Do-it-yourself maintenance

6

Maintena

nce
 a

nd ca

re

on the inside of the lens.

Water has built up inside the light.

When replacing light bulbs

P.445

Front turn signal 
lights/parking lights (types 
A and C) and front turn sig-
nal lights (type B)

1

Turn the bulb base counter-
clockwise and remove it.

2

Remove the light bulb.

3

Install a new light bulb, and 
then install the bulb base to 
the light unit by inserting it 
and turning the bulb base 
clockwise.

After installing the bulb base, wig-

gle it lightly to make sure it is 

securely installed and turn the lights 

and turn signal lights on to visually 

check that there is no light leaking 

from between the bulb base and 

light unit.

Front side marker lights

1

Turn the bulb base counter-
clockwise and remove it.

2

Remove the light bulb.

3

Install a new light bulb, and 
then install the bulb base to 
the light unit by inserting it 
and turning the bulb base 
clockwise.

After installing the bulb base, wig-

gle it lightly to make sure it is 

securely installed and turn the lights 

Replacing light bulbs

450

6-3. Do-it-yourself maintenance

on to visually check that there is no 

light leaking from between the bulb 

base and light unit.

Rear turn signal lights

1

Open the back door and 
using a flathead screwdriver, 
remove the cover.

To prevent damage to the vehicle, 

wrap the tip of the flathead screw-

driver with tape, etc.

2

Remove the securing 2 
screws and light unit.

Remove the light unit by pulling it 

straight back from the rear of the 

vehicle.

3

Disconnect the wire harness.

4

Turn the bulb base counter-
clockwise and remove it.

5

Remove the light bulb.

6

Install a new light bulb, and 
then install the bulb base to 
the light unit by inserting it 
and turning it clockwise.

After installing the bulb base, wig-

gle it lightly to make sure it is 

securely installed and turn on the 

turn signal lights to visually check 

that there is no light leaking from 

between the bulb base and light 

451

6-3. Do-it-yourself maintenance

6

Maintena

nce
 a

nd ca

re

unit.

7

Install the light unit.

Align the 2 guides and push the 

light unit toward the front of the 

vehicle to install it.

8

Install the 2 screws.

9

Install the cover.

Back-up lights

1

Open the back door and 
remove the cover.

Using a flathead screwdriver, 

remove the cover.
To prevent damage to the vehicle, 

wrap the tip of the flathead screw-

driver with tape, etc.

2

Turn the bulb base counter-
clockwise and remove it.

452

6-3. Do-it-yourself maintenance

3

Remove the light bulb.

4

Install a new light bulb, and 
then install the bulb base to 
the light unit by inserting it 
and turning it clockwise.

After installing the bulb base, wig-

gle it lightly to make sure it is 

securely installed and turn on the 

back-up lights to visually check that 

there is no light leaking from 

between the bulb base and light 

unit.

5

Install the cover.

Align the tabs of the cover with the 

grooves and install the cover.

License plate lights

1

Remove the cover.

Using a flathead screwdriver, 

remove the cover.
To prevent damage to the vehicle, 

wrap the tip of the flathead screw-

driver with tape, etc.

2

Remove the lens.

Lens
Hook

453

6-3. Do-it-yourself maintenance

6

Maintena

nce
 a

nd ca

re

1

Insert a small flathead screw-
driver, etc. into either the 
right or left hole of the lens.

2

Push the screwdriver side-
ways in the direction of the 
arrow shown in the illustra-
tion, disengage the hook, and 
then remove the lens.

To prevent damage to the vehicle, 
wrap the tip of the screwdriver with 
tape, etc.

3

Remove the light bulb.

4

Install a new light bulb.

5

Install the lens.

Hooks

1

Fit the lens into either the 
right or left hooks.

2

Push the lens into place.

After installation, confirm that the 
lens is properly installed by gently 
pulling it.

6

Install the cover.

454

6-3. Do-it-yourself maintenance

WARNING

To prevent injury

Before performing any light bulb 

replacement procedure, be sure 

to turn the power switch off. Fail-

ure to do so may result in burns 

from hot components or a part of 

your body may get caught on an 

operating component, possibly 

causing serious injury.

Replacing light bulbs

Turn off the lights. Do not 

attempt to replace the bulb 

immediately after turning off the 

lights.The bulbs become very 

hot and may cause burns.

Do not touch the glass portion 

of the light bulb with bare 

hands. When it is unavoidable 

to hold the glass portion, use 

and hold with a clean dry cloth 

to avoid getting moisture and 

oils on the bulb. Also, if the bulb 

is scratched or dropped, it may 

blow out or crack.

Fully install light bulbs and any 

parts used to secure them. Fail-

ure to do so may result in heat 

damage, fire, or water entering 

the light unit. This may damage 

the lights or cause condensa-

tion to build up on the lens.

Do not attempt to repair or dis-

assemble light bulbs, connec-

tors, electric circuits or 

component parts.

Doing so may result in death or 

serious injury due to electric 

shock.

To prevent damage or fire

Make sure bulbs are fully 

seated and locked.

Check the wattage of the bulb 

before installing to prevent heat 

damage.

455

7

7

Whe

n tr

ouble

 ar

ises

When trouble arises

.

7-1. Essential information

Emergency flashers ....

456

If your vehicle has to be 

stopped in an emergency

..................................

456

If the vehicle is submerged 

or water on the road is ris-
ing .............................

457

7-2. Steps to take in an emer-

gency

If your vehicle needs to be 

towed.........................

459

If you think something is 

wrong ........................

462

If a warning light turns on or 

a warning buzzer sounds

..................................

464

If a warning message is dis-

played........................

474

If you have a flat tire....

479

If the hybrid system will not 

start ...........................

492

If you lose your keys ...

493

If the fuel filler door cannot 

be opened .................

494

If the electronic key does 

not operate properly ..

495

If the 12-volt battery is dis-

charged .....................

497

If your vehicle overheats

..................................

502

If the vehicle becomes stuck

..................................

506

456

7-1. Essential information

7-1.Essential information

Press the switch.

All the turn signal lights will flash. 
To turn them off, press the switch 
once again.

Emergency flashers

If the emergency flashers are 

used for a long time while the 

hybrid system is not operating 

(while the “READY” indicator is 

not illuminated), the 12-volt bat-

tery may discharge.

If any of the SRS airbags deploy 

(inflate) or in the event of a strong 

rear impact, the emergency flash-

ers will turn on automatically. 

The emergency flashers will turn 

off automatically after operating 

for approximately 20 minutes. To 

manually turn the emergency 

flashers off, press the switch 

twice. 

(The emergency flashers may not 

turn on automatically depending 

on the force of the impact and 

conditions of the collision.)

1

Steadily step on the brake 
pedal with both feet and 
firmly depress it.

Do not pump the brake pedal 

repeatedly as this will increase the 

effort required to slow the vehicle.

2

Shift the shift lever to N.

If the shift lever is shifted to N

3

After slowing down, stop the 
vehicle in a safe place by the 
road.

4

Stop the hybrid system.

If the shift lever cannot be 
shifted to N

3

Keep depressing the brake 
pedal with both feet to reduce 
vehicle speed as much as 
possible.

4

To stop the hybrid system, 
press and hold the power 
switch for 2 consecutive sec-
onds or more, or press it 

Emergency flashers

The emergency flashers are 
used to warn other drivers 
when the vehicle has to be 
stopped on the road due to 
a breakdown, etc.

Operating instructions

If your vehicle has to 

be stopped in an emer-

gency

Only in an emergency, such 
as if it becomes impossible 
to stop the vehicle in the 
normal way, stop the vehicle 
using the following proce-
dure:

Stopping the vehicle

457

7-1. Essential information

7

W

he

tro

ub

le

 ar

is

es

briefly 3 times or more in suc-
cession.

5

Stop the vehicle in a safe 
place by the road.

If the door can be opened, 
open the door and exit the 
vehicle.

If the door can not be opened, 
open the window using the 
power window switch and 
ensure an escape route.

If the window can be opened, 
exit the vehicle through the 
window.

If the door and window cannot 
be opened due to the rising 
water, remain calm, wait until 
the water level inside the 
vehicle rises to the point that 
the water pressure inside of 
the vehicle equals the water 
pressure outside of the vehi-
cle and then open the door 
after waiting for the rising 
water to enter the vehicle, and 
exit the vehicle. When the 

WARNING

If the hybrid system has to be 

turned off while driving

Power assist for the steering 

wheel will be lost, making the 

steering wheel heavier to turn. 

Decelerate as much as possible 

before turning off the hybrid sys-

tem.

If the vehicle is sub-

merged or water on 

the road is rising

This vehicle is not designed 
to be able to drive on roads 
that are deeply flooded with 
water. Do not drive on roads 
where the roads may be 
submerged or the water 
may be rising. It is danger-
ous to remain in the vehicle, 
if it anticipated that the vehi-
cle will be flooded or set a 
drift. Remain calm and fol-
low the following.

458

7-1. Essential information

outside water level exceeds 
half the height of the door, the 
door cannot be opened from 
the inside due to water pres-
sure.

Water level exceeds the floor

When the water level exceeds the 

floor and time has passed, the elec-

trical equipment will get damaged, 

the power windows will not operate, 

the engine and motor stop, and the 

vehicle may not be able to get mov-

ing.

Using an emergency escape 
hammer

*1

Laminated glass

*2

 is used in the 

windshield and the windows on this 

vehicle.

Laminated glass cannot be shat-
tered with an emergency hammer

*1

.

*1

:Contact your Toyota dealer or 

aftermarket accessory manufac-
turer for further information about 
an emergency hammer.

*2

:If equipped

How to distinguish laminated 

glass

When looking from the cross-sec-

tional view point, laminated glass is 

two sheets of glass pasted together.

Laminated glass
Tempered glass

WARNING

Caution while driving

Do not drive on roads where the 

roads may be submerged or the 

water may be rising. Otherwise 

the vehicle may be damaged and 

cannot move, as well as become 

flooded and set a drift, which may 

lead to death.

459

7-2. Steps to take in an emergency

7

W

he

tro

ub

le

 ar

is

es

7-2.Steps to take in an emergency

If your vehicle needs 

to be towed

If towing is necessary, we 
recommend having your 
vehicle towed by your Toy-
ota dealer or commercial 
towing service, using a 
wheel-lift type truck or flat-
bed truck.

Use a safety chain system 
for all towing, and abide by 
all state/provincial and local 
laws.

If towing your vehicle with a 
wheel-lift type truck from 
the front, the vehicle’s rear 
wheels and axles must be in 
good conditions. (

P.461)

If they are damaged, use a 
towing dolly or flatbed 
truck.

WARNING

Observe the following precau-

tions.

Failure to do so may result in 

death or serious injury.

When towing the vehicle

2WD models

Be sure to transport the vehicle 

with the front wheels raised or 

with all four wheels raised off the 

ground. If the vehicle is towed 

with the front wheels contacting 

the ground, the drivetrain and 

related parts may be damaged or 

electricity generated by the opera-

tion of the motor may cause a fire 

to occur depending on the nature 

of the damage or malfunction.

AWD models

Be sure to transport the vehicle 

with all four wheels raised off the 

ground. If the vehicle is towed 

with the tires contacting the 

ground, the drivetrain or related 

parts may be damaged, the vehi-

cle may fly off the truck, or elec-

tricity generated by the operation 

of the motor may cause a fire to 

occur depending on the nature of 

the damage or malfunction.

460

7-2. Steps to take in an emergency

The following may indicate a 
problem with your transmission. 
Contact your Toyota dealer or 
commercial towing service 
before towing.

The hybrid system warning 
message is shown on the 
multi-information display and 
the vehicle does not move.

The vehicle makes an abnor-
mal sound.

WARNING

While towing

When towing using cables or 

chains, avoid sudden starts, etc. 

which place excessive stress on 

the towing eyelets, cables or 

chains. The towing eyelets, 

cables or chains may become 

damaged, broken debris may hit 

people, and cause serious dam-

age.

NOTICE

To prevent damage to the 

vehicle when towing using a 

wheel-lift type truck

When raising the vehicle, ensure 

adequate ground clearance for 

towing at the opposite end of the 

raised vehicle. Without adequate 

clearance, the vehicle could be 

damaged while being towed.

To prevent damage to the 

vehicle when towing with a 

sling-type truck

Do not tow with a sling-type truck, 

either from the front or rear.

To prevent damage to the 

vehicle during emergency 

towing

Do not secure cables or chains to 

the suspension components.

Recreational towing (behind 

motor home, etc.)

Never dinghy tow your vehicle to 

prevent causing serious damage 

to the Hybrid AWD system (AWD 

models) and transmission. 

(

P.212)

Situations when it is nec-
essary to contact dealers 
before towing

461

7-2. Steps to take in an emergency

7

W

he

tro

ub

le

 ar

is

es

From the front (2WD models)

Release the parking brake.

Turn automatic mode off. (

P.224)

From the front (AWD models)

Use a towing dolly under the 
rear wheels.

From the rear

Use a towing dolly under the 
front wheels.

When using a flat-bed truck to 
transport the vehicle, use tire 
strapping belts. Refer to the 
owner's manual of the flat-bed 
truck for the tire strapping 
method.
In order to suppress vehicle 
movement during transporta-
tion, set the parking brake and 
turn the power switch off.

A driver must be in the vehicle to 
steer and operate the brakes. 
The vehicle’s wheels, drive train, 
axles, steering and brakes must 

Towing with a wheel-lift 
type truck

NOTICE

Towing with a sling-type truck

Do not tow with a sling-type truck 

to prevent body damage.

2WD models

AWD models

Using a flatbed truck

Emergency towing

462

7-2. Steps to take in an emergency

be in good condition.

Fluid leaks under the vehicle
(Water dripping from the air 
conditioning after use is nor-
mal.)

Flat-looking tires or uneven 
tire wear

Engine coolant temperature 
gauge needle continually 
points higher than normal

Changes in exhaust sound

Excessive tire squeal when 
cornering

Strange noises related to the 
suspension system

Pinging or other noises 
related to the hybrid system

Engine missing, stumbling or 
running roughly

Appreciable loss of power

Vehicle pulls heavily to one 

If you think something 

is wrong

If you notice any of the fol-
lowing symptoms, your 
vehicle probably needs 
adjustment or repair. Con-
tact your Toyota dealer as 
soon as possible.

Visible symptoms

Audible symptoms

Operational symptoms


Content      ..     26      27      28      29     ..