Toyota Highlander Hybrid (2022 year). Manual in english - page 24
 

  Index      Toyota     Toyota Highlander Hybrid (2022 year). Manual in english


Search            copyright infringement  


Content      ..     22      23      24      25     ..


Toyota Highlander Hybrid (2022 year). Manual in english - page 24


383

5-5. Using the other interior features

5

Interior

 featur

es

Luggage compartment

When turning the power 
outlets off

1

Turn the connected devices 
off.

2

Press the “AC120V” switch to 
turn the power outlets off.

3

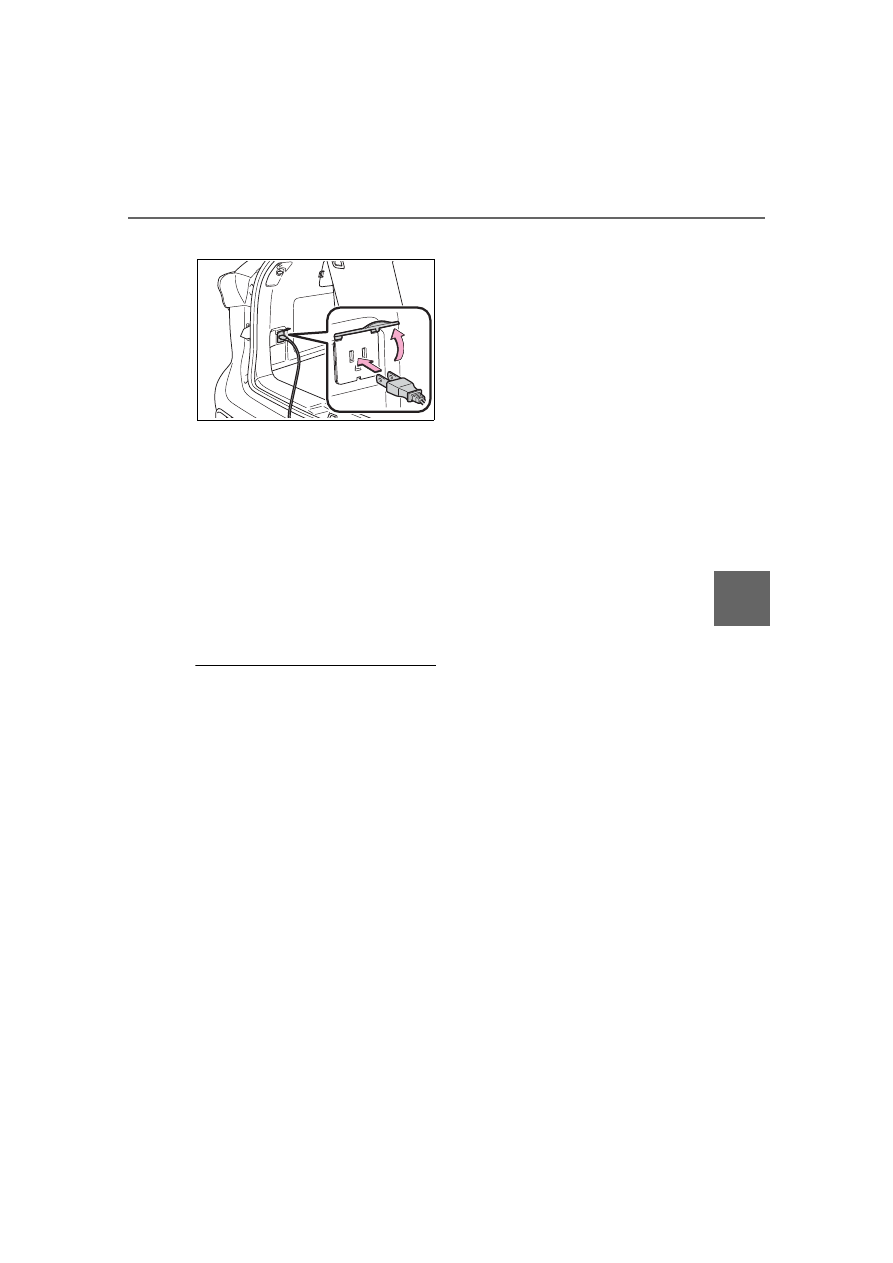
Disconnect each plug from 
the power outlets.

4

Close the lid of each power 
outlet.

The power outlet can be used 

when

The READY indicator is illuminated.

Rules/regulations regarding 

idling stop

The engine will start automatically to 

charge the hybrid battery (traction 

battery) if its charge becomes low. 

In some municipalities, if the engine 

starts while the vehicle is parked or 

stopped, it may violate local rules or 

regulations regarding idling stop and 

you may be penalized. Make sure to 

check the local rules and regula-

tions before using the power outlets 

while the vehicle is parked or 

stopped.

Power outlets

When connecting a device, make 

sure that the total power con-

sumption of all devices connected 

to the 120 VAC power outlets is 

less than 1500 W. If a device is 

connected and the power con-

sumption is exceeded, a protec-

tion circuit will cut the power 

supply and the power outlets will 

not be able to be used.

Depending on the device to be 

used, the current flow may be high 

and the initial peak wattage may 

exceed 1500 W.

In this case, the protection circuit 

may operate, and the power out-

lets may not be able to be used.

Depending on the connected 

device, it may cause interference 

with TV and radio broadcasts.

The voltage of the power outlets 

cannot be measured with a com-

mercially available electrical tes-

ter. If it is necessary to check the 

voltage, have the vehicle 

inspected by your Toyota dealer.

While a power outlet is being 

used, a cooling fan sound may be 

heard from near a rear seat. This 

does not indicate a malfunction.

Devices which may not operate 

correctly

The following 120 VAC devices may 

not operate properly even if their 

power consumption is less than 

1500 W:

Devices with high initial peak watt-

age

Measuring devices that process 

precise data

Devices that require an extremely 

stable power supply

Devices that require a constant 

power supply from the power out-

let, such as a device with a timer.

When the 120 VAC power out-

lets cannot be used

If the “AC120V” switch is pressed 

but the switch indicator does not illu-

minate, the protection circuit may 

have operated.
In this case, perform the appropriate 

procedures as follows.

384

5-5. Using the other interior features

Disconnect the plug of each 

device from the power outlets, 

check that the total power con-

sumption of all devices to be con-

nected to the power outlets is less 

than 1500 W, reconnect the 

devices and then press the 

“AC120V” switch again.

Disconnect the plug of each 

device from the power outlets, 

check that the devices are not 

malfunctioning, reconnect the 

devices and then press the 

“AC120V” switch again.

Check the charge of the hybrid 

battery (traction battery) (

P.117). 

If the charge is low, shift the shift 

lever to P, allow the engine to run 

to charge the hybrid battery (trac-

tion battery), and then press the 

“AC120V” switch again.

If the temperature inside the vehi-

cle is high, such as after the vehi-

cle has been parked in the sun, 

use the air conditioning system to 

sufficiently ventilate or cool the 

interior, and then press the 

“AC120V” switch again.

If the vehicle has been stopped in 

a cold area, to protect the hybrid 

battery (traction battery), the 

power outlets may not be able to 

be used. In this case, drive the 

vehicle for a while to warm up the 

hybrid battery (traction battery), 

and then press the “AC120V” 

switch again.

If the power outlets cannot be used 

even after performing the appropri-

ate procedures above, have the 

vehicle inspected by your Toyota 

dealer.

WARNING

For safe use

Observe the following precau-

tions.

Failure to do so may lead to an 

accident, resulting in death or 

serious injury.

Do not use devices such as the 

following when driving:

• Devices which cannot be prop-

erly secured within the vehicle.

• Devices which may distract the 

driver and be a hindrance to 

safe driving, such as a TV, DVD 

player, etc.

• Unsecured devices which gen-

erate heat, such as a toaster, 

microwave, electric heater, elec-

tric kettle, coffee maker, etc., as 

they may cause burns or a fire 

in the case of sudden braking or 

an accident.

• Devices which may fall under 

the pedals and prevent the 

brake pedal from being 

depressed.

Do not use devices which pro-

duce steam while the windows 

are closed. Doing so may cause 

the windows to fog up, reducing 

visibility and making it difficult to 

drive safely. Also, the steam 

may damage or negatively 

affect other devices.

Do not connect a malfunctioning 

device to a power outlet, as 

doing so may cause the power 

outlets to become inoperable.

Do not disconnect the plug of a 

device while your hands are wet 

or insert a pin or other object 

into the power outlet. Also, if a 

liquid or snow is on the power 

outlet, dry the outlet before 

using it.

Do not attempt to modify, disas-

semble or repair a power outlet. 

Also, do not replace the 120 

VAC inverter with a commer-

cially available one. For infor-

mation on repairs, contact your 

Toyota dealer.

385

5-5. Using the other interior features

5

Interior

 featur

es

WARNING

Do not let children touch the 

power outlets.

Keep the power outlets free of 

dust and foreign matter.

If the plug of a device fits 

loosely in a power outlet, even 

though it is fully inserted, 

replace the power outlet. For 

information on replacement, 

contact your Toyota dealer.

Using the power outlets while 

parked or stopped

Observe the following precau-

tions.

Failure to do so may lead to an 

accident, possibly resulting in 

death or serious injury.

Make sure to engage the park-

ing brake and shift the shift lever 

to P.

Do not leave the vehicle unat-

tended while the READY indica-

tor is illuminated and a device is 

connected to a power outlet.

Make sure that the hood is 

closed. As the engine will start 

automatically depending on the 

condition of the vehicle, make 

sure that nothing is left near or 

contacting the exhaust pipes. 

Also, do not put your head or 

hands anywhere inside the 

engine compartment, as the 

cooling fan may operate sud-

denly. Keep hands and clothing 

(especially a tie, scarf, etc.) 

away from the fan as they may 

get caught in a fan.

Do not use the power outlets in 

an area with poor ventilation or 

an enclosed area, such as a 

garage without a ventilation or 

exhaust system, or in an area 

where the vehicle may become 

surrounded by snow, as the 

exhaust gasses may accumu-

late, causing a lack of oxygen.

Do not use the power outlets if 

the vehicle has a vehicle cover 

installed.

Do not sleep in the vehicle while 

using devices such as an elec-

tric heater.

Devices to be connected

Make sure to read any instruction 

manual which came with a device 

and observe any warnings on the 

device. Do not connect a device 

to a power outlet if the device is 

malfunctioning or its plug is dam-

aged.

Do not use power outlets for med-

ical devices, as the output of the 

power outlet may be cut, depend-

ing on the condition of the vehicle.

NOTICE

Observe the following precau-

tions.

Failure to do so may lead to the 

power outlets not operating cor-

rectly or damage to the vehicle or 

a connected device.

To avoid short circuit or mal-

function

Do not set a device which gen-

erates heat near the interior 

components or on a seat. Heat 

may cause these parts to melt 

or burn.

386

5-5. Using the other interior features

1

To set the visor in the forward 
position, flip it down.

2

To set the visor in the side 
position, flip down, unhook, 
and swing it to the side.

3

To use the side extender, 
place the visor in the side 
position, then slide it back-
ward.

Open the cover.

The light turns on when the cover is 
opened.

To prevent 12-volt battery dis-

charge

If the vanity lights remain on when 

the power switch is turned off, the 

lights will go off automatically after 

20 minutes.

NOTICE

Do not use devices which are 

sensitive to vibration or heat in 

the vehicle.

These devices may malfunction 

due to vibration while driving or 

heat while the vehicle is parked 

in the sun.

When not using a power outlet, 

make sure to close the cover. If 

foreign matter or a liquid enters 

the power outlet, it may cause a 

malfunction or short circuit.

Do not use a multi-point outlet 

adapter as doing so may over-

load the power outlet.

When the ambient tempera-

ture is high

If the temperature inside the vehi-

cle is high, such as after the vehi-

cle has been parked in the sun, 

the power outlets may not be able 

to be used. Sufficiently ventilate 

the interior or use the air condi-

tioning system to cool the interior 

before attempting to use the 

power outlets.

When the ambient tempera-

ture is low

If the vehicle has been stopped in 

a cold area, to protect the hybrid 

battery (traction battery), the 

power outlets may not be able to 

be used. In this case, drive the 

vehicle for a while to warm up the 

hybrid battery (traction battery).

Sun visors

Vanity mirrors

387

5-5. Using the other interior features

5

Interior

 featur

es

1

Push the lid.

2

Push the lid back up half way.

To use the overhead console 

from the conversation mirror 

state

Fully close the lid, then open it 

again. (

P.366)

1

Pull the tab up.

2

Hook the sunshade on to the 
anchors.

To lower the sunshade, pull the tab 

up slightly to unhook the shade 

from the anchors, and lower it 

slowly.

NOTICE

To prevent the 12-volt battery 

from being discharged

Do not leave the vanity lights on 

for extended periods while the 

hybrid system is off.

Conversation mirror

Rear door sunshades (if 
equipped)

NOTICE

To ensure normal operation 

of the sunshades

Do not put anything in an area 

where it may interfere with the 

operation of a rear door sun-

shade.

To prevent damage to the rear 

door sunshades, do not apply 

excessive load or attach items 

to the rear door sunshades.

388

5-5. Using the other interior features

*

: If equipped

HomeLink

®

 programming pro-

cedure

The programming procedures can 

also be found at the following URL.
Website: www.homelink.com/toyota

For support, contact customer sup-

port at the following.
Help Line: 1-800-355-3515

The HomeLink

®

 wireless control 

system in your vehicle has 3 
buttons which can be pro-
grammed to operate 3 different 
devices. Refer to the program-
ming methods on the following 
pages to determine the method 
which is appropriate for the 
device.

Vehicles with auto anti-glare 
inside rear view mirror

HomeLink

®

 indicator light

Garage door operation indi-
cators

HomeLink

®

 icon

Illuminates while HomeLink

®

 is 

operating.

Buttons

Vehicles with Digital Rearview 
Mirror

HomeLink

®

 logo

Appears while HomeLink

®

 is oper-

ating. When the menu button 
(

P.167) is pressed, the logo dis-

appears even while the HomeLink

®


is operating.

Garage door operation indi-
cators

HomeLink

®

 indicator light

Garage door opener

*

The garage door opener can 
be programmed using the 
HomeLink

®

 to operate 

garage doors, gates, entry 
doors, door locks, home 
lighting systems, security 
systems, and other devices.

System components

389

5-5. Using the other interior features

5

Interior

 featur

es

Illuminates above each button 
selected.

Buttons

Codes stored in the Home-
Link

®

 memory

The registered codes are not 

erased even if the 12-volt battery 

cable is disconnected.

If learning failed when registering 
a different code to a HomeLink

®


button that already has a code 

registered to it, the already regis-

tered code will not be erased.

Certification for the garage door opener

WARNING

When programming a garage 

door or other remote control 

device

The garage door or other device 

may operate, so ensure people 

and objects are out of danger to 

prevent potential harm.

390

5-5. Using the other interior features

Before programming Home-
Link

®

During programming, it is pos-
sible that garage doors, 
gates, or other devices may 
operate. For this reason, 
make sure that people and 
objects are clear of the 
garage door or other devices 
to prevent injury or other 
potential harm.

It is recommended that a new 
battery be placed in the 
remote control transmitter for 
more accurate programming.

Garage door opener motors 
manufactured after 1995 may 
be equipped with rolling code 

protection. If this is the case, 
you may need a stepladder or 
other sturdy, safe device to 
reach the “Learn” or “Smart” 
button on the garage door 
opener motor.

Programming HomeLink

®

Steps 

1

 through 

3

 must be per-

formed within 60 seconds, oth-
erwise the HomeLink

®

 indicator 

light will stop flashing and pro-
gramming will not be success-
fully completed.

1

Press and release the Home-
Link

®

 button you want to pro-

gram and check that the 
HomeLink

®

 indicator light 

flashes (orange).

2

Point the remote control 
transmitter for the device at 
the rear view mirror, 1 to 3 in. 
(25 to 75 mm) from the 
HomeLink

®

 buttons.

Keep the HomeLink

®

 indicator light 

in view while programming.

Vehicles with auto anti-glare 
inside rear view mirror

WARNING

Conforming to federal safety 

standards

Do not use the HomeLink

®

 com-

patible transceiver with any 

garage door opener or device that 

lacks safety stop and reverse fea-

tures as required by federal safety 

standards.
This includes any garage door 

that cannot detect an interfering 

object. A door or device without 

these features increases the risk 

of death or serious injury.

When operating or program-

ming HomeLink

®

Never allow a child to operate or 

play with the HomeLink

®

 buttons.

Programming the Home-
Link

®

391

5-5. Using the other interior features

5

Interior

 featur

es

Vehicles with Digital Rearview 
Mirror

3

Program a device.

Vehicles with auto anti-glare 
inside rear view mirror

Vehicles with Digital Rearview 
Mirror

Programming a device other 
than an entry gate (for U.S.A. 
owners)

Press and hold the remote con-
trol transmitter button until the 
HomeLink

®

 indicator light 

changes from slowly flashing 
orange to rapidly flashing green 
(rolling code) or continuously lit 
green (fixed code), then release 
the button.

Programming an entry gate 
(for U.S.A. owners)/Program-
ming a device in the Cana-
dian market

Press and release the remote 
control transmitter button at 2 
second intervals, repeatedly, 
until the HomeLink

®

 indicator 

light changes from slowly flash-
ing (orange) to rapidly flashing 
(green) (rolling code) or continu-
ously lit (green) (fixed code).

4

Test the HomeLink

®

 opera-

tion by pressing the newly 
programmed button and 
observing the indicator light:

HomeLink

®

 indicator light illu-

minates: Programming of a 
fixed code device has com-
pleted. The garage door or 
other device should operate 
when a HomeLink

®

 button is 

pressed and released.

HomeLink

®

 indicator light 

flashes rapidly: The garage 
door opener motor or other 
device is equipped with a roll-
ing code. To complete pro-
gramming, firmly press and 
hold the HomeLink

®

 button 

for 2 seconds then release it.

If the garage door or other 

392

5-5. Using the other interior features

device does not operate, pro-
ceed to “Programming a roll-
ing code system”.

5

Repeat the steps above to 
program another device for 
any of the remaining Home-
Link

®

 buttons.

Programming a rolling code 
system

Two or more people may be 
necessary to complete rolling 
code programming.

1

Locate the “Learn” or “Smart” 
button on the garage door 
opener motor in the garage.

This button can usually be found 

where the hanging antenna wire is 

attached to the unit. The name and 

color of the button may vary by 

manufacturer. Refer to the owner’s 

manual supplied with the garage 

door opener motor for details.

2

Press and release the 
“Learn” or “Smart” button.

Perform 

3

 within 30 seconds after 

performing 

2

.

3

Press and hold the desired 
HomeLink

®

 button (inside the 

vehicle) for 2 seconds and 
release it. Repeat this 
sequence 
(press/hold/release) up to 3 
times to complete program-
ming.
If the garage door opener 
motor operates when the 
HomeLink

®

 button is 

pressed, the garage door 
opener motor recognizes the 
HomeLink

®

 signal.

Vehicles with auto anti-glare 
inside rear view mirror

393

5-5. Using the other interior features

5

Interior

 featur

es

Vehicles with Digital Rearview 
Mirror

Enabling 2-way communi-
cation with a garage door 
(only available for compati-
ble devices)

When enabled, 2-way communi-
cation allows you to check the 
status of the opening and clos-
ing of a garage door through 
indicators in your vehicle.
2-way communication is only 
available if the garage door 
opener motor used is a compati-
ble device. (To check device 
compatibility, refer to 
www.homelink.com.)

1

Within 5 seconds after pro-
gramming the garage door 
opener has been completed, 
if the garage door opener 
motor is trained to Home-
Link

®

, both garage door 

operation indicators will flash 
rapidly (green) and the light 
on the garage door opener 
motor will blink twice, indicat-
ing that 2-way communica-
tion is enabled.

If the indicators do not flash, per-

form 

2

 and 

3

 within the first 10 

presses of the HomeLink

®

 button 

after programming has been com-

pleted.

2

Press a programmed Home-
Link

®

 button to operate a 

garage door.

3

Within 1 minute of pressing 
the HomeLink

®

 button, after 

the garage door operation 
has stopped, press the 
“Learn” or “Smart” button on 
the garage door opener 
motor. Within 5 seconds of 
the establishment of 2-way 
communication with the 
garage door opener, both 
garage door operation indica-
tors in the vehicle will flash 
rapidly (green) and the light 
on the garage door opener 
motor will blink twice, indicat-
ing that 2-way communica-
tion is enabled.

Reprogramming a single 
HomeLink

®

 button

When the following procedure is 
performed, buttons which 
already have devices registered 
to them can be overwritten:

1

Press and hold the desired 
HomeLink

®

 button.

2

When the HomeLink

®

 indica-

tor starts flashing orange, 
release the HomeLink

®

 but-

ton and perform “Program-
ming HomeLink

®

” 

1

 (it takes 

20 seconds for the Home-

394

5-5. Using the other interior features

Link

®

 indicator to start flash-

ing).

Before programming

Install a new battery in the trans-

mitter.

The battery side of the transmitter 

must be pointed away from the 
HomeLink

®

 buttons.

Press the appropriate Home-
Link

®

 button. The HomeLink

®


indicator light should turn on.
The status of the opening and 
closing of a garage door is 
shown by the garage door 
opener indicators.

Vehicles with auto anti-glare 
inside rear view mirror

Opening
Closing

Vehicles with Digital Rearview 
Mirror

Opening
Closing

This function is only available if the 
garage door opener motor used is a 
compatible device. (To check 
device compatibility, refer to 
www.homelink.com.)

The indicators can operate 
within approximately 820 ft. (250 
m) of the garage door. However, 
if there are obstructions 
between the garage door and 
the vehicle, such as houses and 
trees, feedback signals from the 
garage door may not be 
received.
To recall the previous door oper-
ation status, press and release 
either HomeLink

®

 buttons 


Operating HomeLink

®

Color

Status

Orange (flash-

ing)

Currently open-

ing/closing

Green

Opening/closing 

has completed

Red (flashing)

Feedback sig-

nals cannot be 

received

395

5-5. Using the other interior features

5

Interior

 featur

es

and 

 or 

 and 

 (vehicles 

with auto anti-glare inside rear 
view mirror), 

 and 


or 

 and 

 (vehicles 

with Digital Rearview Mirror), 
simultaneously. The last 
recorded status will be dis-
played for 3 seconds.

Press and hold the 2 outside 
buttons for 10 seconds until the 
HomeLink

®

 indicator light 

changes from continuously lit 
(orange) to rapidly flashing 
(green).

If you sell your vehicle, be sure to 
erase the programs stored in the 
HomeLink

®

 memory.

Vehicles with auto anti-glare 
inside rear view mirror

Vehicles with Digital Rearview 
Mirror

Erasing the entire Home-
Link

®

 memory (all three 

codes)

396

5-5. Using the other interior features

397

6

6

Maintena

nce
 a

nd ca

re

Maintenance and care

.

6-1. Maintenance and care

Cleaning and protecting the 

vehicle exterior ..........

398

Cleaning and protecting the 

vehicle interior ...........

401

6-2. Maintenance

Maintenance requirements

..................................

404

General maintenance..

406

Emission inspection and 

maintenance (I/M) pro-
grams ........................

408

6-3. Do-it-yourself mainte-

nance

Do-it-yourself service pre-

cautions.....................

410

Hood ...........................

412

Positioning a floor jack

..................................

413

Engine compartment...

414

12-volt battery .............

419

Tires ............................

422

Tire inflation pressure..

434

Wheels ........................

436

Air conditioning filter....

437

Cleaning the hybrid battery 

(traction battery) air intake 
vents and filter...........

439

Electronic key battery..

442

Checking and replacing 

fuses..........................

444

Headlight aim ..............

446

Light bulbs...................

447

398

6-1. Maintenance and care

6-1.Maintenance and care

Working from top to bottom, 
liberally apply water to the 
vehicle body, wheel wells and 
underside of the vehicle to 
remove any dirt and dust.

Wash the vehicle body using 
a sponge or soft cloth, such 
as a chamois.

For hard-to-remove marks, 
use car wash soap and rinse 
thoroughly with water.

Wipe away any water.

Wax the vehicle when the 
waterproof coating deterio-
rates.

If water does not bead on a clean 
surface, apply wax when the vehi-
cle body is cool.

Automatic car washes

Before washing the vehicle:

• Fold the mirrors

• Turn off the power back door
Start washing from the front of the 

vehicle. Extend the mirrors before 

driving.

Brushes used in automatic car 

washes may scratch the vehicle 

surface, parts (wheel, etc.) and 

harm your vehicle’s paint.

Rear spoiler may not be washable 

in some automatic car washes. 

There may also be an increased 

risk of damage to vehicle.

High pressure car washes

As water may enter the cabin, do 

not bring the nozzle tip near the 

gaps around the doors or perimeter 

of the windows, or spray these 

areas continuously.

When using a car wash

If the door handle becomes wet 

while the electronic key is within the 

effective range, the door may lock 

and unlock repeatedly. In that case, 

follow the following correction pro-

cedures to wash the vehicle:

Place the key in a position 6 ft. (2 

m) or more separate from the 

vehicle while the vehicle is being 

washed. (Take care to ensure that 

the key is not stolen.)

Set the electronic key to bat-

tery-saving mode to disable the 

smart key system. (

P.147)

Wheels and wheel ornaments

Remove any dirt immediately by 

using a neutral detergent.

Wash detergent off with water 

immediately after use.

To protect the paint from damage, 

make sure to observe the follow-

ing precautions.

• Do not use acidic, alkaline or 

abrasive detergent

• Do not use hard brushes

• Do not use detergent on the 

wheels when they are hot, such 

as after driving or parking in hot 

weather

Brake pads and calipers

Rust may form if the vehicle is 

parked with wet brake pads or disc 

rotors, causing them to stick. Before 

parking the vehicle after it is 

washed, drive slowly and apply the 

brakes several times to dry the 

parts.

Cleaning and protect-

ing the vehicle exte-

rior

Perform cleaning in a man-
ner appropriate to each 
component and its material.

Cleaning instructions


Content      ..     22      23      24      25     ..