Toyota Venza Hybrid (2021 year). Manual in english - part 8
 

  Index      Toyota     Toyota Venza Hybrid (2021 year). Manual in english


Search            copyright infringement  


Content      ..     6      7      8     


Toyota Venza Hybrid (2021 year). Manual in english - part 8


462

7-2. Steps to take in an emergency

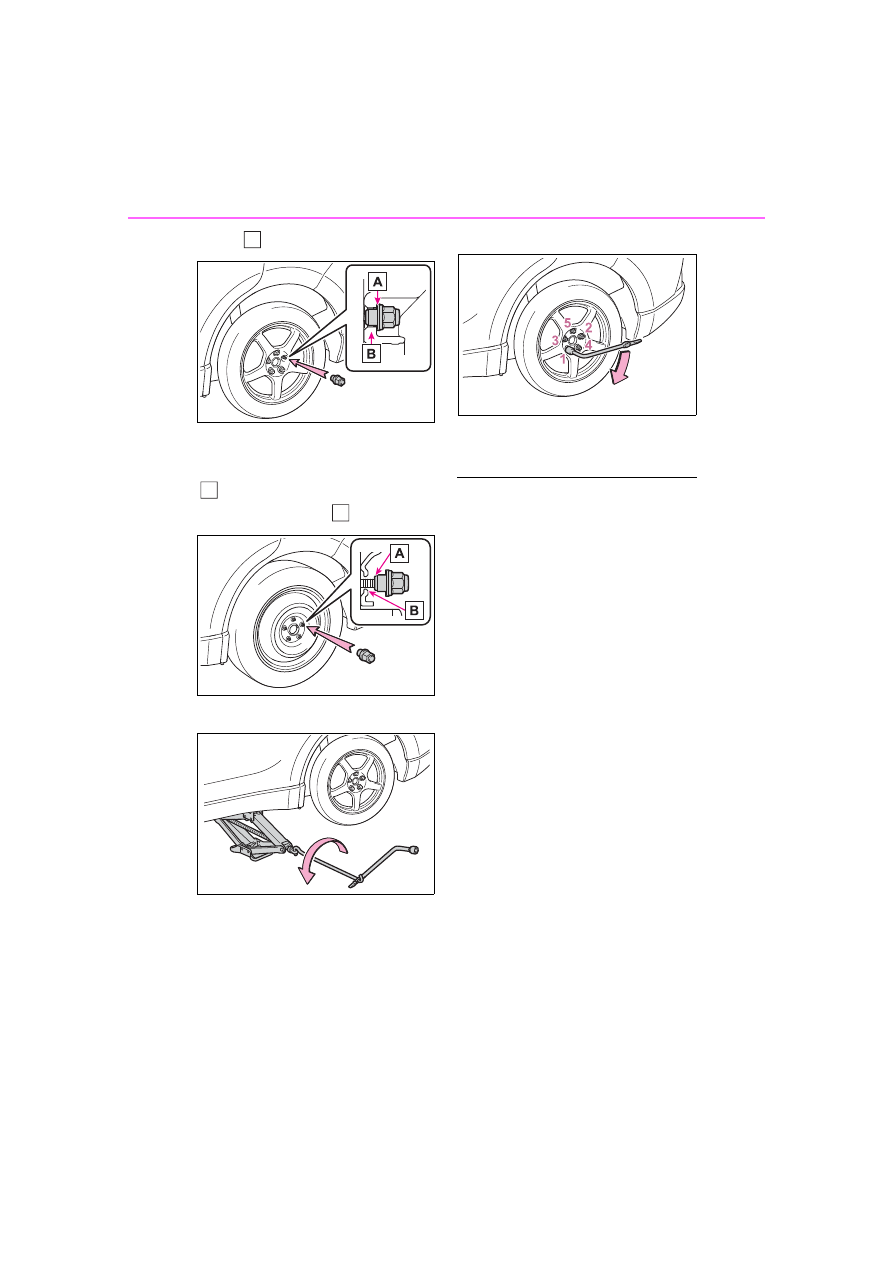
wheel (

).

When replacing an aluminum wheel 

with a steel wheel, tighten the 

wheel nuts until the tapered portion 
(

) comes into loose contact with 

the disc wheel seat (

).

3

Lower the vehicle.

4

Firmly tighten each wheel nut 
two or three times in the 
order shown in the illustra-
tion.

Tightening torque:

76 ft•lbf (103 N•m, 10.5 kgf•m)

5

Stow the flat tire, tire jack and 
all tools.

The compact spare tire

The compact spare tire is identi-

fied by the label “TEMPORARY 

USE ONLY” on the tire sidewall.

Use the compact spare tire tem-

porarily, and only in an emer-

gency.

Make sure to check the tire infla-

tion pressure of the compact 

spare tire. (

P.485)

When using the compact spare 

tire

As the compact spare tire is not 

equipped with a tire pressure warn-

ing valve and transmitter, low infla-

tion pressure of the spare tire will 

not be indicated by the tire pressure 

warning system. Also, if you replace 

the compact spare tire after the tire 

pressure warning light comes on, 

the light remains on.

When the compact spare tire is 

attached

The vehicle height may become 

lower when driving with the compact 

spare tire compared to when driving 

with standard tires.

If you have a flat front tire on a 

road covered with snow or ice

Install the compact spare tire on one 

of the rear wheels of the vehicle. 

Perform the following steps and fit 

tire chains to the front tires:

B

A

B

-------------------------------------------------------------------------------------------------------------------------------------------------------------

463

7-2. Steps to take in an emergency

7

Whe

n tr

ouble

 a

rises

1

Replace a rear tire with the com-

pact spare tire.

2

Replace the flat front tire with the 

tire removed from the rear of the 

vehicle.

3

Fit tire chains to the front tires.

WARNING

When using the compact 

spare tire

Remember that the compact 

spare tire provided is specifi-

cally designed for use with your 

vehicle. Do not use your com-

pact spare tire on another vehi-

cle.

Do not use more than one com-

pact spare tire simultaneously.

Replace the compact spare tire 

with a standard tire as soon as 

possible.

Avoid sudden acceleration, 

abrupt steering, sudden brak-

ing and shifting operations that 

cause sudden engine braking.

When the compact spare tire 

is attached

The vehicle speed may not be 

correctly detected, and the follow-

ing systems may not operate cor-

rectly:
• ABS & Brake assist

• VSC

• TRAC

• Dynamic radar cruise control 

with full-speed range

• PCS (Pre-Collision System)

• EPS

• LTA (Lane Tracing Assist)

• Tire pressure warning system

• AHB (Automatic High Beam)

• BSM (Blind Spot Monitor)

• Panoramic view monitor (if 

equipped)

• Toyota parking assist monitor (if 

equipped)

• Intuitive parking assist (if 

equipped)

• PKSB (Parking Support Brake) 

(if equipped)

• Navigation system (if equipped)

Also, not only can the following 

systems not be utilized fully, but 

they may actually negatively 

affect the drive-train components:
• E-Four (Electronic On-Demand 

AWD system)

Speed limit when using the 

compact spare tire

Do not drive at speeds in excess 

of 50 mph (80 km/h) when a com-

pact spare tire is installed on the 

vehicle.
The compact spare tire is not 

designed for driving at high 

speeds. Failure to observe this 

precaution may lead to an acci-

dent causing death or serious 

injury.

After using the tools and jack

Before driving, make sure all the 

tools and jack are securely in 

place in their storage location to 

reduce the possibility of personal 

injury during a collision or sudden 

braking.

-------------------------------------------------------------------------------------------------------------------------------------------------------------

464

7-2. Steps to take in an emergency

One of the following may be the 
cause of the problem:

The electronic key may not be 
functioning properly. 
(

P.467)

There may not be sufficient 
fuel in the vehicle’s tank.
Refuel the vehicle. (

P.226)

There may be a malfunction 
in the immobilizer system. 
(

P.77)

There may be a malfunction 
in the steering lock system.

The hybrid system may be 
malfunctioning due to an elec-
trical problem such as elec-
tronic key battery depletion or 
a blown fuse. However, 
depending on the type of mal-
function, an interim measure 
is available to start the hybrid 
system. (

P.465)

NOTICE

Be careful when driving over 

bumps with the compact 

spare tire installed on the 

vehicle

The vehicle height may become 

lower when driving with the com-

pact spare tire compared to when 

driving with standard tires. Be 

careful when driving over uneven 

road surfaces.

Driving with tire chains and 

the compact spare tire

Do not fit tire chains to the com-

pact spare tire.
Tire chains may damage the vehi-

cle body and adversely affect driv-

ing performance.

When replacing the tires

When removing or fitting the 

wheels, tires or the tire pressure 

warning valve and transmitter, 

contact your Toyota dealer as the 

tire pressure warning valve and 

transmitter may be damaged if not 

handled correctly.

If the hybrid system 

will not start

Reasons for the hybrid sys-
tem not starting vary 
depending on the situation. 
Check the following and 
perform the appropriate 
procedure:

The hybrid system will not 
start even though the cor-
rect starting procedure is 
being followed (

196)

-------------------------------------------------------------------------------------------------------------------------------------------------------------

465

7-2. Steps to take in an emergency

7

Whe

n tr

ouble

 a

rises

There is a possibility that the 
temperature of the hybrid bat-
tery (traction battery) is 
extremely low (approximately 
below -22°F [-30°C]). (

P.73, 

197)

One of the following may be the 
cause of the problem:

The 12-volt battery may be 
discharged. (

P.469)

The 12-volt battery terminal 
connections may be loose or 
corroded. (

P.396)

One of the following may be the 
cause of the problem:

The 12-volt battery may be 
discharged. (

P.469)

One or both of the 12-volt bat-
tery terminals may be discon-
nected. (

P.396)

Contact your Toyota dealer if 
the problem cannot be repaired, 
or if repair procedures are 
unknown.

When the hybrid system does 
not start, the following steps can 
be used as an interim measure 
to start the hybrid system if the 
power switch is functioning nor-
mally.
Do not use this starting proce-
dure except in cases of emer-
gency.

1

Pull the parking brake switch 
to check that the parking 
brake is set. (

P.208)

Parking brake indicator will come 

on.

2

Shift the shift lever to P.

3

Turn the power switch to 
ACC.

4

Press and hold the power 
switch for about 15 seconds 
while depressing the brake 
pedal firmly.

Even if the hybrid system can be 
started using the above steps, 
the system may be malfunction-
ing. Have the vehicle inspected 
by your Toyota dealer.

The interior lights and 
headlights are dim, or the 
horn does not sound or 
sounds at a low volume

The interior lights and 
headlights do not turn on, 
or the horn does not 
sound

Starting the hybrid sys-
tem in an emergency

-------------------------------------------------------------------------------------------------------------------------------------------------------------

466

7-2. Steps to take in an emergency

1

Remove the cover inside the 
luggage compartment by 
inserting a screwdriver.

When removing the cover, to pre-

vent damage, cover the tip of the 

screwdriver with a rag.

2

Pull the lever.

Using the lever to open the fuel 

filler door may not allow for an ade-

quate reduction in fuel tank pres-

sure before refueling. To prevent 

fuel from spilling out, turn the cap 

slowly when removing it.
During refueling, fuel may spill out 

from the filler opening due to air 

being discharged from inside the 

fuel tank. Therefore, fill the fuel tank 

If you lose your keys

New genuine keys can be 
made by your Toyota dealer 
using the other key and the 
key number stamped on 
your key number plate. 
Keep the plate in a safe 
place such as your wallet, 
not in the vehicle.

NOTICE

When an electronic key is lost

If the electronic key remains lost, 

the risk of vehicle theft increases 

significantly. Visit your Toyota 

dealer immediately with all 

remaining electronic keys that 

were provided with your vehicle.

If the fuel filler door 

cannot be opened

If the fuel filler door opener 
switch cannot be operated, 
contact your Toyota dealer 
to service the vehicle. In 
case where refueling is 
urgently necessary, the fol-
lowing procedure can be 
used to open the fuel filler 
door.

Opening the fuel filler 
door

-------------------------------------------------------------------------------------------------------------------------------------------------------------

467

7-2. Steps to take in an emergency

7

Whe

n tr

ouble

 a

rises

carefully and slowly.

When the electronic key does 

not work properly

Make sure that the smart key sys-

tem has not been deactivated in 

the customization setting. If it is 

off, turn the function on. 

(Customizable features: 

P.505)

Check if battery-saving mode is 

set. If it is set, cancel the function. 

(

P.150)

Use the mechanical key 
(

P.130) in order to perform the 

If the electronic key 

does not operate prop-

erly

If communication between 
the electronic key and vehi-
cle is interrupted (

P.150) 

or the electronic key cannot 
be used because the battery 
is depleted, the smart key 
system and wireless remote 
control cannot be used. In 
such cases, the doors can 
be opened and the hybrid 
system can be started by 
following the procedure 
below.

NOTICE

In case of a smart key system 

malfunction, or other key 

related problems

Take your vehicle with all the 

electronic keys provided with your 

vehicle to your Toyota dealer.

Locking and unlocking 
the doors

-------------------------------------------------------------------------------------------------------------------------------------------------------------

468

7-2. Steps to take in an emergency

following operations.

1

Locks all the doors

2

Unlocks the door

Turning the key rearward unlocks 
the driver’s door. Turning the key 
once again within 5 seconds 
unlocks the other doors.

Key linked functions

1

Closes the windows (turn and 
hold)

*

2

Opens the windows (turn and 
hold)

*

*

: These settings must be custom-

ized at your Toyota dealer.

1

Ensure that the shift lever is 
in P and depress the brake 
pedal.

2

Touch the area behind the 
buttons on the electronic key 
to the power switch.

When the electronic key is 

detected, a buzzer sounds and the 

power switch will turn to ON.
When the smart key system is 

deactivated in customization set-

ting, the power switch will turn to 

ACC.

3

Firmly depress the brake 
pedal and check that 

*1

 or 

*2

 is dis-

WARNING

When using the mechanical 

key and operating the power 

windows

Operate the power window after 

checking to make sure that there 

is no possibility of any passenger 

having any of their body parts 

caught in the window. Also, do not 

allow children to operate the 

mechanical key. It is possible for 

children and other passengers to 

get caught in the power window.

Starting the hybrid sys-
tem

-------------------------------------------------------------------------------------------------------------------------------------------------------------

469

7-2. Steps to take in an emergency

7

Whe

n tr

ouble

 a

rises

played on the multi-informa-
tion display.

*1

:Vehicles with 4.2-inch display

*2

:Vehicles with 7-inch display

4

Press the power switch 
shortly and firmly.

In the event that the hybrid system 

still cannot be started, contact your 

Toyota dealer.

Stopping the hybrid system

Shift the shift lever to P, set the 
parking brake and press the power 
switch as you normally do when 
stopping the hybrid system.

Replacing the key battery

As the above procedure is a tempo-

rary measure, it is recommended 

that the electronic key battery be 

replaced immediately when the bat-

tery is depleted. (

P.425)

Changing power switch modes

Release the brake pedal and press 
the power switch in step 

3

 above.

The hybrid system does not start 
and modes will be changed each 
time the switch is pressed. 
(

P.200)

If you have a set of jumper (or 
booster) cables and a second 
vehicle with a 12-volt battery, 
you can jump start your vehicle 
by following the steps below.

1

Vehicles with alarm: Confirm 
that the electronic key is 
being carried.

When connecting the jumper (or 

booster) cables, depending on the 

situation, the alarm may activate 

and the doors locked. (

P.79)

2

Open the hood (

P.385) and 

fuse box cover.

Push claw 

 and 

 to com-

pletely release the lock, and then lift 

If the 12-volt battery is 

discharged

The following procedures 
may be used to start the 
hybrid system if the vehi-
cle’s 12-volt battery is dis-
charged.
You can also call your 
Toyota dealer or a qualified 
repair shop.

Restarting the hybrid sys-
tem

A

B

-------------------------------------------------------------------------------------------------------------------------------------------------------------

470

7-2. Steps to take in an emergency

up the cover.

3

Open the exclusive jump 
starting terminal cover.

4

Connect a positive jumper cable clamp to 

 on your vehicle and 

connect the clamp on the other end of the positive cable to 

 on 

the second vehicle. Then, connect a negative cable clamp to 


on the second vehicle and connect the clamp at the other end of 
the negative cable to 

.

Exclusive jump starting terminal (your vehicle)

Positive (+) battery terminal (second vehicle)

Negative (-) battery terminal (second vehicle)

Solid, stationary, unpainted metallic point away from the exclu-
sive jump starting terminal and any moving parts as shown in the 
illustration

5

Start the engine of the sec-
ond vehicle. Increase the 
engine speed slightly and 

maintain at that level for 
approximately 5 minutes to 

A

B

C

D

A

B

C

D

-------------------------------------------------------------------------------------------------------------------------------------------------------------

471

7-2. Steps to take in an emergency

7

Whe

n tr

ouble

 a

rises

recharge the 12-volt battery 
of your vehicle.

6

Open and close any of the 
doors of your vehicle with the 
power switch off.

7

Maintain the engine speed of 
the second vehicle and start 
the hybrid system of your 
vehicle by turning the power 
switch to ON.

8

Make sure the “READY” indi-
cator comes on. If the indica-
tor light does not come on, 
contact your Toyota dealer.

9

Once the hybrid system has 
started, remove the jumper 
cables in the exact reverse 
order from which they were 
connected.

10

Close the exclusive jump 

starting terminal cover, and 
reinstall the fuse box cover to 
its original position.

Once the hybrid system starts, 
have the vehicle inspected at 
your Toyota dealer as soon as 
possible.

Starting the hybrid system 

when the 12-volt battery is dis-

charged

The hybrid system cannot be 

started by push-starting.

To prevent 12-volt battery dis-

charge

Turn off the headlights and the 

audio system while the hybrid sys-

tem is off.

Turn off any unnecessary electri-

cal components when the vehicle 

is running at a low speed for an 

extended period, such as in heavy 

traffic.

When the 12-volt battery is 

removed or discharged

Information stored in the ECU is 

cleared. When the 12-volt battery 

is depleted, have the vehicle 

inspected at your Toyota dealer.

Some systems may require initial-

ization. (

P.514)

When removing the 12-volt bat-

tery terminals

When the 12-volt battery terminals 

are removed, the information stored 

in the ECU is cleared. Before 

removing the 12-volt battery termi-

nals, contact your Toyota dealer.

Charging the 12-volt battery

The electricity stored in the 12-volt 

battery will discharge gradually even 

when the vehicle is not in use, due 

to natural discharge and the drain-

ing effects of certain electrical appli-

ances. If the vehicle is left for a long 

time, the 12-volt battery may dis-

charge, and the hybrid system may 

be unable to start. (The 12-volt bat-

tery recharges automatically while 

the hybrid system is operating.)

When recharging or replacing 

the 12-volt battery

In some cases, it may not be pos-

sible to unlock the doors using the 

smart key system when the 12-

volt battery is discharged. Use the 

wireless remote control or the 

mechanical key to lock or unlock 

the doors.

The hybrid system may not start 

on the first attempt after reinstall-

ing the 12-volt battery. In that 

case, start the hybrid system in 

the same manner as when the 

electronic key does not operate 

properly (

P.468). This is not a 

malfunction, as the hybrid system 

will start normally on the second 

attempt.

-------------------------------------------------------------------------------------------------------------------------------------------------------------

472

7-2. Steps to take in an emergency

The power switch mode is memo-

rized by the vehicle. When the 12-

volt battery is reconnected, the 

system will return to the mode it 

was in before the 12-volt battery 

was discharged. Before discon-

necting the 12-volt battery, turn 

the power switch off.

If you are unsure what mode the 

power switch was in before the 

12-volt battery discharged, be 

especially careful when recon-

necting the 12-volt battery.

Some systems may require initial-

ization. (

P.514)

When replacing the 12-volt bat-

tery

Use a 12-volt battery that con-

forms to European regulations.

Use a battery that the case size is 

same as the previous one (LN2), 

20 hours rate capacity (20HR) is 

equivalent (55Ah) or greater, and 

performance rating (CCA) is 

equivalent (345A) or greater.

• If the sizes differ, the 12-volt bat-

tery cannot be properly secured.

• If the 20 hour rate capacity is low, 

even if the time period where the 

vehicle is not used is a short time, 

the 12-volt battery may discharge 

and hybrid system may not be 

able to start.

Use a ventilation type calcium bat-

tery

Use a 12-volt battery with a han-

dle. If a 12-volt battery without a 

handle is used, removal is more 

difficult.

When removing the 12-volt bat-

tery: 

P.396

After replacing, firmly attach the 

following items to the exhaust hole 

of the 12-volt battery.

• Use the exhaust hose that was 

attached to the 12-volt battery 

before replacing and confirm that 

it is firmly connected to the hole 

section of the vehicle.

• Use the exhaust hole plug 

included with the 12-volt battery 

replaced or the one installed on 

the battery prior to the replaced. 

(Depending on the 12-volt battery 

to be replace, the exhaust hole 

may be plugged.)

For details, consult your Toyota 
dealer.

Exhaust hole

Exhaust hose

Hole section of the vehicle

WARNING

When removing the battery 

terminals

Always remove the negative (-) 

terminal first. If the positive (+) ter-

minal contacts any metal in the 

surrounding area when the posi-

tive (+) terminal is removed, a 

spark may occur, leading to a fire 

in addition to electrical shocks 

and death or serious injury.

Avoiding 12-volt battery fires 

or explosions

Observe the following precautions 

to prevent accidentally igniting the 

flammable gas that may be emit-

ted from the 12-volt battery:

Make sure each jumper cable is 

connected to the correct termi-

nal and that it is not unintention-

ally in contact with any other 

than the intended terminal.

A

B

C

-------------------------------------------------------------------------------------------------------------------------------------------------------------

473

7-2. Steps to take in an emergency

7

Whe

n tr

ouble

 a

rises

WARNING

Do not allow the other end of 

the jumper cable connected to 

the “+” terminal to come into 

contact with any other parts or 

metal surfaces in the area, such 

as brackets or unpainted metal.

Do not allow the + and - clamps 

of the jumper cables to come 

into contact with each other.

Do not smoke, use matches, 

cigarette lighters or allow open 

flame near the 12-volt battery.

12-volt battery precautions

The 12-volt battery contains poi-

sonous and corrosive acidic elec-

trolyte, while related parts contain 

lead and lead compounds. 

Observe the following precautions 

when handling the 12-volt battery:

When working with the 12-volt 

battery, always wear safety 

glasses and take care not to 

allow any battery fluids (acid) to 

come into contact with skin, 

clothing or the vehicle body.

Do not lean over the 12-volt bat-

tery.

In the event that battery fluid 

comes into contact with the skin 

or eyes, immediately wash the 

affected area with water and 

seek medical attention.

Place a wet sponge or cloth 

over the affected area until 

medical attention can be 

received.

Always wash your hands after 

handling the 12-volt battery sup-

port, terminals, and other bat-

tery-related parts.

Do not allow children near the 

12-volt battery.

After recharging the 12-volt 

battery

Have the 12-volt battery 

inspected at your Toyota dealer 

as soon as possible.

If the 12-volt battery is deteriorat-

ing, continued use may cause the 

12-volt battery to emit a malodor-

ous gas, which may be detrimen-

tal to the health of passengers.

When replacing the 12-volt 

battery

For information regarding 12-

volt battery replacement, con-

tact your Toyota dealer.

After replacing, securely attach 

the exhaust hose and exhaust 

hole plug to the exhaust hole of 

the replaced 12-volt battery. If 

not properly installed, gases 

(hydrogen) may leak into the 

vehicle interior, and there is the 

possible danger of the gas ignit-

ing and exploding.

NOTICE

When handling jumper cables

When connecting the jumper 

cables, ensure that they do not 

become entangled in the cooling 

fan, etc.

-------------------------------------------------------------------------------------------------------------------------------------------------------------

474

7-2. Steps to take in an emergency

If the engine coolant tem-
perature gauge enters the 
red zone or “Engine Cool-
ant Temp High Stop in a 
Safe Place See Owner’s 
Manual” is shown on the 
multi-information display

1

Stop the vehicle in a safe 
place and turn off the air con-
ditioning system, and then 
stop the hybrid system.

NOTICE

To prevent damaging the 

vehicle

The exclusive jump starting termi-

nal is to be used when charging 

the 12-volt battery from another 

vehicle in an emergency. It cannot 

be used to jump start another 

vehicle.

If your vehicle over-

heats

The following may indicate 
that your vehicle is over-
heating.

The needle of the engine 
coolant temperature gauge 
(

P.87, 91) enters the re

zone, or a loss of hybrid 
system power is experi-
enced. (For example, the 
vehicle speed does not 
increase.)

“Engine Coolant Temp High 
Stop in a Safe Place See 
Owner’s Manual” or “Hybrid 
System Overheated Output 
Power Reduced” is shown 
on the multi-information dis-
play.

Steam comes out from 
under the hood.

Correction procedures

-------------------------------------------------------------------------------------------------------------------------------------------------------------

475

7-2. Steps to take in an emergency

7

Whe

n tr

ouble

 a

rises

2

If you see steam:
Carefully lift the hood after 
the steam subsides.
If you do not see steam:
Carefully lift the hood.

3

After the hybrid system has 
cooled down sufficiently, 
inspect the hoses and radia-
tor core (radiator) for any 
leaks.

Radiator

Cooling fan

If a large amount of coolant leaks, 

immediately contact your Toyota 

dealer.

4

The coolant level is satisfac-
tory if it is between the 
“FULL” and “LOW” lines on 
the reservoir.

Reservoir

“FULL” line

“LOW” line

5

Add coolant if necessary.

Water can be used in an emer-

gency if engine coolant is unavail-

able.
If water was added in an emer-

gency, have the vehicle inspected 

at your Toyota dealer as soon as 

possible.

6

Start the hybrid system and 
turn the air conditioning sys-
tem on to check that the radi-
ator cooling fan operates and 
to check for coolant leaks 
from the radiator or hoses.

The fan operates when the air con-

ditioning system is turned on imme-

diately after a cold start. Confirm 

that the fan is operating by check-

ing the fan sound and air flow. If it is 

difficult to check these, turn the air 

conditioning system on and off 

repeatedly. (The fan may not oper-

ate in freezing temperatures.)

7

If the fan is not operating:
Stop the hybrid system 
immediately and contact your 
Toyota dealer.
If the fan is operating:
Have the vehicle inspected at 
the nearest Toyota dealer.

8

Check if “Engine Coolant 
Temp High Stop in a Safe 

A

B

A

B

C

-------------------------------------------------------------------------------------------------------------------------------------------------------------

476

7-2. Steps to take in an emergency

Place See Owner’s Manual” 
is shown on the multi-infor-
mation display.

If the message does not disappear: 

Stop the hybrid system and contact 

your Toyota dealer.
If the message is not displayed: 

Have the vehicle inspected at the 

nearest Toyota dealer.

If “Hybrid System Over-
heated Output Power 
Reduced” is shown on the 
multi-information display

1

Stop the vehicle in a safe 
place.

2

Stop the hybrid system and 
carefully lift the hood.

3

After the hybrid system has 
cooled down, inspect the 
hoses and radiator core (radi-
ator) for any leaks.

Radiator

Cooling fan

If a large amount of coolant leaks, 

immediately contact your Toyota 

dealer.

4

The coolant level is satisfac-
tory if it is between the 

“FULL” and “LOW” lines on 
the reservoir.

Reservoir

“FULL” line

“LOW” line

5

Add coolant if necessary.

Water can be used in an emer-

gency if power control unit coolant 

is unavailable.
If water was added in an emer-

gency, have the vehicle inspected 

at your Toyota dealer as soon as 

possible.

6

After stopping the hybrid sys-
tem and waiting for 5 minutes 
or more, start the hybrid sys-
tem again and check for the 
multi-information display.

If the message does not disappear: 

Stop the hybrid system and contact 

your Toyota dealer.
If the message is not displayed: 

The hybrid system temperature has 

A

B

A

B

C

-------------------------------------------------------------------------------------------------------------------------------------------------------------

477

7-2. Steps to take in an emergency

7

Whe

n tr

ouble

 a

rises

dropped and the vehicle may be 

driven normally.
However, if the message appears 

again frequently, contact your 

Toyota dealer.

WARNING

When inspecting under the 

hood of your vehicle

Observe the following precau-

tions.

Failure to do so may result in seri-

ous injury such as burns.

If steam is seen coming from 

under the hood, do not open the 

hood until the steam has sub-

sided. The engine compart-

ment may be very hot.

After the hybrid system has 

been turned off, check that the 

“READY” indicator is off.

When the hybrid system is oper-

ating, the gasoline engine may 

automatically start, or the cool-

ing fan may suddenly operate 

even if the gasoline engine 

stops. Do not touch or approach 

rotating parts such as the fan, 

which may lead to fingers or 

clothing (especially a tie, a scarf 

or a muffler) getting caught, 

resulting in serious injury.

Do not loosen the coolant reser-

voir cap while the hybrid system 

and radiator are hot.

High temperature steam or 

coolant could spray out.

NOTICE

When adding engine/power 

control unit coolant

Add coolant slowly after the 

hybrid system has cooled down 

sufficiently. Adding cool coolant to 

a hot hybrid system too quickly 

can cause damage to the hybrid 

system.

To prevent damage to the 

cooling system

Observe the following precau-

tions:

Avoid contaminating the coolant 

with foreign matter (such as 

sand or dust, etc.).

Do not use any coolant additive.

-------------------------------------------------------------------------------------------------------------------------------------------------------------

478

7-2. Steps to take in an emergency

1

Stop the hybrid system. Set 
the parking brake and shift 
the shift lever to P.

2

Remove the mud, snow or 
sand from around the stuck 
tire.

3

Place wood, stones or some 
other material to help provide 
traction under the tires.

4

Restart the hybrid system

5

Shift the shift lever to D or R 
and release the parking 
brake. Then, while exercising 
caution, depress the acceler-
ator pedal.

When it is difficult to free the 

vehicle

Press 

 to turn off TRAC. 

(

P.299)

If the vehicle becomes 

stuck

Carry out the following pro-
cedures if the tires spin or 
the vehicle becomes stuck 
in mud, dirt or snow:

Recovering procedure

WARNING

When attempting to free a 

stuck vehicle

If you choose to push the vehicle 

back and forth to free it, make 

sure the surrounding area is clear 

to avoid striking other vehicles, 

objects or people. The vehicle 

may also lunge forward or lunge 

back suddenly as it becomes free. 

Use extreme caution.

When shifting the shift lever

Be careful not to shift the shift 

lever with the accelerator pedal 

depressed.
This may lead to unexpected 

rapid acceleration of the vehicle 

that may cause an accident 

resulting in death or serious 

injury.

NOTICE

To avoid damaging the trans-

mission and other compo-

nents

Avoid spinning the wheels and 

depressing the accelerator 

pedal more than necessary.

If the vehicle remains stuck 

even after these procedures are 

performed, the vehicle may 

require towing to be freed.

-------------------------------------------------------------------------------------------------------------------------------------------------------------

479

8

8

Vehicle

 specifications

Vehicle specifications

8-1. Specifications

Maintenance data (fuel, oil 

level, etc.)..................

480

Fuel information ..........

488

Tire information ...........

490

8-2. Customization

Customizable features

500

8-3. Initialization

Items to initialize .........

514

-------------------------------------------------------------------------------------------------------------------------------------------------------------

480

8-1. Specifications

8-1.Specifications

*

: Unladen vehicle

Vehicle identification num-
ber

The vehicle identification num-
ber (VIN) is the legal identifier 
for your vehicle. This is the pri-
mary identification number for 
your Toyota. It is used in regis-
tering the ownership of your 
vehicle.
This number is stamped on the 
top left of the instrument panel.

This number is stamped under 
the right-hand front seat.

Maintenance data (fuel, oil level, etc.)

Dimensions and weights

Overall length

*

186.6 in. (4740 mm)

Overall width

*

73.0 in. (1855 mm)

Overall height

*

65.9 in. (1675 mm)

Wheelbase

*

105.9 in. (2690 mm)

Tread

*

Front

63.0 in. (1600 mm)

Rear

63.7 in. (1620 mm)

Vehicle capacity weight (Occupants + 
luggage)

900 lb. (410 kg)

Seating capacity

Seating capacity

5 (Front 2, Rear 3)

Vehicle identification

-------------------------------------------------------------------------------------------------------------------------------------------------------------

481

8-1. Specifications

8

Vehicle

 specifications

This number is also on the Certi-
fication Regulation Label.

Engine number

The engine number is stamped 
on the engine block as shown.

Engine

Model

2.5 L 4-cylinder (A25A-FXS)

Type

4-cylinder in line, 4-cycle, gasoline

Bore and stroke

3.44 

 4.07 in. (87.5 

 103.4 mm)

Displacement

151.8 cu. in. (2487 cm

3

)

Valve clearance

Automatic adjustment

Fuel

Fuel type

Unleaded gasoline only

Octane Rating

87 (Research Octane Number 91) or 
higher

Fuel tank capacity (Reference) 14.5 gal. (55 L, 12.1 Imp.gal.)

-------------------------------------------------------------------------------------------------------------------------------------------------------------

482

8-1. Specifications

Front

Rear

Oil capacity (Drain and refill 

 reference

*

)

*

: The engine oil capacity is a reference quantity to be used when changing 

the engine oil. Warm up and turn off the hybrid system, wait more than 5 
minutes, and check the oil level on the dipstick.

Engine oil selection

“Toyota Genuine Motor Oil” is 
used in your Toyota vehicle. 
Use Toyota approved “Toyota 
Genuine Motor Oil” or equiva-
lent to satisfy the following 

grade and viscosity.
Oil grade: 
API SN/RC multigrade engine 
oil
Recommended viscosity: 
SAE 0W-16

Electric motor (traction motor)

Type

Permanent magnet synchronous motor

Maximum output

88 kW

Maximum torque

149 ft•lbf (202 N•m, 20.6 kgf•m)

Type

Permanent magnet synchronous motor

Maximum output

40 kW

Maximum torque

89.2 ft•lbf (121 N•m, 12.3 kgf•m)

Hybrid battery (traction battery)

Type

Lithium-ion battery

Voltage

3.6 V/cell

Capacity

3.7 Ah

Quantity

70 cells

Nominal voltage

252 V

Lubrication system

With filter

4.8 qt. (4.5 L, 4.0 Imp. qt.)

Without filter

4.4 qt. (4.2 L, 3.7 Imp. qt.)

-------------------------------------------------------------------------------------------------------------------------------------------------------------

483

8-1. Specifications

8

Vehicle

 specifications

SAE 0W-16 is the best choice 
for good fuel economy and good 
starting in cold weather.
If SAE 0W-16 is not available, 
SAE 0W-20 oil may be used. 
However, it must be replaced 
with SAE 0W-16 at the next oil 
change.

Outside temperature

Oil viscosity (0W-16 is explained 
here as an example):
• The 0W in 0W-16 indicates 

the characteristic of the oil 
which allows cold startability. 
Oils with a lower value before 

the W allow for easier starting 
of the engine in cold weather.

• The 16 in 0W-16 indicates the 

viscosity characteristic of the 
oil when the oil is at high tem-
perature. An oil with a higher 
viscosity (one with a higher 
value) may be better suited if 
the vehicle is operated at high 
speeds, or under extreme 
load conditions.

How to read oil container label:
API registered mark is added to 
some oil containers to help you 
select the oil you should use.

*

: The coolant capacity is the quantity of reference.

If replacement is necessary, contact your Toyota dealer.

A

Cooling system

Capacity

*

Gasoline engine

7.0 qt. (6.6 L, 5.8 Imp. qt.)

Power control unit 2.1 qt. (2.0 L, 1.8 Imp. qt.)

Coolant type

Use either of the following:

“Toyota Super Long Life Coolant”

Similar high-quality ethylene gly-
col-based non-silicate, non-amine, 
non-nitrite, and non-borate cool-
ant with long-life hybrid organic 
acid technology

Do not use plain water alone.

-------------------------------------------------------------------------------------------------------------------------------------------------------------

484

8-1. Specifications

*

: The fluid capacity is the quantity of reference.

If replacement is necessary, contact your Toyota dealer.

*

: The fluid capacity is the quantity of reference.

Ignition system (spark plug)

Make

DENSO FC16HR-Q8

Gap

0.031 in. (0.8 mm)

NOTICE

Iridium-tipped spark plugs

Use only iridium-tipped spark plugs. Do not adjust the spark plug gap.

Electrical system (12-volt Battery)

Open voltage at 68°F (20°C):

12.0 V or higher
(Turn the power switch to OFF and turn on 
the high beam headlights for 30 seconds.)
If the voltage is lower than the standard 
value, charge the battery.

Charging rates

Quick charge

15 A max.

Slow charge

5 A max.

Hybrid transmission

Fluid capacity

*

4.1 qt. (3.9 L, 3.4 Imp.qt.)

Fluid type

Toyota Genuine ATF WS

NOTICE

Hybrid transmission fluid type

Using transmission fluid other than the above type may cause abnormal 

noise or vibration, or ultimately damage the transmission of your vehicle.

Rear differential (rear electric motor)

Fluid capacity

*

1.8 qt. (1.7 L, 1.5 Imp.qt.)

Fluid type

Toyota Genuine ATF WS

-------------------------------------------------------------------------------------------------------------------------------------------------------------

485

8-1. Specifications

8

Vehicle

 specifications

If replacement is necessary, contact your Toyota dealer.

*

: Minimum pedal clearance when depressed with a force of 67.4 lbf (300 N, 

30.5 kgf) while the hybrid system is operating.

Vehicles with 18-inch wheels (type A)

NOTICE

Rear differential fluid type

Using differential fluid other than the above type may cause abnormal 

noise or vibration, or ultimately damage the differential of your vehicle.

Brakes

Pedal clearance

*

5.1 in. (129 mm) Min.

Pedal free play

0.04 

 0.24 in. (1.0 

 6.0 mm)

Brake pad wear limit

0.04 in. (1.0 mm)

Fluid type

FMVSS No.116 DOT 3 or SAE J1703
FMVSS No.116 DOT 4 or SAE J1704

Steering

Free play

Less than 1.2 in. (30 mm)

Tires and wheels

Tire size

225/60R18 100H, T165/80R17 104M 
(spare)

Tire inflation pressure
(Recommended cold tire infla-
tion pressure)

Front:

33 psi (230 kPa, 2.3 kgf/cm

2

 or bar)

Rear:

33 psi (230 kPa, 2.3 kgf/cm

2

 or bar)

Spare:

60 psi (420 kPa, 4.2 kgf/cm

2

 or bar)

Wheel size

18 x 7J, 17 x 4T (spare)

Wheel nut torque

76 ft•lbf (103 N•m, 10.5 kgf•m)

-------------------------------------------------------------------------------------------------------------------------------------------------------------

486

8-1. Specifications

Vehicles with 18-inch wheels (type B)

Vehicles with 19-inch wheels (type A)

Tire size

225/60R18 100H, T165/80D17 104M 
(spare)

Tire inflation pressure
(Recommended cold tire infla-
tion pressure)

Front:

33 psi (230 kPa, 2.3 kgf/cm

2

 or bar)

Rear:

33 psi (230 kPa, 2.3 kgf/cm

2

 or bar)

Spare:

60 psi (420 kPa, 4.2 kgf/cm

2

 or bar)

Wheel size

18 x 7J, 17 x 4T (spare)

Wheel nut torque

76 ft•lbf (103 N•m, 10.5 kgf•m)

Tire size

225/55R19 99V, T165/80R17 104M 
(spare)

Tire inflation pressure
(Recommended cold tire infla-
tion pressure)

Front:

33 psi (230 kPa, 2.3 kgf/cm

2

 or bar)

Rear:

33 psi (230 kPa, 2.3 kgf/cm

2

 or bar)

Spare:

60 psi (420 kPa, 4.2 kgf/cm

2

 or bar)

Wheel size

19 x 7J, 17 x 4T (spare)

Wheel nut torque

76 ft•lbf (103 N•m, 10.5 kgf•m)

-------------------------------------------------------------------------------------------------------------------------------------------------------------

487

8-1. Specifications

8

Vehicle

 specifications

Vehicles with 19-inch wheels (type B)

A: Wedge base bulbs (clear)

*

: Vehicles without panoramic view monitor

Tire size

225/55R19 99V, T165/80D17 104M 
(spare)

Tire inflation pressure
(Recommended cold tire infla-
tion pressure)

Front:

33 psi (230 kPa, 2.3 kgf/cm

2

 or bar)

Rear:

33 psi (230 kPa, 2.3 kgf/cm

2

 or bar)

Spare:

60 psi (420 kPa, 4.2 kgf/cm

2

 or bar)

Wheel size

19 x 7J, 17 x 4T (spare)

Wheel nut torque

76 ft•lbf (103 N•m, 10.5 kgf•m)

Light bulbs

Light bulbs

W

Type

Outer foot lights

*

5

A

-------------------------------------------------------------------------------------------------------------------------------------------------------------

488

8-1. Specifications

Gasoline quality

In very few cases, driveability prob-

lems may be caused by the brand of 

gasoline you are using. If driveability 

problems persist, try changing the 

brand of gasoline. If this does not 

correct the problem, consult your 

Toyota dealer.

Recommendation of the use of 

gasoline containing detergent 

additives

Toyota recommends the use of 

gasoline that contains detergent 

additives to avoid the build-up of 

engine deposits.

All gasoline sold in the U.S.A. con-

tains minimum detergent additives 

to clean and/or keep clean intake 

systems, per EPA’s lowest addi-

tives concentration program.

Toyota strongly recommends the 

use of Top Tier Detergent Gaso-

line. For more information on Top 

Tier Detergent Gasoline and a list 

of marketers, please go to the offi-

cial website www.toptiergas.com.

Recommendation of the use of 

low emissions gasoline

Gasolines containing oxygenates 

such as ethers and ethanol, as well 

as reformulated gasolines, are avail-

able in some cities. These fuels are 

typically acceptable for use, provid-

ing they meet other fuel require-

ments.
Toyota recommends these fuels, 

since the formulations allow for 

reduced vehicle emissions.

Non-recommendation of the 

use of blended gasoline

Use only gasoline containing up to 

15% ethanol.

DO NOT use any flex-fuel or gas-

oline that could contain more than 

15% ethanol, including from any 

pump labeled E30 (30% ethanol 

), E50 (50% ethanol 

), E85 

(85% ethanol 

) (which are only 

some examples of fuel containing 

more than 15% ethanol).

If you use gasohol in your vehicle, 

be sure that it has an octane rat-

ing no lower than 87.

Toyota does not recommend the 

use of gasoline containing metha-

nol.

Non-recommendation of the 

use of gasoline containing MMT

Some gasoline contains an octane 

enhancing additive called MMT 

(Methylcyclopentadienyl Manga-

nese Tricarbonyl).
Toyota does not recommend the 

use of gasoline that contains MMT. 

If fuel containing MMT is used, your 

Fuel information

You must only use unleaded 
gasoline in your vehicle.

Select octane rating 87 
(Research Octane Number 
91) or higher. Use of 
unleaded gasoline with an 
octane rating lower than 87 
may result in engine knock-
ing. Persistent knocking 
can lead to engine damage.

At minimum, the gasoline you 
use should meet the specifica-
tions of ASTM D4814 in the 
U.S.A..

A

B

C

-------------------------------------------------------------------------------------------------------------------------------------------------------------

489

8-1. Specifications

8

Vehicle

 specifications

emission control system may be 

adversely affected.
The malfunction indicator lamp on 

the instrument cluster may come on. 

If this happens, contact your Toyota 

dealer for service.

If your engine knocks

Consult your Toyota dealer.

You may occasionally notice light 

knocking for a short time while 

accelerating or driving uphill. This 

is normal and there is no need for 

concern.

NOTICE

Notice on fuel quality

Do not use improper fuels. If 

improper fuels are used, the 

engine will be damaged.

Do not use leaded gasoline. 

Leaded gasoline can cause 

damage to your vehicle’s three-

way catalytic converters caus-

ing the emission control system 

to malfunction.

Do not use gasohol other than 

the type previously stated. 

Other gasohol may cause fuel 

system damage or vehicle per-

formance problems.

Using unleaded gasoline with 

an octane number or rating 

lower than the level previously 

stated will cause persistent 

heavy knocking. 

At worst, this will lead to engine 

damage.

Fuel-related poor driveability

If poor driveability (poor hot start-

ing, vaporization, engine knock-

ing, etc.) is encountered after 

using a different type of fuel, dis-

continue the use of that type of 

fuel.

When refueling with gasohol

Take care not to spill gasohol. It 

can damage your vehicle’s paint.

-------------------------------------------------------------------------------------------------------------------------------------------------------------

490

8-1. Specifications

Full-size tire

Compact spare tire

Tire size (

P.492)

DOT and Tire Identification Number (TIN) (

P.491)

Location of treadwear indicators (

P.397)

Tire ply composition and materials

Plies are layers of rubber-coated parallel cords. Cords are the strands 
which form the plies in a tire.

Tire information

Typical tire symbols

A

B

C

D

-------------------------------------------------------------------------------------------------------------------------------------------------------------

491

8-1. Specifications

8

Vehicle

 specifications

Radial tires or bias-ply tires

A radial tire has “RADIAL” on the sidewall. A tire not marked “RADIAL” is a 
bias-ply tire.

TUBELESS or TUBE TYPE

A tubeless tire does not have a tube and air is directly put into the tire. A 
tube type tire has a tube inside the tire and the tube maintains the air pres-
sure.

Load limit at maximum cold tire inflation pressure (

P.494)

Maximum cold tire inflation pressure (

P.494)

This means the pressure to which a tire may be inflated.

Uniform tire quality grading

For details, see “Uniform Tire Quality Grading” that follows.

Summer tires or all season tires (

P.398)

An all season tire has “M+S” on the sidewall. A tire not marked “M+S” is a 
summer tire.

“TEMPORARY USE ONLY”

A compact spare tire is identified by the phrase “TEMPORARY USE ONLY” 
molded on its sidewall. This tire is designed for temporary emergency use 
only.

Type A

DOT symbol

*

Tire Identification Number 
(TIN)

Tire manufacturer’s identifi-
cation mark

Tire size code

Manufacturer’s optional tire 
type code (3 or 4 letters)

Manufacturing week

Manufacturing year

*

: The DOT symbol certifies that the 

tire conforms to applicable Fed-
eral Motor Vehicle Safety Stan-
dards.

E

F

G

H

I

J

K

Typical DOT and Tire 
Identification Number 
(TIN)

A

B

C

D

E

F

G

-------------------------------------------------------------------------------------------------------------------------------------------------------------

492

8-1. Specifications

Type B

DOT symbol

*

Tire Identification Number 
(TIN)

Tire manufacturer’s identifi-
cation mark

Manufacturer’s code

Manufacturing week

Manufacturing year

*

: The DOT symbol certifies that the 

tire conforms to applicable Fed-
eral Motor Vehicle Safety Stan-
dards.

Typical tire size information

The illustration indicates typical 
tire size.

Tire use 

(P = Passenger car, 
T = Temporary use)

Section width (millimeters)

Aspect ratio
(tire height to section width)

Tire construction code
(R = Radial, D = Diagonal)

Wheel diameter (inches)

Load index (2 digits or 3 dig-
its)

Speed symbol (alphabet with 
one letter)

Tire dimensions

Section width

Tire height

Wheel diameter

Tire size

A

B

C

D

E

F

A

Tire section names

B

C

D

E

F

G

A

B

C

-------------------------------------------------------------------------------------------------------------------------------------------------------------

493

8-1. Specifications

8

Vehicle

 specifications

Bead

Sidewall

Shoulder

Tread

Belt

Inner liner

Reinforcing rubber

Carcass

Rim lines

Bead wires

Chafer

This information has been pre-
pared in accordance with regu-
lations issued by the National 
Highway Traffic Safety Adminis-
tration of the U.S. Department of 
Transportation.
It provides the purchasers 
and/or prospective purchasers 
of Toyota vehicles with informa-
tion on uniform tire quality grad-
ing.

Your Toyota dealer will help answer 
any questions you may have as you 
read this information.

DOT quality grades

All passenger vehicle tires must 
conform to Federal Safety 
Requirements in addition to 
these grades. Quality grades 
can be found where applicable 

on the tire sidewall between 
tread shoulder and maximum 
section width.

For example: Treadwear 200 Trac-
tion AA Temperature A

Treadwear

The treadwear grade is a com-
parative rating based on the 
wear rate of the tire when tested 
under controlled conditions on a 
specified government test 
course.

For example, a tire graded 150 
would wear one and a half (1 - 1/2) 
times as well on the government 
course as a tire graded 100.
The relative performance of tires 
depends upon the actual conditions 
of their use. Performance may dif-
fer significantly from the norm due 
to variations in driving habits, ser-
vice practices and differences in 
road characteristics and climate.

Traction AA, A, B, C

The traction grades, from high-
est to lowest, are AA, A, B and 
C, and they represent the tire’s 
ability to stop on wet pavement 
as measured under controlled 
conditions on specified govern-
ment test surfaces of asphalt 
and concrete.

A tire marked C may have poor 
traction performance.
Warning: The traction grade 
assigned to this tire is based on 
braking (straight ahead) traction 
tests and does not include corner-
ing (turning) traction.

Uniform Tire Quality 
Grading

A

B

C

D

E

F

G

H

I

J

K

-------------------------------------------------------------------------------------------------------------------------------------------------------------

494

8-1. Specifications

Temperature A, B, C

The temperature grades are A 
(the highest), B, and C, repre-
senting the tire’s resistance to 
the generation of heat and its 
ability to dissipate heat when 
tested under controlled condi-
tions on a specified indoor labo-
ratory test wheel.

Sustained high temperature can 
cause the material of the tire to 
degenerate and reduce tire life, and 
excessive temperature can lead to 
sudden tire failure.
Grade C corresponds to a level of 

performance which all passenger 
car tires must meet under the Fed-
eral Motor Vehicle Safety Standard 
No. 109.
Grades B and A represent higher 
levels of performance on the labo-
ratory test wheel than the minimum 
required by law.
Warning: The temperature grades 
of a tire assume that it is properly 
inflated and not overloaded.
Excessive speed, underinflation, or 
excessive loading, either sepa-
rately or in combination, can cause 
heat buildup and possible tire fail-
ure.

Glossary of tire terminology

Tire related term

Meaning

Cold tire inflation pres-
sure

Tire pressure when the vehicle has been parked 
for three hours or more, or has not been driven 
more than 1 mile or 1.5 km under that condition

Maximum inflation pres-
sure

The maximum cold inflated pressure to which a 
tire may be inflated, shown on the sidewall of 
the tire

Recommended inflation 
pressure

Cold tire inflation pressure recommended by a 
manufacturer

Accessory weight

The combined weight (in excess of those stan-
dard items which may be replaced) of transmis-
sion, power steering, power brakes, power 
windows, power seats, radio and heater, to the 
extent that these items are available as factory-
installed equipment (whether installed or not)

Curb weight

The weight of a motor vehicle with standard 
equipment, including the maximum capacity of 
fuel, oil and coolant, and if so equipped, air con-
ditioning and additional weight optional engine

-------------------------------------------------------------------------------------------------------------------------------------------------------------

495

8-1. Specifications

8

Vehicle

 specifications

Maximum loaded vehicle 
weight

The sum of:
(a) Curb weight
(b) Accessory weight
(c) Vehicle capacity weight
(d) Production options weight

Normal occupant weight

150 lb. (68 kg) times the number of occupants 
specified in the second column of Table 1

*

 that 

follows

Occupant distribution

Distribution of occupants in a vehicle as speci-
fied in the third column of Table 1

*

 below

Production options weight

The combined weight of installed regular pro-
duction options weighing over 5 lb. (2.3 kg) in 
excess of the standard items which they 
replace, not previously considered in curb 
weight or accessory weight, including heavy 
duty brakes, ride levelers, roof rack, heavy duty 
battery, and special trim

Rim

A metal support for a tire or a tire and tube 
assembly upon which the tire beads are seated

Rim diameter
(Wheel diameter)

Nominal diameter of the bead seat

Rim size designation

Rim diameter and width

Rim type designation

The industry manufacturer’s designation for a 
rim by style or code

Rim width

Nominal distance between rim flanges

Vehicle capacity weight 
(Total load capacity)

The rated cargo and luggage load plus 150 lb. 
(68 kg) times the vehicle’s designated seating 
capacity

Vehicle maximum load on 
the tire

The load on an individual tire that is determined 
by distributing to each axle its share of the max-
imum loaded vehicle weight, and dividing by two

Vehicle normal load on 
the tire

The load on an individual tire that is determined 
by distributing to each axle its share of curb 
weight, accessory weight, and normal occupant 
weight (distributed in accordance with Table 1

*


below), and dividing by two

Tire related term

Meaning

-------------------------------------------------------------------------------------------------------------------------------------------------------------

496

8-1. Specifications

Weather side

The surface area of the rim not covered by the 
inflated tire

Bead

The part of the tire that is made of steel wires, 
wrapped or reinforced by ply cords and that is 
shaped to fit the rim

Bead separation

A breakdown of the bond between components 
in the bead

Bias ply tire

A pneumatic tire in which the ply cords that 
extend to the beads are laid at alternate angles 
substantially less than 90 degrees to the center-
line of the tread

Carcass

The tire structure, except tread and sidewall 
rubber which, when inflated, bears the load

Chunking

The breaking away of pieces of the tread or 
sidewall

Cord

The strands forming the plies in the tire

Cord separation

The parting of cords from adjacent rubber com-
pounds

Cracking

Any parting within the tread, sidewall, or inner-
liner of the tire extending to cord material

CT

A pneumatic tire with an inverted flange tire and 
rim system in which the rim is designed with rim 
flanges pointed radially inward and the tire is 
designed to fit on the underside of the rim in a 
manner that encloses the rim flanges inside the 
air cavity of the tire

Extra load tire

A tire designed to operate at higher loads and at 
higher inflation pressures than the correspond-
ing standard tire

Groove

The space between two adjacent tread ribs

Innerliner

The layer(s) forming the inside surface of a 
tubeless tire that contains the inflating medium 
within the tire

Innerliner separation

The parting of the innerliner from cord material 
in the carcass

Tire related term

Meaning

-------------------------------------------------------------------------------------------------------------------------------------------------------------

497

8-1. Specifications

8

Vehicle

 specifications

Intended outboard side-
wall

(a)The sidewall that contains a whitewall, bears 
white lettering, or bears manufacturer, brand, 
and/or model name molding that is higher or 
deeper than the same molding on the other 
sidewall of the tire, or
(b)The outward facing sidewall of an asymmetri-
cal tire that has a particular side that must 
always face outward when mounted on a vehi-
cle

Light truck (LT) tire

A tire designated by its manufacturer as primar-
ily intended for use on lightweight trucks or mul-
tipurpose passenger vehicles

Load rating

The maximum load that a tire is rated to carry 
for a given inflation pressure

Maximum load rating

The load rating for a tire at the maximum per-
missible inflation pressure for that tire

Maximum permissible 
inflation pressure

The maximum cold inflation pressure to which a 
tire may be inflated

Measuring rim

The rim on which a tire is fitted for physical 
dimension requirements

Open splice

Any parting at any junction of tread, sidewall, or 
innerliner that extends to cord material

Outer diameter

The overall diameter of an inflated new tire

Overall width

The linear distance between the exteriors of the 
sidewalls of an inflated tire, including elevations 
due to labeling, decorations, or protective bands 
or ribs

Passenger car tire

A tire intended for use on passenger cars, multi-
purpose passenger vehicles, and trucks, that 
have a gross vehicle weight rating (GVWR) of 
10,000 lb. or less.

Ply

A layer of rubber-coated parallel cords

Ply separation

A parting of rubber compound between adjacent 
plies

Tire related term

Meaning

-------------------------------------------------------------------------------------------------------------------------------------------------------------

498

8-1. Specifications

Pneumatic tire

A mechanical device made of rubber, chemi-
cals, fabric and steel or other materials, that, 
when mounted on an automotive wheel, pro-
vides the traction and contains the gas or fluid 
that sustains the load

Radial ply tire

A pneumatic tire in which the ply cords that 
extend to the beads are laid at substantially 90 
degrees to the centerline of the tread

Reinforced tire

A tire designed to operate at higher loads and at 
higher inflation pressures than the correspond-
ing standard tire

Section width

The linear distance between the exteriors of the 
sidewalls of an inflated tire, excluding elevations 
due to labeling, decoration, or protective bands

Sidewall

That portion of a tire between the tread and 
bead

Sidewall separation

The parting of the rubber compound from the 
cord material in the sidewall

Snow tire

A tire that attains a traction index equal to or 
greater than 110, compared to the ASTM E-
1136 Standard Reference Test Tire, when using 
the snow traction test as described in ASTM F-
1805-00, Standard Test Method for Single 
Wheel Driving Traction in a Straight Line on 
Snow-and Ice-Covered Surfaces, and which is 
marked with an Alpine Symbol (

) on at least 

one sidewall

Test rim

The rim on which a tire is fitted for testing, and 
may be any rim listed as appropriate for use 
with that tire

Tread

That portion of a tire that comes into contact 
with the road

Tread rib

A tread section running circumferentially around 
a tire

Tread separation

Pulling away of the tread from the tire carcass

Tire related term

Meaning

-------------------------------------------------------------------------------------------------------------------------------------------------------------

499

8-1. Specifications

8

Vehicle

 specifications

*

: Table 1 

 Occupant loading and distribution for vehicle normal load for 

various designated seating capacities

Treadwear indicators 
(TWI)

The projections within the principal grooves 
designed to give a visual indication of the 
degrees of wear of the tread

Wheel-holding fixture

The fixture used to hold the wheel and tire 
assembly securely during testing

Designated seating 

capacity, Number of 

occupants

Vehicle normal load, 

Number of occupants

Occupant distribution in 

a normally loaded vehi-

cle

2 through 4

2

2 in front

5 through 10

3

2 in front, 1 in second 

seat

11 through 15

5

2 in front, 1 in second 

seat, 1 in third seat, 1 in 

fourth seat

16 through 20

7

2 in front, 2 in second 

seat, 2 in third seat, 1 in 

fourth seat

Tire related term

Meaning

-------------------------------------------------------------------------------------------------------------------------------------------------------------

500

8-2. Customization

8-2.Customization

Changing using the naviga-
tion/multimedia system

1

Press the “MENU” button and 
select “Setup”.

2

Select “Vehicle” on the 
“Setup” screen.

3

Select “Vehicle Customiza-
tion”.

Various setting can be changed. 

Refer to the list of settings that can 

be changed for details.

Changing using the multi-
information display

Vehicles with 4.2-inch display

1

Press 

 or 

 of the meter 

control switches and select 

.

2

Press 

 or 

 of the meter 

control switches, select the 
item.

3

To switch the function on and 
off, press 

 to switch to the 

desired setting.

4

To perform detailed setting of 
functions that support 
detailed settings, press and 
hold 

 and display the set-

ting screen.

The method of performing detailed 

setting differs for each screen. 

Please refer to the advice sentence 

displayed on the screen.
To go back to the previous screen 

or exit the customize mode, press 

.

Vehicles with 7-inch display

1

Press 

 or 

 of the meter 

control switches and select 

.

2

Press 

 or 

 of the meter 

control switches, select the 
item.

3

To switch the function on and 
off, press 

 to switch to the 

desired setting.

4

To perform detailed setting of 
functions that support 
detailed settings, press and 
hold 

 and display the set-

ting screen.

The method of performing detailed 

setting differs for each screen. 

Please refer to the advice sentence 

displayed on the screen.
To go back to the previous screen 

or exit the customize mode, press 

.

Customizable features

Your vehicle includes a vari-
ety of electronic features 
that can be personalized to 
suit your preferences. The 
settings of these features 
can be changed using the 
multi-information display, 
navigation/multimedia sys-
tem, or at your Toyota 
dealer.

Customizing vehicle fea-
tures

-------------------------------------------------------------------------------------------------------------------------------------------------------------

501

8-2. Customization

8

Vehicle

 specifications

When customizing using the 

navigation/multimedia system 

or multi-information display

Stop the vehicle in a safe place, 

apply the parking brake, and shift 

the shift lever to P. Also, to prevent 

12-volt battery discharge, leave the 

hybrid system operating while cus-

tomizing the features.

Some function settings are changed simultaneously with other func-
tions being customized. Contact your Toyota dealer for further 
details.

Settings that can be changed using the navigation system or mul-

timedia system

Settings that can be changed using the multi-information display
Settings that can be changed by your Toyota dealer

Definition of symbols: O = Available, – =Not available

Predictive efficient drive

*

 (

P.71)

*

: If equipped

WARNING

During customization

As the hybrid system needs to be 

operating during customization, 

ensure that the vehicle is parked 

in a place with adequate ventila-

tion. In a closed area such as a 

garage, exhaust gases including 

harmful carbon monoxide (CO) 

may collect and enter the vehicle. 

This may lead to death or a seri-

ous health hazard.

NOTICE

During customization

To prevent 12-volt battery dis-

charge, ensure that the hybrid 

system is operating while custom-

izing features.

Customizable Features

Function

*1

Default setting

Customized 

setting

Predictive efficient drive

On

Off

O

A

B

C

A

B

C

-------------------------------------------------------------------------------------------------------------------------------------------------------------

502

8-2. Customization

Gauges, meters and multi-information display (

P.87, 91, 94

105)

Function

*1

Default setting

Customized 

setting

Language

“English”
(English)

“Français can-

adien”

(Canadian 

French)

O

“Español mexi-

cano”

(Mexican 

Spanish)

Units

*2

miles (MPG 

US)

km (km/L)

O

km (L/100 km)

miles mi/gal 

imp

EV indicator

On

Off

O

Digital Speed

*3

On

Off

O

Gadget Content

*3

No Display

Distance

O

Total Time

Average 

Speed

Fuel Economy Type

*3

Total

Trip

O

Tank

ECO Accelerator Guidance

*4

On

Off

O

“Fuel Economy”

*4

“Total Aver-

age”

“Trip Average”

O

“Tank Aver-

age”

Audio system linked dis-
play

*4

On

Off

O

Energy monitor

*4

On

Off

O

AWD system display

*4

On

Off

O

Drive information type

*4

Trip

Total

O

A

B

C

-------------------------------------------------------------------------------------------------------------------------------------------------------------

503

8-2. Customization

8

Vehicle

 specifications

*1

:For details about each function: 

P.100, 111

*2

:The default setting varies according to country.

*3

:Vehicles with 7-inch display only

*4

:Vehicles with 4.2-inch display only

Head-up display

*

 (

P.116)

Drive information items (first 
item)

*4

Distance

Average 

Speed

O

Total Time

Drive information items (sec-
ond item)

*4

Total Time

Average 

Speed

O

Distance

“Trip Summary”

*4

“ECO Guid-

ance”

“Drive Info”

O

Pop-up display

On

Off

O

Multi-Information display off

Off

On

O

Suggestion function

On

On (when the 

vehicle is 

stopped)

O

O

Off

Sensor sensitivity for darken-
ing the brightness of the 
instrument cluster depend-
ing on the outside brightness

Standard

-2 to 2

O

Sensor sensitivity for return-
ing the brightness of the 
instrument cluster to the orig-
inal level depending on the 
outside brightness

Standard

-2 to 2

O

Function

Default setting

Customized 

setting

Head-up display

On

Off

O

Function

*1

Default setting

Customized 

setting

A

B

C

A

B

C

-------------------------------------------------------------------------------------------------------------------------------------------------------------

504

8-2. Customization

*

: If equipped

Door lock (

P.131, 467)

Tachometer settings

Hybrid Sys-

tem Indicator

Tachometer

O

No content

Navigation display

*

On

Off

O

Driving support system dis-
play

On

Off

O

Compass

*

On

Off

O

Audio system operation sta-
tus

On

Off

O

Function

Default setting

Customized 

setting

Unlocking using a mechani-
cal key

Driver’s door 

unlocked in 

first step, all 

doors 

unlocked in 

second step

All doors 

unlocked in 

first step

O

Automatic door locking func-
tion

Shift position 

linked door 

locking opera-

tion

Off

O

O

Speed linked 

door locking 

operation

Automatic door unlocking 
function

Shift position 

linked door 

unlocking 
operation

Off

O

O

Driver’s door 

linked door 

unlocking 
operation

Function

Default setting

Customized 

setting

A

B

C

A

B

C

-------------------------------------------------------------------------------------------------------------------------------------------------------------

505

8-2. Customization

8

Vehicle

 specifications

Smart key system and wireless remote control (

P.130, 148)

Smart key system (

P.148)

*

: This setting can be changed when the smart door unlocking setting is set 

to Driver’s door.

Function

Default setting

Customized 

setting

Operation signal (emer-
gency flashers)

On

Off

O

O

Operation buzzer volume

5

Off

O

O

1 to 7

Time elapsed before the 
automatic door lock function 
is activated if a door is not 
opened after being unlocked

60 seconds

Off

O

O

30 seconds

120 seconds

Open door reminder buzzer 
(When locking the vehicle)

On

Off

O

Function

Default setting

Customized 

setting

Smart key system

On

Off

O

Smart door unlocking

Driver’s door

All the doors

O

O

Number of consecutive door 
lock operations

2 times

As many as 

desired

O

Time elapsed before unlock-
ing all the door when gripping 
and holding the driver’s door 
handle

*

2 seconds

Off

O

1.5 seconds

2.5 seconds

Power switch illumination

On

Off

O

A

B

C

A

B

C

-------------------------------------------------------------------------------------------------------------------------------------------------------------

506

8-2. Customization

Wireless remote control (

P.130)

Rear seat reminder (

P.133)

Power back door (

P.137)

Function

Default setting

Customized 

setting

Wireless remote control

On

Off

O

Unlocking operation

Driver’s door 

unlocked in 

first step, all 

doors 

unlocked in 

second step

All doors 

unlocked in 

first step

O

O

Theft deterrent panic mode

On

Off

O

Locking operation when door 
opened

On

Off

O

O

The function that activates 
the 

 switch of the wire-

less remote control when 
locking the door (

P.137)

On (Unlocking 

all the door)

Off

O

On (Unlocking 

back door 

only)

Function

Default setting

Customized 

setting

Rear seat reminder function

On

Off

O

Function

Default setting

Customized 

setting

Power back door operations

On

Off

O

O

Back door opener switch 
operations

Press and hold

One short 

press

O

 switch of the wireless 

remote control operation

Press and hold

One short 

press

O

Push twice

Off

Operation buzzer volume

3

1

O

2

A

B

C

A

B

C

A

B

C

-------------------------------------------------------------------------------------------------------------------------------------------------------------

507

8-2. Customization

8

Vehicle

 specifications

*1

:The operation buzzer that sounds when the back door begins to operate 

cannot be turned off.

*2

:The open position is set by the power back door switch. (

P.147)

*3

:When the towing hitch is installed, kick sensor does not work.

*4

:If equipped

Driving position memory

*

 (

P.158)

*

: If equipped

Operation buzzer while the 
back door is operating

*1

Off

On

O

Opening angle

5

1 to 4

O

User setting

*2

Automatic closing of the back 
door when lowered

On

Off

O

Automatic opening of the 
back door using the back 
door opener switch

On

Off

O

Hands free power back 
door

*3, 4

On

Off

O

Function

Default setting

Customized 

setting

Selection the door linking 
driving position memory with 
door unlock operation

Driver’s door

All doors

O

Function to prevent contact 
between the head restraint 
and ceiling (while moving to 
memory location)

On

Off

O

Function

Default setting

Customized 

setting

A

B

C

A

B

C

-------------------------------------------------------------------------------------------------------------------------------------------------------------

508

8-2. Customization

Enabling easier driver entry and exit (power easy access sys-
tem)

*

(

P.158)

*

: If equipped

Outside rear view mirrors (

P.177)

Power windows (

P.179)

Function

Default setting

Customized 

setting

Driver’s seat slide move-
ment when exiting the vehi-
cle

Full

Off

O

O

Partial

steering wheel movement 
when exiting the vehicle

Tilt & tele-

scopic

Tilt only

O

Telescopic 

only

off

Function

Default setting

Customized 

setting

Automatic folding and 
extending operation

Linked to lock-

ing/unlocking 

of the doors

Off

O

Linked to 

power switch 

operation

Function

Default setting

Customized 

setting

Key linked operation (open)

Off

On

O

Key linked operation (close)

Off

On

O

Wireless remote control 
linked operation (open)

Off

On

O

Wireless remote control 
linked operation signal 
(buzzer)

On

Off

O

Side windows open warning 
function

On

Off

O

A

B

C

A

B

C

A

B

C

-------------------------------------------------------------------------------------------------------------------------------------------------------------

509

8-2. Customization

8

Vehicle

 specifications

Lights (

P.214)

*

: Except for Canada

Automatic light control system (

P.214)

Rear window wiper (

P.224)

PCS (Pre-Collision System) (

P.235)

Function

Default setting

Customized 

setting

Daytime Running Lights

*

On

Off

O

O

Light reminder buzzer

On

Off

O

Welcome lamp

On

Off

O

Function

Default setting

Customized 

setting

Light sensor sensitivity

Standard

–2 to 2

O

O

Time elapsed before head-
lights automatically turn off 
after doors are closed

30 seconds

Off

O

O

60 seconds

90 seconds

Windshield wiper linked 
headlight illumination

On

Off

O

Function

Default setting

Customized 

setting

Back door opening linked 
rear window wiper stop func-
tion

Off

On

O

Washer linked rear window 
wiper operation

On

Off

O

Shift position linked rear win-
dow wiper operation 
(

P.225)

Only once

Off

O

Continuous

Function

Default setting

Customized 

setting

PCS (Pre-Collision System)

On

Off

O

A

B

C

A

B

C

A

B

C

A

B

C

-------------------------------------------------------------------------------------------------------------------------------------------------------------

510

8-2. Customization

LTA (Lane Tracing Assist) (

P.243)

RSA (Road Sign Assist)

*

 (

P.253)

*

: If equipped

Adjust alert timing

Middle

Early

O

Late

Function

Default setting

Customized 

setting

Lane centering function

On

Off

O

Steering assist function

On

Off

O

Alert

Steering wheel 

vibration

buzzer

O

Alert sensitivity

High

Standard

O

Vehicle sway warning func-
tion

On

Off

O

Vehicle sway warning sensi-
tivity

Standard

Low

O

High

Function

Default setting

Customized 

setting

RSA (Road Sign Assist)

On

Off

O

Excess speed notification 
method

Display only

No notification

O

Display and 

buzzer

Excess speed notification 
level

1 mph (2 km/h)

3 mph (5 km/h)

O

5 mph (10 

km/h)

Other notifications method 
(No-entry notification)

Display only

No notification

O

Display and 

buzzer

Function

Default setting

Customized 

setting

A

B

C

A

B

C

A

B

C

-------------------------------------------------------------------------------------------------------------------------------------------------------------

511

8-2. Customization

8

Vehicle

 specifications

BSM (Blind Spot Monitor) (

P.267)

RCTA (Rear cross traffic alert) function

*1

 (

P.267)

*1

:If equipped

*2

:This setting is linked with the buzzer volume of the intuitive parking 

assist.

Intuitive parking assist

*1

 (

P.276)

*1

:If equipped

*2

:This setting is linked with the buzzer volume of the RCTA (Rear cross 

traffic alert) function.

Function

Default setting

Customized 

setting

BSM (Blind Spot Monitor)

On

Off

O

Outside rear view mirror indi-
cator brightness

Bright

Dim

O

Alert timing for presence of 
approaching vehicle (sensi-
tivity)

Intermediate

Early

O

Late

Only when 

vehicle 

detected in 

blind spot

Function

Default setting

Customized 

setting

RCTA (Rear cross traffic 
alert) function

On

Off

O

Buzzer volume

*2

Level 2

Level 1

O

Level 3

Function

Default setting

Customized 

setting

Intuitive parking assist

On

Off

O

O

Buzzer volume

*2

2

1

O

O

3

A

B

C

A

B

C

A

B

C

-------------------------------------------------------------------------------------------------------------------------------------------------------------

512

8-2. Customization

PKSB (Parking Support Brake)

*

 (

P.283)

*

: If equipped

Automatic air conditioning system (

P.314, 321)

Illumination (

P.334)

*

: If equipped

Function

Default setting

Customized 

setting

PKSB (Parking Support 
Brake) function

On

Off

O

Function

Default setting

Customized 

setting

A/C Auto switch operation

On

Off

O

O

Function

Default setting

Customized 

setting

Time elapsed before the inte-
rior lights turn off

15 seconds

Off

O

O

7.5 seconds

30 seconds

Operation after the power 
switch is turned off

On

Off

O

Operation when the doors 
are unlocked

On

Off

O

Operation when you 
approach the vehicle with the 
electronic key on your per-
son

On

Off

O

Footwell lighting

*

On

Off

O

Time elapsed before the 
outer foot lights

*

 turn off

15 seconds

Off

O

7.5 seconds

30 seconds

A

B

C

A

B

C

A

B

C

-------------------------------------------------------------------------------------------------------------------------------------------------------------

513

8-2. Customization

8

Vehicle

 specifications

Panoramic fixed moon roof with one-touch frosted glass con-
trol

*

 (

P.347)

*

: If equipped

Vehicle customization

When the speed linked door locking function and shift position linked door 

locking function are both on, the door lock operates as follows.

• If the vehicle is started with all the doors locked, the speed linked door 

locking function would not operate.

• If the vehicle is started with any door unlocked, the speed linked door lock-

ing function will operate.

• When shifting the shift lever to any position other than P, all the doors will 

be locked.

When the smart key system is off, the selecting door to unlock cannot be 

customized.

When the doors remain closed after unlocking the doors and the auto-

matic door lock function is activated, the signals will be generated in 

accordance with the Operation signal (buzzer) and the Operation signal 

(emergency flashers) settings.

Function

Default setting

Customized 

setting

Opaque/transparent state 
memory function when the 
power switch is turned to 
OFF

Off

On

O

A

B

C

-------------------------------------------------------------------------------------------------------------------------------------------------------------

514

8-3. Initialization

8-3.Initialization

*

: If equipped

Items to initialize

The following items must be initialized for normal system 
operation after such cases as the battery being reconnected, 
or maintenance being performed on the vehicle:

List of the items to initialize

Item

When to initialize

Reference

Power back door

• After reconnecting or chang-

ing the battery

• After changing a fuse

P.143

Power windows

When functioning abnormally

P.179

Electronic sunshade

*

P.347

Maintenance required 
reminder message

• After the maintenance is 

performed

P.377

Tire pressure warning system

• When rotating the tires
• When changing the tire
• After registering the ID 

codes

P.404

Toyota parking assist monitor

*

• After reconnecting or chang-

ing the battery

• After changing a fuse

Refer to the 

“NAVIGA-

TION AND 
MULTIME-

DIA SYS-

TEM 

OWNER’S 

MANUAL”.

Panoramic view monitor

*

Oil maintenance

After the maintenance is per-
formed

P.390

-------------------------------------------------------------------------------------------------------------------------------------------------------------

515

9

9

For ow

ner
s

For owners

9-1. For owners

Reporting safety defects for 

U.S. owners...............

516

Seat belt instructions for 

Canadian owners (in 
French)......................

517

SRS airbag instructions for 

Canadian owners (in 
French)......................

518

Headlight aim instructions 

for Canadian owners (in 
French)......................

525

-------------------------------------------------------------------------------------------------------------------------------------------------------------

516

9-1. For owners

9-1.For owners

Reporting safety 

defects for U.S. own-

ers

If you believe that your vehi-
cle has a defect which could 
cause a crash or could 
cause injury or death, you 
should immediately inform 
the National Highway Traffic 
Safety Administration 
(NHTSA) in addition to noti-
fying Toyota Motor Sales, 
U.S.A., Inc. (Toll-free: 1-800-
331-4331).

If NHTSA receives similar 
complaints, it may open an 
investigation, and if it finds 
that a safety defect exists in 
a group of vehicles, it may 
order a recall and remedy 
campaign. However, NHTSA 
cannot become involved in 
individual problems 
between you, your dealer, or 
Toyota Motor Sales, U.S.A., 
Inc.

To contact NHTSA, you may 
call the Vehicle Safety 
Hotline toll-free at 1-888-
327-4236 (TTY: 1-800-424-
9153); go to

http://www.safercar.gov

; or 

write to: Administrator, 
NHTSA, 1200 New Jersey 
Ave. SE., Washington, DC 
20590. You can also obtain 
other information about 
motor vehicle safety from 

http://www.safercar.gov

.

-------------------------------------------------------------------------------------------------------------------------------------------------------------

517

9-1. For owners

9

For ow

ner
s

Tirez sur la ceinture épau-
lière jusqu’à ce qu’elle recou-
vre entièrement l’épaule; elle 
ne doit cependant pas 
toucher le cou ni glisser de 
l’épaule.

Placez la ceinture abdominale 
le plus bas possible sur les 
hanches.

Réglez la position du dossier.
Tenez-vous assis bien au 
fond du siège, le dos droit.

Ne vrillez pas la ceinture de 
sécurité.

Manipulation des ceintures 
de sécurité

Avec un chiffon ou une éponge, 
nettoyez à l’aide d’un savon 
doux et de l’eau tiède. Vérifiez 
aussi les ceintures régulière-
ment pour vous assurer qu’elles 
ne présentent pas d’usure 
excessive, d’effilochage ou de 
coupures.

Seat belt instructions 

for Canadian owners 

(in French)

The following is a French 
explanation of seat belt 
instructions extracted from 
the seat belt section in this 
manual.

See the seat belt section for 
more detailed seat belt 
instructions in English.

Utilisation adéquate des 
ceintures de sécurité

Entretien et soin

AVERTISSEMENT

Dommages et usure de la 

ceinture de sécurité

Vérifiez périodiquement le sys-

tème de ceintures de sécurité. 

Vérifiez qu’il n’y a pas de cou-

pures, d’effilochures ni de pièces 

desserrées. N’utilisez pas une 

ceinture de sécurité endommagée 

avant qu’elle ne soit remplacée. 

Les ceintures de sécurité endom-

magées ne peuvent pas protéger 

les occupants contre les bless-

ures graves, voire mortelles.

-------------------------------------------------------------------------------------------------------------------------------------------------------------

518

9-1. For owners

Emplacement des coussins gonflables SRS

Coussins gonflables SRS avant

Coussin gonflable SRS du conducteur/coussin gonflable SRS du 
passager avant

Peuvent aider à protéger la tête et la poitrine du conducteur et du passager 
avant contre les impacts avec des composants intérieurs

Coussin gonflable SRS de protection des genoux

Peut aider à protéger le conducteur

Coussin gonflable SRS du coussin de siège

Peut aider à retenir le passager avant

SRS airbag instructions for Canadian owners (in 

French)

The following is a French explanation of SRS airbag instruc-
tions extracted from the SRS airbag section in this manual.

See the SRS airbag section for more detailed SRS airbag instruc-
tions in English.

Système de coussins gonflables SRS

A

B

C

-------------------------------------------------------------------------------------------------------------------------------------------------------------

519

9-1. For owners

9

For ow

ner
s

Coussins gonflables SRS latéraux et en rideau

Coussins gonflables SRS latéraux avant

Peuvent aider à protéger le torse des occupants des sièges avant

Coussins gonflables SRS en rideau

• Peuvent aider à protéger principalement la tête des occupants des sièges 

latéraux

• Peuvent aider à empêcher les occupants d’être éjectés du véhicule en 

cas de tonneaux

Composants du système de coussins gonflables SRS

Capteurs d’impact avant

Coussin gonflable du passager avant

Capteurs d’impact latéral (portière avant)

Coussins gonflables en rideau

Limiteurs de force et dispositifs de tension des ceintures de sécu-
rité

Capteurs d’impact latéral (avant)

Coussins gonflables latéraux avant

Voyants “AIR BAG ON” et “AIR BAG OFF”

Coussin gonflable du coussin de siège

D

E

A

B

C

D

E

F

G

H

I

-------------------------------------------------------------------------------------------------------------------------------------------------------------

520

9-1. For owners

Contacteur de boucle de ceinture de sécurité du passager avant

Capteurs d’impact latéral (arrière)

Capteur de position du siège du conducteur

Coussin gonflable du conducteur

Capteurs du système de classification de l’occupant du siège du 
passager avant

Coussin gonflable de protection des genoux

Lampe témoin SRS

Module de capteur de coussin gonflable

Votre véhicule est doté de COUSSINS GONFLABLES ÉVOLUÉS 
dont la conception s’appuie sur les normes de sécurité des véhicules 
à moteur américains (FMVSS208). Le module de capteur de coussin 
gonflable (ECU) contrôle le déploiement des coussins gonflables en 
fonction des informations obtenues des capteurs et d’autres élé-
ments affichés dans le diagramme des composants du système ci-
dessus. Ces informations comprennent des données relatives à la 
gravité de l’accident et aux occupants. Au moment du déploiement 
des coussins gonflables, une réaction chimique se produit dans les 
gonfleurs de coussin gonflable et les coussins gonflables se remplis-
sent rapidement d’un gaz non toxique pour aider à limiter le mouve-
ment des occupants.

J

K

L

M

N

O

P

Q

AVERTISSEMENT

Précautions relatives aux 

coussins gonflables SRS

Observez les précautions suiva-

ntes en ce qui concerne les cous-

sins gonflables SRS.

Négliger de le faire pourrait occa-

sionner des blessures graves, 

voire mortelles.

Le conducteur et tous les pas-

sagers du véhicule doivent por-

ter leur ceinture de sécurité de 

la manière appropriée.

Les coussins gonflables SRS 

sont des dispositifs supplémen-

taires qui doivent être utilisés 

avec les ceintures de sécurité.

-------------------------------------------------------------------------------------------------------------------------------------------------------------

521

9-1. For owners

9

For ow

ner
s

AVERTISSEMENT

Le coussin gonflable SRS du 

conducteur se déploie avec une 

force considérable et peut occa-

sionner des blessures graves, 

voire mortelles, notamment lor-

sque le conducteur se trouve 

très près du coussin gonflable. 

La National Highway Traffic 

Safety Administration (NHTSA), 

aux États-Unis, fait les recom-

mandations suivantes :

La zone à risque du coussin gon-
flable du conducteur couvre 
2 à 3 in. (50 à 75 mm) de la zone 
de déploiement du coussin gon-
flable. Pour assurer une marge de 
sécurité suffisante, restez à 10 in. 
(250 mm) du coussin gonflable. 
Cette distance est mesurée 
depuis le centre du volant jusqu’à 
votre sternum. Si maintenant 
vous vous tenez assis à moins de 
10 in. (250 mm), vous pouvez 
changer votre position de con-
duite de plusieurs manières :

• Reculez votre siège à la posi-

tion maximale vous permettant 

d’atteindre encore aisément les 

pédales.

• Inclinez légèrement le dossier 

du siège. 

Bien que les véhicules soient 

conçus différemment, la plupart 

des conducteurs peuvent main-

tenir une distance de 10 in. 

(250 mm), même si leur siège 

se trouve complètement vers 

l’avant, simplement en inclinant 

un peu le dossier du siège vers 

l’arrière. Si la visibilité avant est 

moindre après avoir incliné le 

dossier de votre siège, utilisez 

un coussin ferme et non glissant 

pour être assis plus haut ou 

relevez le siège si cette option 

est disponible sur votre 

véhicule.

• Si votre volant est réglable en 

hauteur, inclinez-le vers le bas. 

Cela vous permet d’orienter le 

coussin gonflable vers votre 

buste plutôt que vers votre tête 

et vers votre cou.

Le siège doit être réglé de la 

manière recommandée ci-dessus 

par la NHTSA, tout en gardant le 

contrôle des pédales et du volant, 

ainsi que la vue sur les com-

mandes du tableau de bord.

Si la rallonge de ceinture de 

sécurité a été reliée à la boucle 

de ceinture de sécurité du pas-

sager avant sans avoir égale-

ment été attachée à la plaque 

de blocage de la ceinture de 

sécurité du passager avant, les 

coussins gonflables SRS avant 

du passager avant con-

sidéreront que le passager 

avant porte tout de même sa 

ceinture même si elle n’est pas 

attachée. Les coussins gonfla-

bles SRS du passager avant 

peuvent alors ne pas s’activer 

correctement lors d’une colli-

sion, ce qui pourrait occasion-

ner des blessures graves, voire 

mortelles, en cas de collision. 

Assurez-vous de toujours porter 

la ceinture de sécurité avec la 

rallonge de ceinture de sécurité.

-------------------------------------------------------------------------------------------------------------------------------------------------------------

522

9-1. For owners

AVERTISSEMENT

Le coussin gonflable SRS du 

passager avant se déploie 

également avec une force con-

sidérable et peut occasionner 

des blessures graves, voire 

mortelles, notamment lorsque le 

passager avant se trouve très 

près du coussin gonflable. Le 

siège du passager avant doit se 

trouver le plus loin possible du 

coussin gonflable et le dossier 

doit être réglé de manière à ce 

que le passager avant soit assis 

bien droit.

Le déploiement d’un coussin 

gonflable risque d’infliger des 

blessures graves, voire mor-

telles, aux bébés et aux enfants 

mal assis et/ou mal attachés. 

Un bébé ou un enfant trop petit 

pour utiliser une ceinture de 

sécurité doit être correctement 

retenu à l’aide d’un dispositif de 

retenue pour enfants. Toyota 

recommande vivement de 

placer et d’attacher correcte-

ment tous les bébés et tous les 

enfants sur les sièges arrière du 

véhicule à l’aide de dispositifs 

de retenue adaptés. Les sièges 

arrière sont plus sécuritaires 

pour les bébés et les enfants 

que le siège du passager avant.

N’installez jamais un dispositif 

de retenue pour enfants de type 

dos à la route sur le siège du 

passager avant, même si le 

voyant “AIR BAG OFF” est 

allumé. En cas d’accident, la 

force et la vitesse de déploie-

ment du coussin gonflable du 

passager avant pourraient 

infliger à l’enfant des blessures 

graves, voire mortelles, si le dis-

positif de retenue pour enfants 

de type dos à la route était 

installé sur le siège du passager 

avant.

Ne vous asseyez pas sur le 

bord du siège et ne vous 

appuyez pas sur la planche de 

bord.

Ne laissez pas un enfant se 

tenir face au coussin gonflable 

SRS du passager avant ni 

s’asseoir sur les genoux d’un 

passager avant.

Ne laissez pas les occupants 

des sièges avant tenir des 

objets sur leurs genoux.

Ne vous appuyez pas sur la 

portière ou sur le brancard de 

pavillon, ni sur les montants 

avant, latéraux ou arrière.

-------------------------------------------------------------------------------------------------------------------------------------------------------------

523

9-1. For owners

9

For ow

ner
s

AVERTISSEMENT

Ne laissez personne s’age-

nouiller face à la portière sur le 

siège du passager ni sortir la 

tête ou les mains à l’extérieur 

du véhicule.

Ne fixez et n’appuyez rien sur 

des zones telles que la planche 

de bord, le tampon de volant ou 

encore la partie inférieure du 

tableau de bord.

Ces objets peuvent se trans-

former en projectiles lorsque les 

coussins gonflables SRS du 

conducteur, du passager avant 

et de protection des genoux se 

déploient.

Ne fixez rien sur des zones 

telles que les portières, le pare-

brise, les glaces latérales, les 

montants avant ou arrière, le 

brancard de pavillon et la poi-

gnée de maintien.

N’accrochez pas de cintres ni 

d’autres objets rigides sur les 

crochets porte-vêtements. Tous 

ces objets pourraient se trans-

former en projectiles et vous 

occasionner des blessures 

graves, voire mortelles, en cas 

de déploiement des coussins 

gonflables SRS en rideau.

Si un recouvrement de vinyle 

est placé sur la zone de 

déploiement du coussin gon-

flable SRS de protection des 

genoux, veillez à le retirer.

N’utilisez pas d’accessoires 

recouvrant les parties du siège 

où les coussins gonflables SRS 

latéraux et le coussin gonflable 

SRS du coussin de siège se 

déploient, car ces accessoires 

pourraient entraver le déploie-

ment des coussins SRS. De tels 

accessoires peuvent empêcher 

les coussins gonflables SRS 

latéraux et le coussin gonflable 

SRS du coussin de siège de 

s’activer correctement, rendre le 

système inopérant ou provo-

quer le déploiement accidentel 

des coussins gonflables SRS 

latéraux et du coussin gonflable 

SRS du coussin de siège, occa-

sionnant des blessures graves, 

voire mortelles.

Ne frappez pas et n’appliquez 

pas une pression importante à 

l’emplacement des portières 

avant ou des composants des 

coussins gonflables SRS.

Cela peut provoquer un mau-

vais fonctionnement des couss-

ins gonflables SRS.

Ne touchez à aucun composant 

des coussins gonflables SRS 

immédiatement après leur 

déploiement (gonflage), car ils 

pourraient être chauds.

-------------------------------------------------------------------------------------------------------------------------------------------------------------

524

9-1. For owners

AVERTISSEMENT

Si vous avez de la difficulté à 

respirer après le déploiement 

des coussins gonflables SRS, 

ouvrez une portière ou une 

glace latérale pour laisser entrer 

l’air frais, ou quittez le véhicule 

si vous pouvez le faire en toute 

sécurité. Dès que possible, net-

toyez tous les résidus afin 

d’éviter les irritations cutanées.

Si les emplacements de stock-

age des coussins gonflables 

SRS, tels que le tampon de 

volant et les garnitures des 

montants avant et arrière, sont 

endommagés ou fissurés, 

faites-les remplacer par votre 

concessionnaire Toyota.

Ne placez aucun objet, par 

exemple un coussin, sur le 

siège du passager avant. Cela 

disperserait le poids du pas-

sager, ce qui empêcherait le 

capteur de le détecter correcte-

ment. Cela pourrait empêcher le 

déploiement des coussins gon-

flables SRS du passager avant 

en cas de collision.

Modification et mise au rebut 

des composants du système 

de coussins gonflables SRS

Ne mettez pas votre véhicule au 

rebut et n’effectuez aucune des 

modifications suivantes sans 

d’abord consulter votre conces-

sionnaire Toyota. Les coussins 

gonflables SRS pourraient 

fonctionner de manière incor-

recte ou se déployer (gonfler) 

accidentellement, ce qui serait 

susceptible d’occasionner des 

blessures graves, voire mortelles.

Installation, retrait, démontage 

et réparation des coussins gon-

flables SRS

Réparations, modifications, 

retrait ou remplacement du 

volant, du tableau de bord, de la 

planche de bord, des sièges ou 

du capitonnage des sièges, des 

montants avant, latéraux et 

arrière, des brancards de pavil-

lon, des panneaux des portières 

avant, des garnitures des 

portières avant ou des haut-

parleurs des portières avant

Modifications du panneau de la 

portière avant (comme le per-

forer)

Réparations ou modifications de 

l’aile avant, du pare-chocs 

avant ou du côté de l’habitacle

Installation d’une protection de 

calandre (barre safari, barre 

kangourou, etc.), de lames de 

déneigement, de treuils ou d’un 

porte-bagages de toit

Modifications du système de 

suspension du véhicule

Installation d’appareils électro-

niques tels qu’un émetteur-

récepteur radio ou un lecteur de 

CD

Modifications à votre véhicule 

pour une personne aux capac-

ités physiques réduites

-------------------------------------------------------------------------------------------------------------------------------------------------------------

525

9-1. For owners

9

For ow

ner
s

Boulon de réglage A

Boulon de réglage B

Assurez-vous que le réservoir 
de carburant du véhicule est 
plein et que la partie de car-
rosserie située autour des 
phares n’est pas déformée.

Garez le véhicule sur un sol 
parfaitement horizontal.

Assurez-vous que la pression 
de gonflage des pneus est au 
niveau prescrit.

Demandez à quelqu’un de 
s’asseoir sur le siège du con-
ducteur.

Faites rebondir le véhicule à 
plusieurs reprises.

1

Tournez le boulon A vers la 
droite ou vers la gauche à 
l’aide d’un tournevis cruci-
forme.

Retenez le sens de rotation et le 

nombre de tours.

2

Tournez le boulon B du 
même nombre de tours et 
dans le même sens qu’à 
l’étape 

1

.

Si vous n’arrivez pas à régler vos 

phares en suivant cette procédure, 

apportez le véhicule chez votre 

concessionnaire Toyota afin qu’il 

règle la portée des phares.

Headlight aim instruc-

tions for Canadian 

owners (in French)

The following is a French 
explanation of headlight aim 
instructions from the head-
light aim section in this 
manual.

Boulons de réglage verti-
cal

Avant de vérifier la portée 
des phares

A

B

Réglage de la portée des 
phares

-------------------------------------------------------------------------------------------------------------------------------------------------------------


Content      ..     6      7      8