Toyota Sienna (2020 year). Manual in english - part 6


  Index      Toyota     Toyota Sienna (2020 year). Manual in english


Search            copyright infringement  


Content      ..     4      5      6      7     ..


Toyota Sienna (2020 year). Manual in english - part 6


334

5-1. Using the air conditioning system and defogger

SIENNA_OM_OM08035U_(U)

Adjusting the fan speed setting

Press  “

”  on 

  to  increase  the  fan  speed  and  “

”  to

decrease the fan speed.

Press 

 to turn the fan off.

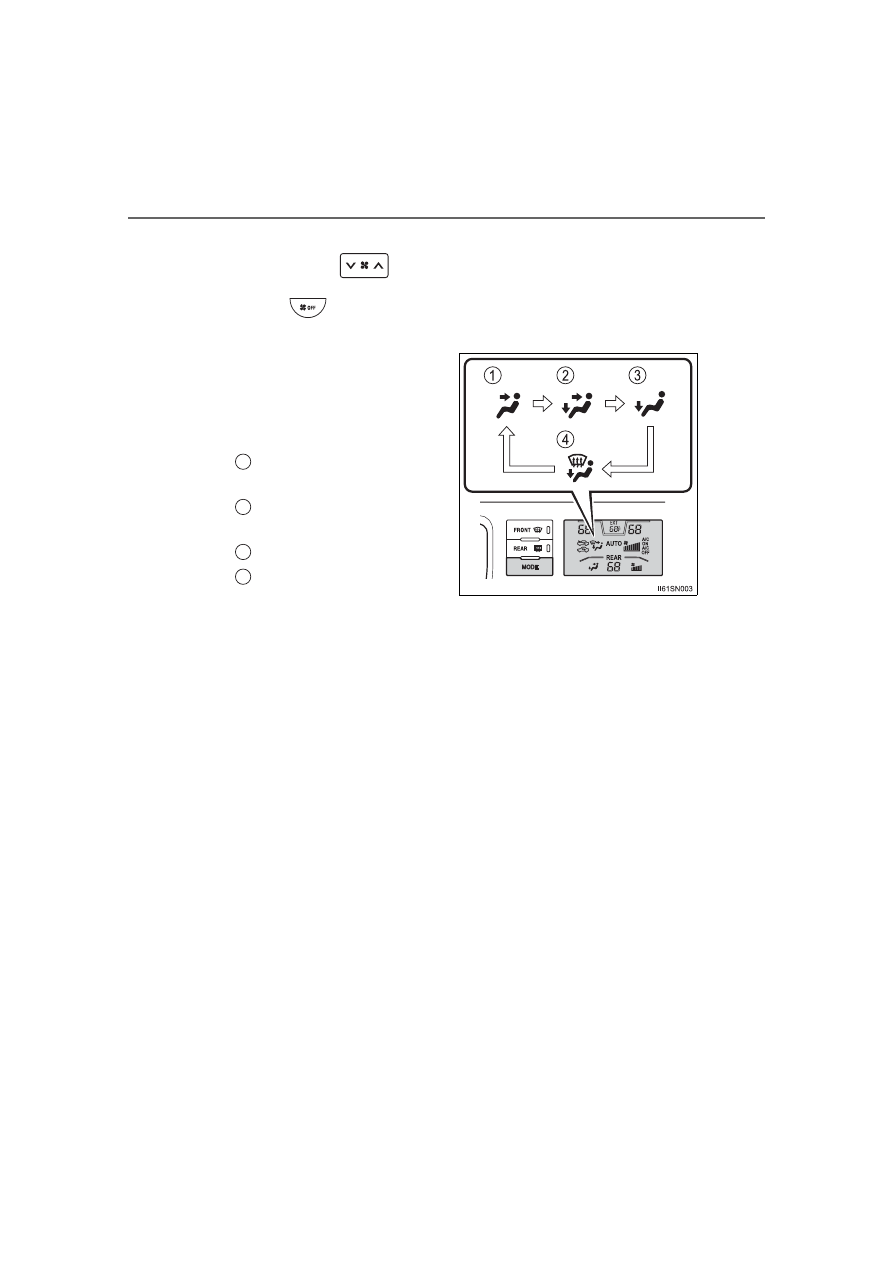
Change the airflow mode

To change the air outlets, press
the “MODE” button.

The  air  outlets  used  are
switched each time the button is
pressed.

Air  flows  to  the  upper
body.
Air flows to the upper body
and feet.
Air flows to the feet.
Air  flows  to  the  feet  and
the  windshield  defogger
operates.

1

2

3
4

-------------------------------------------------------------------------------------------------------------------------------------------------------------

SIENNA_OM_OM08035U_(U)

335

5-1. Using the air conditioning system and defogger

5

In

te

rior 

fe

at

ures

Press 

 (“AUTO” appears on the display).

Adjust the temperature setting.
To stop the operation, press 

.

Automatic mode indicator

If the fan speed setting or air flow modes are operated, the auto-
matic mode indicator goes off. However, automatic mode for func-
tions other than that operated is maintained.

Adjusting the temperature setting

Press the “REAR” button (indicator and rear temperature on the
display on).
Turn the “REAR TEMP” dial clockwise to increase the tempera-
ture and counterclockwise to decrease the temperature.

The air conditioning system switches between individual (the lower side
indicator on the “SYNC” button is off) and simultaneous (the lower side
indicator on the “SYNC” button is on) modes each time the “SYNC” but-
ton is pressed.

Adjusting the fan speed

Press  “

”  on 

  to  increase  the  fan  speed  and  “

”  to

decrease the fan speed.

Press 

 to turn the fan off.

Changing the air outlets

Press the “REAR MODE” button.
The air outlets switch each time the button is pressed. (

P. 342)

Using the automatic mode

Changing the rear setting

1

2

3

1

2

-------------------------------------------------------------------------------------------------------------------------------------------------------------

336

5-1. Using the air conditioning system and defogger

SIENNA_OM_OM08035U_(U)

Switching between outside air and recirculated air modes

Press 

.

The mode switches between outside air mode (

 appears on the

display) and recirculated air mode (

 appears on the display) each

time the button is pressed.

Defogging the windshield

Defoggers  are  used  to  defog  the  windshield  and  front  side  win-
dows.

Press 

.

Set 

 to outside air mode if the recirculated air mode is used. (It

may switch automatically.)
To defog the windshield and the side windows early, turn the air flow and
temperature up.
To  return  to  the  previous  mode,  press 

  again  when  the  wind-

shield is defogged.

Rear window defogger, outside rear view mirror defoggers (if
equipped) and windshield wiper de-icer (if equipped)

Defoggers are used to defog the rear window, and to remove rain-
drops, dew and frost from the outside rear view mirrors. The wind-
shield wiper de-icer is used to prevent ice from building up on the
windshield and wiper blades.
Press 

.

The  defoggers  and  windshield  wiper  de-icer  will  automatically  turn  off
after a period of time.

Other functions

-------------------------------------------------------------------------------------------------------------------------------------------------------------

SIENNA_OM_OM08035U_(U)

337

5-1. Using the air conditioning system and defogger

5

In

te

rior 

fe

at

ures

Location of air outlets

The  air  outlets  and  air  volume
changes  according  to  the
selected air flow mode.

Adjusting  the  air  flow  direction  and  opening/closing  the  air
outlets

Turn the knob to open or close the vent.
Direct air flow to the left or right, up or down.

Air outlets

Center outlets

Right and left side outlets

1
2

-------------------------------------------------------------------------------------------------------------------------------------------------------------

338

5-1. Using the air conditioning system and defogger

SIENNA_OM_OM08035U_(U)

Using automatic mode

Fan speed is adjusted automatically according to the temperature setting and
the ambient conditions. 
Therefore, the fan may stop for a while until warm or cool air is ready to flow
immediately after 

 is pressed.

When the outside temperature exceeds 75°F (24°C) and the air condition-
ing system is on

In order to reduce the air conditioning power consumption, the air condition-
ing system may switch to recirculated air mode automatically. 
This may also reduce fuel consumption.

Recirculated air mode is selected as a default mode when the engine switch
is  turned  to  the  “ON”  position  (vehicles  without  a  smart  key  system)  or
IGNITION ON mode (vehicles with a smart key system).

It is possible to switch to outside air mode at any time by pressing 

.

Fogging up of the windows

The  windows  will  easily  fog  up  when  the  humidity  in  the  vehicle  is  high.
Pressing 

  on  will  dehumidify  the  air  from  the  outlets  and  defog  the

windshield effectively.

If you turn “A/C” off, the windows may fog up more easily.

The windows may fog up if the recirculated air mode is used.

Outside/recirculated air mode

When driving on dusty roads such as tunnels or in heavy traffic, set 
to the recirculated air mode. This is effective in preventing outside air from
entering  the  vehicle  interior.  During  cooling  operation,  setting  the  recircu-
lated air mode will also cool the vehicle interior effectively.

Outside/recirculated  air  mode  may  automatically  switch  depending  on  the
temperature setting or the inside temperature.

-------------------------------------------------------------------------------------------------------------------------------------------------------------

SIENNA_OM_OM08035U_(U)

339

5-1. Using the air conditioning system and defogger

5

In

te

rior 

fe

at

ures

Temperature display

The  temperature  display  on  the  multi-information  display  can  be  changed.
(

P. 540)

When 


is selected for the air outlets used

For your driving comfort, air flowing to the feet may be warmer than air flow-
ing to the upper body depending on the temperature setting.

When the outside temperature is low

The dehumidification function may not operate even when 

 is pressed.

When “A/C ON” flashes in the display

Press 

 and turn off the air conditioning system before turning it on once

more. There may be a problem in the air conditioning system if “A/C ON” con-
tinues to flash. Turn the air conditioning system off and have it inspected by
your Toyota dealer.

Ventilation and air conditioning odors

To let fresh air in, set the air conditioning system to the outside air mode.

During use, various odors from inside and outside the vehicle may enter into
and accumulate in the air conditioning system. This may then cause odor to
be emitted from the vents.

To reduce potential odors from occurring: 
• It is recommended that the air conditioning system be set to outside air

mode prior to turning the vehicle off.

• The start timing of the blower may be delayed for a short period of time

immediately  after  the  air  conditioning  system  is  started  in  automatic
mode.

Air conditioning filter

P. 434

Customization

Settings (e.g. 

 linked operation) can be changed. 

(Customizable features: 

P. 546)

-------------------------------------------------------------------------------------------------------------------------------------------------------------

340

5-1. Using the air conditioning system and defogger

SIENNA_OM_OM08035U_(U)

WARNING

To prevent the windshield from fogging up

Do not use 

 during cool air operation in extremely humid weather.

The difference between the temperature of the outside air and that of the
windshield can cause the outer surface of the windshield to fog up, block-
ing your vision.

To prevent burns

Do not touch the rear view mirror surfaces when the outside rear view mir-
ror defoggers (vehicles with outside rear view mirror defoggers) are on.

Do not touch the glass at lower part of the windshield or to the side of the
front pillars when the windshield wiper de-icer is on. (vehicles with wind-
shield wiper de-icer)

NOTICE

To prevent battery discharge

Do not leave the air conditioning system on longer than necessary when the
engine is stopped.

Do not place anything on the instrument
panel  which  may  cover  the  air  outlets.
Otherwise,  air  flow  may  be  obstructed,
preventing  the  windshield  defoggers
from defogging.

-------------------------------------------------------------------------------------------------------------------------------------------------------------

341

SIENNA_OM_OM08035U_(U)

5-1. Using the air conditioning system and defogger

5

In

te

rior 

fe

at

ures

Rear automatic air conditioning system

Adjusting the temperature setting

Press “

” on the “TEMP” button to increase the temperature and “

to decrease the temperature.

Adjusting the fan speed

Press “

” on 

 to increase the fan speed and “

” to decrease

the fan speed.

Press the “OFF” button to turn the fan off.

Airflow and outlets are automatically adjusted according to the
temperature setting.

Air conditioning controls

-------------------------------------------------------------------------------------------------------------------------------------------------------------

342

5-1. Using the air conditioning system and defogger

SIENNA_OM_OM08035U_(U)

Changing the air outlets

Press the “MODE” button.

The air flow mode switch each time the button is pressed.

Air flows to the upper body.
Air  flows  to  the  upper  body
and feet.
Air flows to the feet.

Press the “AUTO” button (“AUTO” appears on the display).
Adjust the temperature setting.
To stop the operation, press the “OFF” button.

Automatic mode indicator

If the fan speed setting or air flow modes are operated, the auto-
matic mode indicator goes off. However, automatic mode for func-
tions other than that operated is maintained.

Location of air outlets

The  air  outlets  and  air  volume
changes  according  to  the
selected air flow mode.

1
2

3

Using automatic mode

Air outlets

1

2

3

-------------------------------------------------------------------------------------------------------------------------------------------------------------

SIENNA_OM_OM08035U_(U)

343

5-1. Using the air conditioning system and defogger

5

In

te

rior 

fe

at

ures

Adjusting the position of the air outlets

Direct  air  flow  to  the  front  or
rear, up or down.

Temperature display

The  temperature  display  on  the  multi-information  display  can  be  changed.
(

P. 540)

When the front air conditioning system is in simultaneous mode

The lower side indicator on the “SYNC” button is on. The rear air conditioning
system controls will continue to function. (

P. 332)

NOTICE

To prevent battery discharge

Do not leave the air conditioning system on longer than necessary when the
engine is stopped.

-------------------------------------------------------------------------------------------------------------------------------------------------------------

344

SIENNA_OM_OM08035U_(U)

5-1. Using the air conditioning system and defogger

Heated steering wheel

/seat heaters

: If equipped

Heated steering wheel and seat heaters heat the side grips of the
steering wheel and seats, respectively.

WARNING

Care should be taken to prevent injury if anyone in the following categories
comes in contact with the steering wheel and seats when the heater is on:
• Babies,  small  children,  the  elderly,  the  sick  and  the  physically  chal-

lenged

• Persons with sensitive skin
• Persons who are fatigued
• Persons who have taken alcohol or drugs that induce sleep (sleeping

drugs, cold remedies, etc.)

Observe the following precautions to prevent minor burns or overheating:
• Do  not  cover  the  seat  with  a  blanket  or  cushion  when  using  the  seat

heater.

• Do not use seat heater more than necessary.

NOTICE

Do not put heavy objects that have an uneven surface on the seat and do
not stick sharp objects (needles, nails, etc.) into the seat.

To prevent battery discharge, do not use the functions when the engine is
not running.

-------------------------------------------------------------------------------------------------------------------------------------------------------------

SIENNA_OM_OM08035U_(U)

345

5-1. Using the air conditioning system and defogger

5

In

te

rior 

fe

at

ures

Turns  the  heated  steering  wheel
on/off

The indicator light comes on when
the heated steering wheel is oper-
ating.

The heated steering wheel can be used when the engine switch is in IGNI-
TION ON mode.

The heated steering wheel will automatically turn off after about 30 minutes.

Heated steering wheel

-------------------------------------------------------------------------------------------------------------------------------------------------------------

346

5-1. Using the air conditioning system and defogger

SIENNA_OM_OM08035U_(U)

For driver’s seat
For front passenger’s seat
On

The indicator light comes on.

Adjusts the seat temperature

The  further  you  move  the  dial
upward,  the  warmer  the  seat
becomes.

The seat heaters can be used when the engine switch is in the “ON” position
(vehicles without a smart key system) or IGNITION ON mode (vehicles with
a smart key system).

When not in use, move the dial fully downward. The indicator light turns off.

Seat heaters

1
2
3

4

-------------------------------------------------------------------------------------------------------------------------------------------------------------

347

SIENNA_OM_OM08035U_(U)

5-2. Using the interior lights

5

In

te

rior 

fe

at

ures

Interior lights list

Rear personal/interior lights (if equipped) (

P. 348)

Rear ceiling lights (if equipped) (

P. 349)

Front personal/interior lights (

P. 348)

Engine switch light
Front door courtesy lights (if equipped)
Outer foot lights (if equipped)

1
2
3
4
5
6

-------------------------------------------------------------------------------------------------------------------------------------------------------------

348

SIENNA_OM_OM08035U_(U)

5-2. Using the interior lights

Turns the lights on
Turns the door position on
Turns the lights off

Front

Turns the light on/off

Rear (if equipped)

Turns the light on/off

When  the  personal/interior  light  main  switch  is  in  the  off  position,  the
rear personal lights will not turn on even if the switch is on.

Personal/interior light main switch

1
2
3

Personal/interior lights

Type A

Type B

-------------------------------------------------------------------------------------------------------------------------------------------------------------

SIENNA_OM_OM08035U_(U)

349

5-2. Using the interior lights

5

In

te

rior 

fe

at

ures

Turns the lights on/off

When  the  personal/interior  light
main  switch  is  in  the  off  position,
the  rear  ceiling  lights  will  not  turn
on even if the switch is on.

Adjusting the rear personal/interior lights angle (if equipped)

Illuminated entry system

Vehicles without a smart key system 

The lights  automatically turn on/off  according to the  engine switch position,
whether  the  doors  are  locked/  unlocked,  and  whether  the  doors  are  open/
closed.

Vehicles with a smart key system 

The  lights  automatically  turn  on/off  according  to  engine  switch  mode,  the
presence of the electronic key, whether the doors are locked/unlocked, and
whether the doors are open/closed.

To prevent battery discharge

If the interior lights remain on when the engine switch is turned off, the lights
will go off automatically after 20 minutes.

Customization

Settings (e.g. the time elapsed before lights turn off) can be changed. 
(Customizable features: 

P. 547)

Rear ceiling lights (if equipped)

Push the edge of the light lens.

NOTICE

Rear ceiling lights (if equipped)

Do  not  hang  anything  on  the  gap  between  the  ceiling  light  cover  and  the
ceiling or pull the ceiling light cover strongly. 
Doing so may cause damage.

-------------------------------------------------------------------------------------------------------------------------------------------------------------

350

SIENNA_OM_OM08035U_(U)

5-3. Using the storage features

List of storage features

Auxiliary boxes (

P. 358)

Cup holders (

P. 354)

Door pockets (

P. 357)

Bottle holders (

P. 356)

Glove boxes (

P. 351)

Console box (if equipped) 
(

P. 352)

WARNING

Do not leave glasses, lighters or spray cans in the storage spaces, as this
may cause the following when cabin temperature becomes high:
• Glasses may be deformed by heat or cracked if they come into contact

with other stored items.

• Lighters or spray cans may explode. If they come into contact with other

stored  items,  the  lighter  may  catch  fire  or  the  spray  can  may  release
gas, causing a fire hazard.

When driving or when the storage compartments are not in use, keep the
lids closed. 
In the event of sudden braking or sudden swerving, an accident may occur
due to an occupant being struck by an open lid or the items stored inside.

1
2
3

4
5
6

-------------------------------------------------------------------------------------------------------------------------------------------------------------

SIENNA_OM_OM08035U_(U)

351

5-3. Using the storage features

5

In

te

rior 

fe

at

ures

Upper glove box

Push the button.
Open the lid.

Lower glove box

The lower glove box can be opened by pulling the lever and can be
locked  and  unlocked  by  using  the  master  key  (vehicles  without  a
smart key) or the mechanical key (vehicles with a smart key system).

Unlock
Lock
Open

Glove boxes

1
2

1
2
3

-------------------------------------------------------------------------------------------------------------------------------------------------------------

352

SIENNA_OM_OM08035U_(U)

5-3. Using the storage features

Press the tab.

Sliding the console box (type B)

From front

From rear

Console box light

The console box light turns on when the headlight switch is on.

Console box (if equipped)

Type A

Type B

Press the tab and slide the console box.

Pull  up  the  lever  and  slide  the  console
box.

-------------------------------------------------------------------------------------------------------------------------------------------------------------

SIENNA_OM_OM08035U_(U)

353

5-3. Using the storage features

5

In

te

rior 

fe

at

ures

WARNING

Console box adjustment precaution (type B)

Do not adjust the position of the console box while the vehicle is moving. 
This  may  cause  the  driver  to  mishandle  the  vehicle  and  may  lead  to  an
accident that results in death or serious injury.

Be careful not to get hands or feet pinched between the console box and
the rear sliding console or rear seat.

Be careful not to allow the console box to hit any passenger while adjust-
ing its position.

After adjusting the console box, make sure it is securely locked in position.

-------------------------------------------------------------------------------------------------------------------------------------------------------------

354

SIENNA_OM_OM08035U_(U)

5-3. Using the storage features

Cup holders

Front

Console box type A 
(if equipped)

Press in and release the front cup
holder.

Console box type B 
(if equipped)

Console box type C 
(if equipped)

Pull the lid down.

Second seat (if equipped)

Rear

Removing the second center seat.
(

P. 157)

-------------------------------------------------------------------------------------------------------------------------------------------------------------

SIENNA_OM_OM08035U_(U)

355

5-3. Using the storage features

5

In

te

rior 

fe

at

ures

Cup holder light (console box type)

The cup holder light turns on when the headlight switch is on.

WARNING

Do not place anything other than cups or beverage cans in the cup holders.
Other items may be thrown out of the holders in the event of an accident or
sudden  braking  and  cause  injury.  If  possible,  cover  hot  drinks  to  prevent
burns.

-------------------------------------------------------------------------------------------------------------------------------------------------------------

356

SIENNA_OM_OM08035U_(U)

5-3. Using the storage features

When storing a bottle, close the cap.

The bottle may not be stored depending on its size or shape.

Bottle holders

Front

Rear

II63SN007

WARNING

Do not place anything other than a bottle in the bottle holders.
Other items may be thrown out of the holders in the event of an accident or
sudden braking and cause injury.

NOTICE

Rear: Make sure items in the sliding door bottle holder will not interfere with
the motion of the door before operating the door. Items that protrude from
the bottle holder may prevent door opening or damage the vehicle.

-------------------------------------------------------------------------------------------------------------------------------------------------------------

SIENNA_OM_OM08035U_(U)

357

5-3. Using the storage features

5

In

te

rior 

fe

at

ures

Door pockets

Front

Rear

NOTICE

Rear: Make sure magazines are not bent
or protruding from the sliding door pock-
ets. Do not insert anything too big so that
the  shape  of  the  sliding  door  pockets  is
distorted. Such objects may obstruct the
opening/closing  of  the  sliding  doors,
damage  the  sliding  door  pockets  or  the
vehicle  body,  and  may  result  in  a  mal-
function.

-------------------------------------------------------------------------------------------------------------------------------------------------------------

358

SIENNA_OM_OM08035U_(U)

5-3. Using the storage features

Auxiliary boxes

Type A

Type B

Push the lid.

Push down the knob.

Type C (if equipped)

Type D

Type E (if equipped)

Type F

Lift the lid.

-------------------------------------------------------------------------------------------------------------------------------------------------------------

SIENNA_OM_OM08035U_(U)

359

5-3. Using the storage features

5

In

te

rior 

fe

at

ures

Type G (if equipped)

Type H (if equipped)

Removing the second center seat.
(

P. 157)

Type I (if equipped)

Type J (if equipped)

Type K (if equipped)

-------------------------------------------------------------------------------------------------------------------------------------------------------------

360

SIENNA_OM_OM08035U_(U)

5-3. Using the storage features

Coin holder (type B)

Nickels, quarters and dimes can be stored
separately.

WARNING

Maximum storage weight (type A)

Do not store items heavier than 0.4 lb. (200 g).
Doing so may cause the auxiliary box to open and the items inside may fall
out, resulting in an accident.

-------------------------------------------------------------------------------------------------------------------------------------------------------------

361

SIENNA_OM_OM08035U_(U)

5-3. Using the storage features

5

In

te

rior 

fe

at

ures

Luggage compartment features

Raise the hook to use.

The  cargo  hooks  are  provided  for
securing loose items.

Raise the hook to use.

Cargo hooks

WARNING

To avoid injury, always return the cargo hooks to their positions when they
are not in use.

Cargo net hooks

Pattern 1

Pattern 2

NOTICE

To prevent damage to the cargo net hooks, avoid hanging things other than
a cargo net on them.

-------------------------------------------------------------------------------------------------------------------------------------------------------------

362

SIENNA_OM_OM08035U_(U)

5-3. Using the storage features

Engage the latch buckle.

Storage box (if equipped)

-------------------------------------------------------------------------------------------------------------------------------------------------------------

363

SIENNA_OM_OM08035U_(U)

5-4. Using the other interior features

5

In

te

rior 

fe

at

ures

Other interior features

To  set  the  visor  in  the  forward
position, flip it down.
To set the visor in the side posi-
tion,  flip  down,  unhook,  and
swing it to the side.
To use the side extender, place
the  visor  in  the  side  position,
then slide it backward.

Open the cover.

The  light  turns  on  when  the  cover
is opened.

To prevent battery discharge

If the vanity lights remain on for 20 minutes while the engine is off, the lights
will turn off automatically.

Sun visors

1

2

3

Vanity mirrors

-------------------------------------------------------------------------------------------------------------------------------------------------------------

364

SIENNA_OM_OM08035U_(U)

5-4. Using the other interior features

Push the lid and allow the lid to
open.

Push  the  lid.  To  first  locked
position.

Conversation mirror

1

2

-------------------------------------------------------------------------------------------------------------------------------------------------------------

SIENNA_OM_OM08035U_(U)

365

5-4. Using the other interior features

5

In

te

rior 

fe

at

ures

The power outlet can be used for the following components:
12 V: Accessories that run on less than 10 A 
120 V AC: Accessories that use less than 100 W

12 V

Open the cover.

Power outlets

Center panel type A

Center panel type B

Luggage compartment

-------------------------------------------------------------------------------------------------------------------------------------------------------------

366

SIENNA_OM_OM08035U_(U)

5-4. Using the other interior features

120 V AC (if equipped)

Open the cover.

Power  outlet  socket  console
box type A

Power  outlet  socket  console
box type B

Power  outlet  socket  luggage
compartment

-------------------------------------------------------------------------------------------------------------------------------------------------------------

SIENNA_OM_OM08035U_(U)

367

5-4. Using the other interior features

5

In

te

rior 

fe

at

ures

The power outlet can be used when

Vehicles without a smart key system

12 V: The engine switch is in the “ACC” or “ON” position.
120 V AC: The engine switch is in the “ON” position.

Vehicles with a smart key system

12 V: The engine switch is in ACCESSORY or IGNITION ON mode. 
120 V AC: The engine switch is in IGNITION ON mode.

NOTICE

To avoid damaging the power outlet

Close the power outlet lid when the power outlet is not in use.
Foreign objects or liquids that enter the power outlet may cause a short cir-
cuit.

To prevent blown fuse

12 V

Do not use an accessory that uses more than 12 V 10 A.

120 V AC

Do not use a 120 V AC appliance that requires more than 100 W.
If a 120 V AC appliance that consumes more than 100 W is used, the pro-
tection circuit may cut the power supply.

To prevent battery discharge

Do not use the power outlet longer than necessary when the engine is not
running.

Appliances that may not operate properly (120 V AC)

The following 120 V AC appliances may not operate properly even if their
power consumption is under 100 W:

Appliances with high initial peak wattage

Measuring devices that process precise data

Other appliances that require an extremely stable power supply

-------------------------------------------------------------------------------------------------------------------------------------------------------------

368

SIENNA_OM_OM08035U_(U)

5-4. Using the other interior features

The USB charging ports are used to supply 2.1 A of electricity at 5 V
to external devices.
The USB charging ports are for charging only. They are not designed
for data transfer or other purposes.
Depending on the external device, it may not charge properly. Refer to
the  manual  included  with  the  device  before  using  a  USB  charging
port.

Using the USB charging ports

USB charging ports

Center panel (if equipped)

Console box type A 
(if equipped) 

Open the lid

Open the lid

Console box type B 
(if equipped) 

Auxiliary  box  (third  seat  left-
hand side)

Open the lid

Open  the  auxiliary  box  lid  and
open the lid.

-------------------------------------------------------------------------------------------------------------------------------------------------------------

SIENNA_OM_OM08035U_(U)

369

5-4. Using the other interior features

5

In

te

rior 

fe

at

ures

The USB charging ports can be used when

Vehicles without a smart key system

The engine switch is in the “ACC” or “ON” position.

Vehicles with a smart key system

The engine switch is in ACCESSORY or IGNITION ON mode.

Situations in which the USB charging ports may not operate correctly

If a device which consumes more than 2.1 A at 5 V is connected

If a device designed to communicate with a personal computer, such as a
USB memory device, is connected

If the connected external device is turned off (depending on device)

If the temperature inside the vehicle is high, such as after the vehicle has
been parked in the sun

About connected external devices

Depending on the connected external device, charging may occasionally be
suspended and then start again. This is not a malfunction.

NOTICE

To prevent damage to the USB charging ports

Do not insert foreign objects into the ports.

Do not spill water or other liquids into the ports.

When  the USB  charging ports are not  in use,  close the  lids. If  a foreign
object or liquid enters a port may cause a short circuit.

Do not apply excessive force to or impact the USB charging ports.

Do not disassemble or modify the USB charging ports.

To prevent damage to external devices

Do not leave external devices in the vehicle. The temperature inside the
vehicle may become high, resulting in damage to an external device.

Do not push down on or apply unnecessary force to an external device or
the cable of an external device while it is connected.

To prevent battery discharge

Do not use the USB charging ports for a long period of time with the engine
stopped.

-------------------------------------------------------------------------------------------------------------------------------------------------------------

370

SIENNA_OM_OM08035U_(U)

5-4. Using the other interior features

Pull the armrest down for use.

Adjusting the front seat armrests with lock release button (if equipped)

Armrests

Front seat

Second seat (if equipped)

Push the armrest down while pressing the
button.

NOTICE

To prevent damage to the armrest, do not apply too much load on the arm-
rest.

-------------------------------------------------------------------------------------------------------------------------------------------------------------

SIENNA_OM_OM08035U_(U)

371

5-4. Using the other interior features

5

In

te

rior 

fe

at

ures

Assist grips

Type A

Type B

An assist grip installed on the ceil-
ing  can  be  used  to  support  your
body while sitting on the seat.

An assist grip installed on the pil-
lar  can  be  used  when  getting  in
or out of the vehicle and others.

WARNING

Type A: Do not use the assist grip when getting in or out of the vehicle or ris-
ing from your seat.

NOTICE

To prevent damage to the assist grip, do not hang any heavy object or put a
heavy load on the assist grip.

-------------------------------------------------------------------------------------------------------------------------------------------------------------

372

SIENNA_OM_OM08035U_(U)

5-4. Using the other interior features

Pull the tab up.
Secure the sunshade using the hooks.

To retract the sunshade, pull the tab up slightly to unhook the sunshade,
and lower the sunshade slowly.

Rear side sunshades (if equipped)

Rear door window

Rear quarter window

NOTICE

To  ensure  normal  operation  of  the  rear  sunshades,  observe  the  following
precautions.

Do not place anything where it may hinder the opening/closing of the sun-
shade.

Do not place anything on the sunshade.

1
2

-------------------------------------------------------------------------------------------------------------------------------------------------------------

SIENNA_OM_OM08035U_(U)

373

5-4. Using the other interior features

5

In

te

rior 

fe

at

ures

The hooks are designed to hang things like a grocery bag.

Grocery bag hooks

Type A (front seatback) 
(if equipped)

Type B (third seatback)

Type C (luggage compartment)

Type D (luggage compartment)

Pull the hook up.

WARNING

Type C: When not in use, keep the grocery bag hook stowed.
Injuries may result in the event of sudden braking, sudden swerving or an
accident.

NOTICE

Type A and B: Do not hang any object heavier than 8.8 lb. (4 kg) on the gro-
cery bag hook.

ITN38N036

-------------------------------------------------------------------------------------------------------------------------------------------------------------

374

SIENNA_OM_OM08035U_(U)

5-4. Using the other interior features

Garage door opener

The HomeLink

®

 wireless control system in your vehicle has 3 buttons

which can be programmed to operate 3 different devices. Refer to the
programming  methods  on  the  following  pages  to  determine  the
method which is appropriate for the device.

HomeLink

®

 indicator light

Garage  door  operation  indica-
tors
Buttons

Before programming the HomeLink

®

During programming, it is possible that garage doors, gates, or
other devices may operate. For this reason, make sure that peo-
ple and objects are clear of the garage door or other devices to
prevent injury or other potential harm.

It  is  recommended  that  a  new  battery  be  placed  in  the  remote
control transmitter for more accurate programming.

Garage  door  opener  motors  manufactured  after  1995  may  be
equipped with rolling code protection. If this is the case, you may
need  a  stepladder  or  other  sturdy,  safe  device  to  reach  the
“Learn” or “Smart” button on the garage door opener motor.

: If equipped

The garage door opener can be programmed to operate garage
doors,  gates,  entry  doors,  door  locks,  home  lighting  systems,
security systems, and other devices.

HomeLink

®

1
2

3

-------------------------------------------------------------------------------------------------------------------------------------------------------------

SIENNA_OM_OM08035U_(U)

375

5-4. Using the other interior features

5

In

te

rior 

fe

at

ures

Programming the HomeLink

®

Steps 

 through 

 must be performed within 60 seconds, other-

wise the indicator light will stop flashing and programming will not
be able to be completed.

Press  and  release  the  HomeLink

®

  button  you  want  to  program

and check that the HomeLink

®

 indicator light flashes orange.

Point  the  remote  control
transmitter  for  the  device  at
the rear view mirror, 1 to 3 in.
(25  to  75  mm)  from  the
HomeLink

®

 buttons.

Keep  the  HomeLink

®

  indicator

light in view while programming.

Program a device.

Programming  a  device  other  than  an  entry  gate  (for  U.S.A.
owners)

Press  and  hold  the  remote  control  transmitter  button  until  the
HomeLink

®

 indicator light changes from slowly flashing orange to

rapidly  flashing  green  (rolling  code)  or  continuously  lit  green
(fixed code), then release the button.

Programming an entry gate (for U.S.A. owners)/Programming
a device in the Canadian market

Press and release the remote control transmitter button at 2 sec-
ond  intervals,  repeatedly,  until  the  HomeLink

®

  indicator  light

changes  from  slowly  flashing  orange  to  rapidly  flashing  green
(rolling code) or continuously lit green (fixed code).

1

3

1

2

3

-------------------------------------------------------------------------------------------------------------------------------------------------------------

376

SIENNA_OM_OM08035U_(U)

5-4. Using the other interior features

Test  the  HomeLink

®

  operation  by  pressing  the  newly  pro-

grammed button and observing the indicator light:

Indicator light illuminates: Programming of a fixed code device
has completed. The garage door or other device should oper-
ate when a HomeLink

®

 button is pressed and released.

Indicator light flashes rapidly: The garage door opener motor
or  other  device  is  equipped  with  a  rolling  code. To  complete
programming, firmly press and hold the HomeLink

®

 button for

2 seconds then release it.

If the garage door or other device does not operate, proceed
to “Programming a rolling code system”.

Repeat the steps above to program another device for any of the
remaining HomeLink

®

 buttons.

Programming a rolling code system

2 or more people may be necessary to complete rolling code pro-
gramming.

Locate the “Learn” or “Smart”
button  on  the  garage  door
opener motor in the garage.

This button can usually be found
where the hanging antenna wire
is  attached  to  the  unit.  The
name  and  color  of  the  button
may  vary  by  manufacturer.
Refer  to  the  Owner’s  manual
supplied  with  the  garage  door
opener motor for details.

Press  and  release  the
“Learn”  or  “Smart”  button.
Perform 

  within  30  sec-

onds after performing 

.

4

5

1

2

3

2

-------------------------------------------------------------------------------------------------------------------------------------------------------------

SIENNA_OM_OM08035U_(U)

377

5-4. Using the other interior features

5

In

te

rior 

fe

at

ures

Press  and  hold  the  desired
HomeLink

®

 button (inside the

vehicle)  for  2  seconds  and
release  it.  Repeat  this
sequence 

(press/hold/

release)  up  to  3  times  to
complete programming.
If  the  garage  door  opener
motor  operates  when  the
HomeLink

®


button 

is

pressed,  the  garage  door
opener motor recognizes the
HomeLink

®

 signal.

Enabling 2-way communication with a garage door (only avail-
able for compatible devices)

When enabled, 2-way communication allows you to check the sta-
tus of the opening and closing of a garage door through indicators
in your vehicle.
2-way  communication  is  only  available  if  the  garage  door  opener
motor used is a compatible device. (To check device compatibility,
refer to www.HomeLink.com.)

Within 5 seconds after programming the garage door opener has
been  completed,  if  the  garage  door  opener  motor  is  trained  to
HomeLink

®

, both garage door operation indicators will flash rap-

idly  green  and  the  light  on  the  garage  door  opener  motor  will
blink twice, indicating that 2-way communication is enabled.

If the indicators do not flash, perform 

 and 

 within the first 10

presses  of  the  HomeLink

®

  button  after  programming  has  been

completed.

Press  a  programmed  HomeLink

®

  button  to  operate  a  garage

door.
Within  1  minute  of  pressing  the  HomeLink

®

  button,  after  the

garage door operation has stopped, press the “Learn” or “Smart”
button on the garage door opener motor. Within 5 seconds of the
establishment  of  2-way  communication  with  the  garage  door
opener,  both  garage  door  operation  indicators  in  the  vehicle  will
flash rapidly green and the light on the garage door opener motor
will blink twice, indicating that 2-way communication is enabled.

3

1

2

3

2

3

-------------------------------------------------------------------------------------------------------------------------------------------------------------

378

SIENNA_OM_OM08035U_(U)

5-4. Using the other interior features

Reprogramming a single HomeLink

®

 button

When the following procedure is performed, buttons which already
have devices registered to them can be overwritten:

With one hand, press and hold the desired HomeLink

®

 button.

When the HomeLink

®

 indicator starts flashing orange, continue

to  hold  the  HomeLink

®

  button  and  perform  “Programming  the

HomeLink

®

” 

 (it takes 20 seconds for the HomeLink

®

 indicator

to start flashing).

Press  the  appropriate  HomeLink

®

  button.  The  HomeLink

®

  indicator

light should turn on.

The  status  of  the  opening  and
closing of a garage door is shown
by the indicators.

Opening
Closing

This function is only available if the
garage door opener motor used is
a  compatible  device.  (To  check
device  compatibility,  refer  to
www.HomeLink.com.)

The indicators can operate within approximately 820 ft. (250 m) of the
garage door. However, if there are obstructions between the garage
door  and  the  vehicle,  such  as  houses  and  trees,  feedback  signals
from the garage door may not be received. To recall the previous door
operation  status,  press  and  release  either  HomeLink

®

  buttons

 and 

 or 

 and 

 simultaneously. The last

recorded status will be displayed for 3 seconds.

Operating the HomeLink

®

Garage door operation indicators

1

2

1

1
2

Color

Status

Orange (flashing)

Currently opening/closing

Green

Opening/closing has completed

Red (flashing)

Feedback signals cannot be received

-------------------------------------------------------------------------------------------------------------------------------------------------------------

SIENNA_OM_OM08035U_(U)

379

5-4. Using the other interior features

5

In

te

rior 

fe

at

ures

Press and hold the 2 outside but-
tons  for  10  seconds  until  the
HomeLink

®


indicator 

light

changes  from  continuously  lit
orange to rapidly flashing green.

If you sell your vehicle, be sure to
erase  the  programs  stored  in  the
HomeLink

®

 memory.

Codes stored in the HomeLink

®

 memory

The  registered  codes  are  not  erased  even  if  the  battery  cable  is  discon-
nected.

If  learning  failed  when  registering  a  different  code  to  a  HomeLink

®

  button

that already has a code registered to it, the already registered code will not
be erased.

Before programming

Install a new battery in the transmitter.

The battery side of the transmitter must be pointed away from the Home-
Link

®

.

Certification for the garage door opener

For vehicles sold in the U.S.A.

FCC ID: NZLAECHL5
NOTE:
This device complies with part 15 of the FCC Rules. Operation is subject to
the following two conditions: (1) This device may not cause harmful interfer-
ence,  and  (2)  this  device  must  accept  any  interference  received,  including
interference that may cause undesired operation.
FCC WARNING:
Changes or modifications not expressly approved by the party responsible for
compliance could void the user’s authority to operate the equipment.

For vehicles sold in Canada

NOTE:
This device complies with Industry Canada licence-exempt RSS standard(s).
Operation is subject to the following two conditions: (1) this device may not
cause interference, and (2) this device must accept any interference, includ-
ing interference that may cause undesired operation of the device.
REMARQUE:
Le  present  appareil  est  conforme  aux  CNR  d’Industrie  Canada  applicables
aux appareils radio exempts de licence. L’exploitation est autorisee aux deux
conditions suivantes: (1) l’appareil ne doit pas produire de brouillage, et (2)
l’utilisateur  de  l’appareil  doit  accepter  tout  brouillage  radioelectrique  subi,
meme si le brouillage est susceptible d’en compromettre le fonctionnement.

Erasing the entire HomeLink

®

 memory (all three codes)

-------------------------------------------------------------------------------------------------------------------------------------------------------------

380

SIENNA_OM_OM08035U_(U)

5-4. Using the other interior features

About HomeLink

®

HomeLink  and  HomeLink  house  icon  are  registered  trademarks  of  Gentex
Corporation.

When support is necessary

For  compatible  products  and  video  programming  instructions,  please  visit
www.homelink.com/toyota,  www.youtube.com/user/HomeLinkGentex,  or  call
the toll-free HomeLink Hotline at 1-800-355-3515 (North America).

WARNING

When programming a garage door or other remote control device

The  garage  door  or  other  device  may  operate,  so  ensure  people  and
objects are out of danger to prevent potential harm.

Conforming to federal safety standards

Do  not  use  the  HomeLink

®

  compatible  transceiver  with  any  garage  door

opener or device that lacks safety stop and reverse features as required by
federal safety standards. This includes any garage door that cannot detect
an interfering object. A door or device without these features increases the
risk of death or serious injury.

When operating or programming HomeLink

®

Never allow a child to operate or play with the HomeLink

®

 buttons.

-------------------------------------------------------------------------------------------------------------------------------------------------------------

381

SIENNA_OM_OM08035U_(U)

5-4. Using the other interior features

5

In

te

rior 

fe

at

ures

Compass

To  turn  the  compass  on  or  off,
press  and  hold  the  button  for  3
seconds.

: If equipped

The compass on the inside rear view mirror indicates the direc-
tion in which the vehicle is heading.

Operation

Displays and directions

Display

Direction

N

North

NE

Northeast

E

East

SE

Southeast

S

South

SW

Southwest

W

West

NW

Northwest

-------------------------------------------------------------------------------------------------------------------------------------------------------------

382

SIENNA_OM_OM08035U_(U)

5-4. Using the other interior features

The direction display deviates from the true direction determined by
the earth’s magnetic field. The amount of deviation varies according to
the geographic position of the vehicle.

If you cross over a map boundary shown in illustration, the compass will
deviate.
To obtain higher precision or perfect calibration, refer to the following.

Deviation calibration

Stop the vehicle.
Press and hold the button for
6 seconds.
A  number  (1  to  15)  appears
on the compass display.

Press the button and referring to the map above, select the num-
ber of the zone where you are.

If the direction is displayed several seconds after adjustment, the cali-
bration is complete.

Calibrating the compass

Samoa: 5 Guam: 8 Saipan: 8

1

2

3

-------------------------------------------------------------------------------------------------------------------------------------------------------------

SIENNA_OM_OM08035U_(U)

383

5-4. Using the other interior features

5

In

te

rior 

fe

at

ures

Circling calibration

Stop the vehicle in a place where it is safe to drive in a circle.
Press and hold the button for
9 seconds.

“C”  appears  on  the  compass
display.

Drive the vehicle at 5 mph (8
km/h) or less in a circle until
a direction is displayed.

If  there  is  not  enough  space  to
drive in a circle, drive around the
block  until  the  direction  is  dis-
played.

Conditions unfavorable to correct operation

The compass may not show the correct direction in the following conditions:

The vehicle is stopped immediately after turning.

The vehicle is on an inclined surface.

The vehicle is in a place where the earth’s magnetic field is subject to inter-
ference by artificial magnetic fields (underground car park/parking lot, under
a steel tower, between buildings, roof car park/parking lot, near an intersec-
tion, near a large vehicle, etc.).

The vehicle has become magnetized.
(There is a magnet or metal object near the inside rear view mirror.)

The battery has been disconnected.

A door is open.

1

2

3

WARNING

While driving the vehicle

Do  not  adjust  the  display.  Adjust  the  display  only  when  the  vehicle  is
stopped.

When doing the circling calibration

Secure a wide space, and watch out for people and vehicles in the vicinity.
Do not violate any local traffic rules while performing circling calibration.

-------------------------------------------------------------------------------------------------------------------------------------------------------------

384

SIENNA_OM_OM08035U_(U)

5-4. Using the other interior features

NOTICE

To avoid compass malfunctions

Do not place magnets or any metal objects near the inside rear view mirror. 
Doing this may cause the compass sensor to malfunction.

To ensure normal operation of the compass

Do  not  perform  circling  calibration  of  the  compass  in  a  place  where  the
earth’s magnetic field is subject to interference by artificial magnetic fields.

During calibration, do not operate electric systems (moon roof, power win-
dows, etc.) as they may interfere with the calibration.

-------------------------------------------------------------------------------------------------------------------------------------------------------------

385

SIENNA_OM_OM08035U_(U)

5-4. Using the other interior features

5

In

te

rior 

fe

at

ures

Safety Connect

Microphone

*

LED light indicators
“SOS” button

*

: The  installation  position  of  the

microphone may differ for vehicles
with moon roof.

: If equipped

Safety  Connect  is  a  subscription-based  telematics  service  that
uses Global Positioning System (GPS) data and embedded cel-
lular technology to provide safety and security features to sub-
scribers.  Safety  Connect  is  supported  by  Toyota’s  designated
response  center,  which  operates  24  hours  per  day,  7  days  per
week.
Safety  Connect  service  is  available  by  subscription  on  select,
telematics hardware-equipped vehicles.
By  using  the  Safety  Connect  service,  you  are  agreeing  to  be
bound  by  the  Telematics  Subscription  Service Agreement  and
its Terms and Conditions, as in effect and amended from time to
time, a current copy of which is available at Toyota.com in the
United  States,  Toyotapr.com  in  Puerto  Rico  and  Toyota.ca  in
Canada. All use of the Safety Connect service is subject to such
then-applicable Terms and Conditions.

System components

1
2
3

-------------------------------------------------------------------------------------------------------------------------------------------------------------

386

SIENNA_OM_OM08035U_(U)

5-4. Using the other interior features

Subscribers have the following Safety Connect services available:

Automatic Collision Notification

*

Helps drivers receive necessary response from emergency service
providers. (

P. 388)

*

: U.S. Patent No. 7,508,298 B2

Stolen Vehicle Location
Helps drivers in the event of vehicle theft. (

P. 388)

Emergency Assistance Button (SOS)
Connects drivers to response-center support. (

P. 388)

Enhanced Roadside Assistance
Provides drivers various on-road assistance. (

P. 389)

After you have signed the Telematics Subscription Service Agreement
and are enrolled, you can begin receiving services. 
A variety of subscription terms is available for purchase. Contact your
Toyota dealer, call the following appropriate Safety Connect response
center or push the “SOS” button in your vehicle for further subscription
details.

• The United States

1-855-405-6500

• Canada

1-888-869-6828

• Puerto Rico

1-877-855-8377

Services

Subscription

-------------------------------------------------------------------------------------------------------------------------------------------------------------

SIENNA_OM_OM08035U_(U)

387

5-4. Using the other interior features

5

In

te

rior 

fe

at

ures

Safety Connect Services Information

Phone  calls  using  the  vehicles  Bluetooth

®

  technology  will  not  be  possible

during Safety Connect.

Safety Connect is available beginning Fall 2009 on select Toyota models (in
the  contiguous  United  States  only).  Contact  with  the  Safety  Connect
response center is dependent upon the telematics device being in operative
condition, cellular connection availability, and GPS satellite signal reception,
which  can  limit  the  ability  to  reach  the  response  center  or  receive  emer-
gency  service  support.  Enrollment  and  Telematics  Subscription  Service
Agreement  are  required.  A  variety  of  subscription  terms  is  available;
charges vary by subscription term selected and location.

Automatic Collision Notification, Emergency Assistance and Stolen Vehicle
Location  are  available  in  the  United  States,  including  Hawaii  and Alaska,
Puerto Rico and Canada, and Enhanced Roadside Assistance are available
in the United States, Puerto Rico and Canada.

Automatic Collision Notification, Emergency Assistance, Stolen Vehicle and
Enhanced Road Assistance are not available in the U.S. Virgin Islands.
For vehicles first sold in the U.S. Virgin Islands, no Safety Connect services
will function in or outside the U.S. Virgin Islands.

Safety Connect services are not subject to section 255 of the Telecommuni-
cations Act and the device is not TTY compatible.

Languages

The Safety Connect response center will offer support in multiple languages.
The Safety Connect system will offer voice prompts in English, Spanish, and
French. Please indicate your language of choice when enrolling.

When contacting the response center

You may be unable to contact the response center if the network is busy.

When the engine switch is turned to the “ON” position (vehicles with-
out a smart key system) or IGNITION ON mode (vehicles with a smart
key system), the red indicator light comes on for 2 seconds then turns
off. Afterward, the green indicator light comes on, indicating  that the
service is active.
The  following  indicator  light  patterns  indicate  specific  system  usage
conditions:

Green indicator light on = Active service

Green indicator light flashing = Safety Connect call in process

Red indicator light (except at vehicle start-up) = System malfunction
(contact your Toyota dealer)

No indicator light (off) = Safety Connect service not active

Safety Connect LED light Indicators

-------------------------------------------------------------------------------------------------------------------------------------------------------------

388

SIENNA_OM_OM08035U_(U)

5-4. Using the other interior features

Automatic Collision Notification

In case of either airbag deployment or severe rear-end collision, the
system is designed to automatically call the response center. The
responding  agent  receives  the  vehicle’s  location  and  attempts  to
speak with the vehicle occupants to assess the level of emergency.
If  the  occupants  are  unable  to  communicate,  the  agent  automati-
cally  treats the call  as  an  emergency,  contacts  the  nearest emer-
gency services provider to describe the situation, and requests that
assistance be sent to the location.

Stolen Vehicle Location

If your vehicle is stolen, Safety Connect can work with local author-
ities to assist them in locating and recovering the vehicle. After filing
a police report, call the Safety Connect response center at 1-855-
405-6500 in the United States, 1-877-855-8377 in Puerto Rico or 1-
888-869-6828 in  Canada,  and  follow  the prompts  for  Safety Con-
nect to initiate this service.
In  addition  to assisting law enforcement with  recovery of  a stolen
vehicle, Safety-Connect-equipped vehicle location data may, under
certain  circumstances,  be  shared  with  third  parties  to  locate  your
vehicle. Further information is available at Toyota.com in the United
States, Toyotapr.com in Puerto Rico and Toyota.ca in Canada.

Emergency Assistance Button (“SOS”)

In the event of an emergency on the road, push the “SOS” button to
reach  the  Safety  Connect  response  center.  The  answering  agent
will determine your vehicle’s location, assess the emergency, and
dispatch the necessary assistance required.

If  you  accidentally  press  the  “SOS”  button,  tell  the  response-center
agent that you are not experiencing an emergency.

Safety Connect services

-------------------------------------------------------------------------------------------------------------------------------------------------------------

SIENNA_OM_OM08035U_(U)

389

5-4. Using the other interior features

5

In

te

rior 

fe

at

ures

Enhanced Roadside Assistance

Enhanced  Roadside  Assistance  adds  GPS  data  to  the  already
included warranty-based Toyota roadside service.
Subscribers can press the “SOS” button to reach a Safety Connect
response-center agent, who can help with a wide range of needs,
such as: towing, flat tire, fuel delivery, etc. For a description of the
Enhanced  Roadside  Assistance  services  and  their  limitations,
please  see  the  Safety  Connect  Terms  and  Conditions,  which  are
available  at  Toyota.com  in  the  United  States,  Toyotapr.com  in
Puerto Rico and Toyota.ca in Canada.

Important! Read this information before using Safety Connect.

Exposure to radio frequency signals

The Safety Connect system installed in your vehicle is a low-power
radio transmitter and receiver. It receives and also sends out radio
frequency (RF) signals.
In August  1996,  the  Federal  Communications  Commission  (FCC)
adopted RF exposure guidelines with safety levels for mobile wire-
less phones. Those guidelines are consistent with the safety stan-
dards  previously  set  by  the  following  U.S.  and  international
standards bodies.

ANSI (American National Standards Institute) C95.1 [1992]

NCRP (National  Council  on  Radiation  Protection  and Measure-
ment) Report 86 [1986]

ICNIRP  (International  Commission  on  Non-Ionizing  Radiation
Protection) [1996]

Those standards were based on comprehensive and periodic eval-
uations of the relevant scientific literature. Over 120 scientists, engi-
neers,  and  physicians  from  universities,  and  government  health
agencies and industries reviewed the available body of research to
develop the ANSI Standard (C95.1).
The design of Safety Connect complies with the FCC guidelines in
addition to those standards. 

Safety information for Safety Connect

-------------------------------------------------------------------------------------------------------------------------------------------------------------

390

SIENNA_OM_OM08035U_(U)

5-4. Using the other interior features

Certification for Safety Connect

-------------------------------------------------------------------------------------------------------------------------------------------------------------

391

SIENNA_OM_OM08035U_(U)

6

Maintenance and care

6-1. Maintenance and care

Cleaning and protecting 

the vehicle exterior.......... 392

Cleaning and protecting 

the vehicle interior........... 395

6-2. Maintenance

Maintenance 

requirements................... 398

General maintenance........ 401
Emission inspection and 

maintenance (I/M) 
programs......................... 404

6-3. Do-it-yourself maintenance

Do-it-yourself service 

precautions ..................... 405

Hood ................................. 407
Positioning a floor jack ...... 409
Engine compartment......... 410
Tires .................................. 420
Tire inflation pressure ....... 429
Wheels .............................. 432
Air conditioning filter.......... 434
Wireless remote control/

electronic key battery...... 436

Checking and replacing 

fuses ............................... 439

Light bulbs......................... 442

-------------------------------------------------------------------------------------------------------------------------------------------------------------

392

SIENNA_OM_OM08035U_(U)

6-1. Maintenance and care

Cleaning and protecting the vehicle exterior

Working  from  top  to  bottom,  liberally  apply  water  to  the  vehicle
body, wheel wells and underside of the vehicle to remove any dirt
and dust.

Wash  the  vehicle  body  using  a  sponge  or  soft  cloth,  such  as  a
chamois.

For hard-to-remove marks, use car wash soap and rinse thoroughly
with water.

Wipe away any water.

Wax the vehicle when the waterproof coating deteriorates.

If  water  does  not  bead  on  a  clean  surface,  apply  wax  when  the  vehicle
body is cool.

Automatic car washes

Before washing the vehicle:
• Fold the mirrors.
• Turn off the power back door system. (if equipped)
• Turn off the power sliding door system. (if equipped)
Start washing from the front of the vehicle. Make sure to extend the mirrors
before driving.

Brushes used in automatic car washes may scratch the vehicle surface and
harm your vehicle’s paint.

High pressure car washes

Do not allow the nozzles of the car wash to come within close proximity of
the windows.

Before using the car wash, check that the fuel filler door on your vehicle is
closed properly.

When using a car wash (vehicles with a smart key system)

If the door handle becomes wet while the electronic key is within the effec-
tive range, the door may lock and unlock repeatedly. Place the key in a posi-
tion 6 ft. (2 m) or more separate from the vehicle while the vehicle is being
washed. (Take care to ensure that the key is not stolen.)

If the electronic key is inside the vehicle and a door handle becomes wet
during a car wash, a message may be shown on the multi-information dis-
play and a buzzer will sound outside the vehicle. To turn off the alarm, lock
all the doors.

Perform  the  following  to  protect  the  vehicle  and  maintain  it  in
prime condition:

-------------------------------------------------------------------------------------------------------------------------------------------------------------

SIENNA_OM_OM08035U_(U)

393

6-1. Maintenance and care

6

Mainten

ance an

d ca

re

Aluminum wheels

Remove any dirt immediately by using a neutral detergent.

Wash detergent off with water immediately after use.

To protect the paint from damage, make sure to observe the following pre-
cautions.
• Do not use acidic, alkaline or abrasive detergent
• Do not use hard brushes
• Do not use detergent on the wheels when they are hot, such as after driv-

ing or parking in hot weather

Bumpers and side moldings

Do not scrub with abrasive cleaners.

WARNING

When washing the vehicle

Do not apply water to the inside of the engine compartment. Doing so may
cause the electrical components etc. to catch fire.

When  cleaning  the  windshield  (vehicles  with  rain-sensing  windshield
wiper)

When  the  upper  part  of  the  windshield  where  the  raindrop  sensor  is
located is touched by hand

When a wet rag or similar is held close to the raindrop sensor

If something bumps against the windshield

If you directly touch the raindrop sensor body or if something bumps into
the raindrop sensor

Precautions regarding the exhaust pipe

Exhaust gasses cause the exhaust pipe to become quite hot.
When  washing  the  vehicle,  be  careful  not  to  touch  the  pipe  until  it  has
cooled sufficiently, as touching a hot exhaust pipe can cause burns.

Precaution regarding the Blind Spot Monitor (if equipped)

If the paint of the rear bumper is chipped or scratched, the system may mal-
function. If this occurs, consult your Toyota dealer.

Set the wiper switch to off.
If the wiper switch is in “AUTO”, the wip-
ers may operate unexpectedly in the fol-
lowing  situations,  and  may  result  in
hands being caught or other serious inju-
ries  and  cause  damage  to  the  wiper
blades.

Off

-------------------------------------------------------------------------------------------------------------------------------------------------------------

394

SIENNA_OM_OM08035U_(U)

6-1. Maintenance and care

NOTICE

To prevent paint deterioration and corrosion on the body and compo-
nents (aluminum wheels etc.)

Wash the vehicle immediately in the following cases:
• After driving near the sea coast
• After driving on salted roads
• If coal tar or tree sap is present on the paint surface
• If you see dead insects, insect droppings or bird droppings on the paint
• After driving in an area contaminated with soot, oily smoke, mine dust,

iron powder or chemical substances

• If the vehicle becomes heavily soiled in dust or mud
• If liquids such as benzene and gasoline are spilled on the paint surface

If the paint is chipped or scratched, have it repaired immediately.

To prevent the wheels from corroding, remove any dirt and store in a place
with low humidity when storing wheels.

Cleaning the exterior lights

Wash carefully. Do not use organic substances or scrub with a hard brush. 
This may damage the surface of the lights.

Do not apply wax on the surfaces of the lights.
Wax may cause damage to the lenses.

When  using an  automatic car wash  (vehicles with  rain-sensing  wind-
shield wipers)

Set the wiper switch to the off position. If the wiper switch is in “AUTO”, the
wipers may operate and the wiper blades may be damaged.

When using a high pressure car wash

Do  not  bring  the  nozzle  tip  close  to  boots  (rubber  or  resin  manufactured
cover), connectors or the following parts. The parts may be damaged if they
come into contact with high-pressure water.
• Traction related parts
• Steering parts
• Suspension parts
• Brake parts

-------------------------------------------------------------------------------------------------------------------------------------------------------------

395

SIENNA_OM_OM08035U_(U)

6-1. Maintenance and care

6

Mainten

ance an

d ca

re

Cleaning and protecting the vehicle interior

Remove dirt and dust using a vacuum cleaner. Wipe dirty surfaces
with a cloth dampened with lukewarm water.

If dirt cannot be removed, wipe it off with a soft cloth dampened with
neutral detergent diluted to approximately 1%.
Wring out any excess water from the cloth and thoroughly wipe off
remaining traces of detergent and water.

Remove dirt and dust using a vacuum cleaner.

Wipe off any excess dirt and dust with a soft cloth dampened with
diluted detergent.

Use a diluted water solution of approximately 5% neutral wool detergent.

Wring out any excess water from the cloth and thoroughly wipe off
all remaining traces of detergent.

Wipe  the  surface  with  a  dry,  soft  cloth  to  remove  any  remaining
moisture. Allow the leather to dry in a shaded and ventilated area.

Remove dirt and dust using a vacuum cleaner.

Wipe it off with a soft cloth dampened with neutral detergent diluted
to approximately 1%.

Wring out any excess water from the cloth and thoroughly wipe off
remaining traces of detergent and water.

The following procedures will help protect your vehicle’s interior
and keep it in top condition:

Protecting the vehicle interior

Cleaning the leather areas

Cleaning the synthetic leather areas

-------------------------------------------------------------------------------------------------------------------------------------------------------------

396

SIENNA_OM_OM08035U_(U)

6-1. Maintenance and care

Caring for leather areas

Toyota recommends cleaning the interior of the vehicle at least twice a year to
maintain the quality of the vehicle’s interior.

Shampooing the carpets

There are several commercial foaming-type cleaners available. Use a sponge
or  brush  to  apply  the  foam.  Rub  in  overlapping  circles.  Do  not  use  water.
Wipe dirty surfaces and let them dry. Excellent results are obtained by keep-
ing the carpet as dry as possible.

Seat belts

Clean  with  mild  soap  and  lukewarm  water  using  a  cloth  or  sponge.  Also
check the belts periodically for excessive wear, fraying or cuts.

WARNING

Water in the vehicle

Do not splash or spill liquid in the vehicle.
Doing  so  may  cause  electrical  components  etc.  to  malfunction  or  catch
fire.

Do not get any of the SRS components or wiring in the vehicle interior wet. 
(

P. 40)

An electrical malfunction may cause the airbags to deploy or not function
properly, resulting in death or serious injury.

Cleaning the interior (especially instrument panel)

Do not use polish wax or polish cleaner. The instrument panel may reflect
off the windshield, obstructing the driver’s view and leading to an accident,
resulting in death or serious injury.

-------------------------------------------------------------------------------------------------------------------------------------------------------------

SIENNA_OM_OM08035U_(U)

397

6-1. Maintenance and care

6

Mainten

ance an

d ca

re

NOTICE

Cleaning detergents

Do not use the following types of detergent, as they may discolor the vehi-
cle interior or cause streaks or damage to painted surfaces:
• Non-seat  portions:  Organic  substances  such  as  benzene  or  gasoline,

alkaline or acidic solutions, dye, and bleach

• Seats: Alkaline or acidic solutions, such as thinner, benzene, and alco-

hol

Do not use polish wax or polish cleaner. The instrument panel’s or other
interior part’s painted surface may be damaged.

Preventing damage to leather surfaces

Observe the following precautions to avoid damage to and deterioration of
leather surfaces.

Remove any dust or dirt from leather surfaces immediately.

Do not expose the vehicle to direct sunlight for extended periods of time.
Park the vehicle in the shade, especially during summer.

Do not place items made of vinyl, plastic, or containing wax on the uphol-
stery, as they may stick to the leather surface if the vehicle interior heats
up significantly.

Water on the floor

Do not wash the vehicle floor with water.
Vehicle systems such as the audio/visual system may be damaged if water
comes into contact with electrical components such as the audio/visual sys-
tem above or under the floor of the vehicle. Water may also cause the body
to rust.

Cleaning the inside of the rear window and the rear quarter windows

Do  not  use  glass  cleaner  to  clean  the  rear  window  and  the  rear  quarter
windows, as this may cause damage to the rear window defogger heater
wires  or  antenna.  Use  a  cloth  dampened  with  lukewarm  water  to  gently
wipe the windows clean. Wipe the windows in strokes running parallel to
the heater wires or antenna.

Be careful not to scratch or damage the heater wires or antenna.

When cleaning the inside of the windshield

Do not allow glass cleaner to contact the lens. Also, do not touch the lens.
(

P. 263)

-------------------------------------------------------------------------------------------------------------------------------------------------------------


Content      ..     4      5      6      7     ..