Toyota Tundra. Manual - part 830


  Index      Toyota     Toyota Tundra (2007-2010 year) - Service and Repair Manual


Search            copyright infringement  


Content   ..  828  829  830  831   ..


Toyota Tundra. Manual - part 830


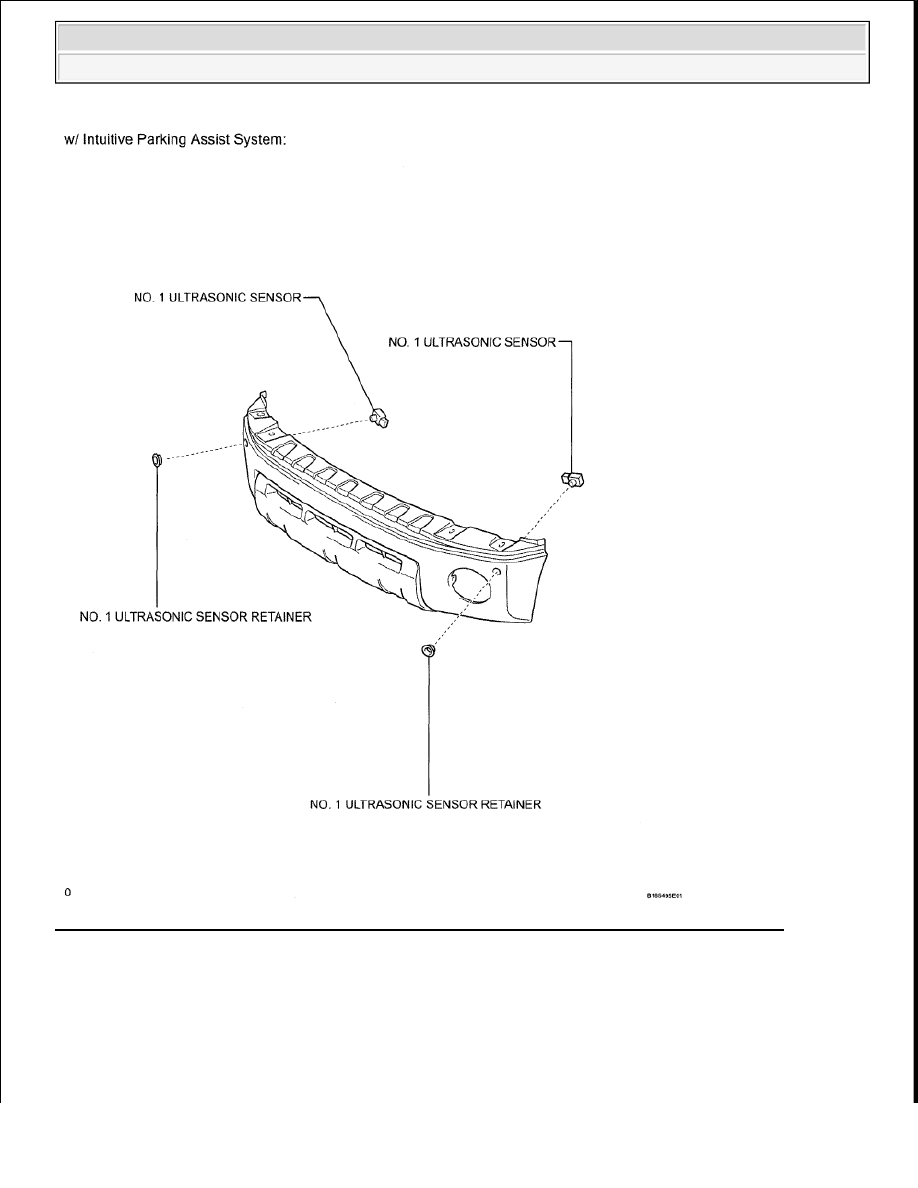
Fig. 37: Identifying Front Bumper Replacement Components - For Steel Type Bumper (6 Of 6) 
Courtesy of TOYOTA MOTOR SALES, U.S.A., INC. 

REMOVAL 

1. DISCONNECT CABLE FROM NEGATIVE BATTERY TERMINAL 

NOTE:

Some systems need to be initialized after the cable is reconnected 


2009 Toyota Tundra 

2009 ACCESSORIES AND EQUIPMENT Exterior - Tundra


2. REMOVE FRONT FENDER SPLASH SHIELD SUB-ASSEMBLY LH (w/ Fog Light) 

a. Remove the 3 clips, 2 screws and fender splash shield. 

Fig. 38: Identifying Fender Splash Shield Clips And Screws 
Courtesy of TOYOTA MOTOR SALES, U.S.A., INC. 

b. Remove the clip.  

c. Disconnect the fog light connector.  

Fig. 39: Identifying Fog Light Connector Clips 
Courtesy of TOYOTA MOTOR SALES, U.S.A., INC. 

3. REMOVE FRONT FENDER SPLASH SHIELD SUB-ASSEMBLY RH (w/ Fog Light) 

HINT: 

(see INITIALIZATION ).  

After the ignition switch is turned OFF, the navigation system 
requires approximately 90 seconds to record various types of 
memory and settings. As a result, after turning the ignition switch 
OFF, wait 90 seconds or more before disconnecting the cable from 
the negative (-) battery terminal.  


2009 Toyota Tundra 

2009 ACCESSORIES AND EQUIPMENT Exterior - Tundra


Use the same procedures described for the LH side. 

4. REMOVE FRONT END PANEL LH 

a. Using a clip remover, remove the 2 clips. 

Fig. 40: Identifying Front End Panel LH Clips And Pins 
Courtesy of TOYOTA MOTOR SALES, U.S.A., INC. 

b. Detach the 2 pins and remove the panel.  

5. REMOVE FRONT END PANEL RH 

HINT: 

Use the same procedures described for the LH side. 

6. REMOVE FRONT BUMPER COVER SUB-ASSEMBLY 

a. Put protective tape around the bumper cover.  

b. Using a clip remover, remove the 8 clips.  

c. Remove the 16 bolts. 

Fig. 41: Identifying Front Bumper Cover Sub-Assembly Bolts 
Courtesy of TOYOTA MOTOR SALES, U.S.A., INC. 

d. Remove the screw and clip. 


2009 Toyota Tundra 

2009 ACCESSORIES AND EQUIPMENT Exterior - Tundra


Fig. 42: Identifying Screw And Clip 
Courtesy of TOYOTA MOTOR SALES, U.S.A., INC. 

HINT: 

Use the same procedures for the RH side and LH side. 

e. Detach the 4 claws and 2 pins and remove the bumper cover. 

Fig. 43: Identifying Bumper Cover Claws And Pins 
Courtesy of TOYOTA MOTOR SALES, U.S.A., INC. 

7. REMOVE FRONT BUMPER BAR 

a. w/o Fog Light: 

Remove the front bumper bar. 

1. Remove the 2 clips. 

HINT: 

Use the same procedures for the RH side and LH side. 

2. w/o Intuitive Parking Assist System: 


2009 Toyota Tundra 

2009 ACCESSORIES AND EQUIPMENT Exterior - Tundra


Content   ..  828  829  830  831   ..