Toyota Tundra. Manual - part 2454


  Index      Toyota     Toyota Tundra (2007-2010 year) - Service and Repair Manual


Search            copyright infringement  


Content   ..  2452  2453  2454  2455   ..


Toyota Tundra. Manual - part 2454


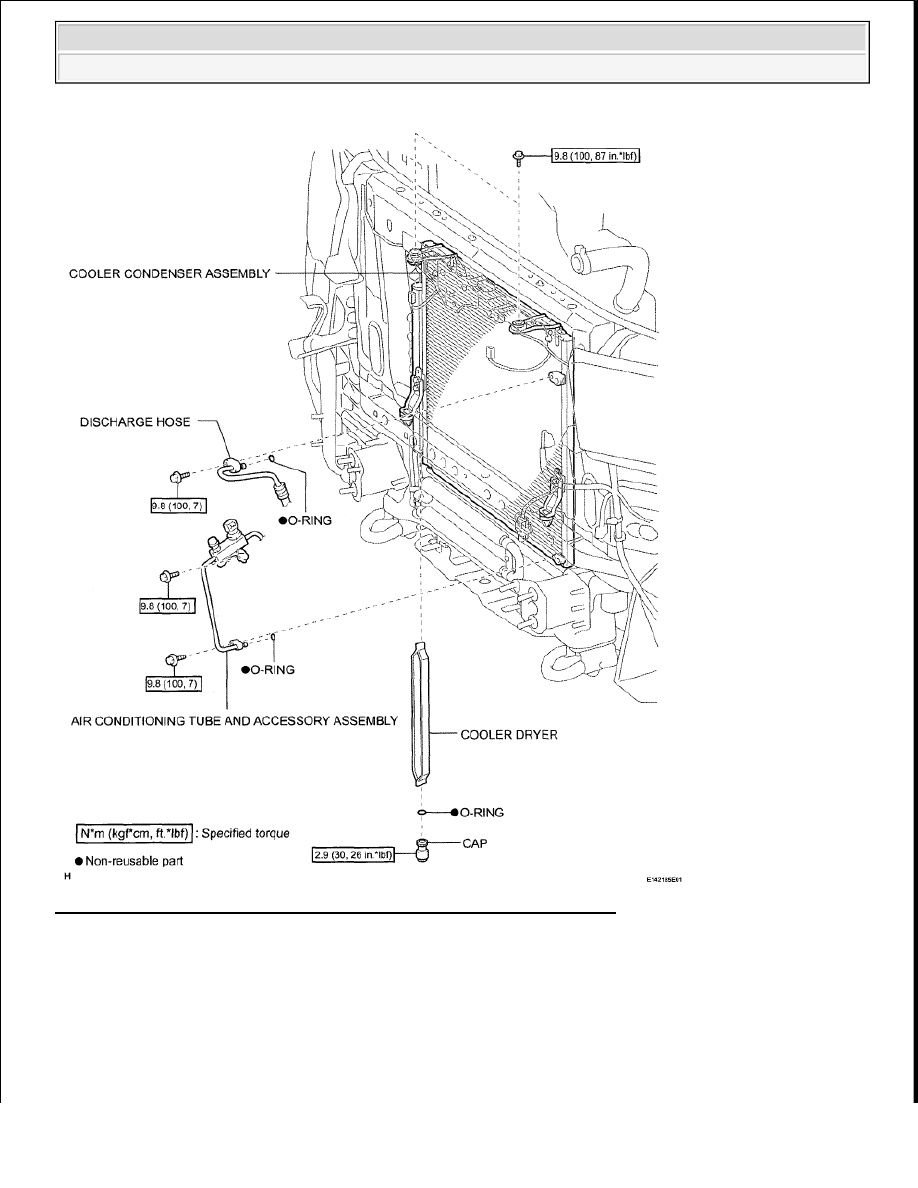
Fig. 291: Identifying Condenser Components With Torque Specifications 
Courtesy of TOYOTA MOTOR SALES, U.S.A., INC. 

ON-VEHICLE INSPECTION 

1. INSPECT COOLER CONDENSER ASSEMBLY 

a. If the fins of the cooler condenser are dirty, clean them with water. Dry the fins with compressed 

air. 


2009 Toyota Tundra 

2009 HVAC Air Conditioning - Tundra


b. If a fin of the cooler condenser is bent, straighten it using a screwdriver or pliers.  

2. CHECK CONDENSER FOR LEAKAGE OF REFRIGERANT 

a. Using a halogen leak detector, check the pipe joints for gas leakage.  

b. If gas leakage is detected in a joint, check the torque of the joint.  

REMOVAL 

1. RECOVER REFRIGERANT FROM REFRIGERATION SYSTEM (See REPLACEMENT )  

2. DISCONNECT CABLE FROM NEGATIVE BATTERY TERMINAL 

3. REMOVE FRONT BUMPER COVER 

a. for Steel Type Bumper: 

Remove front bumper cover (see REMOVAL ). 

b. for Resin Type Bumper: 

Remove front bumper cover (see REMOVAL ). 

4. REMOVE RADIATOR ASSEMBLY 

a. for 1GR-FE: 

Remove the radiator (see REMOVAL ). 

b. for 2UZ-FE: 

Remove the radiator (see REMOVAL ). 

c. for 3UR-FE: 

NOTE:

Do not damage the fins of the condenser.

CAUTION: Wait at least 90 seconds after disconnecting the cable from the 

negative (-) battery terminal to prevent airbag and seat belt 
pretensioner activation.

NOTE:

After the ignition switch is turned LOCK, the navigation system 
requires approximately 90 seconds to record various types of 
memory and settings. As a result, after turning the ignition switch 
LOCK, wait 90 seconds or more before disconnecting the cable from 
the negative (-) battery terminal.  

Some systems need to be initialized after the cable is reconnected 
(see INITIALIZATION ).  


2009 Toyota Tundra 

2009 HVAC Air Conditioning - Tundra


Remove the radiator (see REMOVAL ). 

d. for 3UR-FBE: 

Remove the radiator (see REMOVAL ). 

5. DISCONNECT DISCHARGE HOSE 

a. Remove the bolt and disconnect the discharge hose from the cooler condenser. 

b. Remove the O-ring from the discharge hose. 

Fig. 292: Locating Discharge Hose Bolt 
Courtesy of TOYOTA MOTOR SALES, U.S.A., INC. 

6. DISCONNECT AIR CONDITIONING TUBE AND ACCESSORY ASSEMBLY 

a. Remove the 2 bolts and air conditioning tube and accessory from the cooler condenser. 

NOTE:

When removing the bolt, do not allow any tools to contact the 
pipe.  

When removing the bolt, hold a part of the pipe near the 
connector.  

NOTE:

Seal the openings of the disconnected parts using vinyl tape to 
prevent moisture and foreign matter from entering them.

NOTE:

When removing the bolt, do not allow any tools to contact the 
pipe.  

When removing the bolt, hold a part of the pipe near the 
connector.  


2009 Toyota Tundra 

2009 HVAC Air Conditioning - Tundra


Fig. 293: Locating Air Conditioning Tube And Bolts 
Courtesy of TOYOTA MOTOR SALES, U.S.A., INC. 

b. Remove the O-ring from the air conditioning tube and accessory. 

7. REMOVE COOLER CONDENSER ASSEMBLY 

a. Remove the 2 bolts.  

b. Remove the cooler condenser, as shown in the illustration. 

Fig. 294: Locating Cooler Condenser And Bolts 
Courtesy of TOYOTA MOTOR SALES, U.S.A., INC. 

8. REMOVE COOLER DRYER 

a. Using a 14 mm socket hexagon wrench, remove the cap from the modulator. 

NOTE:

Seal the openings of the disconnected parts using vinyl tape to 
prevent moisture and foreign matter from entering them.


2009 Toyota Tundra 

2009 HVAC Air Conditioning - Tundra


Content   ..  2452  2453  2454  2455   ..