Toyota Tundra. Manual - part 1942


  Index      Toyota     Toyota Tundra (2007-2010 year) - Service and Repair Manual


Search            copyright infringement  


Content   ..  1940  1941  1942  1943   ..


Toyota Tundra. Manual - part 1942


j

Step 2: 

1

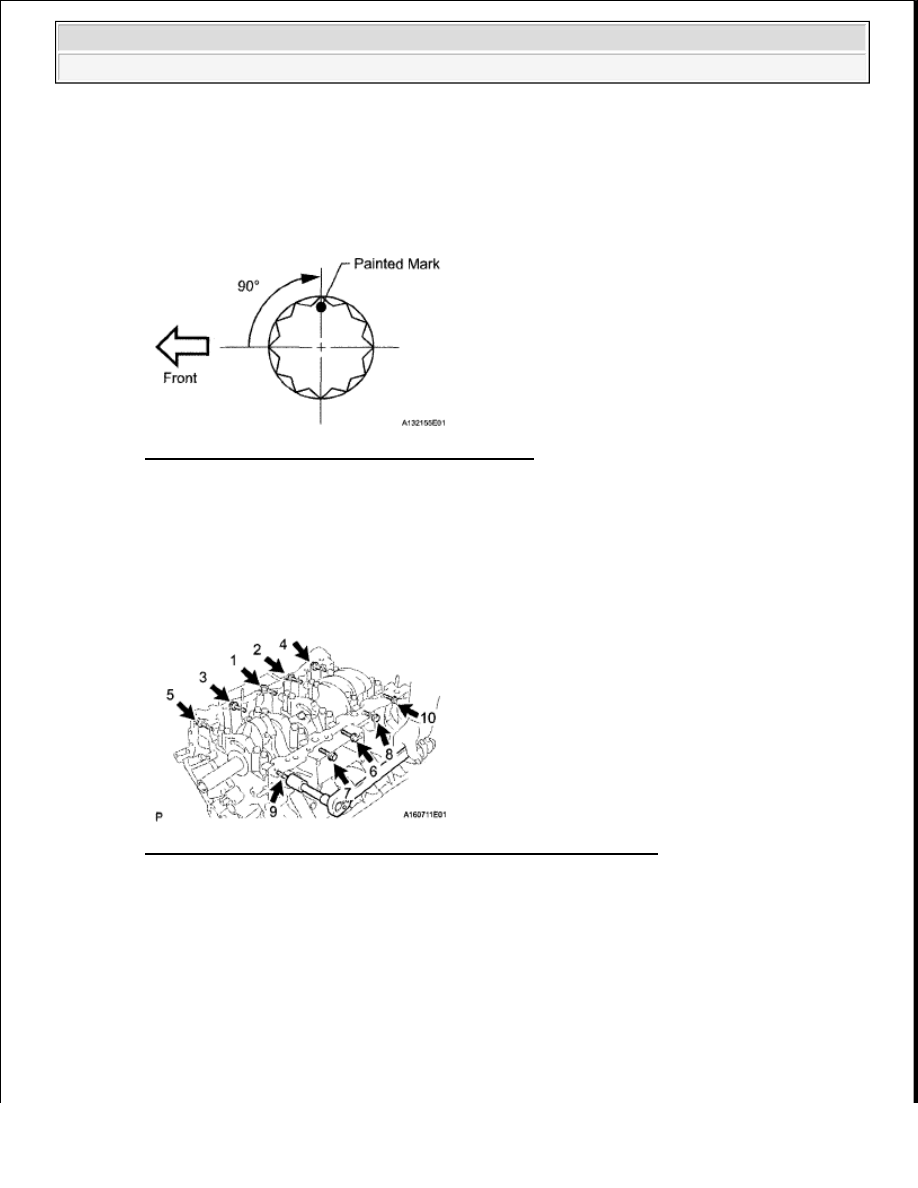
Mark the front of the bearing cap bolts with paint   

2

Tighten the bearing cap bolts another 90° in the order shown in step 1   

3

Check that the painted marks are now at a 90° angle to the front   

Fig. 148: Identifying Bearing Cap Bolt Paint Mark 
Courtesy of TOYOTA MOTOR SALES, U.S.A., INC. 

k

Check that the crankshaft turns smoothly   

l

Install and uniformly tighten the 10 main bearing cap bolts and 10 new seal washers in several 
steps, in the sequence shown in the illustration  

Torque: 45 N*m (459 kgf*cm, 33 ft.*lbf)  

Fig. 149: Identifying Main Bearing Cap Bolts Tightening Sequence 
Courtesy of TOYOTA MOTOR SALES, U.S.A., INC. 

m

Check that the crankshaft turns smoothly   

8

INSTALL CONNECTING ROD BEARING 

a

Clean the connecting rod's bearing contact surface, cap's bearing contact surface and both surfaces 
of both bearings   

b

Install the connecting rod bearings to the connecting rods and bearing caps   

c

Using a vernier caliper, measure the distance between the connecting rod's and bearing cap's edges, 
and each connecting rod bearing's edge  


2009 Toyota Tundra 

2009 ENGINE Engine Mechanical (3UR-FBE) - Tundra


Dimension A - B or B - A:  

0 to 0.7 mm (0 to 0.0276 in.)  

9

INSTALL PISTON AND CONNECTING ROD 

a

Apply engine oil to the cylinder walls, the pistons, and the surfaces of the connecting rod bearings   

b

Position the piston rings so that the ring ends are as shown in the illustration  

HINT: 

The expander ends can be placed anywhere  

NOTE:

Do not apply engine oil to the bearings and the contact 
surfaces.  

Do not allow coolant to come into contact with the bearing inner 
surface.  

If any coolant comes into contact with the bearing inner surface, 
replace the bearing with a new one. 

Fig. 150: Identifying Distance Between Connecting Rod And 
Bearing Cap Edges 
Courtesy of TOYOTA MOTOR SALES, U.S.A., INC. 

NOTE:

Do not align the ring ends.


2009 Toyota Tundra 

2009 ENGINE Engine Mechanical (3UR-FBE) - Tundra


Fig. 151: Identifying Piston Rings Position 
Courtesy of TOYOTA MOTOR SALES, U.S.A., INC. 

c

Using a hammer handle and piston ring compressor, push the correctly numbered piston and 
connecting rod into the cylinder with the front mark of the piston facing forward  

Fig. 152: Identifying Front Mark Of Piston 
Courtesy of TOYOTA MOTOR SALES, U.S.A., INC. 

d

Place the connecting rod cap on the connecting rod  

1

Match the numbered connecting rod cap with the connecting rod   


2009 Toyota Tundra 

2009 ENGINE Engine Mechanical (3UR-FBE) - Tundra


2

Check that the front mark of the connecting rod cap is facing forward  

Front mark  

FRONT MARK REFERENCE CHART 

Fig. 153: Identifying Front Mark Of Connecting Rod Cap 
Courtesy of TOYOTA MOTOR SALES, U.S.A., INC. 

e

Apply a light coat of engine oil to the threads and under the heads of the connecting rod cap bolts   

f

Temporarily install the connecting rod cap bolts  

HINT: 

The connecting rod cap bolts are tightened in 2 progressive steps  

g

Step 1: 

1

Install and alternately tighten the bolts of the connecting rod cap in several steps  

Torque: 40 N*m (408 kgf*cm, 30 ft.*lbf)  

Fig. 154: Installing Connecting Rod Cap Bolts 
Courtesy of TOYOTA MOTOR SALES, U.S.A., INC. 

Item Front Mark

LH

Front Side

RH

Rear Side


2009 Toyota Tundra 

2009 ENGINE Engine Mechanical (3UR-FBE) - Tundra


Content   ..  1940  1941  1942  1943   ..