Toyota Tundra. Manual - part 11


  Index      Toyota     Toyota Tundra (2007-2010 year) - Service and Repair Manual


Search            copyright infringement  


Content   ..  9  10  11  12   ..


Toyota Tundra. Manual - part 11


HINT: 

The zero point calibration is performed only once after the system enters test mode.  

Calibration cannot be performed again until the stored data is cleared once.  

2. Check that the buzzer sounds for 3 seconds and DTC C1336 is erased.  

3. Turn the ignition switch OFF.  

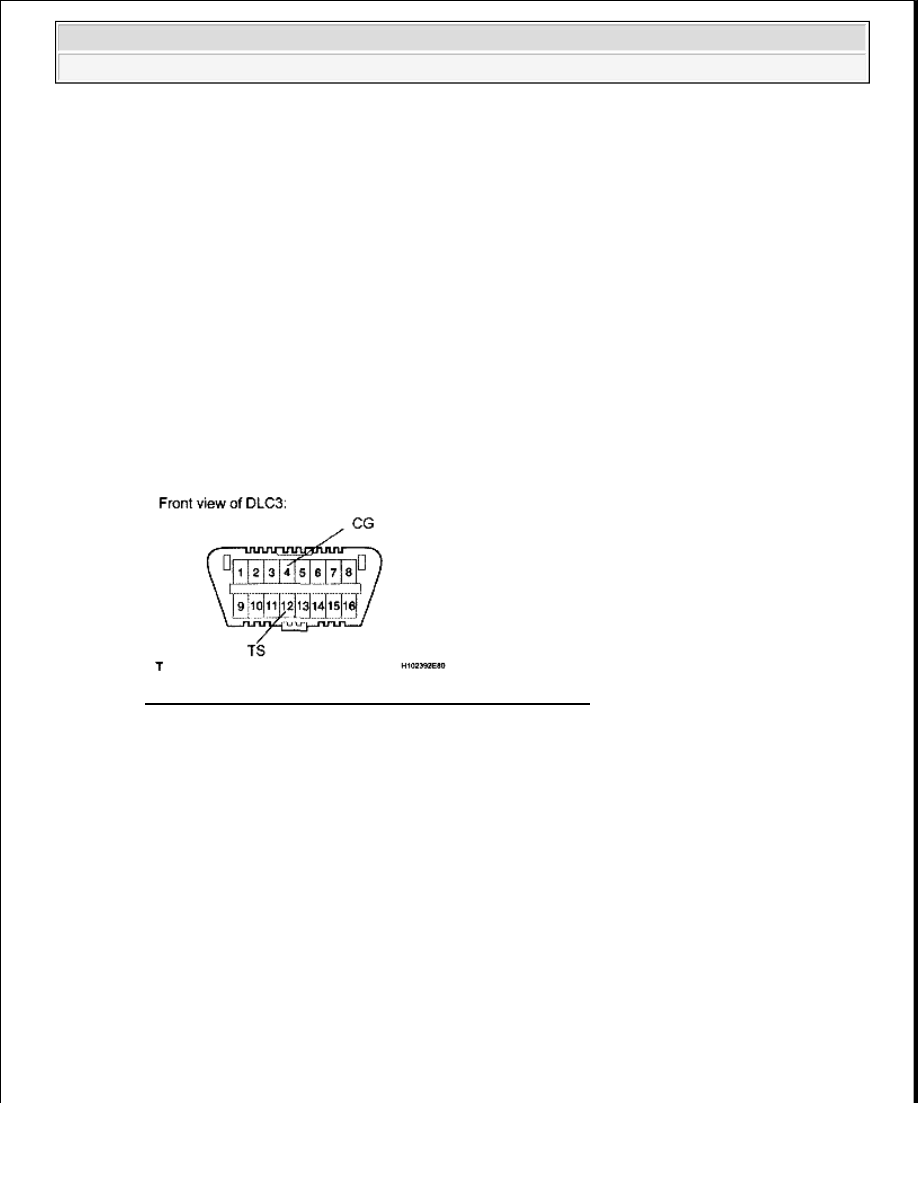
12. CLEAR ZERO POINT CALIBRATION DATA (WHEN USING SST CHECK WIRE) 

a. Turn the ignition switch ON.  

b. Using SST, connect and disconnect terminals 12 (TS) and 4 (CG) of the DLC3 4 times or more 

within 8 seconds. 

SST 09843-18040  

c. Check that the VSC OFF indicator light comes on.  

d. Using a check wire, perform the zero point calibration of the deceleration sensor. 

Fig. 34: Identifying Terminals 12 (TS) & 4 (CG) Of DLC3 
Courtesy of TOYOTA MOTOR SALES, U.S.A., INC. 

13. PERFORM ZERO POINT CALIBRATION OF MASTER CYLINDER PRESSURE SENSOR 

AND DECELERATION SENSOR (WHEN USING SST CHECK WIRE) 

a. Enter Test Mode. 

1. Turn the ignition switch OFF.  

2. Check that the shift lever is in parking or neutral and apply the parking brake. 

NOTE:

While obtaining the zero point, do not vibrate the vehicle by tilting, 
moving or shaking it and keep it stationary. (Do not start the engine.)  

While obtaining the zero point, do not depress the brake pedal.  

Obtain the zero point on a level surface (with an inclination of less 
than 1°).  

CAUTION: Application of the parking brake is not necessary for 

entering test mode. However, apply the parking brake for 


2009 Toyota Tundra 

2009 GENERAL INFORMATION Introduction - Tundra


3. Using SST, connect terminals 12 (TS) and 4 (CG) of the DLC3. 

SST 09843-18040  

4. Turn the ignition switch ON. 

Fig. 35: Identifying Terminals 12 (TS) & 4 (CG) Of DLC3 
Courtesy of TOYOTA MOTOR SALES, U.S.A., INC. 

b. Obtain the zero points of the master cylinder pressure sensor and deceleration sensor. 

1. Keep the vehicle stationary on a level surface for 1 second or more. 

HINT: 

The zero point calibration is performed only once after the system enters test mode.  

Calibration cannot be performed again until the stored data is cleared once.  

2. Check that the buzzer sounds for 3 seconds and DTC C1336 is erased.  

3. Turn the ignition switch OFF.  

14. PERFORM INITIALIZATION OF STEERING ANGLE SENSOR 

a. Check that the steering wheel is in the centered position.  

b. Disconnect the negative battery terminal for more than 2 seconds. 

safety.

NOTE:

Do not start the engine.

NOTE:

Complete the adjustment of the steering wheel and wheel alignment, and 
then initialize the steering angle sensor. If the order is reversed, the 
steering wheel and wheel alignment will become misaligned.

NOTE:

After the ignition switch is turned OFF, the navigation system 
requires approximately 90 seconds to record various types of 
memory and settings. As a result, after turning the ignition switch 
OFF, wait 90 seconds or more before disconnecting the cable from 


2009 Toyota Tundra 

2009 GENERAL INFORMATION Introduction - Tundra


c. Reconnect the negative battery terminal.  

15. ZERO POINT CALIBRATION 

a. Zero point calibration procedures: 

HINT: 

Make sure that the zero point calibration has finished normally, and then perform the sensitivity 
check. 

1. Check that all of the following conditions are met: 

The vehicle is parked on a level surface.  

No objects are placed on the front seat RH.  

The front seat inner belt RH (passenger side buckle switch) is off.  

2. Adjust the seat position in accordance with the table below. 

SEAT POSITION ADJUSTMENT REFERENCE TABLE 

3. Connect the Techstream to the DLC3.  

4. Turn the ignition switch ON.  

5. Perform the zero point calibration by following the prompts on the tester screen. 

HINT: 

Refer to the Techstream operator's manual for further details.  

If the zero point calibration has not finished normally, replace the front seat RH.  

16. SENSITIVITY CHECK 

a. Sensitivity check procedures: 

1. Connect the Techstream to the DLC3.  

2. Turn the ignition switch ON.  

3. Perform the sensitivity check by following the prompts on the tester screen. 

HINT: 

Refer to the Techstream operator's manual for further details. 

the negative (-) battery terminal.

Adjustment Item

Position

Slide Direction Rearmost position

Reclining Angle

Upright position

Headrest Height

Lowest position

Lifter Height

Lowest position


2009 Toyota Tundra 

2009 GENERAL INFORMATION Introduction - Tundra


4. Confirm that the beginning sensor reading is within the standard range. 

Standard range:  

-3.2 to 3.2 kg (-7.0 to 7.0 lb)  

5. Place a 30 kg (66.2 lb) weight (e.g. a lead mass) onto the front passenger seat.  

6. Confirm that the sensitivity is within the standard range. 

Standard range:  

27 to 33 kg (59.5 to 72.8 lb)  

HINT: 

When performing the sensitivity check, use a solid metal weight (the check result may 
not be accurate if a liquid weight is used).  

If the sensitivity deviates from the standard range, retighten the bolts of the front seat 
RH taking care not to deform the seat rail. After performing this procedure, if the 
sensitivity is not within the standard range, replace the front seat RH.  

17. DESCRIPTION OF CODE REGISTRATION 

a. When adding master keys or sub-keys (additional registration). 

1. Register key code in the transponder key ECU. 

CODE REGISTRATION DESCRIPTION 

b. After replacing the transponder key ECU (New key code registration). 

1. Register the key code (immobilizer code) in the new transponder key ECU. 

CODE REGISTRATION DESCRIPTION 

2. Register the ECU - ECM COMMUNICATION ID between the ECM and the new 

transponder key ECU. 

CODE REGISTRATION DESCRIPTION 

c. After replacing the ECM. 

1. Reregister the ECU - ECM COMMUNICATION ID between the new ECM and the 

Target ECU

See Procedure

Transponder key ECU Procedure "A"

Target ECU

See Procedure

Transponder key ECU Procedure "B"

Target ECU See Procedure

ECM

Procedure "C"


2009 Toyota Tundra 

2009 GENERAL INFORMATION Introduction - Tundra


Content   ..  9  10  11  12   ..