Suzuki Grand Vitara JB416 / JB420 / JB419. Manual - part 508
 

  Index      Suzuki     Suzuki Grand Vitara JB416 / JB420 / JB419 - service repair manual 2007 year


Search            


Content   ..  506  507  508  509   ..


Suzuki Grand Vitara JB416 / JB420 / JB419. Manual - part 508


9H-1 Interior Trim: 

Body, Cab and Accessories

Interior Trim

Repair Instructions

Floor Carpet Removal and Installation

S6JB0A9806001

Removal

1) Remove front seats and rear seats.
2) Remove seat belt lower anchor bolt.
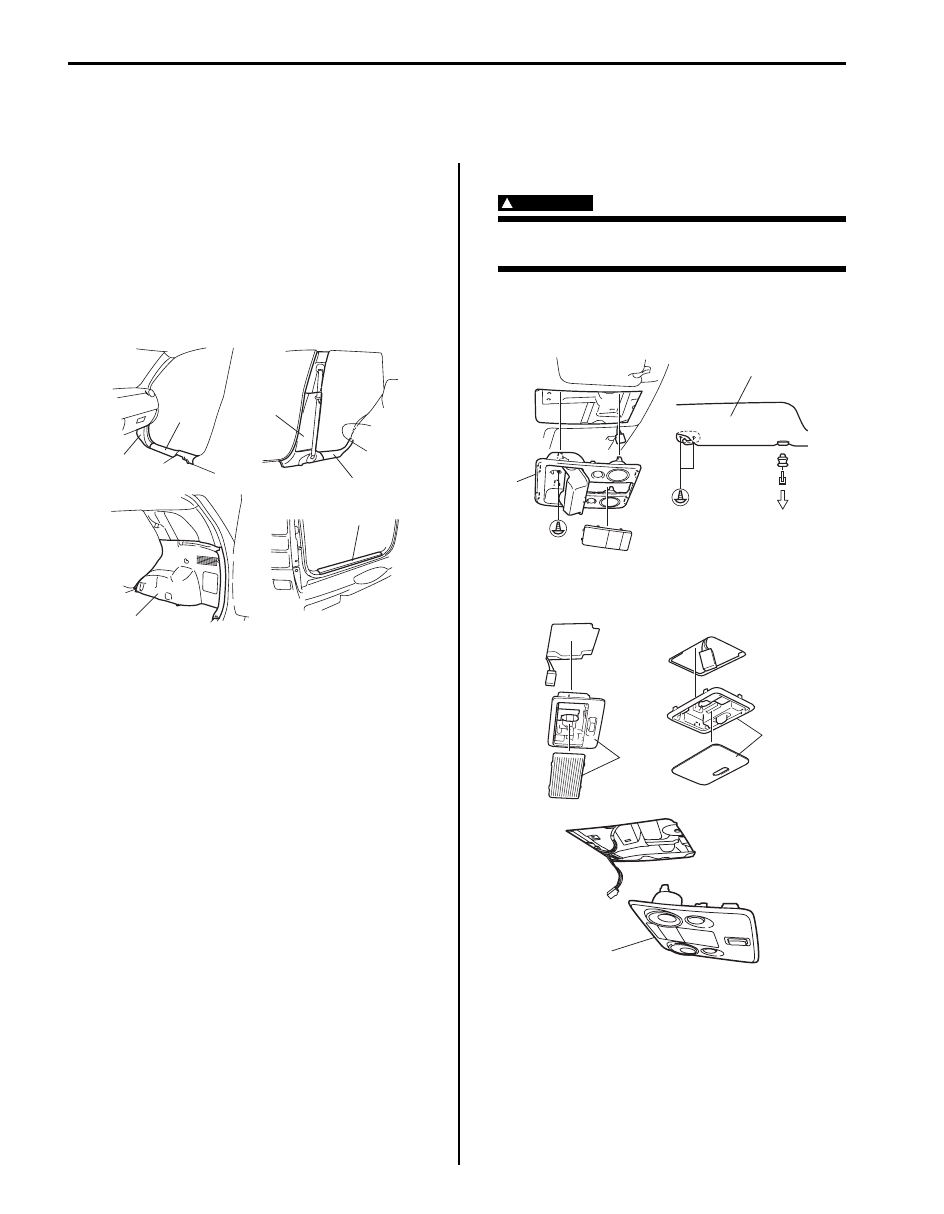
3) Remove side sill scuffs (1) (front and rear for 5 door 

model), front pillar lower trims (2), center pillar inner 
lower trims (3) (for 5 door model), back panel trim 
(4), rear quarter lower trims (5).

4) Remove front and rear console boxes.
5) Remove floor carpet.

Installation
Reverse removal sequence to install front floor carpet, 
noting the following instruction.
• For tightening torque of rear seat mounting bolt and 

nut, refer to “Rear Seat Components in Section 9G”.

• For tightening torque of front seat mounting bolt, refer 

to “Front Seat Components in Section 9G”.

• For tightening torque of seat belt lower anchor bolt, 

refer to “Front Seat Belt Components in Section 8A” 
and “Rear Seat Belt Components in Section 8A”.

Head Lining Removal and Installation

S6JB0A9806002

WARNING

!


Refer to “Air Bag Warning: in Section 00” 
before starting service work.


Removal

1) Remove overhead console (1) (if equipped) and 

sunvisor (2).

2) Remove room lamp (2), luggage lamp (1) and spot 

lamp (3) (if equipped).

1

2

1

3

4

5

I5JB0A980001-01

2

1

I5JB0A980002-02

2

1

3

I5JB0A980003-01

Interior Trim:  9H-2

3) Remove front pillar upper trims (1), side sill scuffs (2) 

(front and rear for 5 door model), center pillar inner 
lower trims (3) (for 5 door model), center pillar inner 
upper trims (4) (for 5 door model), back panel trim 
(5), rear quarter lower trims (6) and rear quarter 
upper trims (7).

4) Remove assistant grip (1).
5) Remove head lining clips (2) and remove head lining 

(3).

Installation
Reverse removal procedure noting the following.
• Set roof harness (1), rear washer hose (2) and 

antenna feeder (3) to head lining with adhesive tape 
(4) as shown.

3 door model

1

2

2

4

5

3

6

7

I5JB0A980004-01

2

2

1

1

3

I5JB0A980005-01

[A]: Left-hand steering vehicle
[B]: Right-hand steering vehicle

1

2

3

4

1

2, 3

4

[A]

[B]

I5JB0A980006-02

9H-3 Interior Trim: 

5 door model

• For equipped with sliding roof, hook on bracket (1) of 

roof lining to sliding roof housing (2).

• For equipped with sliding roof, adhere fasteners (1) on 

roof lining to fasteners of sliding roof frame securely.

• For tightening torque of seat belt anchor bolt, refer to 

“Front Seat Belt Components in Section 8A” an
“Rear Seat Belt Components in Section 8A”.

[C]: Left-hand steering vehicle with sliding roof
[D]: Right-hand steering vehicle with sliding roof

[E]: Left-hand steering vehicle without sliding roof

[F]: Right-hand steering vehicle without sliding roof

1

4

2

1

2

3

4

[C]

1

2

3

3

4

[D]

[E]

1

4

2

3

[F]

I5JB0A980009-01

1

2

I5JB0A980007-01

1

1

I5JB0A980010-01

Interior Trim:  9H-4

Console Box Components

S6JB0A9806003

A

A

A

A

A

A

A

1

2

3

4

I5JB0A980008-02

1. Front console box

3. Gear shift panel

2. Rear console box

4. Console rear panel


Content   ..  506  507  508  509   ..