Suzuki Grand Vitara JB416 / JB420 / JB419. Manual - part 386
 

  Index      Suzuki     Suzuki Grand Vitara JB416 / JB420 / JB419 - service repair manual 2007 year


Search            


Content   ..  384  385  386  387   ..


Suzuki Grand Vitara JB416 / JB420 / JB419. Manual - part 386


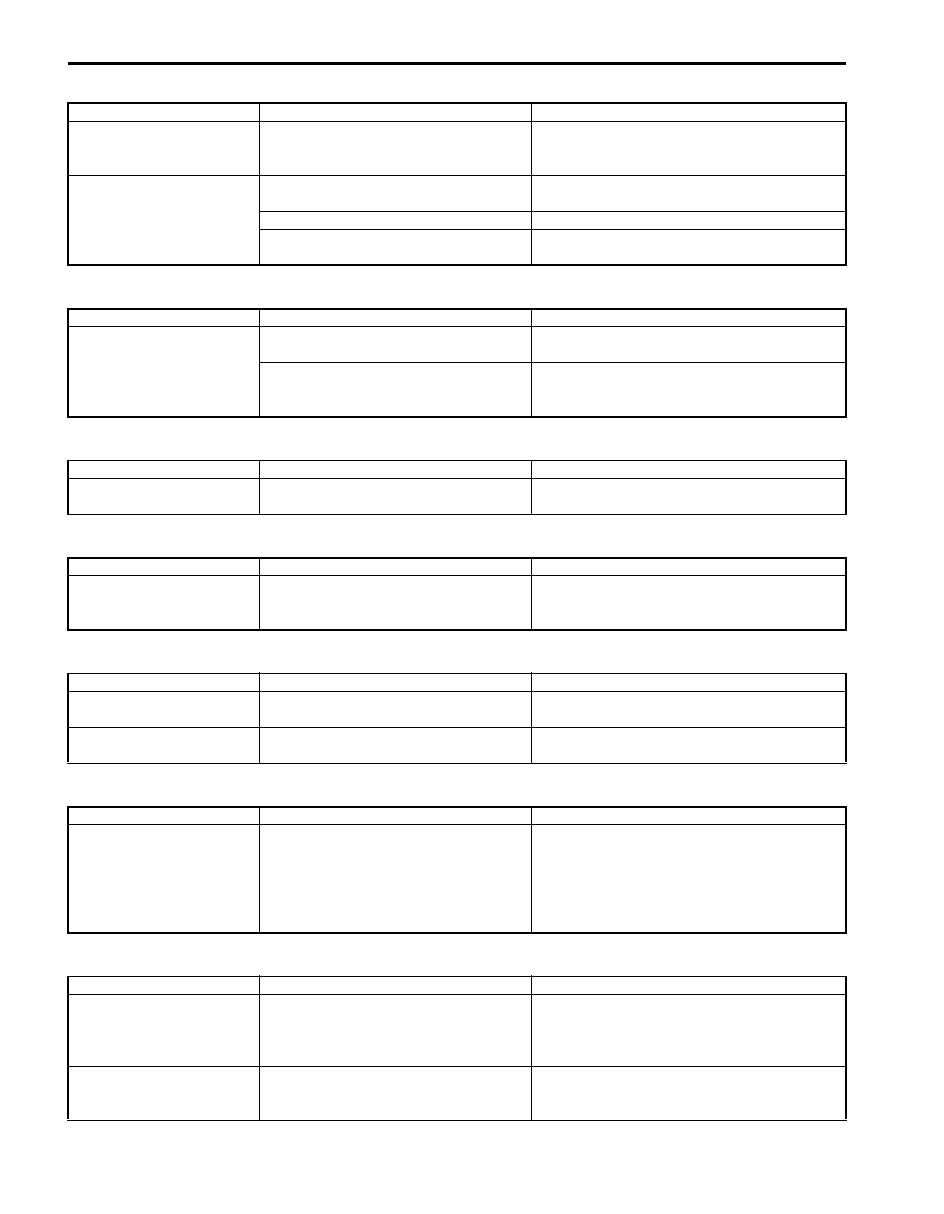
7B-35 Air Conditioning System: 

Abnormal Noise from Magnetic Clutch

Abnormal Noise from Tubing

Abnormal Noise from Condenser Assembly

Abnormal Noise from Crankshaft Pulley

Abnormal Noise from Tension Pulley

Abnormal Noise from A/C Evaporator

Abnormal Noise from Blower Motor

Condition

Possible cause

Correction / Reference Item

A rumbling noise is heard 
when compressor is not 
in operation

Worn or damaged bearings

Replace magnet clutch assembly.

A chattering noise is 
heard when compressor 
is in operation

Faulty magnet clutch clearance 
(excessive clearance)

Adjust magnet clutch clearance.

Worn magnet clutch friction surface

Replace magnet clutch assembly.

Compressor oil leaked from shaft seal, 
contaminating the friction surface

Replace compressor body assembly.

Condition

Possible cause

Correction / Reference Item

A droning noise is heard 
from inside of the vehicle, 
but not particularly 
noticeable in engine 
compartment

Faulty tubing clamps

Reposition clamps or increase the number of 
clamps.

Resonance caused by pulsation from 
variations in refrigerant pressure

Attach a silencer to tubing, or modify its 
position and length.

Condition

Possible cause

Correction / Reference Item

Considerable vibration in 
condenser assembly

Resonance from condenser assembly 
bracket and body

Firmly insert a silencer between condenser 
assembly bracket and body.

Condition

Possible cause

Correction / Reference Item

A large rattling noise is 
heard at idle or sudden 
acceleration

Loosen crankshaft pulley bolt

Retighten bolt.

Condition

Possible cause

Correction / Reference Item

Clattering noise is heard 
from pulley

Worn or damaged bearing

Replace tension pulley.

Pulley cranks upon 
contact

Cracked or loose bracket

Replace or retighten bracket.

Condition

Possible cause

Correction / Reference Item

Whistling sound is heard 
from A/C evaporator

Depending on the combination of the 
interior / exterior temperatures, engine 
rpm and refrigerant pressure, the 
refrigerant flowing out of the expansion 
valve may, under certain conditions, 
make a whistling sound

At times, slightly decreasing refrigerant volume 
may stop this noise.
Inspect expansion valve and replace if faulty.

Condition

Possible cause

Correction / Reference Item

Blower motor emits a 
chirping sound in 
proportion to its speed of 
rotation

Worn or damaged motor brushes or 
commutator

Replace blower motor.

Fluttering noise or large 
droning noise is heard 
from blower motor

Leaves or other debris introduced from 
fresh air inlet to blower motor

Remove debris and make sure that the screen 
at fresh air inlet is intact.

Air Conditioning System:  7B-36

DTC B1502: Inside Air Temperature Sensor and/or Its Circuit Malfunction

S6JB0A7204012

Wiring Diagram

DTC Detecting Condition and Trouble Area

DTC Confirmation Procedure

1) Connect scan tool to DLC with ignition switch turned OFF.
2) Turn ON ignition switch and clear DTC using scan tool.
3) Check DTC.

DTC Troubleshooting

NOTE
When DTC B1503, B1511, B1512 and B1530 are indicated together, it is possible that “BLK/RED” wire 
circuit open.


5V

BLU/BLK

G52-20
G52-13

BLK/RED

[A]

2

3

1

13

20

I5JB0A720020-01

[A]: HVAC control module connector “G52” (harness side view)

2. Inside air temperature sensor

1. HVAC control module

3. To other sensors

DTC Detecting Condition

Trouble Area

Inside air temperature sensor signal voltage is more than or less than 
specified value for specified time continuously.

• Inside air temperature sensor circuit
• Inside air temperature sensor
• HVAC control module

Step

Action

Yes

No

1

Inside air temperature sensor signal circuit check
1) Disconnect inside air temperature sensor connector with 

ignition switch turned OFF.

2) Check for proper connection to inside air temperature 

sensor at “BLU/BLK” and “BLK/RED” wire terminals.

3) If OK, measure voltage between “BLU/BLK” wire 

terminal of inside air temperature sensor connector and 
vehicle body ground with ignition switch turned ON.

Is voltage 4 – 6 V?

Go to Step 5.

Go to Step 2.

2

Inside air temperature sensor signal circuit check
1) Disconnect connector from HVAC control module with 

ignition switch turned OFF.

2) Check for proper connection to HVAC control module 

connector at “G52-20” and “G52-13” terminals.

3) If OK, measure resistance between “BLU/BLK” wire 

terminal of inside air temperature sensor connector and 
“G52-20” terminal of HVAC control module connector.

Is resistance below 5 

?

Go to Step 3.

“BLU/BLK” wire open or 
high resistance circuit.

3

Inside air temperature sensor signal circuit check
1) Measure resistance between “BLU/BLK” wire terminal of 

inside air temperature sensor connector and vehicle 
body ground.

Is resistance infinity?

Go to Step 4.

“BLU/BLK” wire shorted 
to ground circuit.

7B-37 Air Conditioning System: 

DTC B1503: A/C Evaporator Air Temperature Sensor and/or Its Circuit Malfunction

S6JB0A7204013

Wiring Diagram

DTC Detecting Condition and Trouble Area

DTC Confirmation Procedure

1) Connect scan tool to DLC with ignition switch turned OFF.
2) Turn ON ignition switch and clear DTC using scan tool.
3) Check DTC.

4

Inside air temperature sensor signal circuit check
1) Measure voltage between “BLU/BLK” wire terminal of 

inside air temperature sensor connector and vehicle 
body ground with ignition switch turned ON.

Is voltage 0 V?

Go to Step 5.

“BLU/BLK” wire shorted 
to other circuit.

5

Inside air temperature sensor ground circuit check
1) Connect HVAC control module connector with ignition 

switch turned OFF.

2) Measure resistance between “BLK/RED” wire terminal of 

inside air temperature sensor connector and vehicle 
body ground.

Is resistance below 5 

?

Go to Step 7.

Go to Step 6.

6

Inside air temperature sensor ground circuit check
1) Measure resistance between “G52-13” terminal of HVAC 

control module connector and vehicle body ground.

Is resistance below 5 

?

“BLK/RED” wire open or 
high resistance circuit.

HVAC control module 
faulty.

7

Inside air temperature sensor check
1) Check inside air temperature sensor referring to “Inside 

Air Temperature Sensor Inspection”.

Is it in good condition?

HVAC control module 
faulty.

Inside air temperature 
sensor faulty.

Step

Action

Yes

No

5V

BLK/RED

WHT/BLK

G52-19
G52-13

[A]

2

3

1

13

19

I5JB0A720021-01

[A]: HVAC control module connector “G52” (harness side view)

2. Evaporator temperature sensor

1. HVAC control module

3. To other sensors

DTC Detecting Condition

Trouble Area

Evaporator temperature sensor signal voltage is more than or less than 
specified value for specified time continuously.

• Evaporator temperature sensor 

circuit

• Evaporator temperature sensor
• HVAC control module

Air Conditioning System:  7B-38

DTC Troubleshooting

NOTE
When DTC B1502, B1511, B1512 and B1530 are indicated together, it is possible that “BLK/RED” wire 
circuit open.


Step

Action

Yes

No

1

Evaporator temperature sensor signal circuit check
1) Disconnect evaporator temperature sensor connector 

with ignition switch turned OFF.

2) Check for proper connection to evaporator temperature 

sensor at “WHT/BLK” and “BLK/RED” wire terminals.

3) If OK, measure voltage between “WHT/BLK” wire 

terminal of evaporator temperature sensor connector 
and vehicle body ground with ignition switch turned ON.

Is voltage 4 – 6 V?

Go to Step 5.

Go to Step 2.

2

Evaporator temperature sensor signal circuit check
1) Disconnect connector from HVAC control module with 

ignition switch turned OFF.

2) Check for proper connection to HVAC control module 

connector at “G52-19” and “G52-13” terminals.

3) If OK, measure resistance between “WHT/BLK” wire 

terminal of evaporator temperature sensor connector 
and “G52-19” terminal of HVAC control module 
connector.

Is resistance below 5 

?

Go to Step 3.

“WHT/BLK” wire open 
or high resistance 
circuit.

3

Evaporator temperature sensor signal circuit check
1) Measure resistance between “WHT/BLK” wire terminal 

of evaporator temperature sensor connector and vehicle 
body ground.

Is resistance infinity?

Go to Step 4.

“WHT/BLK” wire 
shorted to ground 
circuit.

4

Evaporator temperature sensor signal circuit check
1) Measure voltage between “WHT/BLK” wire terminal of 

evaporator temperature sensor connector and vehicle 
body ground with ignition switch turned ON.

Is voltage 0 V?

Go to Step 5.

“WHT/BLK” wire 
shorted to other circuit.

5

Evaporator temperature sensor ground circuit check
1) Connect HVAC control module connector with ignition 

switch turned OFF.

2) Measure resistance between “BLK/RED” wire terminal of 

evaporator temperature sensor connector and vehicle 
body ground.

Is resistance below 5 

?

Go to Step 7.

Go to Step 6.

6

Evaporator temperature sensor ground circuit check
1) Measure resistance between “G52-13” terminal of HVAC 

control module connector and vehicle body ground.

Is resistance below 5 

?

“BLK/RED” wire open or 
high resistance circuit.

HVAC control module 
faulty.

7

Evaporator temperature sensor check
1) Check evaporator temperature sensor referring to “A/C 

Evaporator Temperature Sensor Inspection”.

Is it in good condition?

HVAC control module 
faulty.

Evaporator temperature 
sensor faulty.


Content   ..  384  385  386  387   ..