Subaru Forester (2023 year). Manual in english - page 9
 

  Index      Manuals     Subaru Forester (2023 year). Manual in english


Search            copyright infringement  


Content      ..     7      8      9      10     ..


Subaru Forester (2023 year). Manual in english - page 9


(141,1)

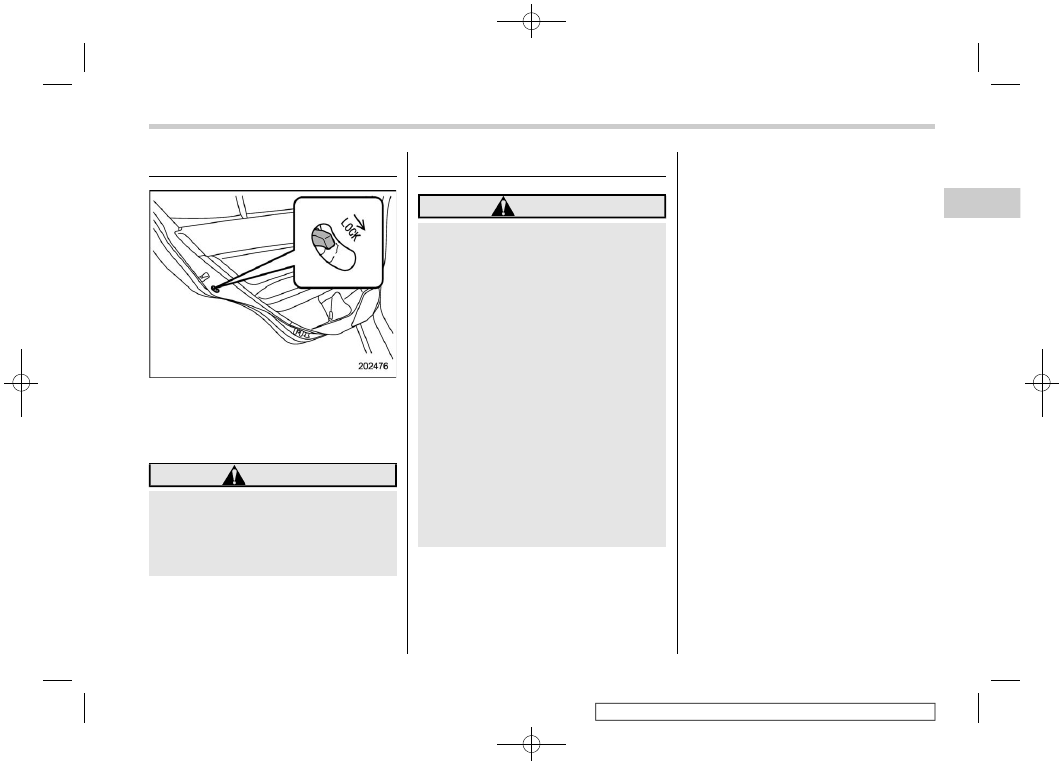
2-7. Child safety locks

Each rear door has a child safety lock.
When the child safety lock lever is in the
lock position, the door cannot be opened
from the inside. The door can only be
opened from the outside.

WARNING

Always turn the child safety locks to
the “LOCK” position when children
sit in the rear seat. Serious injury
could result if a child accidentally
opens the door and falls out.

2-8. Windows

WARNING

To avoid serious personal injury
caused by entrapment, always con-
form to the following instructions
without exception.

.

When operating the power win-

dows, be extremely careful to
prevent anyone’s body parts or
any other objects from being
caught in the window.

.

Always lock the passengers’ win-

dows using the lock switch when
children are riding in the vehicle.

.

Always carry the key when you

leave the vehicle for safety rea-
sons and never allow an unat-
tended child to remain in the
vehicle. Failure to follow this
procedure could result in injury
to a child operating the power
window.

NOTE

.

If the power window system detects
resistance, an impact or abnormal-
ity, the window operation may be
automatically stopped to prevent

further jamming, entrapment or mal-
function.

– The closing window slides down

slightly and stops.

– The opening window stops slid-

ing down.

.

The power window system may
detect resistance, an impact or an
abnormality in the following cases.

– A substantial sized object is

caught between the window and
the window frame.

– A foreign object is caught be-

tween the window and the win-
dow frame.

– The vehicle drives over a deep

pothole.

.

The window cannot be closed for a
few seconds after the window is
automatically stopped by the sys-
tem.

– CONTINUED –

Child safety locks

139

2

Keys

and

doors

(142,1)

&

Power window operation

!

Power window switches

.

Driver’s side power window switches:

1

For front left window (with one-touch auto
up and down feature)

2

For front right window (with one-touch
auto up and down feature (if equipped))

3

For rear left window

4

For rear right window

5

Lock switch

All door windows can be controlled by the
power window switch cluster on the driver
side door.
These switches illuminate when activated.

.

Passenger ’s side power window
switches:

Each passenger’s window can be con-
trolled by the power window switch located
on the door.
These switches illuminate when activated.

!

Operating the window

With one-touch auto up and down feature

1

Automatically close*

2

Close

3

Open

4

Automatically open*

*: To stop the window halfway, operate the

switch to the opposite side.

Windows

140

(143,1)

Without one-touch auto up and down
feature

1

Close

2

Open

NOTE

Avoid the following.

.

Continuously operating a switch in
the same direction after the window
is fully closed or fully opened.

.

Continuously operating three or
more switches all at once in the
same direction after the windows
are fully closed or fully opened.

Either of the operations described
above may cause the power window
breaker to operate making it impossible
to open or close the window. Be sure to
initialize the power windows. Refer to

“Initialization of power window (win-
dows with off delay function)”

P142.

!

Anti-entrapment function (windows
with off delay function)

While closing the window, if the window
senses a substantial enough object
trapped between the window and the
window frame, it automatically moves
down slightly and stops.
If a foreign object is caught while window is
opening, the window will stop.

CAUTION

.

Never attempt to test the power

window operation using body
parts.

.

If an object is caught just before

the window fully closes, the sys-
tem may not operate properly.

NOTE

.

If a window detects an impact similar
to that caused by trapping an object
(for example, when the vehicle en-
counters a deep pothole), the anti-
entrapment function may operate.

.

You cannot close the window for a
few seconds after the anti-entrap-
ment function operates.

!

Off delay function (if equipped)

The windows can be operated for approxi-
mately 40 seconds even after the ignition
switch is turned to the “ACC” or “OFF”
position. If a front door is opened within 40
seconds, the off delay function is can-
celed.

!

Locking the passengers’ windows

1

Lock

2

Unlock

The lock switch is in the lock position, the
rear windows cannot be operated by the
driver’s side switches. The passenger’s
side switches and the rear seat side
switches are not operational either.

– CONTINUED –

Windows

141

2

Keys

and

doors

(144,1)

When the indicator on the window
switches does not illuminate, the window
switch cannot be operated.

&

Initialization of power window
(windows with off delay func-
tion)

If the one-touch auto up and down function
or off delay function does not operate
properly, operate each window according
to the following procedure in order to
initialize the power window system.
1. Close the door.
2. Turn the ignition switch to the “ON”

position.

3. Open the window completely and then

press and hold down the power win-
dow switch for approximately 1 sec-
ond.

4. Close the window completely and then

pull and hold the power window switch
for approximately 1 second.

2-9. Rear gate

CAUTION

When loading and unloading cargo,
be careful not to come in contact
with the hot engine exhaust gas or
the exhaust pipe, because they
could burn you.

&

Manual rear gate

The rear gate can be locked and unlocked
using any of the following systems.

.

Power door locking switch: Refer to
“Locking and unlocking from the inside”

P133.

.

Keyless access with the push-button
start system (if equipped): Refer to
“Keyless access with push-button start
system”

P111.

.

Remote keyless entry system: Refer to
“Remote keyless entry system”

P128.

.

Automatic door locking/unlocking: Re-
fer to “Automatic door locking/unlock-
ing”

P134.

To open:

Rear gate opener button

1. Unlock the rear gate.
2. Press and hold the rear gate opener

button. The rear gate will open slightly.

3. Hold the rear gate and lift it up slowly.

NOTE

If the rear gate cannot be opened due to
a discharged vehicle battery, a mal-
function in the door locking/unlocking
system or other causes, the rear gate
can be unlocked by manually operating
the rear gate lock release lever. For the
procedure, refer to “Rear gate – if the
rear gate cannot be opened”

P435.

Rear gate

142

(145,1)

To close:

Lower the rear gate slowly and push down
firmly until the latch engages.
The rear gate can be lowered easily if you
pull it down holding the handle.

WARNING

.

To prevent dangerous exhaust

gas from entering the vehicle,
always keep the rear gate closed
while the engine is running.

.

Do not attempt to shut the rear

gate while holding the handle.

.

Do not close the rear gate by

pulling the handle from inside the
cargo space. There is a danger of
your hand being caught and
injured.

CAUTION

.

Do not jam a plastic bag in or

place cellophane tape on the rear
gate stays or scratch the stays
while loading or unloading cargo.
Doing so could cause leakage of
gas from the stays, which may
result in their inability to hold the
rear gate open.

.

Be careful not to hit your head or

face on the rear gate when open-
ing or closing the rear gate and
when loading or unloading cargo.

&

Power rear gate (if equipped)

WARNING

.

When operating the power rear

gate, observe the following pre-
cautions. Ignoring the precau-
tions may result in an injury (e.
g., anyone’s body is hit against
the rear gate or is caught in the
rear gate, etc.)

– Make sure there are no people

around the rear gate.

– Never let anyone get close to

the rear gate.

.

When closing the rear gate, be

sure to prevent anyone’s body
parts or any other objects from
being caught in the rear gate.

Otherwise, serious personal in-
jury may be caused by entrap-
ment.

.

After opening the rear gate on a

slope using the power rear gate
feature, the rear gate may close.
Make sure that the rear gate has
stopped completely after open-
ing it.

.

When leaving the vehicle, always

carry the key for safety and never
allow an unattended child to

– CONTINUED –

Rear gate

143

2

Keys

and

doors

(146,1)

remain in the vehicle. Doing so
could result in injury to the child
operating the power rear gate.

.

The driver should be aware of and

pay careful attention to his/her
responsibilities.

.

Use the power rear gate only

when the area around the rear
gate is clearly visible and when
you have checked that there is no
danger of people being caught in
the gate.

CAUTION

.

When closing the rear gate after

opening it, make sure to use the
power rear gate. If the rear gate is
closed manually with extra force,
the power rear gate may be
damaged.

.

Do not install any accessories

other than genuine SUBARU
parts on the rear gate. If the
weight of rear gate increases
excessively, the rear gate stays
cannot support the rear gate
sufficiently when opening the
rear gate. Also, the power rear
gate may not function properly or
may malfunction.

The power rear gate operates only when
all of the following conditions are satisfied.

.

The vehicle is stopped completely.

.

The outside temperature is within a
range of −22

8

F to 140

8

F (from −30

8

C to

60

8

C).

.

The ignition switch is in the “LOCK”/
“OFF” or “ACC” position. Or, the ignition
switch is in the “ON” position and the
select lever is in the “P” position.

We recommend using the power rear gate
function in most circumstances instead of
manual operation.

NOTE

.

Do not press the power rear gate
button repeatedly while the power
rear gate is operating. Otherwise,
the system may ignore the button
operation in order to avoid being
damaged.

.

If the vehicle starts to move while the
power rear gate is operating, the
system sounds a buzzer and closes
the rear gate automatically. At this
time, if the system detects jamming,
it will deactivate the power rear gate
and the rear gate will not be closed. If
this occurs, close the rear gate
manually. For details, refer to “Man-
ual rear gate”

P142.

.

If you try to open the rear gate using
the power rear gate function imme-
diately after closing the rear gate
using the power rear gate function,
an electronic chirp will sound and
the rear gate will not open. Wait for a
while before trying to open the rear
gate via the power rear gate func-
tion.

.

If either of the operating conditions
has not been satisfied while operat-
ing the power rear gate, an electro-
nic chirp will sound and the power
rear gate will be deactivated. In this
case, the rear gate may stop opening
or closing suddenly.

!

Operation

NOTE

.

The rear gate will remain unlocked
even after closing it. Always lock the
rear gate when leaving the vehicle.

.

If you cannot open/close the rear
gate by performing the operation
described here, a short electronic
chirp will sound three times (beep,
beep, beep).

Rear gate

144

(147,1)

!

By the power rear gate button
(other than the buttons on the
rear gate)

Power rear gate button on the instrument
panel

Power rear gate button on the access key
fob

Power rear gate button on the transmitter

To open the rear gate:

Press and hold the power rear gate button
when the rear gate is closed. The rear gate

will open automatically. Then an electronic
chirp and the hazard warning flashers will
operate as follows:

.

When operating the power rear gate
button on the instrument panel/trans-
mitter: sounds and flashes twice.

.

When operating the power rear gate
button on the access key fob: sounds
and flashes four times.

NOTE

.

If the rear gate cannot be opened by
operating the power rear gate button
on the instrument panel, unlock it
with the keyless access function or
the remote keyless entry system.
Then, it will be possible to open the
power rear gate using the power rear
gate button on the instrument panel.

.

The factory setting (default setting)
of the operation for the “

” button

on the access key fob or the trans-
mitter is pressing and holding. This
setting can be changed to non-
operation or pressing twice at
SUBARU dealers. For more details,
contact a SUBARU dealer.

To pause the opening rear gate:

Briefly press the power rear gate button
while the rear gate is being opened. Then
an electronic chirp will sound twice and the

– CONTINUED –

Rear gate

145

2

Keys

and

doors

(148,1)

hazard warning flashers will flash twice.
If you press the power rear gate button
again, the rear gate will close.
You can open the rear gate by pressing the
power rear gate button briefly while the
rear gate is being closed.

NOTE

The rear gate cannot be paused when it
is in the approximately 2 in (5 cm) range
from the fully closed position. The
system will ignore any button operation
and the rear gate will continue to open.

To close the rear gate:

Press and hold the power rear gate button.
Then an electronic chirp will sound twice
and the hazard warning flashers will flash
twice. If you briefly press the power rear
gate button again, the rear gate will open.

NOTE

The factory setting (default setting) of
the operation for the “

” button on

the access key fob or the transmitter is
pressing and holding. This setting can
be changed to non-operation or press-
ing twice at SUBARU dealers. For more
details, contact a SUBARU dealer.

!

By the buttons on the rear gate

NOTE

After performing the following proce-
dures, an electronic chirp will sound
twice and the hazard warning flashers
will flash twice.

Rear gate opener button

Power rear gate button on the inside edge
of the rear gate

1

Power rear gate button

2

Power rear gate lock button

To open the rear gate:

1. For models with “keyless access with

push-button start system”, carry the
access key fob. For models without
“keyless access with push-button start
system”, unlock the rear gate.

2. Briefly press the rear gate opener

button when the rear gate is closed.

The rear gate will open automatically.

To pause the opening rear gate:

Briefly press either of the following buttons
while the rear gate is being opened.

.

Rear gate opener button

Rear gate

146

(149,1)

.

Power rear gate button on the inside
edge of the rear gate

If you press the power rear gate button
again, the rear gate will close. You can
open the rear gate by pressing the power
rear gate button briefly while the rear gate
is being closed.

NOTE

The rear gate cannot be paused when it
is in the approximately 2 in (5 cm) range
from the fully closed position. The
system will ignore any button operation
and the rear gate will continue to open.

To close the rear gate:

Briefly press either of the following but-
tons.

.

Rear gate opener button

.

Power rear gate button on the inside
edge of the rear gate

If you press the power rear gate button
again, the rear gate will open.

To Lock the doors using the power rear
gate lock button:

Carry the access key fob, and press the
power rear gate lock button. All doors, the
rear gate and the fuel filler lid are locked,
and the rear gate will be closed. Also, the
hazard warning flashers will flash once,
and an electronic chirp will sound once.

NOTE

.

By pushing the power rear gate lock
button for more than 2 seconds, all
doors are locked, however, the auto
door closing function of the rear
gate will be canceled.

.

If any of the doors is not fully closed,
the outside warning chime sounds
five times to alert you that the doors
are not properly closed.

!

By manual operation

To open the rear gate:

Lift up the rear gate, when the rear gate at
midway position. The rear gate will open
automatically.

To close the rear gate:

Pull down the rear gate when the rear gate
is opened. The rear gate will close auto-
matically.

NOTE

.

If the rear gate is moved slowly, it
may not operate automatically open
or close.

.

When leaving the vehicle, make sure
that all doors and the rear gate are
completely locked.

!

Manual operation

NOTE

Using the power rear gate operation is
recommended. Manual operation will
require physical effort.

The power rear gate can be closed
manually. Refer to “Manual rear gate”

P142.

– CONTINUED –

Rear gate

147

2

Keys

and

doors

(150,1)

!

Memory function

Memory switch

Memory switch status

1

ON status

2

OFF status

Your desired rear gate height can be
registered.

Registration of the rear gate height:

To register the rear gate height, perform
the following procedures.
1. Open the rear gate using the power

rear gate function.

2. With the rear gate at the desired

height, stop it using the power rear
gate function.

3. Press the memory switch to select the

“ON” status.

Power rear gate button on the inside edge
of the rear gate

1

Power rear gate button

2

Power rear gate lock button

4. With the rear gate at the desired

height, press and hold the power rear

gate button on the inside edge of the
rear gate until an electronic chirp is
heard and the hazard warning flashers
flash three times. The electronic chirp
and the flashing hazard warning
flashers confirm the selected rear gate
height has been registered.

NOTE

.

To change the registered height,
press the memory switch to select
the “OFF” status and perform the
registering procedure again.

.

It is possible to register the height
from approximately 2 in (5 cm) or
more from the completely closed
position.

Retrieval of the rear gate height:

To open the rear gate and stop it at the
registered height, perform the following
procedure.
1. Press the memory switch to select the

ON status.

2. Press and hold any of the power rear

gate switches.

Even if any of the power rear gate switches
are pressed and held while the memory
switch is in the OFF status, you can stop it
at the registered height by pressing the
memory switch to select the ON status

Rear gate

148

(151,1)

before the rear gate reaches the registered
height.

NOTE

The rear gate will open to the position
that is stored in the memory function
even if the rear gate is opened by the
reverse function.

!

Reverse function

WARNING

.

Do not let parts of your body get

caught when operating the re-
verse function. If the reverse
function does not operate for
some reason, this may lead to
serious injury or accidents.

.

The reverse function may not

operate if foreign objects are
caught in the rear gate just before
it closes completely. Be careful
not to catch your fingers and
other body parts.

.

The reverse function may not

operate depending on the object
shape and the manner in which it
was caught. Be careful not to
catch your fingers and other
body parts.

CAUTION

.

If the reverse function is operated

3 times consecutively, automatic
opening and closing of the power
rear gate function will be can-
celed and the rear gate will stop
opening or closing suddenly.
However, the rear gate may open
or close depending on the rear
gate height when automatic op-
eration is ceased. Be careful that
the rear gate does not hit any-
one’s head or face, etc. and that
fingers and baggage, etc. are not
caught in it.

.

Take care not to damage the

touch sensors. Otherwise, the
reverse function may cease to
operate.

If, while opening or closing using power
rear gate, the rear gate catches persons or
baggage or hits an obstacle, an electronic
chirp will sound 3 times and the rear gate
will operate as follows.

When opening the rear gate:

The rear

gate will automatically close.

When closing the rear gate:

The rear

gate will automatically open.

1

Touch sensor

Touch sensors are attached on the left and
right edges of the rear gate. If the touch
sensors detect fingers, baggage, etc.
while closing by the power rear gate
function, an electronic chirp will sounds 3
times and the rear gate will open auto-
matically.

NOTE

When the rear gate is opened using the
reverse function, it will be opened fully
or to the height registered in the
memory function.

– CONTINUED –

Rear gate

149

2

Keys

and

doors

(152,1)

!

Rear gate drop prevention function

The rear gate is lowered by the weight of
snow and such, an electronic chirp will
sound and the rear gate drop prevention
function will apply braking to the rear gate
so that it prevents a rapid closure of the
rear gate.

NOTE

If there is snow on the rear gate, only
use the power rear gate function after
removing the snow.

!

Selecting audible signal operation

Using an electronic chirp, the power rear
gate will give you an audible signal before
starting its operation. If desired, the audi-
ble signal can be turned off by a SUBARU
dealer. Consult your SUBARU dealer for
details.

For models with “keyless access with
push-button start system”, you can turn
the audible signal off by operating the
combination meter display (color LCD).
For details, refer to “Keyless Entry Sys-
tem”

P197.

The ON/OFF setting of the audible signal
also works as the audible signal settings
for the “remote keyless entry system” and
the “keyless access with push-button start
system”. However, for the warning chime

such as that caused by “Reverse function”

P149 or “Rear gate drop prevention

function”

P150, it cannot be set as non-

operational.

!

Initialization of power rear gate

If the power rear gate detects some
abnormality while operating, an electronic
chirp will sound and the power rear gate
operation will be automatically stopped in
either opening or closing position. In this
case, the system needs to be initialized in
the following order to restart the function
properly.

!

If the power rear gate is closed

1. Keep pressing the rear gate opener

button until it is unlocked (for approxi-
mately 5 seconds) and lift up the rear

gate.

2. Pull down the rear gate until it starts to

close automatically. The system will be
initialized once the gate is fully closed.

3. Operate the power rear gate and check

that the function operates properly.

!

If the power rear gate is opened

1. Pull down the rear gate until it starts to

close automatically. The system will be
initialized once the gate is fully closed.
If the rear gate will not close comple-
tely, keep pressing the rear gate open-
er button for approximately 5 seconds
and pull down the rear gate.

2. Operate the power rear gate and check

that the function operates properly.

CAUTION

If the power rear gate function does
not operate properly, have your
vehicle checked by SUBARU dealer.

Rear gate

150

(153,1)

2-10. Moonroof (if equipped)

WARNING

Never let anyone’s hands, arms,
head or any objects protrude from
the moonroof. A person could be
seriously injured if any of the follow-
ing conditions occur.

.

The vehicle stops suddenly.

.

The vehicle turns sharply.

.

The vehicle is involved in an

accident.

.

Body parts protruding from the

vehicle are struck by outside
objects.

To avoid serious personal injury
caused by entrapment, always con-
form to the following instructions
without exception.

.

Before closing the moonroof,

make sure that no one’s hands,
arms, head or other objects will
be accidentally caught in the
moonroof.

.

Always carry the key when you

leave the vehicle for safety rea-
sons and never allow an unat-
tended child to remain in the

vehicle. Failure to follow this
procedure could result in injury
to a child operating the moon-
roof.

.

Never try to check the anti-en-

trapment function by deliberately
placing part of your body in the
moonroof.

CAUTION

.

Do not sit on the edge of the open

moonroof.

.

Do not operate the moonroof if

falling snow or extremely cold
conditions have caused it to
freeze shut.

.

Do not touch the moving parts of

the moonroof while the moonroof
is operating.

.

If the moonroof does not close,

we recommend that you have the
system checked by a SUBARU
dealer.

The moonroof operates only when the
ignition switch is in the “ON” position.

&

Moonroof switch

1

OPEN/CLOSE switch

2

Open

3

Close

To open the moonroof:

Press the rear side of the “OPEN/CLOSE”
switch. The sunshade will also be opened
together with the moonroof. The moonroof
will stop at a position approximately 6 in
(15 cm) away from the fully opened
position. Press the rear side of the switch
again to open the moonroof completely.

To close the moonroof:

Press the front side of the “OPEN/CLOSE”
switch.
To stop the moonroof at a selected mid-
way position while opening or closing it,
momentarily push the switch to the

– CONTINUED –

Moonroof

151

2

Keys

and

doors

(154,1)

“OPEN” side or “CLOSE” side.

After washing the vehicle or after it rains,
wipe away water on the roof prior to
opening the moonroof to prevent drops of
water from falling into the passenger
compartment.

NOTE

.

Driving with the moonroof fully open
can cause an annoying sound to be
generated at high speeds. If this
occurs, use the moonroof at the
initial stop position of 6 in (15 cm)
away from the fully opened position.

.

The moonroof cannot be operated
while the remote engine starter sys-
tem is operating.

&

Anti-entrapment function

When the moonroof senses a substantial
enough object trapped between its glass
and the vehicle’s roof during closure, it
automatically moves back to the fully open
position and stops there. The anti-entrap-
ment function may also be activated by a
strong shock on the moonroof even when
there is nothing trapped.

CAUTION

Never attempt to test this function
using fingers, hands or other parts
of your body.

NOTE

For the sake of safety, it is recom-
mended that you avoid driving with the
moonroof fully opened.

&

Sunshade

The sunshade can be slid forward or
backward by hand while the moonroof is
closed.
If the moonroof is opened, the sunshade
also moves back.

Moonroof

152

(157,1)

3-1. Ignition switch (models without “keyless

access with push-button start system”) ..... 158

Key positions ..................................................... 158
Key reminder chime............................................ 159
Ignition switch light ............................................ 159

3-2. Push-button ignition switch (models with

“keyless access with push-button start
system”) ........................................................ 160

Safety precautions.............................................. 160
Operating range for push-button start system ..... 160
Switching power status....................................... 161
When access key fob does not operate

properly............................................................ 162

3-3. Hazard warning flasher .................................. 162
3-4. Meters and gauges ......................................... 162

Speedometer ...................................................... 162
Tachometer......................................................... 162
Odometer ........................................................... 163
Double trip meter................................................ 163
Fuel gauge ......................................................... 164
ECO gauge ......................................................... 164
Combination meter settings ................................ 165

3-5. Illumination brightness control ..................... 165

Auto dimmer cancel function .............................. 165

3-6. Warning and indicator .................................... 166

Initial illumination for system check .................... 166
Seatbelt warning light and chime ........................ 166
SRS airbag system warning light ........................ 169
Front passenger’s frontal airbag ON and OFF

indicators ......................................................... 170

CHECK ENGINE warning light/Malfunction

indicator light................................................... 170

Coolant temperature low indicator light/

Coolant temperature high warning light ............ 171

Charge warning light .......................................... 172
Oil pressure warning light .................................. 172
Engine low oil level warning light ....................... 172
Windshield washer fluid warning light ................ 173
AT OIL TEMP warning light ................................. 173
Rear differential oil temperature warning light

(if equipped)..................................................... 173

Low tire pressure warning light (U.S.-spec.

models)............................................................ 173

ABS warning light .............................................. 175
Brake system warning light (red) ........................ 175
Electronic parking brake light............................. 176
Auto Vehicle Hold ON indicator light .................. 178
Auto Vehicle Hold operation indicator light ......... 178
Depress brake indicator light (if equipped) ......... 178
Low fuel warning light........................................ 178
Door open warning light..................................... 178
Engine hood open warning light ......................... 178
All-Wheel Drive warning light ............................. 178
Power steering warning light .............................. 179
Vehicle Dynamics Control warning light/Vehicle

Dynamics Control operation indicator light ....... 179

Vehicle Dynamics Control OFF indicator light ..... 180
Warning chimes and warning indicator of the

keyless access with push-button start system
(if equipped)..................................................... 181

Security indicator light ....................................... 185

Instruments and controls

3

Instruments

and

controls

(158,1)

SI-DRIVE indicator light ...................................... 186
Select lever/gear position indicator ..................... 186
Turn signal indicator lights ................................. 186
High beam indicator light.................................... 186
High beam assist indicator light.......................... 186
Automatic headlight beam leveler warning

light.................................................................. 187

LED headlight warning light ................................ 187
Steering Responsive Headlight warning light/

Steering Responsive Headlight OFF indicator
light.................................................................. 187

Front fog light indicator light (if equipped) .......... 187
Headlight indicator light (if equipped) ................. 187
Auto Start Stop warning light/Auto Start Stop

OFF indicator light (yellow) ............................... 187

Auto Start Stop indicator light (green)................. 188
Auto Start Stop No Activity Detected indicator

light.................................................................. 188

X-MODE indicator light (if equipped) ................... 188
Hill descent control indicator light

(if equipped) ..................................................... 188

BSD/RCTA warning light (if equipped) ................. 189
BSD/RCTA OFF indicator light (if equipped) ........ 189
RAB warning indicator (if equipped).................... 189
RAB OFF indicator (if equipped) ......................... 189
Driver Monitoring System operation indicator

light (green)/Driver Monitoring System warning
light (yellow) (if equipped) ................................ 189

Driver Monitoring System OFF indicator light

(if equipped) ..................................................... 189

Driver Monitoring System temporary stop

indicator light (if equipped) ............................... 189

Icy road surface warning light (if equipped) ........ 189

3-7. Combination meter display (color LCD)

(if equipped) ..................................................190

Basic operation.................................................. 191
Welcome screen (opening animation) and

Good-bye (ending animation) screen ................ 191

Warning screen .................................................. 192
Telltale screen.................................................... 192
Basic screens .................................................... 193
Menu screens .................................................... 196

3-8. Multi-function display (black and white) .......198

Driving information display ................................ 198
Outside temperature indicator ............................ 201
X-MODE indicator (if equipped) .......................... 202
Clock ................................................................. 202

3-9. Multi-function display (color LCD) .................202

Features ............................................................ 202
Welcome screen................................................. 203
Self-check screen............................................... 203
Interruption screen............................................. 204
Basic operation.................................................. 204
Basic screens .................................................... 204
Setting screen.................................................... 211
How to get the source code using the open

source ............................................................. 224

3-10. Clock ..............................................................225

Setting the clock manually ................................. 225
Setting the clock automatically........................... 226
Regulatory information....................................... 227

Instruments and controls


Content      ..     7      8      9      10     ..