Subaru Solterra (2023 year). Manual in english - page 31
 

  Index      Manuals     Subaru Solterra (2023 year). Manual in english


Search            copyright infringement  


Content      ..     29      30      31      32     ..


Subaru Solterra (2023 year). Manual in english - page 31


498

7-3. Do-it-yourself maintenance

4

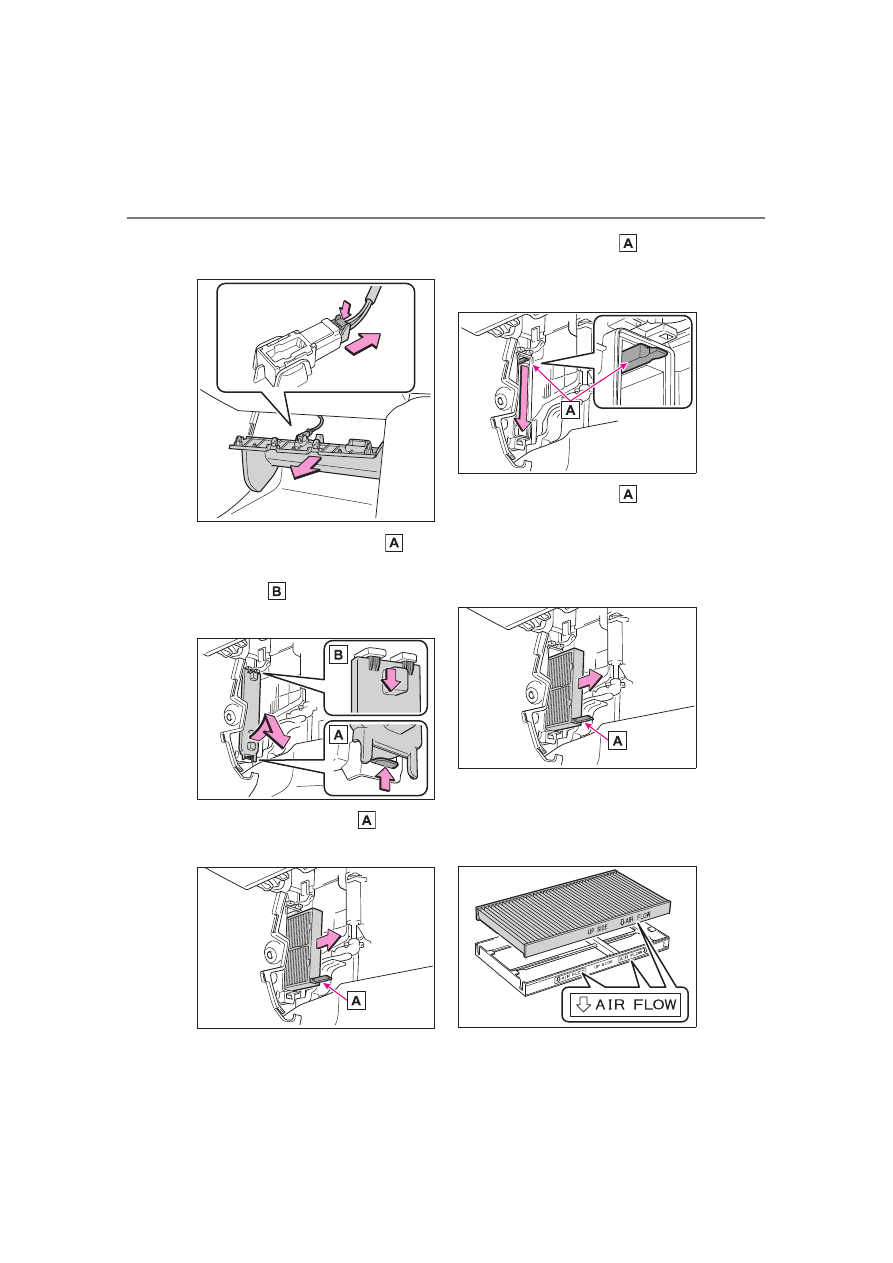
Vehicles with footwell lights: 
Unplug the connector.

5

Unlock the filter cover ( ), 
pull the filter cover out of the 
claws ( ), and remove the 
filter cover.

6

Hold the filter case   and 
remove the lower filter case.

7

Hold the filter case   and 
pull down the upper filter 
case.

8

Hold the filter case   and 
remove the upper filter case.

Dust and dirt (fallen leaves, etc.) 

may have accumulated within the 

bottom of the air conditioning unit, 

so remove it with a vacuum cleaner.

9

Remove the air conditioning 
filter from the upper and 
lower filter case and replace 
it with a new one.

499

7-3. Do-it-yourself maintenance

7

Ma
in

te

nan

ce 
an

car

e

Install so that the arrow points to 

the rear of the vehicle.

10

When installing, reverse the 

steps listed.

When installing the filter cover

Slide the recessed part 

 of the fil-

ter cover on the upper surface of the 
upper filter case 

 as shown in the 

figure, and attach it so that it is lifted 
toward the insertion part of the 
cover attachment.

Checking interval

Inspect and replace the air condi-

tioning filter according to the mainte-

nance schedule. In dusty areas or 

areas with heavy traffic flow, early 

replacement may be required. (For 

scheduled maintenance information, 

please refer to the “Warranty and 

Maintenance Booklet” or “Warranty 

and Service Booklet”.)

If air flow from the vents 

decreases dramatically

The filter may be clogged. Check 

the filter and replace if necessary.

Air conditioning filter with 

deodorizing function

When fragrances are placed in your 

vehicle, the deodorizing effect may 

become significantly weakened in a 

short period.
When an air conditioning odor 

comes out continuously, replace the 

air conditioning filter.

WARNING

When replacing the air condi-

tioning filter

Observe the following precau-

tions. Failure to do so may result 

in the air conditioning system 

operating during the procedure, 

possibly resulting in injury.

Check that the charging con-

nector is not connected

Do not use the Remote Air Con-

ditioning System

NOTICE

When using the air condition-

ing system

Make sure that a filter is always 

installed. Using the air condi-

tioning system without a filter 

may cause damage to the sys-

tem.

The filter is replaceable. When 

cleaning the filter, do not clean 

with water or an air gun.

To prevent damage to the fil-

ter cover

When moving the filter cover in 

the direction of arrow to release 

the fitting, pay attention not to 

apply excessive force to the 

claws. Otherwise, the claws may 

be damaged.

500

7-3. Do-it-yourself maintenance

If the key battery is depleted

The following symptoms may occur:

The smart key system and wire-

less remote control will not func-

tion properly.

The operational range will be 

reduced.

Prepare the following before 
replacing the battery:

Flathead screwdriver

Small flathead screwdriver

Lithium battery CR2450

Use a CR2450 lithium battery

Batteries can be purchased at 

your SUBARU dealer, local electri-

cal appliance shops or camera 

stores.

Replace only with the same or 

equivalent type recommended by 

the manufacturer.

Dispose of used batteries accord-

ing to the local laws.

1

Release the lock and remove 
the mechanical key.

2

Remove the key cover.

Use a screwdriver of an appropriate 

size. Forcedly prying may cause 

the cover damaged.
To prevent damage to the key, 

cover the tip of the flathead screw-

driver with a rag.

3

Remove the depleted battery 
using a small flathead screw-
driver.

When removing the cover, the elec-

tronic key module may stick to the 

cover and the battery may not be 

visible.
In this case, remove the electronic 

key module in order to remove the 

battery.
When removing the battery, use a 

screwdriver of an appropriate size.
Insert a new battery with the “+” ter-

Electronic key battery

Replace the battery with a 
new one if it is depleted.

Items to prepare

Replacing the battery

501

7-3. Do-it-yourself maintenance

7

Ma
in

te

nan

ce 
an

car

e

minal facing up.

4

When installing the key cover 
and mechanical key, install 
by conducting step 2 and 
step 1 with the directions 
reversed.

WARNING

Battery precautions

Observe the following precau-

tions.
Failure to do so may result in 

death or serious injury.

Do not swallow the battery. 

Doing so may cause chemical 

burns.

A coin battery or button battery 

is used in the electronic key. If a 

battery is swallowed, it may 

cause severe chemical burns in 

as little as 2 hours and may 

result in death or serious injury.

Keep away new and removed 

batteries from children.

If the cover cannot be firmly 

closed, stop using the electronic 

key and stow the key in the 

place where children cannot 

reach, and then contact your 

SUBARU dealer.

If you accidentally swallow a 

battery or put a battery into a 

part of your body, get emer-

gency medical attention imme-

diately.

To prevent battery explosion 

or leakage of flammable liq-

uid or gas

Replace the battery with a new 

battery of the same type. If a 

wrong type of battery is used, it 

may explode.

Do not expose batteries to 

extremely low pressure due to 

high altitude or extremely high 

temperatures.

Do not burn, break or cut a bat-

tery.

NOTICE

When replacing the battery

Use a flathead screwdriver of 

appropriate size. Applying exces-

sive force may deform or damage 

the cover.

For normal operation after 

replacing the battery

Observe the following precautions 

to prevent accidents:

Always work with dry hands.

Moisture may cause the battery 

to rust.

Do not touch or move any other 

component inside the remote 

control.

Do not bend either of the battery 

terminals.

502

7-3. Do-it-yourself maintenance

1

Turn the power switch off.

Confirm that the charging connec-

tor is not connected. Also, do not 

use the Remote Air Conditioning 

System during the procedure.

2

Open the fuse box cover.

Motor compartment

Push the tab in and lift the lid off.

Left side instrument panel

Remove the lid.

3

Remove the fuse.

Only type A fuse can be removed 

using the pullout tool.

4

Check if the fuse is blown.

Replace the blown fuse with a new 

fuse of an appropriate amperage 

rating. The amperage rating can be 

found on the fuse box lid.

Type A

Normal fuse

Blown fuse

Type B

Normal fuse

Checking and replac-

ing fuses

If any of the electrical com-
ponents do not operate, a 
fuse may have blown. If this 
happens, check and replace 
the fuses as necessary.

Checking and replacing 
fuses

503

7-3. Do-it-yourself maintenance

7

Ma
in

te

nan

ce 
an

car

e

Blown fuse

Type C

Normal fuse

Blown fuse

After a fuse is replaced

When installing the lid, make sure 

that the tab is installed securely.

If the lights do not turn on even 

after the fuse has been replaced, 

a bulb may need replacement.

If the replaced fuse blows again, 

have the vehicle inspected SUB-

ARU dealer.

If there is an overload in a cir-

cuit

The fuses are designed to blow, pro-

tecting the wiring harness from 

damage.

When replacing an electronic 

component, such as a lights, 

etc.

SUBARU recommends that you use 

genuine SUBARU products 

designed for this vehicle. Because 

certain bulbs are connected to cir-

cuits designed to prevent overload, 

non-genuine parts or parts not 

designed for this vehicle may be 

unusable.

WARNING

To prevent system break-

downs and vehicle fire

Observe the following precau-

tions.

Failure to do so may cause dam-

age to the vehicle, and possibly a 

fire or injury.

Never use a fuse of a higher 

amperage rating than that indi-

cated, or use any other object in 

place of a fuse.

Always use a genuine SUBARU 

fuse or equivalent.

Never replace a fuse with a 

wire, even as a temporary fix.

Do not modify the fuses or fuse 

boxes.

NOTICE

Before replacing fuses

Have the cause of electrical over-

load determined and repaired 

SUBARU dealer as soon as pos-

sible.

504

7-3. Do-it-yourself maintenance

Adjustment bolt A

Adjustment bolt B

Make sure the vehicle has a 
full tank of gasoline and the 
area around the headlight is 
not deformed.

Park the vehicle on level 
ground.

Make sure the tire inflation 
pressure is at the specified 
level.

Have someone sit in the 
driver’s seat.

Bounce the vehicle several 
times.

1

Using a Phillips-head screw-
driver, turn bolt A in either 
direction.
Remember the turning direc-
tion and the number of turns.

2

Turn bolt B the same number 
of turns and in the same 
direction as step 

1

.

If the headlight cannot be adjusted 

using this procedure, take the vehi-

cle to your SUBARU dealer to 

adjust the headlight aim.

Headlight aim

Vertical movement adjust-
ing bolts

Before checking the head-
light aim

Adjusting the headlight 
aim

505

7-3. Do-it-yourself maintenance

7

Ma
in

te

nan

ce 
an

car

e

LED lights

The lights consist of a number of 

LEDs. If any of the LEDs burn out, 

take your vehicle to your SUBARU 

dealer to have the light replaced.

Condensation build-up on the 

inside of the lens

Temporary condensation build-up 

on the inside of the headlight lens 

does not indicate a malfunction. 

Contact your SUBARU dealer for 

more information in the following sit-

uations:

Large drops of water have built up 

on the inside of the lens.

Water has built up inside the 

headlight.

When replacing an electronic 

component, such as a lights, 

etc.

P.503

Light bulbs

If any exterior light does not 
turn on, have it replaced by 
your SUBARU dealer.

507

8

8

Wh
e

tro
ub
le

 a

ri

se

s

When trouble arises

8-1. Essential information

Emergency flashers ....

508

If your vehicle has to be 

stopped in an emergency

..................................

509

If the vehicle is submerged 

or water on the road is ris-
ing .............................

510

8-2. Steps to take in an emer-

gency

If your vehicle needs to be 

towed.........................

511

If you think something is 

wrong ........................

515

If a warning light turns on or 

a warning buzzer sounds

..................................

516

If a warning message is dis-

played........................

525

If you have a flat tire....

529

If the EV system will not 

start ...........................

540

If you lose your keys ...

542

If the electronic key does 

not operate properly ..

542

If the 12-volt battery is dis-

charged .....................

544

If your vehicle overheats

..................................

548

If the vehicle becomes stuck

..................................

550

508

8-1. Essential information

8-1.Essential information

Press the switch.

All the turn signal lights will flash.
To turn them off, press the switch 
once again.

Emergency flashers

If the emergency flashers are 

used for a long time while the EV 

system is not operating (while the 

“READY” indicator is not illumi-

nated), the 12-volt battery may 

discharge.

If any of the SRS airbags deploy 

(inflate) or in the event of a strong 

rear impact, the emergency flash-

ers will turn on automatically.

The emergency flashers will turn 

off automatically after operating 

for approximately 20 minutes. To 

manually turn the emergency 

flashers off, press the switch 

twice. (The emergency flashers 

may not turn on automatically 

depending on the force of the 

impact and conditions of the colli-

sion.)

Emergency flashers

The emergency flashers are 
used to warn other drivers 
when the vehicle has to be 
stopped in the road due to a 
breakdown, etc.

Operating instructions

509

8-1. Essential information

8

Wh
e

tro
ub
le

 a

ri

se

s

1

Steadily step on the brake 
pedal with both feet and 
firmly depress it.

Do not pump the brake pedal 

repeatedly as this will increase the 

effort required to slow the vehicle.

2

Shift the shift position to N.

If the shift position is shifted to 
N

3

After slowing down, stop the 
vehicle in a safe place by the 
road.

4

Stop the EV system.

If the shift position cannot be 
shifted to N

3

Keep depressing the brake 
pedal with both feet to reduce 
vehicle speed as much as 
possible.

4

To stop the EV system: Press 
and hold the power switch for 
2 consecutive seconds or 

more, or press it briefly 3 
times or more in succession.

5

Stop the vehicle in a safe 
place by the road.

If emergency stopped

The functions of the air conditioning, 

etc., may be partially limited in order 

to reduce the power consumption of 

the 12-volt battery.

If your vehicle has to 

be stopped in an emer-

gency

Only in an emergency, such 
as if it becomes impossible 
to stop the vehicle in the 
normal way, stop the vehi-
cle using the following pro-
cedure:

Stopping the vehicle

WARNING

If the EV system has to be 

turned off while driving

Turning the EV system off while 

driving will not cause a loss of 

steering or braking control. How-

ever, power assist for the steering 

wheel may be lost making it diffi-

cult to steer smoothly before stop-

ping the vehicle depending on the 

remaining charge in the 12-volt 

battery or usage conditions. 

Decelerate as much as possible 

before turning off the EV system.

510

8-1. Essential information

If the door can be opened, 
open the door and exit the 
vehicle.

If the door can not be opened, 
open the window using the 
power window switch and 
ensure an escape route.

If the window can be opened, 
exit the vehicle through the 
window.

If the door and window cannot 
be opened due to the rising 
water, remain calm, wait until 
the water level inside the 
vehicle rises to the point that 
the water pressure inside of 
the vehicle equals the water 
pressure outside of the vehi-
cle and then open the door 
after waiting for the rising 
water to enter the vehicle, and 
exit the vehicle. When the 

outside water level exceeds 
half the height of the door, the 
door cannot be opened from 
the inside due to water pres-
sure.

Water level exceeds the floor

When the water level exceeds the 

floor and time has passed, the elec-

trical equipment will get damaged, 

the power windows will not operate, 

the motor stop, and the vehicle may 

not be able to get moving.

Using an emergency escape 
hammer

*

Laminated glass is used in the wind-

shield on this vehicle.
Laminated glass cannot be shat-
tered with an emergency hammer

*

.

Tempered glass is used in the win-

dows on this vehicle.

*

: Contact your SUBARU dealer or 

aftermarket accessory manufac-
turer for further information about 
an emergency hammer.

If the vehicle is sub-

merged or water on 

the road is rising

This vehicle is not designed 
to be able to drive on roads 
that are deeply flooded with 
water. Do not drive on roads 
where the roads may be 
submerged or the water 
may be rising. It is danger-
ous to remain in the vehicle, 
if it anticipated that the 
vehicle will be flooded or 
set a drift. Remain calm and 
follow the following.

WARNING

Caution while driving

Do not drive on roads where the 

roads may be submerged or the 

water may be rising. Otherwise 

the vehicle may be damaged and 

cannot move, as well as become 

flooded and set a drift, which may 

lead to death.

511

8-2. Steps to take in an emergency

8

Wh
e

tro
ub
le

 a

ri

se

s

8-2.Steps to take in an emergency

In the following situations, it is 
not possible to be towed by 
another vehicle using cables or 
chains, as the front wheels may 
be locked due to the parking 
lock. Contact your SUBARU 
dealer or commercial towing 
service.

There is a malfunction in the 
shift control system. (

P.233, 

525)

There is a malfunction in the 
immobilizer system. (

P.66)

There is a malfunction in the 
smart key system. (

P.542)

The 12-volt battery is dis-
charged. (

P.544)

The following may indicate a 
problem with your transmission. 
Contact your SUBARU dealer or 
commercial towing service 
before towing.

The EV system warning mes-
sage is shown on the multi-
information display and the 
vehicle does not move.

The vehicle makes an abnor-
mal sound.

From the front

Use a towing dolly under the 
rear wheels.

If your vehicle needs 

to be towed

If towing is necessary, we 
recommend having your 
vehicle towed by your SUB-
ARU dealer or commercial 
towing service, using a 
wheel-lift type truck or flat-
bed truck.

Use a safety chain system 
for all towing, and abide by 
all state/provincial and local 
laws.

Situations when it is not 
possible to be towed by 
another vehicle

Situations when it is nec-
essary to contact dealers 
before towing

Towing with a wheel-lift 
type truck

512

8-2. Steps to take in an emergency

From the rear

Use a towing dolly under the 
front wheels.

When using a flat-bed truck to 
transport the vehicle, use tire 
strapping belts. Refer to the 
owner’s manual of the flat-bed 
truck for the tire strapping 
method.
In order to suppress vehicle 
movement during transporta-
tion, set the parking brake and 
turn the power switch off.

If a tow truck is not available in 
an emergency, your vehicle may 
be temporarily towed using 
cables or chains secured to the 
emergency towing eyelets. This 

WARNING

Observe the following precau-

tions. Failure to do so may result 

in death or serious injury.

When towing the vehicle

Be sure to transport the vehicle 

with all four wheels raised off the 

ground. If the vehicle is towed 

with the tires contacting the 

ground, the drivetrain or related 

parts may be damaged, the vehi-

cle may fly off the truck, or elec-

tricity generated by the operation 

of the motor may cause a fire to 

occur depending on the nature of 

the damage or malfunction.

NOTICE

To prevent damage to the 

vehicle when towing using a 

wheel-lift type truck

When raising the vehicle, ensure 

adequate ground clearance for 

towing at the opposite end of the 

raised vehicle. Without adequate 

clearance, the vehicle could be 

damaged while being towed.

Towing with a sling-type truck

Do not tow with a sling-type truck 

to prevent body damage.

Using a flatbed truck

Emergency towing

513

8-2. Steps to take in an emergency

8

Wh
e

tro
ub
le

 a

ri

se

s

should only be attempted on 
hard surfaced roads for short 
distances at under 18 mph (30 
km/h).
A driver must be in the vehicle to 
steer and operate the brakes. 
The vehicle’s wheels, drive train, 
axles, steering and brakes must 
be in good condition.

To have your vehicle towed by 
another vehicle, the towing eye-
let must be installed to your 
vehicle. Install the towing eyelet 
using the following procedure.

1

Take out the wheel bolt 
wrench

*

 and towing eyelet. 

(

P.531)

*

: Wheel bolt wrench can be pur-

chased at your SUBARU dealer.

2

Remove the eyelet cover 
using a flathead screwdriver.

To protect the bodywork, place a 

rag between the screwdriver and 

the vehicle body as shown in the 

illustration.

3

Insert the towing eyelet into 
the hole and tighten partially 
by hand.

4

Tighten down the towing eye-
let securely using a wheel 
bolt wrench

*

 or hard metal 

bar.

*

: Wheel bolt wrench can be pur-

chased at your SUBARU dealer.

5

Securely attach cables or 
chains to the towing eyelet.

Take care not to damage the vehi-

cle body.

6

Enter the vehicle being towed 
and start the EV system.

If the EV system does not start, turn 

the power switch to ON.

7

Shift the shift position to N 
and release the parking 
brake.

Turn automatic mode off. (

P.244)

Emergency towing proce-
dure

514

8-2. Steps to take in an emergency

While towing

If the EV system is off, the power 

assist for the brakes and steering 

will not function, making steering 

and braking more difficult.

Wheel bolt wrench

Wheel bolt wrench can be pur-

chased at your SUBARU dealer.

WARNING

Observe the following precau-

tions. Failure to do so may result 

in death or serious injury.

While towing

When towing using cables or 

chains, avoid sudden starts, 

etc., which place excessive 

stress on the towing eyelets, 

cables or chains. The towing 

eyelets, cables or chains may 

become damaged, broken 

debris may hit people, and 

cause serious damage.

Do not perform any of the fol-

lowing as doing so may cause 

the parking lock mechanism to 

engage, locking the front 

wheels and possibly leading to 

an accident resulting in death or 

serious injury:

• Unfasten the driver’s seat belt 

and open the driver’s door.

• Turn the power switch off.

Installing towing eyelets to 

the vehicle

Make sure that towing eyelets are 

installed securely. If not securely 

installed, towing eyelets may 

come loose during towing.

NOTICE

To prevent damage to the 

vehicle during emergency 

towing

Do not secure cables or chains to 

the suspension components.


Content      ..     29      30      31      32     ..