Subaru Crosstrek (2023 year). Manual in english - page 20
 

  Index      Manuals     Subaru Crosstrek (2023 year). Manual in english


Search            copyright infringement  


Content      ..     18      19      20      21     ..


Subaru Crosstrek (2023 year). Manual in english - page 20


(316,1)

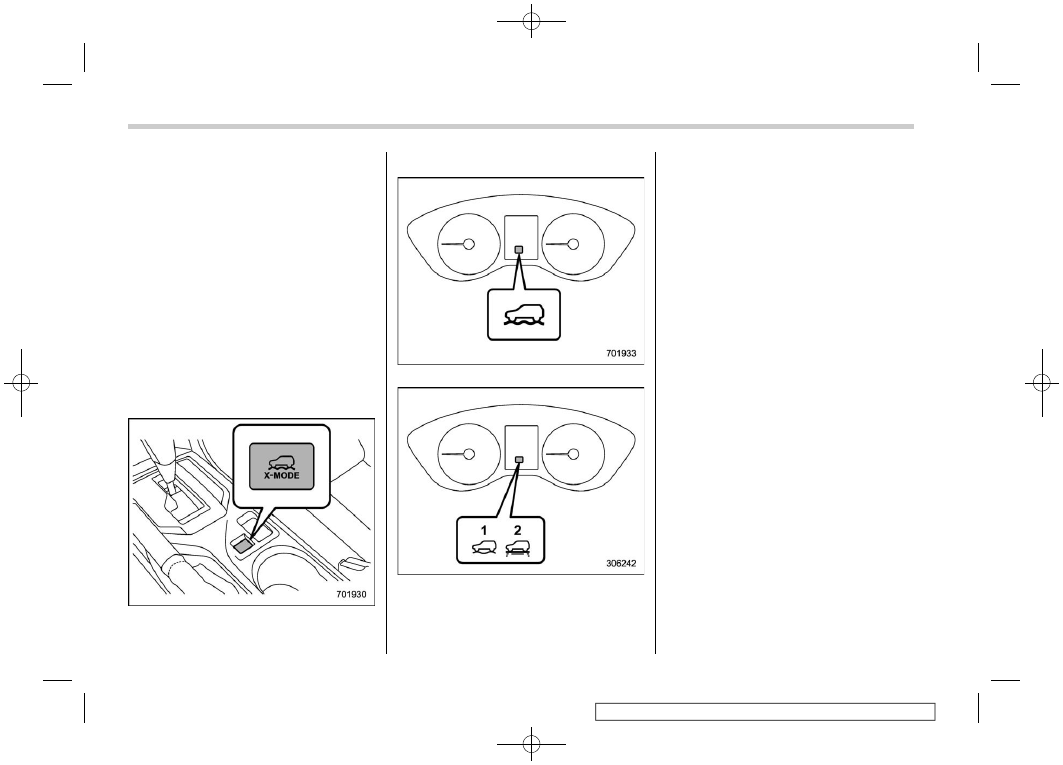
X-MODE has the following functions.

.

Hill descent control function:

Using the hill descent control function, you
can keep the vehicle at a consistent speed
driving downhill. If the vehicle speed is
likely to increase, the brake control system
will be activated to adjust the vehicle
speed.

.

Driving ability control:

This mode increases the hill-climbing
ability and driving ability as well as
enabling smooth application of torque for
easier control of the steering wheel.

&

To activate/deactivate the
X-MODE

X-MODE switch

!

Type B combination meter

X-MODE indicator (models with 1 mode)

X-MODE indicator (models with 2 modes)

1)

DEEP SNOW·MUD mode indicator

2)

SNOW·DIRT mode indicator

!

To activate

Models with 2 modes

Press the X-MODE switch to turn to
“SNOW·DIRT”, “DEEP SNOW·MUD” or
to deactivate the system.
While the X-MODE is activated, the
X-MODE indicator appears.

Models with 1 mode

Press the X-MODE switch. While the
X-MODE is activated, the X-MODE indi-
cator appears.

!

To deactivate

Models with 2 modes

Press the X-MODE switch until it turns off.
The X-MODE indicator will disappear
when the X-MODE is deactivated.

Models with 1 mode

Press the X-MODE switch again. The
X-MODE indicator will disappear when
the X-MODE is deactivated.

NOTE

.

For models with 2 modes: SNOW·-

DIRT is suitable for driving on a snow-
covered road where the points of con-
tact between the tires and road surface
are visible, or for driving on an unpaved
road.

.

For models with 2 modes: DEEP

SNOW·MUD is suitable for driving on

Starting and operating/X-MODE

7-44

(317,1)

a road covered with deep snow where
the points of contact between the tires
and road surface are not visible, or for
driving on a muddy road.

.

For models with 2 modes: When the

X-MODE is ON, the Vehicle Dynamics
Control system cannot be switched ON
and OFF using the Vehicle Dynamic
Control OFF switch. The Vehicle Dy-
namics Control system is fixed to ON in
“SNOW·DIRT” and OFF in “DEEP
SNOW·MUD”.

.

Even if you try to activate the

X-MODE by pressing the X-MODE
switch when the vehicle speed is 12
mph (20 km/h) or more, the X-MODE will
not be activated. At this time, a buzzer
will sound twice.

.

If the vehicle speed reaches 25 mph

(40 km/h) or more while the X-MODE is
activated, a buzzer will sound once and
the X-MODE will be deactivated.

.

For models with SI-DRIVE, the

SI-DRIVE mode will change to the
Intelligent (I) mode when the X-MODE
is deactivated.

.

For models with SI-DRIVE, the

SI-DRIVE mode will not be affected
even if the SI-DRIVE switch is pressed
while the X-MODE is activated. At this
time, the buzzer will sound twice.

.

For models with Auto Start Stop

system, the system will be stopped
while the X-MODE is activated.

.

While the engine is running, if any of

the following conditions is met, the
X-MODE will be deactivated. In this
case, it is not possible to activate the
X-MODE. Also, for models with
SI-DRIVE, the mode will change to the
Intelligent (I) mode and it will not be
possible to change to the other modes.

– The CHECK ENGINE warning
light/Malfunction indicator light illu-
minates.
– The AT OIL TEMP warning light
flashes.
– The ABS warning light illumi-
nates.
– The Vehicle Dynamics Control
warning light illuminates.

.

If there is a possibility that the

engine could overheat because of a
temperature increase of the engine
coolant, it is not possible to activate
the X-MODE. Even while the X-MODE is
activated, the X-MODE will be deacti-
vated when the engine coolant tem-
perature increases. In this case, the
mode will change to the Intelligent (I)
mode (models with SI-DRIVE).

&

Hill descent control function

The hill descent control function will be in
standby mode when the X-MODE is
activated and the vehicle speed is less
than approximately 12 mph (20 km/h).
The function will operate when the vehicle
speed is less than approximately 12 mph
(20 km/h) and the accelerator ratio is less
than approximately 10%.
The function will turn off when the vehicle
speed is more than approximately 12 mph
(20 km/h) and the accelerator pedal is
depressed.

CAUTION

The braking power of the hill des-
cent control function may not be
sufficient when strong braking
power is needed (e.g., when towing
a trailer).

NOTE

.

Even while the hill descent control

function is operating, you can vary the
vehicle speed by using the brake pedal
or accelerator pedal.

.

During braking by the hill descent

control function, the stop lights will
illuminate.

– CONTINUED –

Starting and operating/X-MODE

7-45

7

(318,1)

.

The hill descent control function is

operable regardless of the gradient of
the road.

.

The hill descent control function

may be considered normal when the
following conditions occur.

– An operating sound is heard
briefly from the engine compart-
ment while the hill descent control
function is operating.
– The sensation of depressing the
brake pedal is different, (harder than
usual etc.) when the brake pedal is
depressed during hill descent con-
trol function operation.

!

Hill descent control indicator

Hill descent control indicator (type B)

This indicator appears while the hill des-
cent control function is in the standby
mode. It flashes while the function is
operating. It will disappear when the
function is in the disabled mode. When
this function is changed from operational
to non-operational, it will disappear when
the vehicle speed reaches more than
approximately 18 mph (30 km/h).

Tire pressure monitoring
system (TPMS) (U.S.-spec.
models)

The tire pressure monitoring system pro-
vides the driver with a warning message
when tire pressure is severely low.
The tire pressure monitoring system will
activate only when the vehicle is driven at
speeds above 20 mph (32 km/h). Also, this
system may not react immediately to a
sudden drop in tire pressure (for example,
a blow-out caused by running over a sharp
object).

Starting and operating/Tire pressure monitoring system (TPMS) (U.S.-spec. models)

7-46

(319,1)

WARNING

.

If the low tire pressure warning

light illuminates while driving,
never brake suddenly. Instead,
perform the following procedure.
Otherwise, an accident involving
serious vehicle damage and ser-
ious personal injury could occur.

(1) Keep driving straight ahead

while gradually reducing
speed.

(2) Slowly pull off the road to a

safe location.

(3) Check the pressure for all four

tires and adjust the pressure
to the COLD tire pressure
shown on the tire inflation
pressure label. The tire infla-
tion pressure label is located
on the door pillar on the
driver’s side.

Even when the vehicle is driven a

very short distance, the tires get
warm and their pressures in-
crease accordingly. Be sure to
let the tires cool thoroughly be-
fore adjusting their pressures to
the standard values shown on the
tire inflation pressure label. Refer
to “Tires and wheels”

11-21.

The tire pressure monitoring sys-
tem does not function when the
vehicle is stationary. After adjust-
ing the tire pressures, increase
the vehicle speed to at least 20
mph (32 km/h) to start the TPMS
rechecking of the tire inflation
pressures. If the tire pressures
are now above the severe low
pressure threshold, the low tire
pressure warning light should
turn off a few minutes later.

If this light still illuminates while
driving after adjusting the tire
pressure, a tire may have signifi-
cant damage and a fast leak that
causes the tire to lose air rapidly.
If you have a flat tire, replace it
with a spare tire as soon as
possible.

.

When a spare tire is mounted or a

wheel rim is replaced without the
original pressure sensor/trans-
mitter being transferred, the low
tire pressure warning light will
illuminate steadily after blinking
for approximately one minute.
This indicates the TPMS is unable
to monitor all four road wheels.
Contact your SUBARU dealer as
soon as possible for tire and
sensor replacement and/or sys-

tem resetting.

.

When a tire is repaired with liquid

sealant, the tire pressure warning
valve and transmitter may not
operate properly. If a liquid sea-
lant is used, contact your nearest
SUBARU dealer or other qualified
service shop as soon as possi-
ble. Make sure to replace the tire
pressure warning valve and
transmitter when replacing the
tire. You may reuse the wheel if
there is no damage to it and if the
sealant residue is properly
cleaned off. Do not inject any tire
liquid or aerosol tire sealant into
the tires, as this may cause a
malfunction of the tire pressure
sensors. If the light illuminates
steadily after blinking for ap-
p r o x i m a t e l y o n e m i n u t e ,
promptly contact a SUBARU
dealer to have the system in-
spected.

– CONTINUED –

Starting and operating/Tire pressure monitoring system (TPMS) (U.S.-spec. models)

7-47

7

(320,1)

CAUTION

Do not place metal film or any metal
parts in the cargo area. This may
cause poor reception of the signals
from the tire pressure sensors, and
the tire pressure monitoring system
will not function properly.

NOTE

This device complies with part 15 of the
FCC Rules. Operation is subject to the
following two conditions: (1) This de-
vice may not cause harmful interfer-
ence, and (2) this device must accept
any interference received, including
interference that may cause undesired
operation.

FCC CAUTION
Changes or modifications not ex-
pressly approved by the party respon-
sible for compliance could void the
user’s authority to operate the equip-
ment.

Parking your vehicle

&

Parking brake

To set the parking brake, depress the
brake pedal firmly and hold it down until
the parking brake lever is fully pulled up.

To release the parking brake, pull the lever
up slightly, press the release button, then
lower the lever while keeping the button
pressed.
When the parking brake is set while the
engine is running, the parking brake
warning light illuminates. After starting
the vehicle, be sure that the warning light
has turned off before the vehicle is driven.
Refer to “Brake system warning light (red)”

3-20.

CAUTION

Never drive while the parking brake
is set because this will cause un-
necessary wear on the brake linings.
Before starting to drive, always
make sure that the parking brake
has been fully released.

&

Parking tips

When parking your vehicle, always per-
form the following items.

.

Apply the parking brake firmly.

.

For MT models, put the shift lever in the

“1” (1st) for upgrade or “R” (Reverse) for a
downgrade.

.

For CVT models, put the select lever in

the “P” (Park) position.

Never rely on the mechanical friction of the
transmission alone to hold the vehicle.

Starting and operating/Parking your vehicle

7-48

(321,1)

When parking on a hill, always turn the
steering wheel. When the vehicle is
headed up the hill, the front wheels should
be turned away from the curb.

When facing downhill, the front wheels
should be turned into the curb.

WARNING

.

Never leave unattended children

or pets in the vehicle. They could
accidentally injure themselves or
others through inadvertent op-
eration of the vehicle. Also, on
hot or sunny days, the tempera-
ture in a closed vehicle could
quickly become high enough to
cause severe or possibly fatal
injuries to people.

.

Do not park the vehicle over

flammable materials such as dry
grass, waste paper or rags, as
they may burn easily if they come
near hot engine or exhaust sys-
tem parts.

.

Be sure to stop the engine if you

take a nap in the vehicle. If engine
exhaust gas enters the passen-
ger compartment, occupants in
the vehicle could die from carbon
monoxide (CO) contained in the
exhaust gas.

CAUTION

.

If your vehicle has a bumper

under guard (optional), pay atten-
tion to blocks and other obstruc-

tions on the ground when park-
ing. The underspoiler could be
damaged by contact with them.

.

The braking power of the parking

brake may not be sufficient when
s t r o n g e r b r a k i n g p o w e r i s
needed (e.g., when parking on a
steep slope while towing a trai-
ler).

Starting and operating/Parking your vehicle

7-49

7

(322,1)

Hill start assist system

WARNING

.

The Hill start assist system is a

device only for helping the driver
to START the vehicle on an uphill
grade. To prevent accidents
when the vehicle is parked on a
slope, be sure to firmly set the
parking brake. When setting the
parking brake, make sure that the
vehicle remains stationary when
the clutch pedal (MT models) and
brake pedal (both MT and CVT
models) are released.

.

Do not turn the ignition switch to

the “LOCK”/“OFF” position while
the Hill start assist system is
operating. The Hill start assist
system will be deactivated and
may lead to an accident.

The Hill start assist system is a device to
make the following vehicle operations
easier.

1)

Starting forward facing uphill

2)

Starting backward facing downhill

A)

Brake pedal (both MT models and CVT
models)

B)

Clutch pedal (MT models only)

In both these cases, the Hill start assist
system operates under the following con-

ditions.

.

The clutch pedal is depressed while the

brake pedal is also depressed (MT mod-
els).

.

The vehicle has stopped with the brake

pedal depressed (CVT models).

Braking power is maintained temporarily
(for approximately 2 seconds) by the Hill
start assist system after the brake pedal is
released. The driver is therefore able to
start the vehicle in the same way as on a
level grade, just using the clutch pedal (MT
models only) and accelerator pedal (all
models).

If the braking power of the Hill start assist
system is insufficient after the brake pedal
is released, apply more braking power by
depressing the brake pedal again.

The Hill start assist system may not
operate on slight grades. Also, the Hill
start assist system does not operate in the
following cases.

Starting and operating/Hill start assist system

7-50

(323,1)

.

When starting backward facing uphill

.

When starting forward facing downhill

.

While the parking brake is applied

.

While the ignition switch is in the “ACC”

or “LOCK”/“OFF” position

.

While the Hill start assist warning light/

Hill start assist OFF indicator light is
illuminated. Refer to “Hill start assist
warning light/Hill start assist OFF indicator
light”

3-22.

.

While the Auto Start Stop warning light

is illuminated. Refer to “Auto Start Stop
warning light/Auto Start Stop OFF indica-
tor light (yellow)”

3-32.

When using the Hill start assist system, a
braking effect may be felt even after the
brake pedal has been released. However,
for MT models, this braking effect should
disappear once the clutch pedal is re-
leased.

CAUTION

The braking power of the Hill start
assist system may not be sufficient
when strong braking power is
needed (e.g., when towing a trailer).

NOTE

A slight jolt may be felt when the
vehicle begins to move forward after
being reversed.

&

To activate/deactivate the Hill
start assist system

Hill start assist OFF indicator light

CAUTION

When starting on an up hill grade,
make sure the Hill start assist OFF
indicator light is off.

If the Hill start assist OFF indicator
light is on, make sure the parking
brake is applied.

To activate or deactivate the Hill start
assist system, perform the following steps.

NOTE

If you make an error when performing
any steps in the following procedure,

– CONTINUED –

Starting and operating/Hill start assist system

7-51

7

(324,1)

place the ignition switch in the “LOCK”/
“OFF” position once and then start
over again.

!

To deactivate

1. Park your vehicle in a flat and safe
location and apply the parking brake.
2. Turn the ignition switch to the “LOCK”/
“OFF” position.
3. Restart the engine.

4. Confirm the following items.

(1) The brake system warning light
illuminates.
(2) The Vehicle Dynamics Control
warning light turns off.
(3) The Vehicle Dynamics Control
OFF indicator light turns off.
(4) The ABS warning light turns off.

5. Press and hold the Vehicle Dynamics
Control OFF switch for 30 seconds until
the Vehicle Dynamics Control OFF indica-
tor light

on the combination meter turns

on and off.
6. Within 5 seconds, release the Vehicle
Dynamics Control OFF switch.
7. Within 2 seconds, press back the
Vehicle Dynamics Control OFF switch.
The Hill start assist OFF indicator light
turns on and off.
8. Turn the ignition switch to the “LOCK”/
“OFF” position. Hill start assist is deacti-
vated.

NOTE

When the Hill start assist system is
deactivated, the Hill start assist OFF

indicator light illuminates.

!

To reactivate

To reactivate Hill start assist system,
repeat steps 1 to 8. When the Hill start
assist system is activated, the Hill start
assist OFF indicator light turns off.

&

Hill start assist warning light/
Hill start assist OFF indicator
light

Refer to “Hill start assist warning light/Hill
start assist OFF indicator light”

3-22.

Starting and operating/Hill start assist system

7-52

(325,1)

Cruise control (if equipped)

NOTE

For models with EyeSight system:
Refer to the Owner’s Manual supple-
ment for the EyeSight system.

Cruise control enables you to maintain a
constant vehicle speed without holding
your foot on the accelerator pedal and it is
operative when the vehicle speed is 20
mph (30 km/h) or more.

WARNING

.

Do not use the cruise control

under any of the following condi-
tions. These may cause loss of
vehicle control.

– Driving up or down a steep

grade

– Driving on slippery or winding

roads

– Driving in heavy traffic

– Towing a trailer

.

When using the cruise control,

always set the speed appropri-
ately according to the speed limit,
traffic flow, road conditions, and
other conditions.

NOTE

Make sure the cruise control system is
turned off when the cruise control is not
in use to avoid unintentionally setting
of the cruise control.

&

To set cruise control

Cruise control main button

1. Press the cruise control main button.

Cruise control indicator light (type A)

Cruise control indicator light (type B)

The cruise control indicator light on the
combination meter will illuminate.
2. Depress the accelerator pedal until the
vehicle reaches the desired speed.

– CONTINUED –

Starting and operating/Cruise control

7-53

7

(326,1)

3. Press the “RES/SET” switch to the
“SET” side and release it. Then release the
accelerator pedal.

NOTE

When setting a cruise speed for the first
time during a drive, both “SET” and
“RES” may be used to set the initial
cruise speed.

Cruise control set indicator light (type A)

1)

When setting the displayed unit as “MPH”

2)

When setting the displayed unit as “km/h”

Cruise control set indicator light (type B)

1)

When setting the displayed unit as “MPH”

2)

When setting the displayed unit as “km/h”

At this time, the cruise control set indicator
light is illuminated in the combination
meter. The set speed will be shown on
the combination meter. You can change
the displayed unit by operating the combi-
nation meter display.

.

For type A meter details, refer to

“Combination meter settings”

3-11.

.

For type B meter details, refer to

“Screen Settings”

3-40.

The vehicle will maintain the desired
speed.

Vehicle speed can be temporarily in-
creased while driving with the cruise
control activated. Simply depress the

Starting and operating/Cruise control

7-54

(327,1)

accelerator pedal to accelerate the vehi-
cle. When the accelerator pedal is re-
leased, the vehicle will return to and
maintain the previous cruising speed.

&

To temporarily cancel the
cruise control

The cruise control can be temporarily
canceled in the following ways.

.

Press the “CANCEL” button.

.

Press the X-MODE switch to activate

the X-MODE (models with X-MODE).

.

Depress the brake pedal.

.

Depress the clutch pedal (MT models

only).

WARNING

For CVT models, you can cancel the
cruise control by shifting the select
lever into the “N” position. However,
do not shift the lever into the “N”
position while driving except in case
of emergency. If the select lever is
shifted into the “N” position, the
engine brake will no longer work.
This could result in an accident.

The cruise control set indicator light in the
combination meter turns off when the
cruise control is canceled.

To resume the cruise control after it has
been temporarily canceled and with vehi-
cle speed of approximately 20 mph (30
km/h) or more, press the “RES/SET”

switch to the “RES” side to return to the
original cruising speed automatically.
The cruise control set indicator light in the
combination meter will automatically illu-
minate at this time.

&

To turn off the cruise control

There are two ways to turn off the cruise
control:

.

Press the cruise control main button

again.

.

Turn the ignition switch to the “ACC” or

“LOCK”/“OFF” position (but only when the
vehicle is completely stopped).

&

To change the cruising speed

!

To increase the speed (by the “RES/
SET” switch)

– CONTINUED –

Starting and operating/Cruise control

7-55

7

(328,1)

Press the “RES/SET” switch to the “RES”
side and hold it until the vehicle reaches
the desired speed. Then, release the
switch. The vehicle speed at that moment
will be memorized and treated as the new
set speed.

When setting the displayed unit as
“MPH”:

The set speed can be increased 1 mph
(1.6 km/h) each time by pressing the “RES/
SET” switch to the “RES” side.

When setting the displayed unit as
“km/h”:

The set speed can be increased 1 km/h
(0.6 mph) each time by pressing the “RES/
SET” switch to the “RES” side.

!

To increase the speed (by accelera-
tor pedal)

1. Depress the accelerator pedal to ac-
celerate the vehicle to the desired speed.

2. Press the “RES/SET” switch to the
“SET” side once. Now the desired speed is
set and the vehicle will keep running at that
speed without depressing the accelerator
pedal.

!

To decrease the speed (by the “RES/
SET” switch)

Press the “RES/SET” switch to the “SET”
side and hold it until the vehicle reaches
the desired speed. Then, release the
switch. The vehicle speed at that moment
will be memorized and treated as the new
set speed.

When setting the displayed unit as
“MPH”:

The set speed can be decreased 1 mph
(1.6 km/h) each time by pressing the “RES/
SET” switch to the “SET” side.

When setting the displayed unit as
“km/h”:

The set speed can be decreased 1 km/h
(0.6 mph) each time by pressing the “RES/
SET” switch to the “SET” side.

Starting and operating/Cruise control

7-56

(329,1)

!

To decrease the speed (by brake
pedal)

1. Depress the brake pedal to release
cruise control temporarily.

2. When the speed decreases to the
desired speed, press the “RES/SET”
switch to the “SET” side once. Now the
desired speed is set and the vehicle will
keep running at that speed without depres-
sing the accelerator pedal.

&

Cruise control indicator light

Refer to “Cruise control indicator light”

3-

31.

&

Cruise control set indicator
light

Refer to “Cruise control set indicator light”

3-31.

Auto Start Stop system (if
equipped)

The Auto Start Stop system is designed to
automatically stop and restart the engine
when the vehicle is stationary for a short
period of time (while waiting for a traffic
light or in a traffic jam, etc.) after the engine
has warmed up. The system operates in
order to reduce fuel consumption and
exhaust emissions, as well as undesired
idling noise.

&

System operation

CAUTION

The Auto Start Stop system is de-
signed to automatically stop and
restart the engine for a short period
of time during idling. Do not use the
system when parking the vehicle
normally.

So that it can be used safely and comfor-
tably, in addition to driver operations, the
Auto Start Stop system is designed to
constantly monitor the vehicle conditions
as well as the environment inside and
outside the vehicle, in order to control
stopping and restarting of the engine.
After the vehicle has been completely

– CONTINUED –

Starting and operating/Auto Start Stop system

7-57

7

(330,1)

stopped by depressing the brake pedal
with the select lever in the “D” position, the
engine will be automatically stopped.
If you release the brake pedal with the
select lever kept in the “D” position, the
engine will be automatically restarted.

Auto Start Stop indicator light (green)
(type A)

Auto Start Stop indicator light (green)
(type B)

If the engine is temporarily stopped by the
system, the Auto Start Stop indicator light
on the combination meter will illuminate in
green. This indicator light will turn off when
the system restarts the engine.

NOTE

.

After starting the engine, if the

vehicle is left idling without being
driven, the Auto Start Stop system will
not operate.

.

Your vehicle is equipped with a

special high-performance battery.
When replacing the vehicle battery, be
sure to replace it with a genuine
SUBARU battery (or equivalent) de-
signed specifically for use in a vehicle

equipped with the Auto Start Stop
system. For details, we recommend
that you consult your SUBARU dealer.

!

Operational conditions

The Auto Start Stop system will automa-
tically stop the engine when all of the
following conditions are met.

.

The engine is sufficiently warmed up.

.

The engine hood is closed.

.

The driver’s door is closed.

.

The driver’s seatbelt is fastened.

.

The CHECK ENGINE warning light/

Malfunction indicator light is off.

.

Airflow mode selection is set to a mode

other than “

” mode.

.

The rear window defogger is not in use.

.

The X-MODE has been turned off (if

equipped).

After the vehicle is stopped, the engine will
be automatically stopped when the follow-
ing conditions are met.

.

The steering wheel is in the straight

ahead position.

.

The steering wheel is not being oper-

ated.

NOTE

.

After the vehicle is stopped, the

engine may not automatically stop

Starting and operating/Auto Start Stop system

7-58

(331,1)

under the following conditions.

– The vehicle is stopped on a road
with a steep slope.
– The vehicle is stopped by hard
braking.
– Negative pressure in the brake
booster is not sufficient.

.

After the vehicle is stopped, the

engine may not automatically stop if
the brake pedal is not fully depressed.
Make sure to depress the brake pedal
firmly when stopping the vehicle.

.

In the following cases, it may take

some time for the Auto Start Stop
system to operate.

– The battery is discharged be-
cause the vehicle has not been used
for a long period of time, etc.
– The coolant temperature is low.
– The battery terminals have been
reconnected after replacing the bat-
tery, etc.

!

Non-operational conditions

In any of the following cases, the Auto
Start Stop system will not operate.

.

When the Auto Start Stop warning light/

Auto Start Stop OFF indicator light (yellow)
is illuminating or flashing

.

When the CHECK ENGINE warning

light/Malfunction indicator light is illuminat-
ing

.

When the engine hood is opened

.

When the vehicle is at an altitude of

more than approximately 10,000 ft (3,000
m)

.

When the CVT fluid is not sufficiently

warmed up

.

When the temperature of the CVT fluid

is abnormally high

.

When the vehicle battery is not in good

condition

.

When using the climate control system,

the temperature difference between the
setting temperature and the temperature
inside the vehicle is significant

.

When using the climate control system,

the amount of air flow is significant

NOTE

The Auto Start Stop system may not
operate if the CHECK ENGINE warning
light/Malfunction indicator light or
other warning lights on the combina-
tion meter are illuminating or flashing.

!

Engine restart operational condi-
tions

In any one of the following cases, the
engine will be automatically restarted even
if the brake pedal is kept depressed.

.

When slightly releasing the brake pedal

on road with a steep slope and the vehicle
begins rolling

.

When further depressing the brake

pedal

.

When depressing the accelerator pedal

.

When you move the select lever to the

“R” position

.

When turning the steering wheel

.

When airflow mode selection set to

” mode

.

When the climate control system can

no longer maintain the set temperature

.

When unbuckling the driver’s seatbelt

.

When opening the driver’s door

.

When turning on the X-MODE

.

When activating the rear window de-

fogger

!

Engine restart non-operational
conditions

WARNING

Do not open the engine hood when
the Auto Start Stop system is in
operation. It may cause the vehicle
to move while on a slope, the steer-
ing wheel operation may become
heavy, or the brakes may not work
well, which can create dangerous
conditions.

To ensure safety, the engine will not be
automatically restarted if you open the

– CONTINUED –

Starting and operating/Auto Start Stop system

7-59

7


Content      ..     18      19      20      21     ..