Subaru Outback (2023 year). Manual in english - page 20
 

  Index      Manuals     Subaru Outback (2023 year). Manual in english


Search            copyright infringement  


Content      ..     18      19      20      21     ..


Subaru Outback (2023 year). Manual in english - page 20


(315,1)

vehicle, or conditions outside the ve-
hicle.

&

To Turn Off the Climate Con-
trol System

To turn off the climate control system,
touch “ON/OFF”.

4-5. Front Seat Heater and
Ventilation (If Equipped)

&

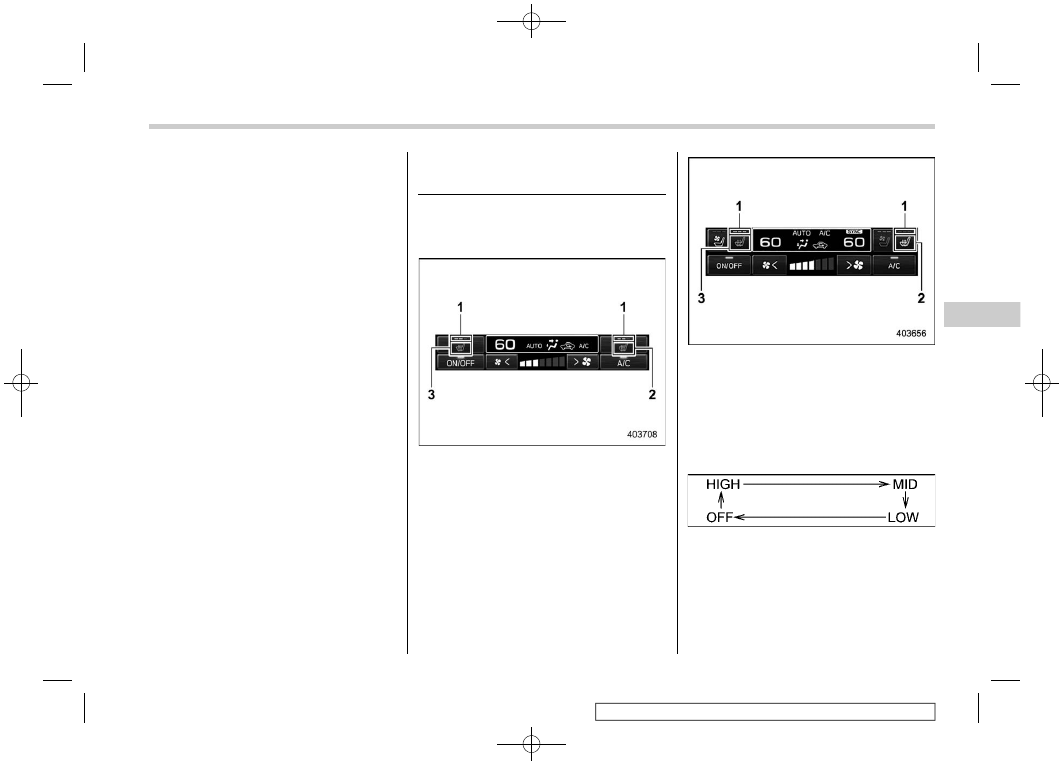
Front Seat Heater

The seat heater operates when the ignition
switch is in the “ON” position.

Dual 7.0-inch display models

11.6-inch display models

1)

Seat heater indicator

2)

Front passenger’s seat heater icon

3)

Driver’s seat heater icon

Touch the driver’s/passenger’s seat hea-
ter icon on the climate control screen.
Each time you touch the icon, the mode
will change as follows.

HIGH:

3 indicator lights are illuminated.

MID:

2 indicator lights are illuminated.

LOW:

1 indicator light is illuminated.

– CONTINUED –

Front Seat Heater and Ventilation

313

4

Climate

Control

(316,1)

OFF:

All indicator lights turn off.

Selecting HIGH mode will cause the seat
to heat up quicker.
Holding and releasing the seat heater icon
turns the seat heater off in any mode.

NOTE

The front seat heater function cannot
be used simultaneously with the seat
ventilation (if equipped).

&

Front Seat Ventilation

The front seat ventilation operates when
the ignition switch is in the “ON” position.

1)

Seat ventilation indicator

2)

Front passenger’s seat ventilation icon

3)

Driver’s seat ventilation icon

Touch the driver’s/passenger’s seat venti-
lation icon on the climate control screen.
Each time you touch the icon, the mode
will change as follows.

HIGH:

3 indicator lights are illuminated.

MID:

2 indicator lights are illuminated.

LOW:

1 indicator light is illuminated.

OFF:

All indicator lights turn off.

Holding and releasing the seat ventilation
icon turns the seat ventilation off in any
mode.

4-6. Defrosting

To defrost or dehumidify the windshield
and front door windows, perform the
following procedures.

.

To select the “

” mode, press the

defroster button.

.

To select the “ ” mode, touch “ ” on

the airflow mode selection screen.

NOTE

.

When the “

” or “ ” mode is

selected, the air conditioner operates
automatically regardless of the posi-
tion of the air conditioner icon to
defrost the windshield more quickly.
However, the indicator on the air con-
ditioner icon may not illuminate. At the
same time, the air inlet selection is

Defrosting

314

(317,1)

automatically set to the outside air
circulation mode.

.

After defrosting the windshield by

pressing the defroster button “

”,

pressing the button again returns the
system to the setting that had been
selected before the defroster was acti-
vated.

4-7. Operating Tips for Heater
and Air Conditioner

&

Cleaning Ventilator Grille

1)

Front ventilator inlet grille

2)

Condenser

Always keep the front ventilator inlet grille
free of snow, leaves, or other obstructions
to ensure efficient heating and defrosting.
Since the condenser is located in front of
the radiator, this area should be kept clean
because cooling performance is impaired
by any accumulation of insects and leaves
on the condenser.

&

Efficient Cooling after Park-
ing in Direct Sunlight

After parking in direct sunlight, drive with
the windows open for a few minutes to
allow outside air to circulate into the
heated interior. This results in quicker
cooling by the air conditioner. Keep the
windows closed during the operation of the
air conditioner for maximum cooling effi-
ciency.

&

Lubrication Oil Circulation in
the Refrigerant Circuit

Operate the air conditioner compressor at
a low engine speed (at idle or low driving
speeds) a few minutes each month during
the off-season to circulate its oil.

&

Checking Air Conditioning
System before Summer Sea-
son

Check the air conditioner unit for refriger-
ant leaks, hose conditions, and proper
operation each spring. Have the air con-
ditioning system checked by your
SUBARU dealer.

– CONTINUED –

Operating Tips for Heater and Air Conditioner

315

4

Climate

Control

(318,1)

&

Cooling and Dehumidifying in
High Humidity and Low Tem-
perature Weather Condition

Under certain weather conditions (high
relative humidity, low temperatures, etc.) a
small amount of water vapor emission
from the air outlets may be noticed. This
condition is normal and does not indicate
any problem with the air conditioning
system.

&

Air Conditioner Compressor
Shut-Off When Engine Is
Heavily Loaded

To improve acceleration and gas mileage,
the air conditioner compressor is designed
to temporarily shut off during air condi-
tioner operation whenever the accelerator
is fully depressed such as during rapid
acceleration or when driving on a steep
upgrade.

&

Refrigerant for Your Climate
Control System

1)

Air conditioner label

Your air conditioner uses ozone friendly
refrigerant R-1234yf (HFO-1234yf).
Before adding, changing or checking the
refrigerant, check the air conditioner label
in the location shown in the illustration to
confirm which type of refrigerant is used in
your vehicle.
Consult your SUBARU dealer for service.
Repairs needed as a result of using the
wrong refrigerant are not covered under
warranty.

4-8. Air Filtration System

Your vehicle’s air conditioning system is
equipped with an air filtration system.
Replace the cabin air filter according to
the replacement schedule found in the
“Warranty and Maintenance Booklet”. This
schedule should be followed to maintain
the filter’s dust collection ability. Under
extremely dusty conditions, the filter
should be replaced more frequently. Have
your filter checked or replaced by your
SUBARU dealer. For replacement, use
only a genuine SUBARU air filter kit.

CAUTION

Contact your SUBARU dealer if the
following occurs, even if it is not yet
time to change the filter.

.

Reduction of the airflow through

the vents.

.

Windshield gets easily fogged or

misted.

NOTE

The filter can influence the air condi-
tioning, heating and defroster perfor-
mance if not properly maintained.

Air Filtration System

316

(319,1)

&

Replacing the Cabin Air Filter

1. Remove the glove box.

(1) Open the glove box.

(2) Remove the damper shaft from the
glove box.

(3) Push both sides of the glove box
inward to unlock the stoppers and then
pull down the glove box as far as it will
go.

(4) Pull out the glove box horizontally
and remove the hinge portion. When

doing this, be careful not to damage
the hinge.

2. Remove the cabin air filter according to
the following procedure in order to prevent
dust on the air cleaner from falling to the
inside of its housing.

(1) Pinch both tabs and remove the
filter cover.
(2) Gently tilt down the end of the filter
and slowly pull it out 0.4 in (1 cm).
(3) Slowly pull out the rest of the filter.

– CONTINUED –

Air Filtration System

317

4

Climate

Control

(320,1)

3. Replace the cabin air filter with a new
one and then reinstall the cover.

CAUTION

The arrow mark on the filter must
point UP.

4. Reinstall the glove box, and connect
the damper shaft.
5. Close the glove box.

Air Filtration System

318

(321,1)

5-1. Antenna ........................................................... 320

Printed Antenna.................................................. 320

Roof Antenna..................................................... 320

5-2. Audio Set .........................................................320

Audio

5

Audio

(322,1)

5-1. Antenna

&

Printed Antenna

CAUTION

Do not use sharp instruments or
window cleaner containing abra-
sives to clean the inner surface of
the window on which the antenna is
printed. Doing so may damage the
antenna printed on the window.

The antenna is printed on the inner surface
of the rear window glass.

NOTE

Antenna performance will deteriorate
significantly if you apply tinting film or

any other material over the antenna
portion of the rear window glass.

&

Roof Antenna

The satellite radio antenna and telematics
antenna (if equipped) are installed in the
center of the roof at the rear.

5-2. Audio Set

If your vehicle is equipped with a genuine
SUBARU navigation system or audio
system, refer to the separate navigation/
audio Owner’s Manual for details.

Antenna

320

(325,1)

6-1. Interior Light ................................................... 324

Dome Light......................................................... 324
Map Lights ......................................................... 324
Cargo Area Light (Outback/Subaru Outback

Wilderness) ...................................................... 325

Rear Gate Light (If Equipped).............................. 325
OFF Delay Timer................................................. 325

6-2. Sun Visors....................................................... 326

Vanity Mirror with Light....................................... 326

6-3. Storage Compartment .................................... 327

Glove Box .......................................................... 327
Center Console................................................... 327
Overhead Console .............................................. 328

6-4. Cup Holder ...................................................... 328

Front Passenger’s Cup Holder ............................ 328
Rear Passenger’s Cup Holder ............................. 329

6-5. Bottle Holders ................................................. 329
6-6. Accessory Power Outlets .............................. 330
6-7. USB Power Supply ......................................... 332

How to Use the USB Power Supply ..................... 333

6-8. Ashtray (Dealer Option) ..................................334
6-9. Assist Grip .......................................................334
6-10. Coat Hook ......................................................335
6-11. Shopping Bag Hook ......................................336

Legacy............................................................... 336
Outback/Subaru Outback Wilderness.................. 336

6-12. Floor Mat ........................................................336
6-13. Lifting Cargo Cover (Outback/Subaru

Outback Wilderness – If Equipped) .............337

To Install the Cover Housing .............................. 337
Using the Cover ................................................. 338
To Remove the Cover Housing ........................... 340
To Stow the Cover.............................................. 341
To Take Out the Stowed Cover ........................... 342

6-14. Convenient Tie-Down Hooks (Outback/

Subaru Outback Wilderness) .......................342

6-15. Adjustable Storage Net (Outback/Subaru

Outback Wilderness).....................................343

6-16. Under-Floor Storage Compartment..............343

Interior Equipment

6

Interior

Equipment

(326,1)

6-1. Interior Light

CAUTION

When leaving your vehicle, make
sure the lights are turned off to
avoid battery discharge.

&

Dome Light

1)

OFF

2)

DOOR

3)

ON

The dome light switch has the following
positions:

ON:

The light turns on.

OFF:

The light turns off.

DOOR:

The dome light illuminates auto-

matically when any of the doors (for
Outback/Subaru Outback Wilderness, in-
cluding the rear gate) is opened. Several
seconds after all of the doors (including the
rear gate) are closed, the dome light
gradually turns off. For details, refer to
“OFF Delay Timer”

P325.

&

Map Lights

!

Map light switches

To turn on the map light, press the lens.
To turn it off, press the lens again.

CAUTION

Do not keep watching the light
source because they use LEDs.
Doing so could damage your eyes.

!

Door interlock switch

1)

Door interlock switch

The door interlock switch has the following
positions.

OFF:

The map lights do not illuminate

automatically in conjunction with a door
opening. However, the lights can be turned
on manually by pressing the map light
lens.

DOOR:

The map lights illuminate auto-

matically when any of the doors (other than
the rear gate or trunk lid) is opened even

Interior Light

324

(327,1)

while the map light is off. Several seconds
after all of the doors (other than the rear
gate or trunk lid) are closed, the map lights
gradually turn off. For details, refer to “OFF
Delay Timer”

P325.

&

Cargo Area Light (Outback/
Subaru Outback Wilderness)

1)

ON

2)

DOOR

3)

OFF

The cargo area light switch has the
following positions.

ON:

The light turns on.

OFF:

The light turns off.

DOOR:

The light illuminates only when the

rear gate is opened. The light gradually
turns off several seconds after the rear

gate is closed. For details, refer to “OFF
Delay Timer”

P325.

&

Rear Gate Light (If Equipped)

1)

OFF

2)

DOOR

DOOR:

The light illuminates when the rear

gate is opened. The light remains illumi-
nated for several seconds and gradually
turns off after the rear gate is closed.

OFF:

The light turns off.

&

OFF Delay Timer

The following lights have an automatic
illumination function.

.

Dome light

.

Map lights

.

Trunk light (Legacy)

.

Cargo area light (Outback/Subaru

Outback Wilderness)

.

Rear gate light (if equipped)

When the interior light switch is set to the
“DOOR” position, the light will automati-
cally turn on and off depending on the
locking and unlocking of the doors, the
opening and closing of the doors, as well
as the position of the ignition switch.

NOTE

The setting for the period of time in
which the lights remain on (OFF delay
timer) can be changed by a SUBARU
dealer. Contact your SUBARU dealer
for details. Also, the setting can be
changed by operating the center infor-
mation display. For details, refer to “Car
settings”

P226 (11.6-inch display

models) or “Vehicle setting icons”

P246 (dual 7.0-inch display models).

Interior Light

325

6

Interior

Equipment

(328,1)

6-2. Sun Visors

To block out glare, swing down the visors.
To use the sun visor at a side window,
swing it down and move it sideways.

With the sun visor positioned over the side
window, you can slide the sun visor toward
the rear to prevent glare through the gap
between the sun visor and center pillar. To
slide the sun visor, pull it toward the rear of
the vehicle. When you have finished
sliding it, push it toward the front of the
vehicle.

CAUTION

Do not slide the sun visor over the
windshield. The slided sun visor
would obstruct your view of the
rearview mirror.

&

Vanity Mirror with Light

CAUTION

Keep the vanity mirror cover closed
while the car is being driven to avoid
being blinded by glare.

To use the vanity mirror, swing down the
sun visor and open the vanity mirror cover.
The lights beside the vanity mirror illumi-
nate when the mirror cover is opened.

NOTE

Use of the vanity mirror light for a long
period of time while the engine is not
running can cause battery discharge.

Sun Visors

326

(329,1)

6-3. Storage Compartment

CAUTION

.

Always keep the storage com-

partment closed while driving to
reduce the risk of injury in the
event of sudden stops or an
accident.

.

Do not store the following items

in the storage compartment.
Otherwise, it may cause a fire or
accident.

– Spray cans, containers with

flammable or corrosive li-
quids or any other dangerous
items.

– Plastic or other heat-vulner-

able or flammable articles
such as a lighter.

&

Glove Box

1)

Lock

2)

Unlock

To open the glove box, pull the handle. To
close it, push the lid firmly upward.
To lock the glove box, insert the key and
turn it clockwise. To unlock the glove box,
insert the key and turn it counterclockwise.

For models with “keyless access with
push-button start system”, use the emer-
gency key to lock or unlock the glove box.

NOTE

The emergency key is directional. If the
key cannot be inserted, change the
direction that the grooved side is facing
and insert it again.

&

Center Console

The center console box provides a storage
space.

1)

Upper lid opening lever

2)

Upper and lower lid opening lever (dotted
surface)

The center console box has a two-layer
structure consisting of an upper compart-
ment and lower compartment.

– CONTINUED –

Storage Compartment

327

6

Interior

Equipment

(330,1)

&

Overhead Console

To open the console, push on the lid lightly
and it will automatically open.

WARNING

Do not use the overhead console
while driving. Doing so may distract
you from the road conditions ahead
and cause an accident that may
result in serious injury or death.

CAUTION

.

Before operating this vehicle, en-

sure that the overhead console is
closed.

.

When your vehicle is parked in

the sun or on a warm day, the
inside of the overhead console
heats up. Avoid storing plastic or
other heat vulnerable or flam-
mable articles such as a lighter
in the overhead console.

.

Do not pull the lid when opening

the overhead console.

There is the risk that the over-
head console may be damaged.

6-4. Cup Holder

CAUTION

Take care to avoid spills. Beverages,
if hot, might burn you and/or your
passengers. Spilled beverages may
also damage upholstery, carpets or
audio equipment.

&

Front Passenger’s Cup
Holder

CAUTION

.

Do not pick up a cup from the cup

holder or put a cup in the holder
while you are driving, as this may
distract you and lead to an acci-
dent.

.

Take care not to spill a beverage

on the select lever or any
switch(es) in the adjacent area. If
the beverage is spilled, it may
cause a malfunction of the select
lever and/or switch(es).

Cup Holder

328

(331,1)

1)

Spacer

The dual cup holder is built into the center
console.
Place a spacer in it before putting in a
small cup or can.

&

Rear Passenger’s Cup Holder

A dual cup holder is built into the armrest.

CAUTION

When a cup containing a beverage is
in the cup holder, do not fold down
or recline any seat. Otherwise, the
beverage could spill while driving
and, if the beverage is hot, it could
burn you and/or your passengers.

6-5. Bottle Holders

CAUTION

.

Do not pick up a bottle from the

bottle holder or put a bottle in the
holder while you are driving, as
this may distract you and lead to
an accident.

.

When placing a beverage in a

bottle holder, make sure it is
capped. Otherwise, the beverage
could spill when opening/closing
the door or while driving and, if
the beverage is hot, it could burn
you and/or your passengers.

The bottle holder equipped on each door

– CONTINUED –

Bottle Holders

329

6

Interior

Equipment

(332,1)

trim can be used to hold beverage bottles
and other items.

6-6. Accessory Power Out-
lets

Power outlet in the glove box

Power outlet in the center console (if
equipped)

Power outlet in the cargo area (Outback/
Subaru Outback Wilderness)

Accessory power outlets are provided in
the glove box, center console and cargo
area. Electrical power (12 V DC) from the
battery is available at any of the outlets
when the ignition switch is in either the
“ACC” or “ON” position.
You can use an in-vehicle electrical appli-
ance by connecting it to an outlet.
The maximum power rating of an appli-
ance that can be connected is

120 W

. Do

not use an appliance which exceeds the
indicated wattage for each outlet.
When using appliances connected to two
or more outlets simultaneously, the total
power consumed by them must not ex-
ceed 120 W.

Accessory Power Outlets

330


Content      ..     18      19      20      21     ..