Subaru Forester (2022 year). Manual in english - page 3
 

  Index      Manuals     Subaru Forester (2022 year). Manual in english


Search            copyright infringement  


Content      ..     1      2      3      4      ..


Subaru Forester (2022 year). Manual in english - page 3


(40,1)

System settings. Refer to “Driver Mon-
itoring System settings”

F

P221.

!

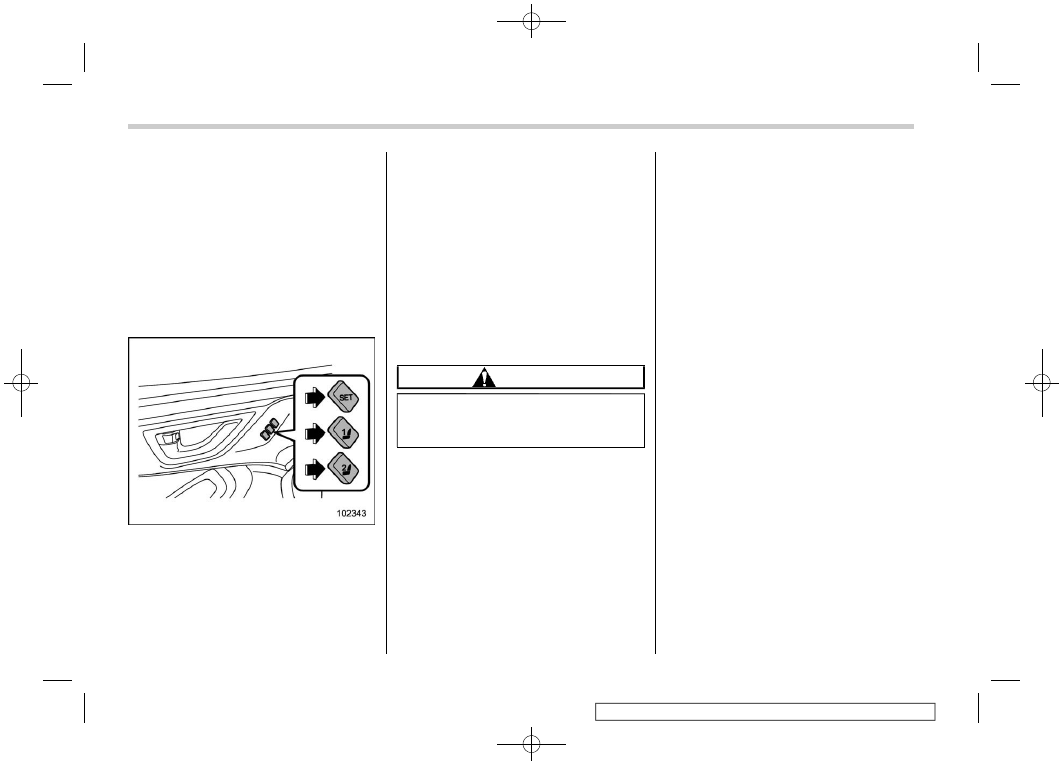
Registration of memory position
with button “1” or “2”

1. Adjust the seat position under the
following conditions.

.

The parking brake is applied.

.

The ignition switch is in the “ON”

position.

.

The select lever is in the “P” position.

2. Register the adjusted positions by
either of the following procedures.

.

Press the “SET” button, then press

either “1” or “2” until a chirp sounds
within 5 seconds.

.

While pressing and holding the

“SET” button, press either “1” or “2”

until a chirp sounds within 5 seconds.

A chirp will sound once, and the seat
position and outside mirror angle on the
passenger’s side will be registered.

NOTE

If a new position is registered for the
same button, the previously registered
memory position is deleted.

!

Registration of the reverse tilt-
down mirror angle with button
“1” or “2”

CAUTION

Depress the brake pedal when re-
gistering the reverse tilt-down mir-
ror angle.

1. Move the select lever to the “R”
position, then the outside mirror angle will
move to the reverse tilt-down position.
2. Adjust the outside mirror angle. For
details about the settings, refer to “Remote
control mirror switch”

F

P257.

3. Move the select lever to the “P”
position, then the outside mirror angle will
return to its original position.
4. Register the adjusted positions by
either of the following procedures.

.

Press the “SET” button, then press

either “1” or “2” until a chirp sounds
within 5 seconds.

.

While pressing and holding the

“SET” button, press either “1” or “2”
until a chirp sounds within 5 seconds.

A chirp will sound once, and the seat
position and outside mirror angle will be
registered.

NOTE

The factory setting (default setting) for
this function is set as the front passen-
ger’s side mirror. The setting of the
right and left side mirror/front passen-
ger’s side mirror operation can be
changed by a SUBARU dealer. Contact
your SUBARU dealer for details.

!

Registration of memory position
with a key fob

1. Adjust the seat position under the
following conditions.

.

The parking brake is applied.

.

The ignition switch is in the “LOCK”/

“OFF” position.

.

The select lever is in the “P” position.

Seats

38

(41,1)

2. Hold the access key fob and press and
hold the “SET” button, then press the “ ”
button of the access key fob.

A chirp will sound once, and the seat
position is registered.

NOTE

When registering the seat position,
carry the access key that you want to
register with you. If you are carrying 2
or more access keys, registration may
not be possible.

!

Registration of the reverse tilt-
down mirror angle with the key
fob

CAUTION

Depress the brake pedal when re-
gistering the reverse tilt-down mir-
ror angle.

1. Move the select lever to the “R”
position, then the outside mirror angle will
move to the reverse tilt-down position.
2. Adjust the outside mirror angle. For
details about the settings, refer to “Remote
control mirror switch”

F

P257.

3. Move the select lever to the “P”
position, then the outside mirror angle will
return to its original position.
4. Turn the ignition switch to the “OFF”/
“LOCK” position.
5. Hold the access key fob and press and
hold the “SET” button, then press the “ ”
button of the access key fob.
A chirp will sound once, and the reverse
tilt-down mirror angle will be registered.

NOTE

.

The factory setting (default setting)

for this function is set as the front
passenger’s side mirror. The setting of

the right and left side mirror/front
passenger’s side mirror operation can
be changed by a SUBARU dealer.
Contact your SUBARU dealer for de-
tails.

.

The system stores the adjusted

mirror angle for approximately 45 sec-
onds after the ignition switch is turned
to the “OFF” position. Register the
mirror angle while the memory function
is available.

!

Retrieval of memory position
registered with button “1” or “2”

WARNING

Be sure to press the correct button
to retrieve your registered seat posi-
tion. If the seat position is not
optimum for you, it may adversely
affect your driving and may reduce
the effectiveness of the seatbelt.
That could result in an accident
involving serious injury or death.

– CONTINUED –

Seats

39

1

Seat,

seatbelt

and

SRS

airbags

(42,1)

1. Turn the ignition switch to the “ON”
position.
2. Put the select lever is in the “P” position
and apply the parking brake, then press
button “1” or “2”.

A chirp will sound and the seat and outside
mirror move to the registered position.
When the select lever is moved to the “R”
position, the outside mirror will move to the
registered reverse tilt-down position.

NOTE

.

If the vehicle battery is removed, the

registered memory position data will
not be deleted.

.

When the button “1” or “2” is

pressed within 45 seconds after the
driver’s door is opened, the registered

memory position can be retrieved even
if the ignition switch is in the “LOCK” or
“OFF” position.

.

If buttons “1” and “2” are pressed at

the same time, execution of seat posi-
tion retrieval may not be possible.

.

When the retrieved position is the

same as the current seat position, a
chirp will sound twice.

!

Retrieval of the memory position
registered with access key fob

1. Hold the registered access key fob.

2. Unlock the driver’s door by pressing
the “ ” button or touching the sensor
behind the door handle.
3. Open the driver’s door.

A chirp will sound and the seat and angle

of the outside mirrors moves to the
registered position.
When the select lever is moved to the “R”
position, the outside mirror will move to the
registered reverse tilt-down position.

NOTE

.

A retrieved seat position might de-

viate as the function is used continu-
ously over time.

.

A retrieved seat position might de-

viate if you attempt to continue operat-
ing the registered seat in the same
direction when the registered seat is
already at the farthest possible point of
adjustment in any direction.

.

If the registered memory position

cannot be retrieved after performing
the previous procedures, try the follow-
ing procedures.

(1) Press the “SET” button on the
driver’s door.
(2) Press the “ ” button on the
access key fob or the door lock
button to lock the doors.
(3) Perform the prior procedures
again.

.

If the keyless access function is

disabled, the memory position cannot
be retrieved by touching the sensor
behind the driver’s door handle. How-
ever, the memory position can still be

Seats

40

(43,1)

retrieved by pressing the “ ” button on
the access key fob. For information
about how to enable/disable the key-
less access function, refer to “Dis-
abling keyless access function”

F

P124.

.

If a new position is registered for the

same access key fob, the previously
registered memory position data will be
deleted.

.

If you are carrying 2 or more access

keys, seat position retrieval may not be
possible.

.

If, while carrying an access key, 45

seconds passed after you enter the
operating range of the keyless access
function, it may not be possible to
retrieve the registered memory posi-
tion even if the door is open. For the
operating range of the keyless access
function, refer to “Locking and unlock-
ing by holding the access key fob”

F

P117.

!

Clearing the registered seat posi-
tion with access key fob

1. Close the driver’s door.
2. Hold the access key fob and press and
hold the “SET” button, then press the “ ”
button on the access key fob.

A chirp will sound, and the registered seat
position and outside mirror angle on the

passenger’s side will be cleared.

NOTE

After deleting the seat position, wait for
a few moments before registering a
new seat position.

1-2. Rear seats

WARNING

Seatbelts provide maximum re-
straint when the occupant sits back
and upright in the seat. Do not place
cushions or any other materials
between occupants and seatbacks
or seat cushions. By doing so, the
risk of sliding under the lap belt and
of the lap belt sliding up over the
abdomen will increase, and both can
result in serious injury or death.

– CONTINUED –

Rear seats

41

1

Seat,

seatbelt

and

SRS

airbags

(44,1)

WARNING

Never stack luggage or other cargo
higher than the top of the seatback
as it could tumble forward and injure
passengers in the event of a sudden
stop or accident.

&

Armrest (if equipped)

To lower the armrest, pull down the top
edge of the armrest.

WARNING

.

To avoid serious injury, passen-

gers must never sit on the center
armrest.

.

When using the seatbelt, do not

allow it to become tangled with
an arm rest. The seatbelt will not
perform its original function in an
emergency and it may cause a
serious injury.

&

Folding down the rear seat-
back

WARNING

.

When you fold down the seat-

back, check that there are no
passengers or objects on the rear
seat. Not doing so creates a risk
of injury or property damage if
the seatback suddenly folds
down.

.

Never allow passengers to ride

on the folded rear seatback or in
the cargo area. Doing so may
result in serious injury or death.

.

Secure all objects and especially

long items properly to prevent
them from being thrown around
inside the vehicle and causing
serious injury during a sudden
stop, steering maneuver or accel-
eration.

.

When you return the seatback to

its original position, shake it
slightly to confirm that it is se-
curely in place. If it is not securely
fixed in place, it may suddenly
fold down in the event of sudden
braking, or objects may move out
from the cargo area. Both could
cause serious injury or death.

Rear seats

42

(45,1)

1)

Striker

WARNING

When the seatback is returned to its
original position, observe the fol-
lowing precautions. Failure to do so
may lead to serious injury or an
accident because the operation effi-
ciency of the seatbelt is inhibited.

.

The seatbelt should not be
caught in the seatback and it
should be fully visible.

.

The seatbelt should not pass

behind the striker for the seat-
back.

CAUTION

.

Do not hang luggage etc. on the

striker. The possibility exists that
the seatback may not be able to
be fixed firmly in place. This
could lead to unexpected acci-
dents.

.

While driving, if something hits

the release latch, it is possible
that the seatback will fold down.
Be careful that no luggage etc.
hits the latch.

1. Lower the head restraint of the rear
center seating position.

Release knob

Release latch on both sides of the cargo
area (if equipped)

2. Unlock the seatback by pulling the lock
release knob or release latch (if equipped)
and then fold the seatback down.

– CONTINUED –

Rear seats

43

1

Seat,

seatbelt

and

SRS

airbags

(46,1)

!

Return the rear seatback

WARNING

.

When returning the seatback to

its original position, observe the
following precaution.

Failure to observe the precaution
may damage the seatbelt, impair-
ing its effectiveness, and possi-
bly result in a serious injury.

.

When returning the seatback to

its original position, pull the
seatbelt out towards the vehicle
exterior so that it will not be
caught between the seatback
and the trim.

Lock release knob

1)

Unlocked

2)

Locked

A)

Unlocking marker in red

To return the seatback to its original
position, raise the seatback until it locks
into place and make sure that the unlock-
ing marker on the lock release knob is no
longer visible.

WARNING

When you return the seatback to its
original position, check that the
unlocking marker on the lock re-
lease knob is not visible. Also, shake
the seatback slightly to confirm that
it is securely fixed in place. If the
seatback is not securely fixed in
place, the seatback may suddenly

fold down in the event of sudden
braking, or objects may move out
from the cargo area, which could
cause serious injury or death.

&

Reclining the seatback (if
equipped)

Rear seats

44

(47,1)

WARNING

To prevent the passenger from slid-
ing under the seatbelt in the event of
a collision, observe the following
precautions:

.

Keep the seatback in the upright

position while the vehicle is in
motion.

.

Do not place objects such as

cushions between the passenger
and the seatback.

Otherwise, the risk of sliding under
the lap belt and of the lap belt sliding
up over the abdomen will increase,
and both can result in serious inter-
nal injury or death.

CAUTION

If your vehicle is equipped with a
cargo area cover, observe the fol-
lowing precautions.

.

Be careful not to pinch your hand

between the head restraint and
the cargo area cover when you
recline the rear seat.

.

Move the front cover of the cargo

area cover backward so that the
cover is not damaged by the

reclined seatback. Refer to “Car-
go area cover”

F

P297.

Pull the strap and adjust the seatback to
the desired position.
Then release the strap and move the
seatback back and forth to confirm that it
is securely fixed in place.

1-3. Head restraints

WARNING

The front seat head restraints are
designed to be installed into the
front seats only. The rear seat head
restraints are designed to be in-
stalled into the rear seats only. Do
not attempt to install the front seat
head restraints into the rear seats, or
the rear seat head restraints into the
front seats.

NOTE

It is possible to adjust the angle of the
front seat head restraints only. When
installing the front seat head restraints,
make sure that the angle of the head
restraints can be adjusted.

– CONTINUED –

Head restraints

45

1

Seat,

seatbelt

and

SRS

airbags

(48,1)

&

Front seats

Both the driver’s seat and the front
passenger’s seat are equipped with head
restraints. Both head restraints are adjus-
table in the following ways.

!

Height adjustment

1)

Head restraint

2)

Release button

3)

Remove button

To release:

.

Lowermost to the 1st step

Pull the head restraint up to the 1st step.

To raise:

.

1st step to the 3rd step

Pull the head restraint up while pressing
the release button on the top of the
seatback.

To lower:

Push the head restraint down while press-
ing the release button on the top of the
seatback.

To remove:

Use a key or other hard, pointed object to
press the remove button, then pull out the
head restraint.

To install:

Push the head restraint into the holes on
the top of the seatback until it locks.

Each head restraint should be adjusted so
that the center is closest to the top of the
occupant’s ears.

NOTE

When the head restraint cannot be
pulled out or installed due to insuffi-
cient clearance, tilt the seat and then

perform the installation and removal
tasks.

!

Angle adjustment

The angle of the head restraint can be
adjusted in several steps. While maintain-
ing a suitable driving posture, adjust the
head restraint to a position where the back
of your head is as close to the head
restraint as possible.

To tilt:

Tilt the head restraint by hand to the
preferred position. A click will sound when
the head restraint is locked.

To return:

Tilt the head restraint as far forward as it
can go. The head restraint will automati-
cally return to the fully upright position.

Head restraints

46

(49,1)

Then, adjust the head restraint to the
preferred angle.

&

Rear seats

Head restraints are installed in all second-
row seats and can be adjusted as de-
scribed below.

!

Window side seating position

1)

Head restraint

2)

Release button

To remove:

Press the release button, and pull out the
head restraint.

To install:

Push the head restraint into the holes on
the top of the seatback until it locks. Press
and hold the release button to lower the
head restraint.

After installing the head restraint, make
sure it is securely locked.

!

Center seating position

1)

When not used (retracted position)

2)

When used (extended position)

CAUTION

The head restraint is not intended to
be used in the retracted position.
Before sitting in the seat, raise the
head restraint to the extended posi-
tion.

1)

Head restraint

2)

Release button

To raise:

Pull the head restraint up.

To lower:

Press the release button then push the
head restraint down.

To remove:

Press the release button, and pull out the
head restraint.

To install:

Push the head restraint into the holes on
the top of the seatback until it locks. Press
and hold the release button to lower the
head restraint.

When the rear center seating position is
occupied, raise the head restraint to the

– CONTINUED –

Head restraints

47

1

Seat,

seatbelt

and

SRS

airbags

(50,1)

extended position. When it is not occupied,
lower it to improve rearward visibility.

1-4. Seat heater (if equipped)

The seat heater is equipped in the front
seats or rear seats (window side seating
position).

The seat heater operates when the ignition
switch is either in the “ACC” or “ON”
position.

&

Safety precautions

CAUTION

.

People with delicate skin may

suffer slight burns even at low
temperatures if they use the seat
heater for a long period of time.
When using the heater, always be
sure to warn the persons con-
cerned.

.

Do not put anything on the seat

which insulates against heat,
such as a blanket, cushion, or
similar items. This may cause the
seat heater to overheat.

.

When the seat is warmed enough

or before you leave the vehicle,
be sure to turn off the seat heater.

NOTE

Use of the seat heater for a long period
of time while the engine is not running
can cause battery discharge.

Seat heater

48

(51,1)

&

Front seat heater

Front seats

1)

HI

– Rapid heating

2)

LO

– Normal heating

3)

Off

A)

Left-hand side

B)

Right-hand side

To turn on the seat heater, push the “LO” or
“HI” position on the switch, as desired,
depending on the temperature.
Selecting the “HI” position will cause the
seat to heat up quicker.

To turn off the seat heater, lightly press the
opposite side of the current position.

The indicator located on the switch illumi-
nates when the seat heater is in operation.

&

Rear seat heater (if equipped)

CAUTION

Do not open and close the center
console lid while operating the rear
seat heater switch. There is the risk
of fingers being caught in the lid.

The seat heater operates when the ignition
switch is in the “ON” position.

Rear seat heater switch

1)

HIGH mode indicators

2)

LOW mode indicators

A)

Left-hand side

B)

Right-hand side

Press the rear seat heater switch. Each
time you press the switch, the mode will
change as follows.

When LOW mode is selected, the LOW
mode indicator on the rear seat heater
switch illuminates. When HIGH mode is
selected, both the LOW and HIGH mode
indicators illuminate. When the OFF mode
is selected, all the indicators turn off.

– CONTINUED –

Seat heater

49

1

Seat,

seatbelt

and

SRS

airbags

(52,1)

Selecting “HIGH” mode will cause the seat
to heat up quicker.

NOTE

Only the front seat heater switches
retain the previous switch position
even if the vehicle has restarted. The
rear seat heater switch will reset.

1-5. Seatbelts

&

Seatbelt safety tips

WARNING

.

All persons in the vehicle should

fasten their seatbelts BEFORE
the vehicle starts to move. Other-
wise, the possibility of serious
injury becomes greater in the
event of a sudden stop or acci-
dent.

.

All belts should fit snugly in order

to provide full restraint. Loose
fitting belts are not as effective in
preventing or reducing injury.

.

Each seatbelt is designed to sup-

port only one person. Never use a
single belt for two or more per-
sons – even children. Otherwise,
in an accident, serious injury or
death could result.

.

Replace all seatbelt assemblies

including retractors and attach-
ing hardware worn by occupants
of a vehicle that has been in a
serious accident. The entire as-
sembly should be replaced even
if damage is not obvious.

.

Never use a belt that is twisted or

reversed. In an accident, this can
increase the risk or severity of
injury.

.

Keep the lap belt as low as

possible on your hips. In a colli-
sion, this spreads the force of the
lap belt over stronger hip bones
instead of across the weaker
abdomen.

.

Seatbelts provide maximum re-

straint when the occupant sits
well back and upright in the seat.
To reduce the risk of sliding
under the seatbelt in a collision,
the front seatbacks should be
always used in the upright posi-
tion while the vehicle is running.
If the front seatbacks are not
used in the upright position in a
collision, the risk of sliding under
the lap belt and of the lap belt
sliding up over the abdomen will
increase, and both can result in
serious internal injury or death.

.

Do not put cushions or any other

materials between occupants
and seatbacks or seat cushions.
If you do so, the risk of sliding
under the lap belt and of the lap
belt sliding up over the abdomen
will increase, and both can result

Seatbelts

50

(53,1)

in serious internal injury or death.

WARNING

Never place the shoulder belt under
the arm or behind the back. If an
accident occurs, this can increase
the risk or severity of injury.

CAUTION

Metallic parts of the seatbelt can
become very hot in a vehicle that has
been closed up in sunny weather;
they could burn an occupant. Do not
touch such hot parts until they cool.

Your vehicle is equipped with a crash
sensing and diagnostic module, which will
record the use of the seatbelt by the front
passenger when any of the SRS frontal,
side and curtain airbags deploy.

!

Infants or small children

Use a child restraint system that is suitable
for your vehicle. Refer to “Child restraint
systems”

F

P62.

!

Children

WARNING

Place children in the rear seat prop-
erly restrained at all times. The SRS
airbag deploys with considerable
speed and force and can injure or
even kill children, especially if they
are not restrained or improperly
restrained. Because children are
lighter and weaker than adults, their
risk of being injured from deploy-
ment is greater. For that reason, we
strongly recommend that ALL chil-
dren (including those in child re-
straint systems and those that have
outgrown child restraint devices) sit
in the REAR seat properly restrained
at all times in a child restraint
system or in a seatbelt, whichever
is appropriate for the child’s height
and weight.

Secure ALL types of child restraint
devices (including forward facing
child restraint systems) in the REAR
seats at all times.

NEVER INSTALL A CHILD RE-
STRAINT SYSTEM IN THE FRONT
SEAT. DOING SO RISKS SERIOUS
INJURY OR DEATH TO THE CHILD
BY PLACING THE CHILD’S HEAD
TOO CLOSE TO THE SRS AIRBAG.

According to accident statistics,
children are safer when properly
restrained in the rear seating posi-
tions than in the front seating posi-
tions. For instructions and precau-
tions concerning the child restraint
system, refer to “Child restraint
systems”

F

P62.

If a child is too big for a child restraint
system, the child should sit in the rear seat
and be restrained using the seatbelts.
According to accident statistics, children
are safer when properly restrained in the
rear seating positions than in the front
seating positions. Never allow a child to
stand up or kneel on the seat.

If the shoulder portion of the belt crosses
the face or neck, move the child closer to
the belt buckle to help provide a good
shoulder belt fit. Care must be taken to

– CONTINUED –

Seatbelts

51

1

Seat,

seatbelt

and

SRS

airbags

(54,1)

securely place the lap belt as low as
possible on the hips and not on the child’s
waist. If the shoulder portion of the belt
cannot be properly positioned, a child
restraint system should be used. Never
place the shoulder belt under the child’s
arm or behind the child’s back.

!

Expectant mothers

Expectant mothers also need to use the
seatbelts. They should consult their doctor
for specific recommendations. The lap belt
should be worn securely and as low as
possible over the hips, not over the waist.

&

Emergency Locking Retrac-
tor (ELR)

The driver’s seatbelt has an Emergency
Locking Retractor (ELR).
The emergency locking retractor allows
normal body movement but the retractor
locks automatically during a sudden stop,
impact or if you pull the belt very quickly
out of the retractor.

&

Automatic Locking Retractor/
Emergency Locking Retrac-
tor (ALR/ELR)

Each passenger’s seatbelt has an Auto-
matic Locking Retractor/Emergency Lock-
ing Retractor (ALR/ELR). The Automatic
Locking Retractor/Emergency Locking
Retractor normally functions as an Emer-
gency Locking Retractor (ELR). The ALR/
ELR has an additional locking mode
“Automatic Locking Retractor (ALR)
mode” intended to secure a child restraint
system. When the seatbelt is once drawn
out completely and is then retracted even
slightly, the retractor locks the seatbelt in
that position and the seatbelt cannot be
extended. As the belt is rewinding, clicks
will be heard which indicate the retractor
functions as an ALR. When the seatbelt is
retracted fully, the ALR mode is released.

When securing a child restraint system on
the rear seats by the use of the seatbelt,
the seatbelt must be changed over to the
Automatic Locking Retractor (ALR) mode.

When the child restraint system is re-
moved, make sure that the seatbelt re-
tracts fully and the retractor returned to the
Emergency Locking Retractor (ELR)
mode.
For instructions on how to convert the
retractor to the ALR mode and restore it to
the ELR mode, refer to “Installing child
restraint systems with ALR/ELR seatbelt”

F

P67.

&

Seatbelt warning light
and chime

Refer to “Seatbelt warning light and chime”

F

P169.

&

Fastening the seatbelt

!

Front seatbelts

1. Adjust the seat position according to
the following procedure.

Driver’s seat:

Adjust the seatback to the

upright position. Move the seat as far from
the steering wheel as practical while still
maintaining full vehicle control.

Seatbelts

52

(55,1)

Front passenger’s seat:

Adjust the seat-

back to the upright position. Move the seat
as far back as possible.
2. Sit well back in the seat.
3. Pick up the tongue plate and pull the
belt out slowly. Do not let it get twisted.

.

If the belt stops before reaching the

buckle, return the belt slightly and pull it
out more slowly.

.

If the belt still cannot be unlocked, let

the belt retract slightly after giving it a
strong pull, then pull it out slowly again.

4. Insert the tongue plate into the buckle
until you hear a click.

5. To tighten the lap part, pull up on the
shoulder belt.
6. Place the lap belt as low as possible on
the hips, not on the waist.

!

Adjusting the front seat shoulder
belt anchor height

The shoulder belt anchor height should be
adjusted to the position best suited for the
driver/front passenger. Always adjust the
anchor height so that the shoulder belt
passes over the middle of the shoulder
without touching the neck.

To raise:

Slide the anchor up.

To lower:

Pull the release knob and slide the anchor
down.

Pull down the anchor to make sure that it is
locked in place.

– CONTINUED –

Seatbelts

53

1

Seat,

seatbelt

and

SRS

airbags


Content      ..     1      2      3      4      ..