Subaru WRX (2019 year). Instruction - part 14


  Index      Subaru     Subaru WRX - instruction 2019 year in english


Search            


Content   ..  12  13  14  15   ..


Subaru WRX (2019 year). Instruction - part 14


(216,1)

北米Model "A1720BE-A" EDITED: 2018/ 3/ 9

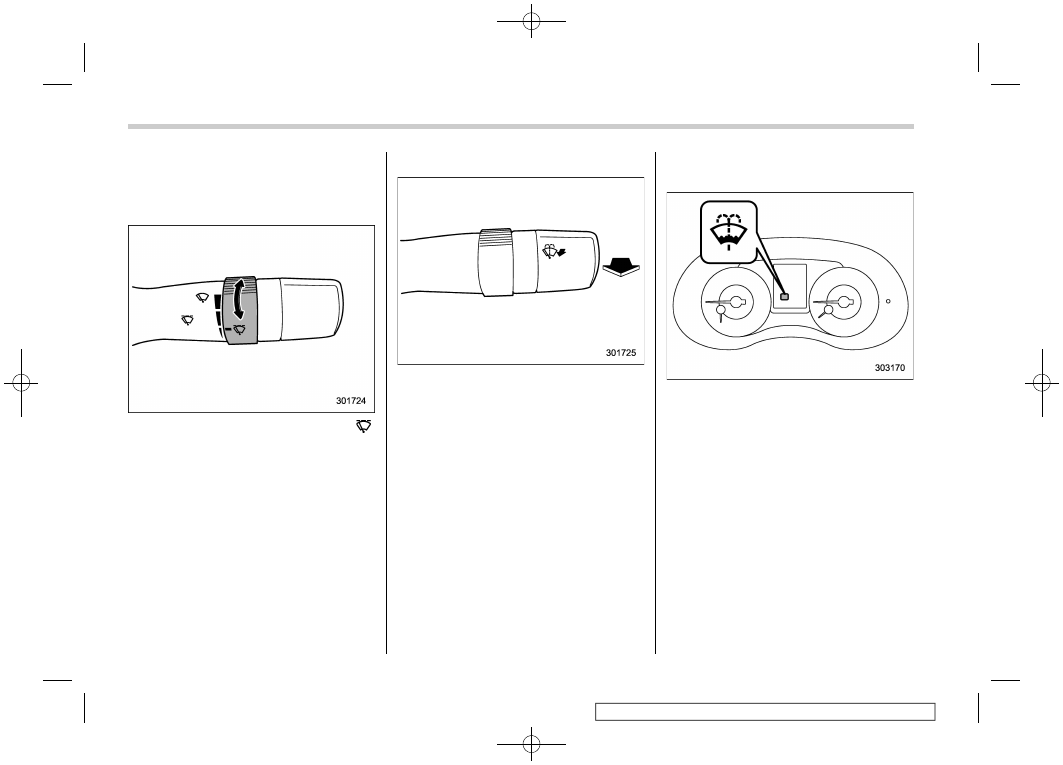
For a single wipe of the wipers, push the
lever up. The wipers operate until you
release the lever.

!

Wiper intermittent time control

When the wiper switch is in the “

position, turn the dial to adjust the operat-
ing interval of the wiper. You can adjust the
operating interval in several steps.

!

Windshield washer

To wash the windshield, pull the wiper
control lever toward you. The washer fluid
sprays until you release the lever. The
wipers operate while you pull the lever.

NOTE

The windshield washer fluid warning
indicator appears when the washer
fluid level in the tank has dropped to
the lower limit. If the warning indicator
appears, refill the tank with fluid. For
the refilling procedure, refer to “Wind-
shield washer fluid” 
F11-38.

Instruments and controls/Wiper and washer

3-76

(217,1)

北米Model "A1720BE-A" EDITED: 2018/ 3/ 9

Mirrors

Always check that the inside and outside
mirrors are properly adjusted before you
start driving.

&

Inside mirror

1)

Normal position

2)

Anti-glare position

Push the tab on the mirror for normal use.
To reduce glare from the headlights of the
vehicle behind you, pull the tab to the anti-
glare position.

&

Auto-dimming mirror/com-
pass (if equipped)

1)

Display

2)

Switch

During nighttime driving, the auto-dimming
feature senses distracting glare from
vehicle headlights behind you and auto-
matically dims to eliminate the glare and
preserve your vision.

!

To Operate the Auto-Dimming Fea-
ture

Press the “

” switch to turn the auto-

dimming feature on/off. The auto-dimming
feature is enabled when the switch’s green
LED indicator is on. The auto-dimming
feature will default to on with each ignition
cycle.

!

To Operate the Compass Feature

1. To turn the compass feature on/off,
press and hold the “

” switch for more

than 3 seconds or until the display turns
on/off. The compass feature will default to
on with each ignition cycle.
2. If the display reads “C”, slowly drive the
vehicle in circles until compass is cali-
brated.

Compass calibration zones

– CONTINUED –

Instruments and controls/Mirrors

3-77

3

(218,1)

北米Model "A1720BE-A" EDITED: 2018/ 3/ 9

3. To adjust for compass zone variance:

(1) Find your current location and
zone number on the map.
(2) Press and hold the “

” switch for

more than 6 seconds or until a zone
number appears in the display.
(3) Once the zone number appears in
the display, toggle the “

” switch

again until your current location zone
number appears. After you stop press-
ing the switch, your new zone number
will be saved. Within a few seconds,
the display will show a compass direc-
tion.

4. If the vehicle’s magnetics have chan-
ged or if the compass appears inaccurate,
recalibrate the compass. Press and hold
the “

” switch for more than 9 seconds or

until a “C” appears in the display. Once a
“C” appears in the display, slowly drive the
vehicle in circles until compass is cali-
brated.

&

Auto-dimming mirror/com-
pass with HomeLink

®

(if

equipped)

1)

Display

2)

HomeLink Buttons

3)

Switch

During nighttime driving, the auto-dimming
feature senses distracting glare from
vehicle headlights behind you and auto-
matically dims to eliminate the glare and
preserve your vision.

!

To Operate the Auto-Dimming Fea-
ture

Press the “

” switch to turn the auto-

dimming feature on/off. The auto-dimming
feature is enabled when the switch’s green
LED indicator is on. The auto-dimming
feature will default to on with each ignition
cycle.

!

To Operate the Compass Feature

1. To turn the compass feature on/off,
press and hold the “

” switch for more

than 3 seconds or until the display turns
on/off. The compass feature will default to
on with each ignition cycle.
2. If the display reads “C”, slowly drive the
vehicle in circles until compass is cali-
brated.

Compass calibration zones

Instruments and controls/Mirrors

3-78

(219,1)

北米Model "A1720BE-A" EDITED: 2018/ 3/ 9

3. To adjust for compass zone variance:

(1) Find your current location and
zone number on the map.
(2) Press and hold the “

” switch for

more than 6 seconds or until a zone
number appears in the display.
(3) Once the zone number appears in
the display, toggle the “

” switch

again until your current location zone
number appears. After you stop press-
ing the switch, your new zone number
will be saved. Within a few seconds,
the display will show a compass direc-
tion.

4. If the vehicle’s magnetics have chan-
ged or if the compass appears inaccurate,
recalibrate the compass. Press and hold
the “

” switch for more than 9 seconds or

until a “C” appears in the display. Once a
“C” appears in the display, slowly drive the
vehicle in circles until compass is cali-
brated.

!

HomeLink

®

Wireless Control Sys-

tem

The HomeLink

®

Wireless Control System

provides a convenient way to replace up to
three hand-held radio-frequency remotes
used to activate devices such as gate
operators, garage door openers, entry
door locks, security systems, even home
lighting. The below steps are generic
programming instructions; for Genie and
Sommer garage door openers please go
directly to the HomeLink website. Addi-
tional information and programming vi-
deos can be found at
www.HomeLink.com and
www.youtube.com/HomeLinkGentex.

CAUTION

.

Before programming HomeLink

to a garage door opener or gate
operator, make sure that people
and objects are out of the way of
the device to prevent potential
harm or damage.

.

When programming a garage

door opener, it is advised to park
outside of the garage.

.

Do not use HomeLink with any

garage door opener that lacks
safety stop and reverse features
as required by U.S. federal safety

standards (this includes any gar-
age door opener model manufac-
tured before April 1, 1982). A
garage door that cannot detect
an object signaling the door to
stop and reverse does not meet
current U.S. federal safety stan-
dards.

.

It is also recommended that a new

battery be placed in the hand-
held remote (garage door opener
remote) of the device for quicker
and more accurate training.

.

Some vehicles may require the

ignition switch to be turned to the
“ON” or “ACC” position for pro-
gramming and/or operation of
HomeLink.

.

Keep the hand-held remote (gar-

age door opener remote) of the
device you are programming for
use in other vehicles as well as
for future HomeLink program-
ming. It is also suggested that
upon the sale of the vehicle, the
programmed HomeLink buttons
be erased for security purposes.
Refer to “Erasing HomeLink But-
tons” 
F3-82.

– CONTINUED –

Instruments and controls/Mirrors

3-79

3

(220,1)

北米Model "A1720BE-A" EDITED: 2018/ 3/ 9

!

Programming a New HomeLink
Button

1)

Indicator Light

2)

HomeLink Buttons

1. Press and release the HomeLink but-
ton that you would like to program. The
HomeLink indicator light will flash orange
slowly (if not, refer to “Erasing HomeLink
Buttons” F3-82).

1)

Garage door opener remote

2. Position the hand-held remote (garage
door opener remote) 1 to 3 inches (2 to 8
cm) away from the HomeLink button that
you would like to program.

NOTE

Some hand-held remotes (garage door
opener remotes) may actually train
better at a distance of 6 to 12 inches
(15 to 30 cm). Keep this in mind if you
have difficulty with the programming
process.

3. While the HomeLink indicator light is
flashing orange, press and hold the hand-
held remote button. Continue pressing the
hand-held remote button until the
HomeLink indicator light changes from
orange to green. You may now release
the hand-held remote button.

NOTE

Some devices may require you to re-
place this “Programming a New
HomeLink Button” step 3 with proce-
dures noted in the “Gate Operator /
Canadian Programming” section. Refer
to “Gate Operator / Canadian Program-
ming” 
F3-82.

Instruments and controls/Mirrors

3-80

(221,1)

北米Model "A1720BE-A" EDITED: 2018/ 3/ 9

1)

Indicator Light

4. Press the HomeLink button that you
would like to program and observe the
indicator light.

.

If the indicator light remains constant

green, your device should operate
when the HomeLink button is pressed.
At this point, if your device operates,
programming is complete.
.

If the indicator light rapidly flashes

green, firmly press, hold for two sec-
onds and release the HomeLink button
up to three times to complete the
programming process. At this point if
your device operates, programming is
complete. If the device does not
operate, continue with the next step
of the programming instructions.

1)

“Learn” button

5. At the garage door opener motor,
(security gate motor, etc.) locate the
“Learn”, “Smart”, or “Program” button. This
can usually be found where the hanging
antenna wire is attached to the motor-head
unit (see the device’s manual to identify
this button). The name and color of the
button may vary by manufacturer.

NOTE

A ladder and/or second person may
simplify the following steps.

6. Firmly press and release the “Learn”,
“Smart”, or “Program” button. You now
have 30 seconds in which to complete step
7.

7. Return to the vehicle and firmly press,
hold for two seconds and release the
HomeLink button up to three times. At this
point programming is complete and your
device should operate when the HomeLink
button is pressed and released.

– CONTINUED –

Instruments and controls/Mirrors

3-81

3

(222,1)

北米Model "A1720BE-A" EDITED: 2018/ 3/ 9

1)

Status Indicators

8. If status indicator arrows appear next
to the indicator light, please refer to
“Garage Door Two-Way Communication”
F3-83.

In the event that there are still program-
ming difficulties or questions, additional
HomeLink information and programming
videos can be found at
www.HomeLink.com and
www.youtube.com/HomeLinkGentex. For
Genie and Sommer garage door openers
please go directly to the HomeLink web-
site.

!

Gate Operator/Canadian Pro-
gramming

Canadian radio-frequency laws require
transmitter remote signals to “time-out”
(or quit) after several seconds of transmis-
sion, which may not be long enough for
HomeLink to pick up the signal during
programming. Similar to this Canadian
law, some U.S. gate operators are de-
signed to “time-out” in the same manner.
The indicator LED on the hand-held
remote will go off when the device times
out, indicating that it has finished transmit-
ting.

If you live in Canada or you are having
difficulties programming a gate operator or
garage door opener by using the program-
ming procedures, replace “Programming a
New HomeLink Button” step 3 with the
following:

While the HomeLink indicator light is
flashing orange, press and release (“cy-
cle”) your device’s hand-held remote every
two seconds until the HomeLink indicator
light changes from orange to green. You
may now release the hand-held remote
button.

NOTE

If programming a garage door opener
or gate operator, it is advised to unplug

the device during the “cycling” process
to prevent possible overheating.

Proceed with “Programming a New
HomeLink Button” step 4 to complete.

!

Using HomeLink

To operate, simply press and release the
programmed HomeLink button. Activation
will now occur for the trained device (i.e.
garage door opener, gate operator, secur-
ity system, entry door lock, home/office
lighting, etc.). For convenience, the hand-
held remote of the device may also be
used at any time.

!

Erasing HomeLink Buttons

To erase programming from the three
buttons (individual buttons cannot be
erased but can be “reprogrammed” as
outlined below), follow the step noted:

Press and hold the two outer HomeLink
buttons for at least 10 seconds. The LED
indicator will change from continuously lit
to rapidly flashing. Release both buttons.
Do not hold for longer than 20 seconds.
HomeLink is now ready to be programmed
at any time beginning with “Programming a
New HomeLink Button” - step 1.

Instruments and controls/Mirrors

3-82

(223,1)

北米Model "A1720BE-A" EDITED: 2018/ 3/ 9

!

R e p r o g r a m m i n g a S i n g l e
HomeLink Button

To program a previously trained button,
follow these steps:
1. Press and hold the desired HomeLink
button. DO NOT release the button.
2. The indicator light will begin to slowly
flash orange after 20 seconds. The
HomeLink button can be released at this
point. Proceed with “Programming a New
HomeLink Button” - step 3.
3. If you do not complete the program-
ming of a new device to the button, it will
revert to the previously stored program-
ming.

!

Garage Door Two-Way Commu-
nication

HomeLink has the capability of commu-
nicating with your garage door opener.
HomeLink can receive and display “clos-
ing” or “opening” status messages from
compatible garage door opener systems.
At any time, HomeLink can also recall and
display the last recorded status commu-
nicated by the garage door opener to
indicate your garage door being “closed”
or “opened”.

HomeLink has the capability of receiving
this communication from the garage door
opener at a range up to 820 feet (250 m).
Range may be reduced by obstacles such
as houses or trees. You may have to slow
your vehicle speed to successfully receive
the garage door opener communication.

!

Programming Two-Way Commu-
nication

1)

Status Indicators

Within five seconds after programming a
new HomeLink button, both of HomeLink’s
garage door status indicators will flash
rapidly green indicating that the garage
door two-way communication has been
enabled. If your garage door status in-
dicators flashed, two-way communication
programming is complete.

If the garage door status indicators do not
flash, additional HomeLink information
and programming videos can be found
online at www.HomeLink.com and
www.youtube.com/HomeLinkGentex.

!

Using Two-Way Communication

1)

Status Indicators

Recall and display (at any time) the last
recorded garage door status message
communicated to HomeLink by simulta-
neously pressing HomeLink buttons 1 and
2 for two seconds. HomeLink will display
the last recorded status for three seconds.

– CONTINUED –

Instruments and controls/Mirrors

3-83

3

(224,1)

北米Model "A1720BE-A" EDITED: 2018/ 3/ 9

1)

Garage Door Opener CLOSING (Blinking
Orange)

2)

Garage Door Opener CLOSED (Solid
Green)

3)

Garage Door Opener OPENING (Blink-
ing Orange)

4)

Garage Door Opener OPENED (Solid
Green)

If two-way communication programming is
successful, HomeLink will display the
status of your garage door opener with
arrow indicators.

!

Certification

In the event that there are still program-
ming difficulties or questions, additional
HomeLink information and programming
videos can be found at
www.HomeLink.com,
www.youtube.com/HomeLinkGentex, or
by calling the toll-free HomeLink-hotline
at 1-800-355-3515.
.

U.S.-spec. models

CAUTION

FCC WARNING

Changes or modifications not ex-
pressly approved by the party re-
sponsible for compliance could void
the user’s authority to operate the
equipment.

This device complies with part 15 of the
FCC Rules. Operation is subject to the
following two conditions: (1) This de-
vice may not cause harmful interfer-
ence, and (2) this device must accept
any interference received, including
interference that may cause undesired
operation.

.

Canada-spec. models

HomeLink

®

and the HomeLink

®

house are

registered trademarks of Gentex Corpora-
tion.

Instruments and controls/Mirrors

3-84

(225,1)

北米Model "A1720BE-A" EDITED: 2018/ 3/ 9

WARNING

.

W h e n

p r o g r a m m i n g

t h e

HomeLink

®

Wireless Control Sys-

tem, you may be operating a
garage door opener or other
device. Make sure that people
and objects are out of the way of
the garage door or other device
to prevent potential harm or da-
mage.

.

Do not use the HomeLink

®

Wire-

less Control System with a gar-
age door opener that lacks the
safety stop and reverse feature
as required by applicable safety
standards. A garage door opener
which cannot detect an object,
signaling the door to stop and
reverse, does not meet these
safety standards. Using a garage
door opener without these fea-
tures increases risk of serious
injury or death. For more infor-
mation, consult the HomeLink

®

website at www.homelink.com or
call 1-800-355-3515.

&

Outside mirrors

!

Convex mirror (passenger side)

WARNING

Objects look smaller in a convex
mirror and farther away than when
viewed in a flat mirror. Do not use the
convex mirror to judge the distance
of vehicles behind you when chan-
ging lanes. Use the inside mirror (or
glance backwards) to determine the
actual size and distance of objects
that you view in convex mirror.

!

Remote control mirror switch

: Select side to adjust
: Direction control

The remote control mirrors operate only
when the ignition switch is in the “ON” or
“ACC” position.
1. Turn the control switch to the side that
you want to adjust. “L” is for the left mirror,
“R” is for the right mirror.
2. Move the control switch in the direction
you want to move the mirror.
3. Return the control switch to the neutral
position to prevent unintentional opera-
tion.

You can also adjust the mirrors manually.

Instruments and controls/Mirrors

3-85

3

(226,1)

北米Model "A1720BE-A" EDITED: 2018/ 3/ 9

Defogger and deicer

1)

Rear window defogger

2)

Outside mirror defogger

3)

Windshield wiper deicer (if equipped)

The defogger and deicer system is acti-

vated only when the ignition switch is in the
“ON” position.

Control switch

To activate the defogger and deicer sys-
tem, press the control switch that is located
on the climate control panel. The rear
window defogger, outside mirror defogger
and windshield wiper deicer are activated
simultaneously. The indicator light on the
control switch illuminates while the defog-
ger and deicer system is activated.

To turn them off, press the control switch
again. They also turn off when the ignition
switch is turned to the “ACC” or “LOCK”/
“OFF” position.

The defogger and deicer system will
automatically shut off after approximately
15 minutes. If the rear window and the

outside mirrors have been cleared and the
windshield wiper blade rubbers have been
deiced completely before that time, press
the control switch to turn them off. If
defrosting, defogging or deicing is not
complete, you have to press the control
switch to turn them on again.

It is possible for the defogger and deicer
system to be set to continuous operation
mode by a SUBARU dealer. Consult your
SUBARU dealer for details. Also, you can
change the setting using the multi-function
display (color LCD). For details, refer to
“Defogger setting” F3-61.

If the battery voltage drops below the
permissible level, continuous operation of
the defogger and deicer system is can-
celed and the system stops operating.

CAUTION

.

To prevent the battery from being

discharged, do not operate the
defogger and deicer system con-
tinuously for any longer than
necessary.

.

Do not use sharp instruments or

window cleaner containing abra-
sives to clean the inner surface of
the rear window. They may da-
mage the conductors printed on

Instruments and controls/Defogger and deicer

3-86

(227,1)

北米Model "A1720BE-A" EDITED: 2018/ 3/ 9

the window.

NOTE

.

Turn on the defogger and deicer

system if the wipers are frozen to the
windshield.
.

If the windshield is covered with

snow, remove the snow so that the
windshield wiper deicer works effec-
tively.
.

While the defogger and deicer sys-

tem is in the continuous operation
mode:

– If the vehicle speed remains at 9
mph (15 km/h) or lower for 15
minutes, the windshield wiper dei-
cer system automatically stops op-
erating. However, the rear window
defogger system and outside mirror
defogger system maintain continu-
ous operation in this condition.
– If the vehicle battery voltage
drops below the permissible level,
continuous operation of the defog-
ger system and deicer system is
canceled and the system stops
operating.

Tilt/telescopic steering wheel

WARNING

.

Do not adjust the steering wheel

tilt/telescopic position while driv-
ing. This may cause loss of
vehicle control and result in per-
sonal injury.

.

If the lever cannot be raised to the

fixed position, adjust the steering
wheel again. It is dangerous to
drive without locking the steering
wheel. This may cause loss of
vehicle control and result in per-
sonal injury.

1)

Tilt adjustment

2)

Telescopic adjustment

1. Adjust the seat position. Refer to “Front
seats” F1-2.
2. Pull the tilt/telescopic lock lever down.
3. Move the steering wheel to the desired
level.
4. Pull the lever up to lock the steering
wheel in place.
5. Make sure that the steering wheel is
securely locked by moving it up and down,
and forward and backward.

Instruments and controls/Tilt/telescopic steering wheel

3-87

3

(228,1)

北米Model "A1720BE-A" EDITED: 2018/ 3/ 9

Horn

1)

Horn mark

To sound the horn, push the horn pad.

Instruments and controls/Horn

3-88

(231,1)

北米Model "A1720BE-A" EDITED: 2018/ 3/ 9

Ventilator control .................................................... 4-2

Center and side ventilators .................................... 4-2

Climate control panel ............................................. 4-3

Type A ................................................................... 4-3
Type B ................................................................... 4-4

Automatic climate control operation..................... 4-5

Sensors ................................................................. 4-5

Manual climate control operation .......................... 4-6

Airflow mode selection........................................... 4-6
Temperature control ............................................... 4-7
Fan speed control .................................................. 4-8
Air conditioner control ........................................... 4-8
Air inlet selection................................................... 4-8

Defrosting ................................................................ 4-9

Operating tips for heater and air conditioner ...... 4-9

Cleaning ventilation grille .......................................4-9
Efficient cooling after parking in direct sunlight ......4-9
Lubrication oil circulation in the refrigerant

circuit..................................................................4-9

Checking air conditioning system before summer

season ................................................................4-9

Cooling and dehumidifying in high humidity and

low temperature weather conditions................... 4-10

Air conditioner compressor shut-off when engine

is heavily loaded................................................ 4-10

Refrigerant for your climate control system .......... 4-10

Air filtration system.............................................. 4-10

Replacing a cabin air filter .................................... 4-11

Climate control

4

(232,1)

北米Model "A1720BE-A" EDITED: 2018/ 3/ 9

Ventilator control

&

Center and side ventilators

Center ventilators
1)

Open

2)

Close

Side ventilators
1)

Open

2)

Close

To adjust the flow direction, move the tab.
To open or close the ventilator, turn the
thumb-wheel up or down.

Climate control/Ventilator control

4-2

(233,1)

北米Model "A1720BE-A" EDITED: 2018/ 3/ 9

Climate control panel

&

Type A

1)

Airflow mode selection dial (Refer to
“Airflow mode selection” F4-6.)

2)

Defroster button (Refer to “Airflow mode
selection” F4-6.)

3)

Rear window defogger button (Refer to
“Defogger and deicer” F3-86.)

4)

Fan speed control dial (Refer to “Fan
speed control” F4-8.)

5)

Air conditioner button (Refer to “Air
conditioner control” F4-8.)

6)

Air inlet selection button (Refer to “Air
inlet selection” F4-8.)

7)

Temperature control dial (Refer to “Auto-
matic climate control operation” F4-5
and/or “Temperature control” F4-7.)

8)

AUTO button (Refer to “Automatic cli-
mate control operation” F4-5.)

9)

OFF button (Refer to “Automatic climate
control operation” F4-5.)

– CONTINUED –

Climate control/Climate control panel

4-3

4


Content   ..  12  13  14  15   ..