Subaru Ascent (2019 year). Instruction - part 14


  Index      Subaru     Subaru Ascent - instruction 2019 year in english


Search            


Content   ..  12  13  14  15   ..


Subaru Ascent (2019 year). Instruction - part 14


(211,1)

北米Model "A3200BE-A" EDITED: 2018/ 3/ 5

!

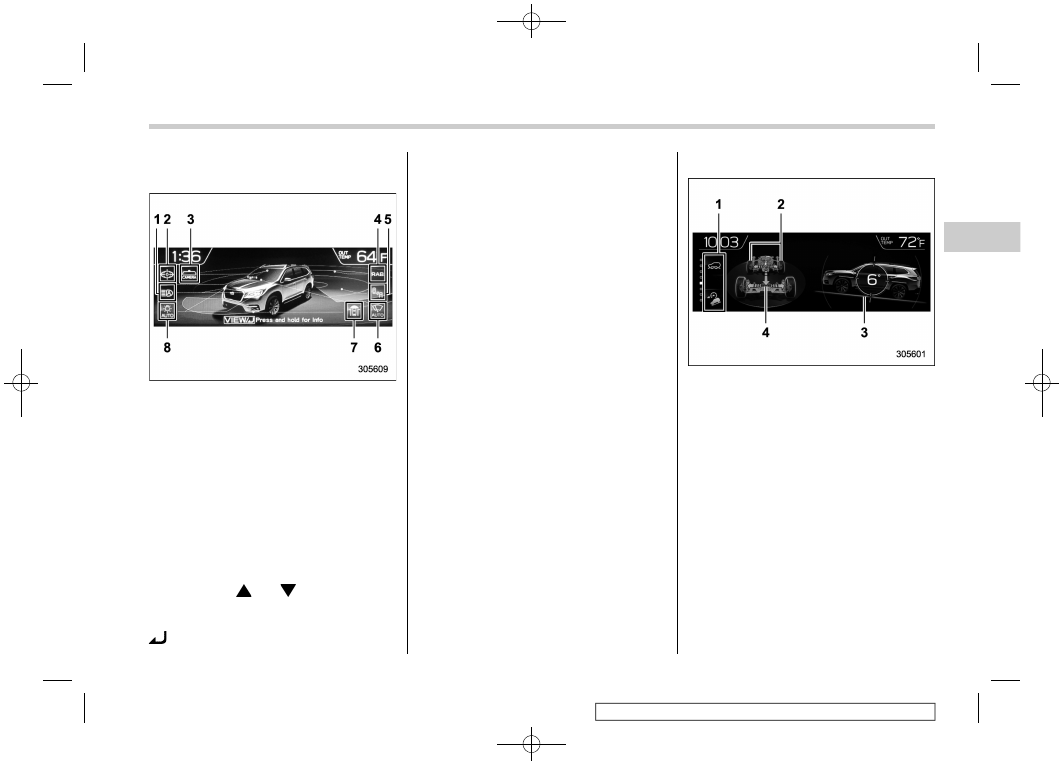
Electric components operation
screen

1)

High beam assist*

2)

EyeSight

3)

Smart rear view mirror*

4)

Reverse Automatic Braking (RAB)*

5)

BSD/RCTA*

6)

Auto wiper*

7)

Front view monitor*

8)

Auto on/off headlights

*: If equipped

This screen displays the electric compo-
nents operation status of the vehicle.
The electric components information can
be shown on the screen.
1. Press the “

” or “

” button to select

the preferred item.
2. Press and hold the “ENTER” or VIEW/

button to enter the selected item.

NOTE

.

Indicators do not display for func-

tions that are not equipped to the
vehicle.
.

The indicators of functions that are

not operating are displayed in grey.
.

If the multi-function display (color

LCD) unit, battery, or fuse is removed,
the Auto on/off headlights indicator
turns off on the multi-function display
(color LCD). After reinstalling the re-
moved multi-function display (color
LCD) unit, battery, or fuse to the
vehicle, the Auto on/off headlights
indicator will appear once more if the
light control switch is turned to the
“AUTO” position.

!

Prevention safety screen

1)

Telltale screen

2)

Steering angle

3)

Vehicle posture

4)

Running condition

This screen displays the driving status of
the vehicle and the operation status func-
tions. For functions that are operating, the
indicator will illuminate or flash.

NOTE

.

The vehicle posture indication may

differ from the actual vehicle posture.
.

When X-MODE has turned on, the

screen of the multi-function display is
switched to the prevention safety
screen.

– CONTINUED –

Multi-function display (color LCD)

209

3

Instruments

and

controls

(212,1)

北米Model "A3200BE-A" EDITED: 2018/ 3/ 5

!

EyeSight screen

1)

Lead vehicle indicator

2)

Your own vehicle indicator

3)

Stop lights

4)

Road line indicator

5)

Lane indicator

This screen displays the status of the
EyeSight system. The lead vehicle indica-
tor moves forward and backward depend-
ing on the distance with the vehicle in front.
For details, refer to the Owner’s Manual
supplement for the EyeSight system.

!

Favorite screen

Favorite screen (display example)

This screen displays up to three optional
pieces of information that can be selected
from the following items.

Item

Details

The engine oil temperature is
displayed.

The average vehicle speed is
displayed.

The accelerator opening ratio is
displayed.

The vehicle posture is displayed.

The current rate of fuel consump-
tion is displayed.

The direction of the vehicle is
displayed.*

1

The weather information is dis-
played.*

2

The posted speed limit of the road
you are currently driving on is
displayed.*

1

Multi-function display (color LCD)

210

(213,1)

北米Model "A3200BE-A" EDITED: 2018/ 3/ 5

Item

Details

The calendar is displayed.

Nothing is displayed.

*1: If equipped
*2: Models with SiriusXM Satellite Radio

NOTE

Some displayed items may not be
displayed depending on the model
and specifications.

The items shown in the favorite screen can
be changed. For details, refer to “Favorite
setting” FP217.

!

Weather information screen (if
equipped)

1)

Weather information for the destination.*

2)

Weather information for the current loca-
tion.

*: Only when a destination is set in the
navigation system

The weather information is displayed on
the screen.

NOTE

.

When all of the following conditions

are satisfied, weather information is
displayed.

– The vehicle is equipped with an
audio and navigation system for
SiriusXM satellite radio.
– You have a current SiriusXM
satellite radio subscription.

.

The weather forecast for the set

destination remains displayed until a
new destination is set or until you reach
the destination.
.

Depending on the reception timing

of XM, the display of weather informa-
tion may be delayed.

!

Navigation screen (models with
navigation system)

The navigation system information to the
destination is displayed on the screen.

NOTE

When a destination is not set in the
navigation system, the compass orien-
tation, name, route sign and speed limit
of the road the vehicle is traveling on
remain displayed on the screen.

– CONTINUED –

Multi-function display (color LCD)

211

3

Instruments

and

controls

(214,1)

北米Model "A3200BE-A" EDITED: 2018/ 3/ 5

!

Audio screen

The screen of the currently selected audio
source is displayed.
For details about how to use the audio set,
refer to the separate navigation/audio
Owner’s Manual.

!

Fuel consumption screen

1)

Driving range on remaining fuel

2)

Average fuel consumption corresponding
to the driving distance of each trip meter

3)

Current fuel consumption

The fuel consumption information is dis-
played on the screen.

NOTE

The driving range on the remaining fuel
is only a guide. The indicated value may
differ from the actual driving range on
the remaining fuel, so you must im-
mediately fill the tank when the low fuel
warning light illuminates.

!

Clock/date screen

The time and date are displayed.
You can adjust the time and date. For
details, refer to “Clock” FP221.

Multi-function display (color LCD)

212

(215,1)

北米Model "A3200BE-A" EDITED: 2018/ 3/ 5

!

Guidance screen

Models with front view monitor

Other models

When the “ENTER” or “VIEW/

” button

on the instrument panel is pressed and
held on this screen, the setting screen can

be displayed.
For details, refer to “Setting screen”
FP213.

&

Setting screen

1. Press and hold the “ENTER” or “VIEW/

” button on the guidance screen. The

top menu is displayed.
2. Operate the “

” or “

” button to

select the preferred menu from the top
menu.
3. Press the “ENTER” or “VIEW/

button to enter the selected menu.
4. Operate the “

” or “

” button to

select the preferred menu from the 2nd
menu.
5. Press the “ENTER” or “VIEW/

button to enter the selected menu.

– CONTINUED –

Multi-function display (color LCD)

213

3

Instruments

and

controls

(216,1)

北米Model "A3200BE-A" EDITED: 2018/ 3/ 5

The menu list is as follows.

Top menu

2nd menu

Description

Page

Time/Date

Time/Date*

Set and adjust the time and date. 12h or 24h format can be selected.

216

Birthday

Set a birthday.

216

Anniversary

Set an anniversary day.

216

Go Back

Return to the 1st menu.

Display/Beep

Screen Off*

Turn the screen on or off.

Yes or No

216

Favorite

Set and customize the triple meter.

217

Bypass Screen

Set the bypass screen for each item.

On or Off

217

Beep

Adjust the beep sound volume.

High, Low or Off

217

Go Back

Return to the 1st menu.

Camera set-
tings (if
equipped)

Brightness

Set and adjust the brightness of a display.

218

Contrast

Set and adjust the contrast of a display.

218

Camera Shift Link

Set the camera shift link.

On or Off

218

Go Back

Return to the 1st menu.

Maintenance

Engine Oil

Set and adjust the oil maintenance notification date.

219

Oil Filter

Set and adjust the oil filter maintenance notification date.

219

Tires

Set and adjust the tire maintenance notification date.

219

Maintenance Schedule

Set and adjust the vehicle maintenance notification date.

219

ON/OFF

Turn on or off the self-check screen that is
activated when the ignition switch is turned to the
“ON” position.

On or Off

219

Clear All Settings

Clear all settings for maintenance items.

Yes or No

220

Go Back

Return to the 1st menu.

Initialize

Reset all settings to the default settings.

Yes or No

220

Multi-function display (color LCD)

214

(217,1)

北米Model "A3200BE-A" EDITED: 2018/ 3/ 5

Top menu

2nd menu

Description

Page

Go Back

Return to the setting screen.

*: You can also set this while driving.

– CONTINUED –

Multi-function display (color LCD)

215

3

Instruments

and

controls

(218,1)

北米Model "A3200BE-A" EDITED: 2018/ 3/ 5

!

Date and time settings

You can set the date, time and 12h or 24h
format settings.

!

Current date and time setting

For details about clock setting, refer to
“Clock” FP221.

!

Birthday setting

If a birthday or anniversary is approaching,
a message will be displayed when the
ignition switch is turned to the “ON”
position. This function can be set to on or
off. For details, refer to “Bypass screen
setting” FP217.
1. Select “Birthday” from the 2nd menu in
the setting screen. Refer to “Setting
screen” FP213.

2. Select from the list the number that you

want to register.

3. Enter the date and the text by using the
control switches.
4. Select “Set” to exit settings. Select “Go
Back” to return to the previous screen
without applying the setting changes.

NOTE

You can store a maximum of 5 birth-
days.

!

Anniversary setting

1. The procedure for setting an anniver-
sary is the same as “Birthday setting”
FP216, 
except that in step 1 “Anniversary”
is selected.

NOTE

You can store a maximum of 5 anniver-
saries.

!

Display/Beep settings

You can set the display settings and
volume settings.

!

Screen OFF setting

1. Select “Screen Off” from the 2nd menu
in setting screen. Refer to “Setting screen”
FP213.

2. Select “Yes” to turn off the screen.
Select “No” to return to the previous
screen.

Restoring the screen
When the “ENTER” or “VIEW/

” button is

operated after the ignition switch is turned

Multi-function display (color LCD)

216

(219,1)

北米Model "A3200BE-A" EDITED: 2018/ 3/ 5

to the “ON” or “ACC” position, the screen
will be restored. The screen will be
restored with the basic screen that was
displayed when the screen was turned off.

!

Favorite setting

1. Select the “Favorite” from the 2nd
menu in setting screen. Refer to “Setting
screen” FP213.

2. Set the desired items by using the
control switches. For details about items,
refer to “Favorite screen” FP210.
3. Select “Set” to exit settings. Select “Go
Back” to return to the previous screen
without applying the setting changes.

NOTE

.

You can display a maximum of the 3

items.

.

The same item cannot be selected

for the left, center or right location.
.

Weather information for 3 hours

later or 6 hours later can be displayed.

!

Bypass screen setting

1. Select “Bypass Screen” from the 2nd
menu in the setting screen. Refer to
“Setting screen” FP213.

2. Select “On” or “Off” to turn the display
of items on or off by using the control
switches.
3. Select “Set” to exit settings. Select “Go
Back” to return to the previous screen
without applying the setting changes.

NOTE

Traffic information setting is only dis-

played for the audio unit with SiriusXM
satellite radio.

!

Beep setting

1. Select “Beep” from the 2nd menu in the
setting screen. Refer to “Setting screen”
FP213.

2. Set the beep volume by using the
control switches.
3. Select “Set” to exit settings. Select “Go
Back” to return to the previous screen
without applying the setting changes.

– CONTINUED –

Multi-function display (color LCD)

217

3

Instruments

and

controls

(220,1)

北米Model "A3200BE-A" EDITED: 2018/ 3/ 5

!

Camera settings (if equipped)

You can set the front camera display
settings.

!

Brightness setting

1. Select “Brightness” from the 2nd menu
in the setting screen. Refer to “Setting
screen” FP213.

2. Select the brightness level by using the
control switches.
3. Press the “VIEW/

” button to confirm

the setting.

!

Contrast setting

1. Select “Contrast” from the 2nd menu in
the setting screen. Refer to “Setting
screen” FP213.

2. Select the contrast level by using the
control switches.
3. Press the “VIEW/

” button to confirm

the setting.

!

Camera shift link setting

1. Select “Camera Shift Link” from the
2nd menu in the setting screen. Refer to
“Setting screen” FP213.

2. Select “On” or “Off” by using the control
switches.
3. Select “Set” to exit settings. Select “Go
Back” to return to the previous screen
without applying the setting changes.

Multi-function display (color LCD)

218

(221,1)

北米Model "A3200BE-A" EDITED: 2018/ 3/ 5

!

Maintenance settings

You can set maintenance reminders.

!

Engine oil setting

1. Select “Engine Oil” from the 2nd menu
in the setting screen. Refer to “Setting
screen” FP213.

2. Set the date and distance of the
reminder by using the control switches.
3. Select “Set” to exit settings. Select
“Update” to change the notification dis-
tance to the default value. Select “Go
Back” to return to the previous screen
without applying the setting changes.

NOTE

.

The reminder will be displayed by

either date or distance in accordance
with the setting.
.

Even when either “Day” or “Dis-

tance” are displayed as “_ _” a pop-up
screen will appear.
.

The reminder will be displayed until

either of the following conditions is
satisfied.

– The period of time passed after
the registered notification date is 15
days or more.
– The total distance driven after the
registered notification distance is
approximately 311 miles (500 km) or
more.

!

Oil filter setting

The setting procedure is the same as
“Engine oil setting” FP219, but select the
“Oil Filter” item in step 1.

!

Tires setting

The setting procedure is the same as
“Engine oil setting” FP219, but select the
“Tires” item in step 1.

!

Maintenance schedule setting

The setting procedure is the same as
“Engine oil setting” FP219, but select the
“Maintenance Schedule” item in step 1.

!

On/Off setting

1. Select “On/Off” from the 2nd menu on
the setting screen. Refer to “Setting
screen” FP213.

2. Select “On” or “Off” to turn the opening
screen on or off by using the control
switches.
3. Select “Set” to exit settings. Select “Go
Back” to return to the previous screen
without applying the setting changes.

– CONTINUED –

Multi-function display (color LCD)

219

3

Instruments

and

controls

(222,1)

北米Model "A3200BE-A" EDITED: 2018/ 3/ 5

!

Clear setting

1. Select “Clear All Settings” from the 2nd
menu on the setting screen. Refer to
“Setting screen” FP213.

2. Select “Yes” or “No” by using the
control switches.

!

Initialize

You can initialize the items that have been
set to your preference.
1. Select “Initialize” from the 2nd menu on
the setting screen. Refer to “Setting
screen” FP213.

2. Select “Yes” or “No” by using the
control switches.

&

How to get the source code
using the open source

Free/Open Source Software Information

This product contains Free/Open Source
Software (FOSS).
The license information and/or the source
code of such FOSS can be found at the
following URL.

http://www.globaldenso.com/en/open-
source/ivi/subaru/

Multi-function display (color LCD)

220

(223,1)

北米Model "A3200BE-A" EDITED: 2018/ 3/ 5

3-10. Clock

For models with a SUBARU genuine
navigation and/or audio system, the clock
can be adjusted using either auto mode or
manual mode.
.

Auto mode: automatic clock adjustment

.

Manual mode: manual clock adjust-

ment

&

Setting the clock manually

!

Type A multi-function display (black
and white)

1. Turn the ignition switch to “ON”.

2. Press the

button.

3. Select “Settings”.

4. Select “Vehicle”.
5. Select “Clock adjustment” and then
select “Manual”.

6. Press the “+” button or the “−” button
beside the clock.

!

Setting 12-hour or 24-hour dis-
play

The clock can be set to 12-hour or 24-hour
display. Perform the following procedure to
switch the display format.
1. Turn the ignition switch in the “LOCK”/
“OFF” position.
2. Press and hold the “−” button located
near the clock display for approximately 5
seconds. The clock display will then start
to flash.
3. While the clock display is flashing,
press and hold the “+” button for approxi-
mately 2 seconds. The clock format will
then change.
4. The clock display will continue to flash
for approximately 3 seconds to indicate
that the clock display has been changed.

– CONTINUED –

Clock

221

3

Instruments

and

controls

(224,1)

北米Model "A3200BE-A" EDITED: 2018/ 3/ 5

!

Type B multi-function display (color
LCD)

1. Turn the ignition switch to “ON”.

2. Press the

button.

3. Select “Settings”.
4. Select “Vehicle”.
5. Select “Clock adjustment” and then
select “Manual”.

Models with front view monitor
1)
2)

“VIEW/

” button

3)

Other models
1)
2)

“ENTER” button

3)

6. Press the “

” or “

” button to display

the guidance screen.

Clock

222

(225,1)

北米Model "A3200BE-A" EDITED: 2018/ 3/ 5

1)

Models with front view monitor

2)

Other models

7. While displaying the guidance screen,
press and hold the “ENTER” or “VIEW/

button. The screen goes to the selection
screen.

8. Press the “

” or “

” button to select

the item.

9. Select “Time/Date” and press the
“ENTER” or “VIEW/

” button.

10. Select “Time/Date” and press the
“ENTER” or “VIEW/

” button.

NOTE

If “Clock adjustment” is not in manual
mode, “Time/Date” cannot be selected.
Be sure to perform steps 2 through 5.

11. Press the “

” or “

” button to scroll

through to the items you can set.

(1) Press the “ENTER” or “VIEW/

button to choose the item you would
like to change.
(2) Press the “

” or “

” button to

adjust the items.
(3) After adjusting the item, press the
“ENTER” or “VIEW/

” button. The

item will be set and time adjustment will
complete.

12. Select “Set” and press the “ENTER” or
“VIEW/

” button to complete the clock

setting.

– CONTINUED –

Clock

223

3

Instruments

and

controls

(226,1)

北米Model "A3200BE-A" EDITED: 2018/ 3/ 5

Select “Go Back” to return to the previous
screen without saving settings.

NOTE

The Birthday/Anniversary and mainte-
nance reminder system function are
based on the time and date on the
multifunction display (color LCD).

&

Setting the clock automati-
cally

1. Turn the ignition switch to “ON”.

2. Press the

button.

3. Select “Settings”.
4. Select “Vehicle”.
5. Select “Clock adjustment” and then
select “Auto”.

!

Models with navigation system

The clock will be set automatically where a
GPS signal is available.

!

Other models

The clock will be set and adjusted auto-
matically when a smartphone is connected
via Bluetooth

®

for transferring phonebook

data.
1. Register the smartphone to the audio
system. For details, refer to “Bluetooth
SETTINGS” in the supplemental Owner’s
Manual for the audio/navigation system.
2. Transfer phonebook data to the sys-
tem. For details, refer to “Bluetooth SET-
TINGS” in the supplemental Owner’s
Manual for the audio/navigation system.
The clock will be adjusted automatically.

NOTE

Depending on the model of smart-
phone, the settings of the connected
smartphone may need to be changed.
(ex: For iOS or other models, notifica-
tion settings may need to be activated.)
For details, check the instructions on
connecting smartphones.

&

Regulatory information

The Bluetooth

®

word mark and logos are

registered trademarks owned by Bluetooth
SIG, Inc.

Clock

224


Content   ..  12  13  14  15   ..