Subaru Legacy (2005 year). Manual - part 569
4AT(diag)-113
AUTOMATIC TRANSMISSION (DIAGNOSTICS)
Diagnostic Procedure with Diagnostic Trouble Code (DTC)
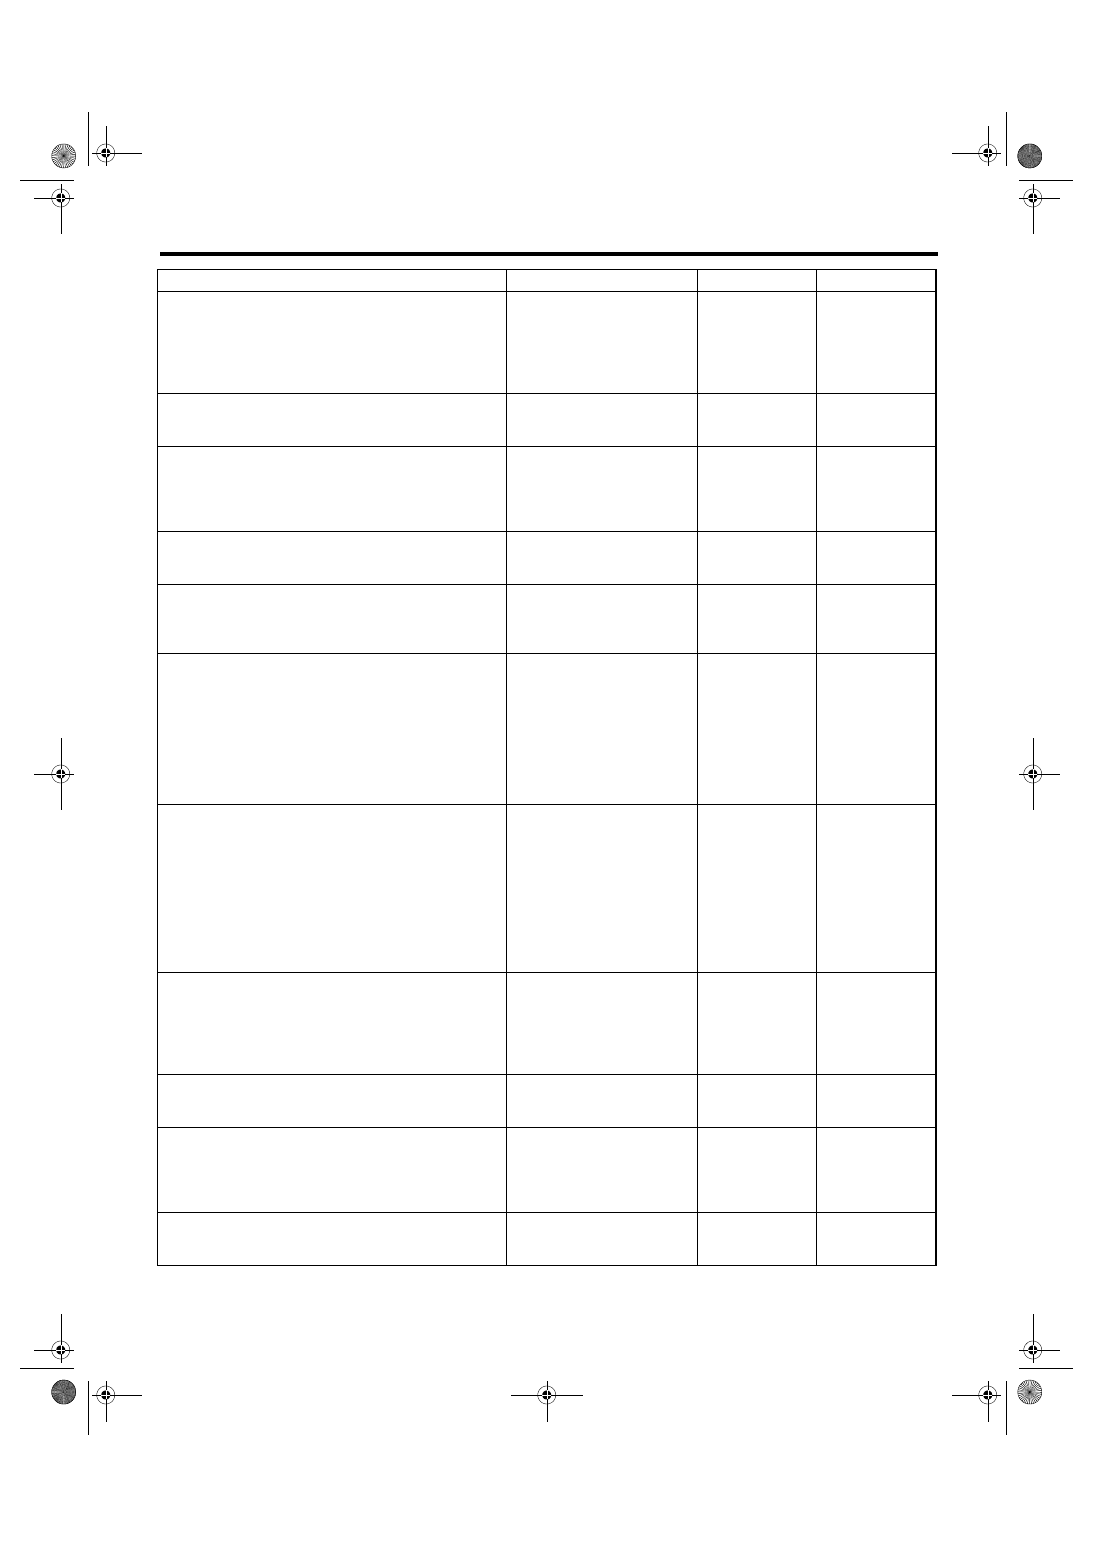
Step
Check
Yes
No
1
CHECK OUTPUT OF LATERAL G SENSOR
USING SUBARU SELECT MONITOR.
1) Select {Current Data Display & Save} in
Subaru Select Monitor.
2) Read the lateral G sensor output on Subaru
Select Monitor display.
Is the value on display 2.3 —
2.7 V when the lateral G sen-
sor is in horizontal position?
2
CHECK POOR CONTACT IN CONNECTOR. Is there poor contact in con-
nector between TCM and lat-
eral G sensor?
Repair the con-
nector.
3
CHECK ABSCM&H/U.
1) Connect all the connectors.
2) Perform the clear memory mode.
3) Perform the inspection mode.
4) Read the DTC.
Is the same DTC still dis-
played?
Replace the TCM.
<Ref. to 4AT-66,
Transmission Con-
trol Module
(TCM).>
4
CHECK ANY OTHER DTC ON DISPLAY.
Is any other DTC displayed?
Perform the diag-
nosis according to
DTC.
Temporary poor
contact occurs.
5
CHECK CONDITIONAL INFORMATION
WHEN FAULTY.
Read the lateral G sensor output on Subaru
Select Monitor display.
Is the reading on monitor dis-
play 4.65 V or more?
6
CHECK OPEN CIRCUIT IN LATERAL G SEN-
SOR OUTPUT HARNESS AND GROUND
HARNESS.
1) Turn the ignition switch to OFF.
2) Disconnect the connector from TCM.
3) Measure the resistance between TCM con-
nector terminals.
Connector & terminal
(B54) No. 2 — No. 9:
Is the resistance 4.3 — 4.9
k
Ω?
Repair the har-
ness connector
between lateral G
sensor and
ABSCM&H/U.
7
CHECK BATTERY SHORT OF HARNESS.
1) Turn the ignition switch to OFF.
2) Remove the console box.
3) Disconnect the connector from lateral G
sensor.
4) Disconnect the connector from TCM.
5) Measure the voltage between TCM con-
nector and chassis ground.
Connector & terminal
(B54) No. 2 (+) — Chassis ground (
−
):
Is the voltage less than 1 V?
Repair the har-
ness between lat-
eral G sensor and
TCM.
8
CHECK BATTERY SHORT OF HARNESS.
1) Turn the ignition switch to ON.
2) Measure the voltage between TCM con-
nector and chassis ground.
Connector & terminal
(B54) No. 2 (+) — Chassis ground (
−
):
Is the voltage less than 1 V?
Repair the har-
ness between lat-
eral G sensor and
TCM.
9
CHECK POOR CONTACT IN CONNECTOR. Is there poor contact in con-
nector between TCM and lat-
eral G sensor?
Repair the con-
nector.
10
CHECK TCM.
1) Connect all the connectors.
2) Perform the clear memory mode.
3) Perform the inspection mode.
4) Read the DTC.
Is the same DTC still dis-
played?
Replace the TCM.
<Ref. to 4AT-66,
Transmission Con-
trol Module
(TCM).>
11
CHECK ANY OTHER DTC ON DISPLAY.
Is any other DTC displayed?
Perform the diag-
nosis according to
DTC.
Temporary poor
contact occurs.